…it could have looked like this:
If Dungeons of Daggorath were made 34 years later…
Leave a reply

…it could have looked like this:

…that would have been my next computer after my Commodore VIC-20. $600 back in 1983 would be over $2000 in 2026. There was really no way I was talking my grandmother in to buying me a $2000 home computer back when folks were still unsure why anyone would want a home computer.
But, if I did, I’d be much more excited about the return of Commodore. The FPGA recreation, where they are making them using the original molds from the 1980s, has sold over 20,000 units. Likewise, reports of TheC64 (an emulator that looks like a mini C64) estimated to have sold over 300,000 units tells me the love Commodore users had for their 8-bit machines still lives on the same way it does in our CoCo community for our 8-bit systems.
Today I learned that the replica Commodore 64s are for sale at Best Buy (for shipment only, through a third party seller):
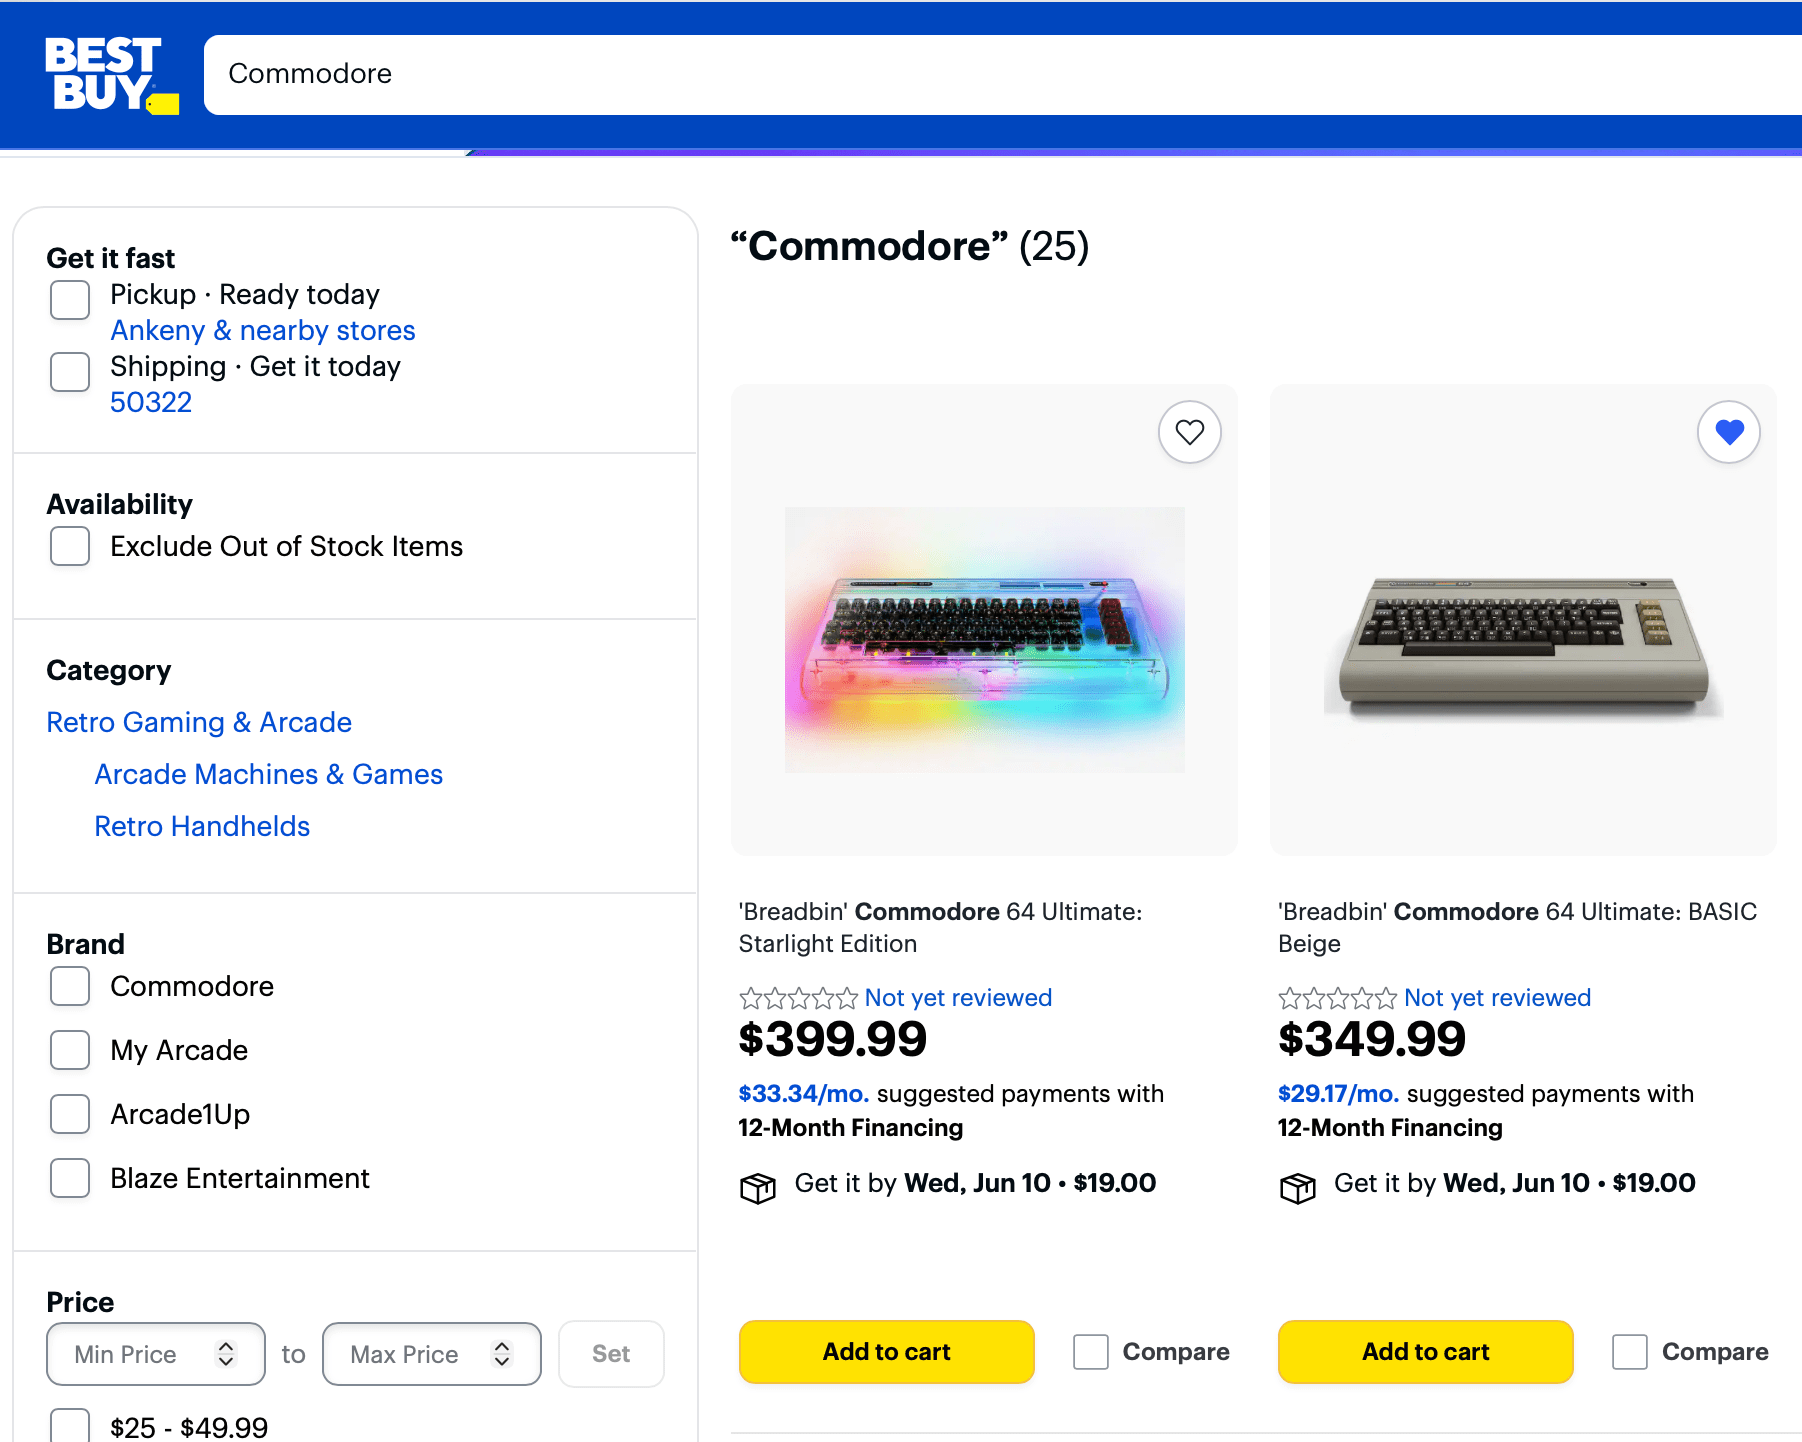
https://www.bestbuy.com/site/searchpage.jsp?id=pcat17071&st=Commodore
We live in wonderful times.
Historically, the C64 is the “largest selling computer model of all time” — a feat we will likely never see beaten since modern PCs and Macs have such a short lifespan on store shelves before they are replaced by a different model. While overall there have been more Macs or PCs sold, those have all been different models over the years. (This is the main thing I had against “more PCs sold than Macs” back in the 1990s — you were comparing thousands and thousands of different PC models collectively against a handful of Mac models; but as soon as you compared individual models, the iMac was one of the largest models sold of any computer of its era.)
The VIC-20 was far from the best selling system of its era, yet even it got a TheVIC20 release in a full size replica model with an emulator inside. I had to order main from the UK, so it annoyingly has the “correct” spelling of Colour instead of the Americanized version ;-)

There have also been replicas of things like the ZX Spectrum and other “obscure to us in the USA” models.
Maybe one day they will come for our community and we’ll see a mainstream emulator replica of a CoCo.
One can hope.
Congrats, new Commodore. Maybe I can finally get that C64 I would have loved to have 40 years ago.
Can someone please “explain this to me like I’m five”:
https://www.6809.org.uk/xroar/online/?-run=512scroll.cas
Click that link to see it run in the web browser. This screen shot does not really show how it looks running:
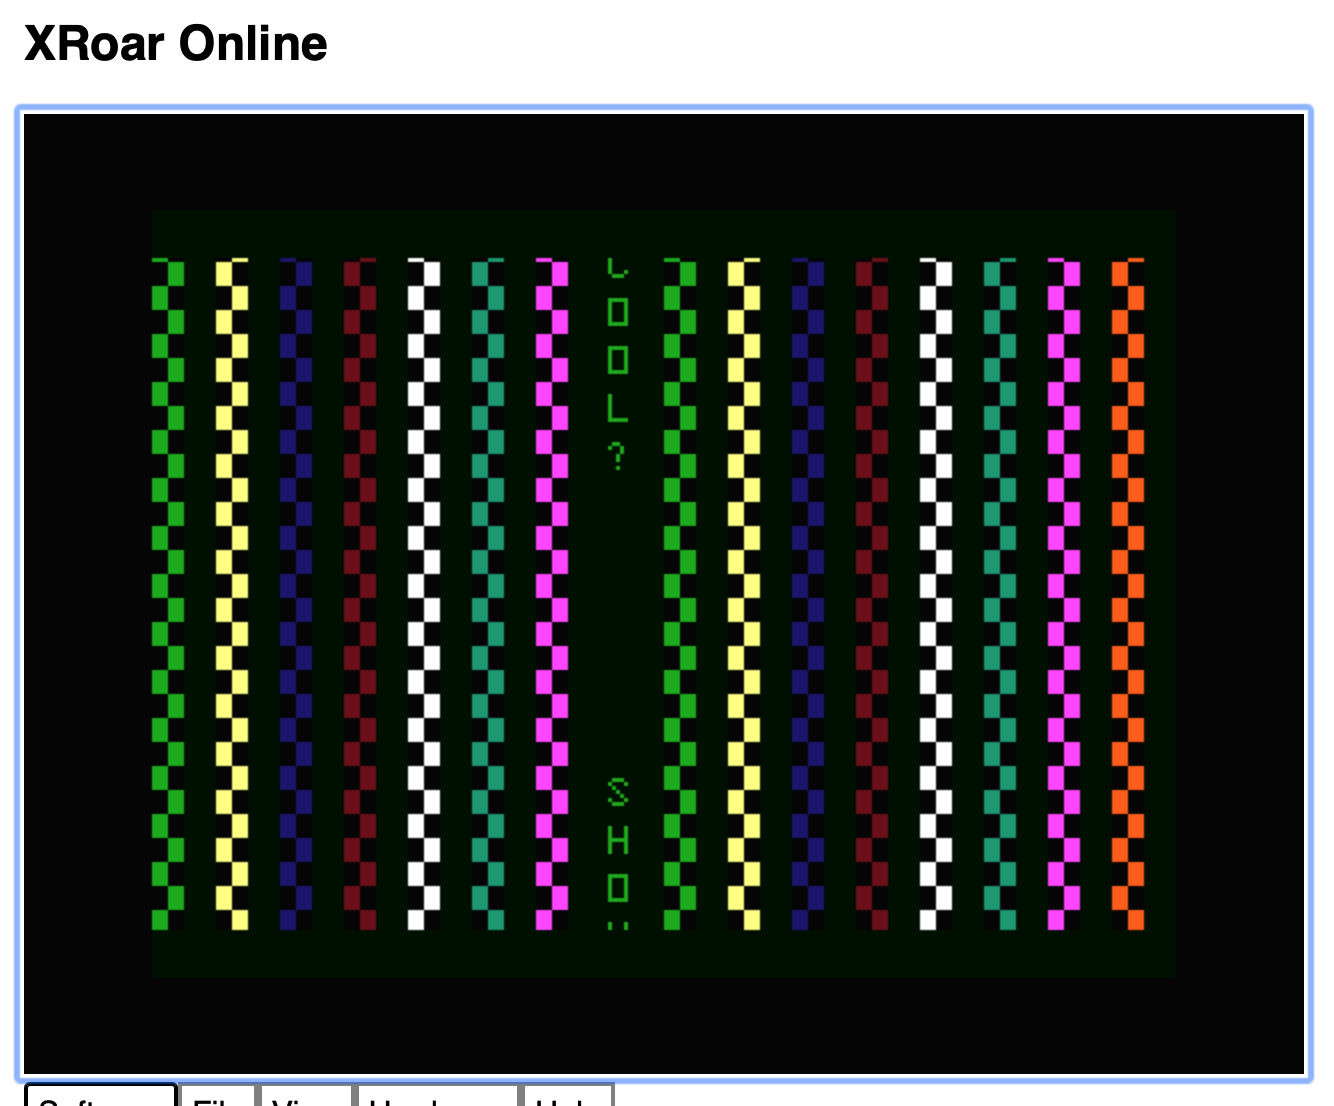
It shows a CoCo 32×16 text screen smoothy scrolling semigraphics blocks and text characters up the screen. The note that the SAM is not involved is also something I need a child-like explanation of. What does the SAM actually do that would be part of such a technique?
In a post to the CoCo mailing list, Juan Castro said this:
“… I was trying to comment on this post – https://subethasoftware.com/2026/05/19/where-does-cocos-pmode-graphics-memory-start/#comment-42465 – and I was trying to say this:
In GFXFLIP.BAS, instead of the ‘flip through them’ code, try this:
1000 ‘GO DO THE ROTATION
– Juan Casto via CoCo Mailing list
1010 GOTO 1050
1020 FOR P=2 TO 5:GOSUB 1070:PMODE 4,P:SCREEN1:NEXT
1030 IF INKEY$=”” THEN 1030
1040 FOR P=4 TO 1 STEP -1:GOSUB 1070:PMODE 4,P:SCREEN1:NEXT
1050 IF INKEY$=”” THEN 1050
1060 GOTO 1020
1070 FOR TT=0 TO 40:NEXT:RETURN
“
So let’s take a look and see what it does. Replacing my code from 70-110 with a GOSUB to this routine gives us this:
0 'GFXFLIP2.BAS
1 'Juan Castro
10 PCLEAR 8
15 ' DRAW FIRST SCREEN
20 PMODE 4,1:PCLS:SCREEN 1,1
30 CIRCLE(128,96),50
35 ' DRAW SECOND SCREEN
40 PMODE 4,5:PCLS:SCREEN 1,1
50 LINE (10,10)-(245,171),PSET,B
60 ' FLIP THROUGH THEM
70 GOSUB 1000
110 GOTO 70

1000 'GO DO THE ROTATION
1010 GOTO 1050
1020 FOR P=2 TO 5:GOSUB 1070:PMODE 4,P:SCREEN1:NEXT
1030 IF INKEY$="" THEN 1030
1040 FOR P=4 TO 1 STEP -1:GOSUB 1070:PMODE 4,P:SCREEN1:NEXT
1050 IF INKEY$="" THEN 1050
1060 GOTO 1020
1070 FOR TT=0 TO 40:NEXT:RETURN
…and when you run it, you will see it takes the PMODE 4 screen (which is 4 blocks of graphics memory) then goes in a loop where it starts the displayed screen at block 2, then 3, then 4, then 5. With a small delay in-between each change, it shows (initially) the first PMODE 4 screen (blocks 1-4), then it toggles the memory displayed through each block until the start is block 5. This makes the screen appear to scroll up in chunks (1/4th of the screen each time). The process is then reversed to scroll back down.
Neat trick.

A recent e-mail exchange with CoCo user Torsten D. inspired me to try something stupid.
The Radio Shack Color Computer gained the VARPTR command in the Extended BASIC ROM. As has been discussed here many times, VARPTR returns the memory location of a 5-byte variable descriptor. There are actually seven bytes total, since the two bytes before the VARPTR address is the two byte variable name.
0 'MAKE42-1.BAS
10 DIM A,B,C:A=42:B=VARPTR(A)
20 FOR C=B-2 TO B+4
30 PRINT C,PEEK(C):NEXT
Running this will show the full seven bytes required to represent the A variable:

VARPTR is returning 9792 as the location of the start of the 5-byte floating point value for the numeric A variable. The two bytes before it are the variable name: 65 (uppercase “A”) and 0 (no second letter). Had the variable name been “AA” that would be 65 65.
The five bytes of 134, 40, 0, 0 and 0 are the floating point representation of 42.0.
If you got the VARPTR address of one numeric variable, and of a second numeric variable, you could just copy those five bytes and clone the variable value:
0 'MAKE42-2.BAS
10 DIM A,B,I
20 A=42:B=0
30 PRINT "A =";A,"B =";B
40 FOR I=0 TO 4:POKE VARPTR(B)+I,PEEK(VARPTR(A)+I):NEXT
50 PRINT "A =";A,"B =";B
If you run this, you will see output showing “A = 42” and “B = 0”, followed by output showing “A = 42” and “B = 42”. The code in line 40 copies the five bytes (offset 0 to 4) from the VARPTR address of variable A into the VARPTR address of variable B.
But why would you want to do that?
B=A is would have been much simpler.
And if you can clone a variable, you could also change a variable if you knew what five bytes represented the number you wanted. In the first example, we saw that the five bytes that represent 42.0 are 134, 40, 0, 0 and 0. Knowing that, you could do something like this:
0 'MAKE42-3.BAS
10 DIM A,V
20 PRINT "A =";A
30 V=VARPTR(A):POKE V,134:POKE V+1,40: POKE V+2,0:POKE V+3,0:POKE V+4,0
40 PRINT "A =";A
The “DIM” is not really needed in this example, but it is a good habit to get into if you want to control the order your variables exist in the variable table. Variables that need to be the fastest should be at the front of the list, and variables use infrequently or ones that can be slow can be at the end.
But I digress.
The point of this stupid code is that an “A” variable is created with 0 as its default value, then VARPTR is used to see where that variable is in memory. Five POKE commands put that floating point representation of 42.0 into that variable’s storage… So when you print A, you get a value of 42, even though A=42 (or indeed, A= ANYTHING) was nowhere in the program.
I have no idea why you would want to do that.
Until next time…

I just learned about the Clock Signal emulator:
https://github.com/TomHarte/CLK
The author recently joined the Cocopedia.com and has updated some technical sections with information he has learned in adding support for the CoCo. Clock Signal is described as:
“A latency-hating emulator of: the Acorn Electron, BBC Micro and Archimedes, Amstrad CPC, Apple II/II+/IIe and early Macintosh, Atari 2600 and ST, ColecoVision, Enterprise 64/128, Commodore Vic-20 and Amiga, MSX 1/2, Oric 1/Atmos, early PC compatibles, Sega Master System, Sinclair ZX80/81 and ZX Spectrum, and Thomson MO5/6.”
– https://github.com/TomHarte/CLK
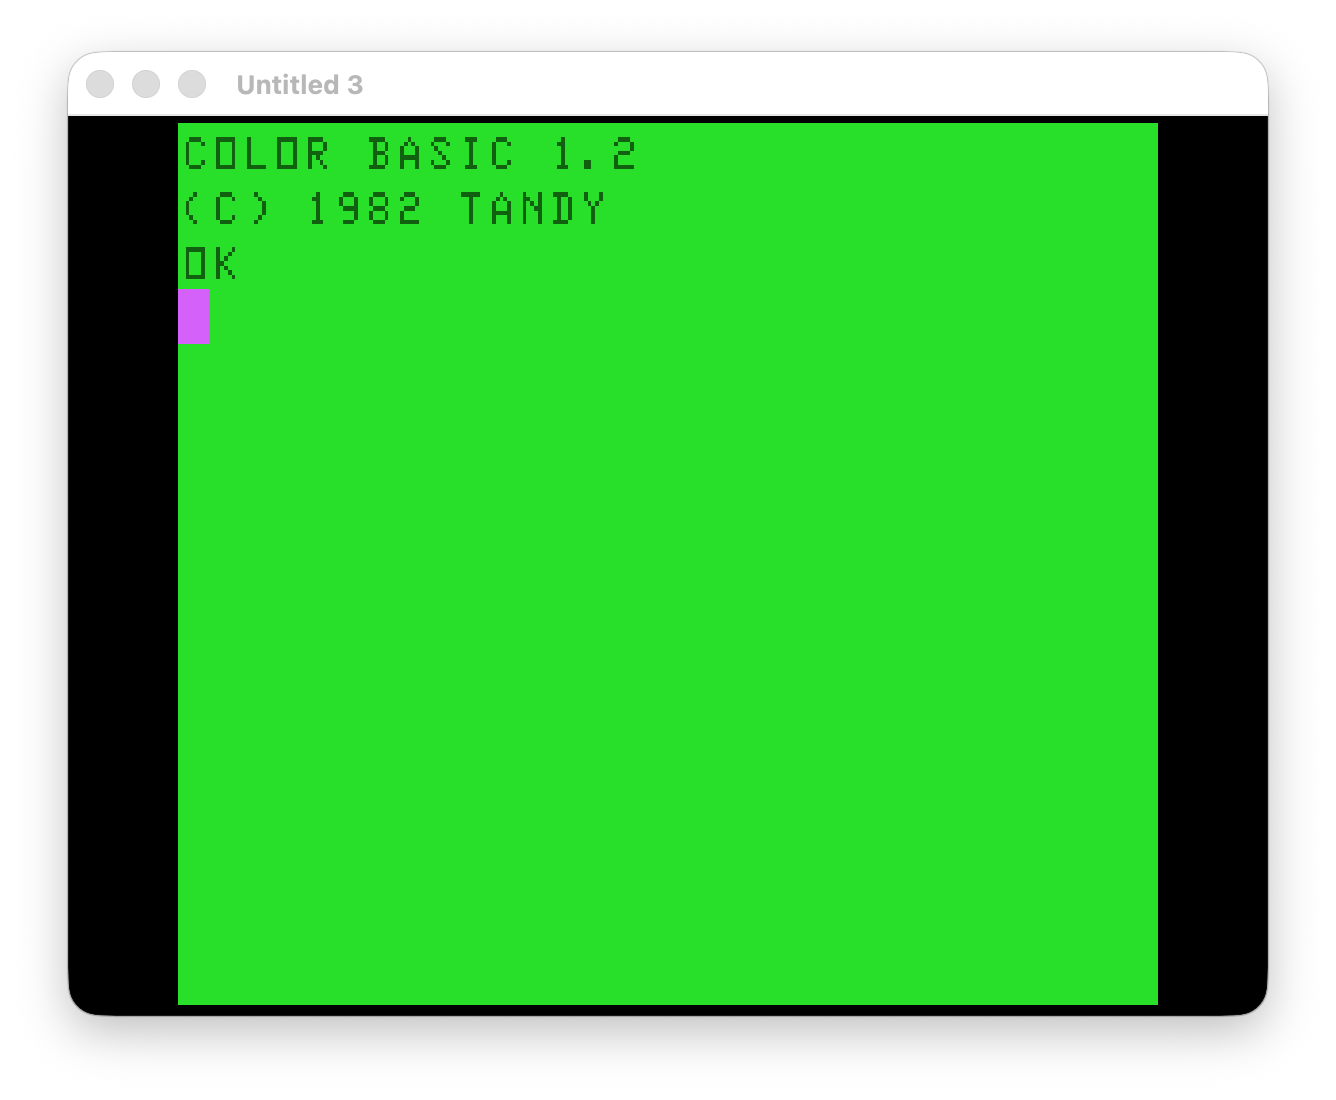
The author is adding CoCo to this list. As someone who started out with a Commodore VIC-20, then went to the CoCo, I am intrigued to find another emulator that will do both. (MAME/MESS also does both.) There is currently early support for the CoCo in there, but it only boots a CoCo Color BASIC 1.2 ROM:
I was able to download Clock Signal from GitHub, then open the Xcode project on my Mac, change one setting, then build and run. Neat!
When you first run one of the emulators, it will prompt you to drag in the needed ROMs:
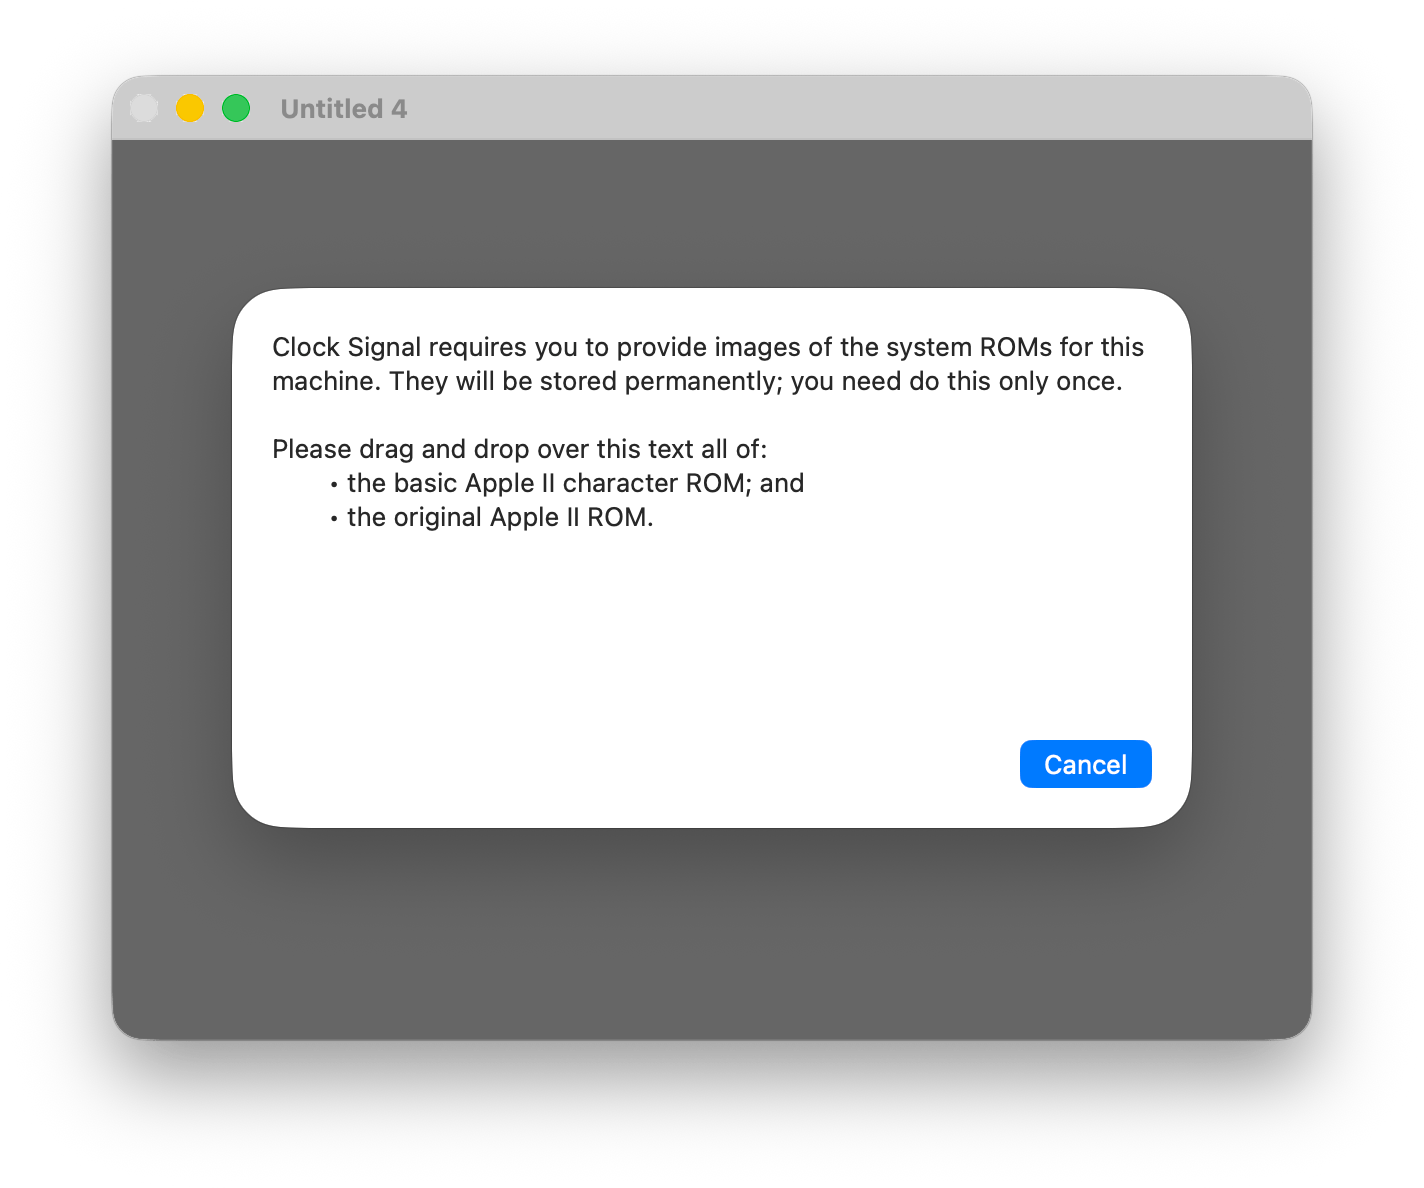
Drag them into that window, then it’s ready to go. Pretty easy.
I know little beyond this, but plan to play with this a bit and try to get some of the other systems up and running.
One downside is that it looks like there may not be a Windows version.
To be continued…
When I got my first Radio Shack TRS-80 Color Computer 1 back around 1983, I dove into the Getting Started manuals and learned all the new wonderful commands that EXTENDED COLOR BASIC offered me that my Commodore VIC-20 did not have. Commands like PLAY for music, SOUND for a beep, and graphics commands to draw CIRCLEs, LINEs and even DRAW complex objects were … amazing.
On my original tape based CoCo (EXTENDED COLOR BASIC) the high-resolution graphics memory started just after the memory used for the 32×16 text screen:
DEC     HEX     DESCRIPTION
-----   ----    -----------
0       0000    Color BASIC Use
512     0400    Text Screen
1536    0600    Hi-Rez Graphics
Knowing that, as I learned some 6809 assembly language I wrote routines to scroll a PMODE 4 256×192 graphics screen. I used this to do video titles for my dad. I’d create a screen using a graphics program, and load that into the second half of the graphics memory, then let my routine smooth scroll that screen into view.
I’d love to find that old source code and see how awfully inefficient it was. I bet one of you could really show me a faster way to do it.
But I digress…
The next major leap in home computing for me was getting a disk drive for my CoCo. Imagine being able to store up to 156K of data on a floppy disk, and load things at such blazing speed (compared to the tape player and it’s 1500 baud rate).
It was nice… but it broke my assembly code! It turned out, when DISK BASIC was added, it used memory after the text screen for its own purposes, and shifted the high resolution graphics memory 2K further down in the memory map:
DEC     HEX     DESCRIPTION
-----   ----    -----------
0       0000    Color BASIC Use
512     0400    Text Screen
1536    0600    Disk BASIC Use
3584    0E00    Hi-Rez Graphics
Learning this, I adjusted my assembly routines to work on graphics screens starting at 3584 (disk systems) rather than 1536 (tape systems).
I wondered if there was some programmatic way to tell where the screen started. I don’t think this even dawned on me back in the 1980s, but I asked this question to the new Color Computer mailing list and quickly got an answer:
Word at $BC (GRPRAM) is start of graphics RAM. Word at $BA (BEGGRP) gets you the start of the current view window.
Juan Castro
Enviado do meu Olivetti Programma 101
http://retropolis.com.br
Bonus. Not only can you tell where graphics memory starts, but you can tell which page is displayed. With EXTENDED BASIC, you have 8 1.5K pages of graphics memory you can use. You reserve them with the PCLEAR command (it defaults to 4 pages). You can learn more about PCLEAR in this article.
PMODE 3 (128×192 4-color) and PMODE 4 (256×192 2-color) both need 4 pages, so you can have two screens in those modes. PMODE 0 uses 1 page, so you can have 8 pages in that ode.
When you use PMODE, the first parameter is the graphics mode, and the second is which page for the screen to start on. For PMODE 4 you can do “PMODE 4,1” to get one screen of 4 pages starting at page 1, and “PMODE 4,5” to get a second screen of 4 pages starting at page 5. You can set PMODE to the first screen and draw something, then set it to the second screen and draw something different, then flip back and forth between them using PMODE. Here is a silly example:
0 'GFXFLIP.BAS
10 PCLEAR 8
15 ' DRAW FIRST SCREEN
20 PMODE 4,1:PCLS:SCREEN 1,1
30 CIRCLE(128,96),50
35 ' DRAW SECOND SCREEN
40 PMODE 4,5:PCLS:SCREEN 1,1
50 LINE (10,10)-(245,171),PSET,B
60 ' FLIP THROUGH THEM
70 PMODE 4,1:SCREEN 1,1
80 FOR A=1 TO 100:NEXT
90 PMODE 4,5:SCREEN 1,1
100 FOR A=1 TO 100:NEXT
110 GOTO 70
That program will reserve all 8 pages, then set a PMODE 4 screen starting at page 1. It draws a circle on that page. Then it sets a PMODE 4 screen starting at page 5. It draws a box on that screen. After that it just toggles between showing PMODE 4 starting at page 1, then at page 5, and the image will flicker back and forth between the circle screen and the square screen.
With low-resolution PMODE 0, you can do 8 screens of animation this way.
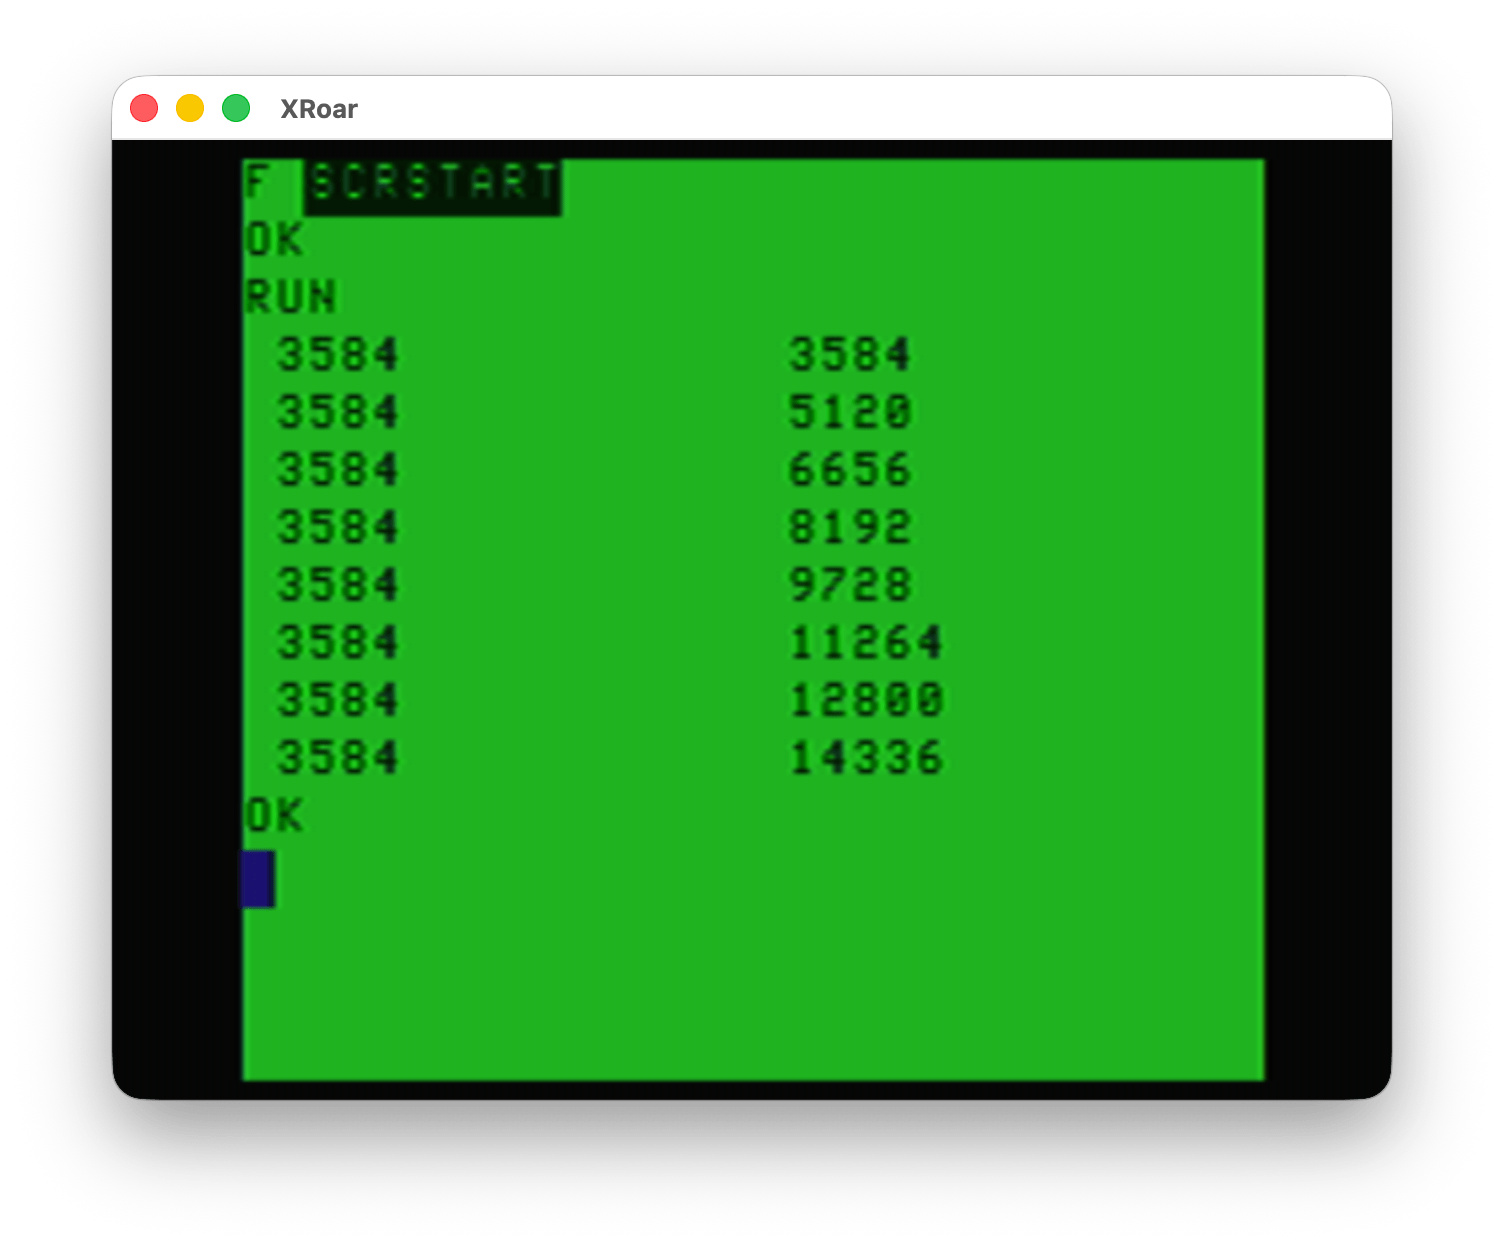
I wrote a second program that will print out where screen memory starts, and where the current viewed page starts.
0 ' SCRSTART.BAS
1 ' THANK YOU, JUAN CARLOS!
10 PCLEAR 8
20 FOR P=1 TO 8:PMODE 0,P
30 PRINT PEEK(&HBC)*256+PEEK(&HBD),PEEK(&HBA)*256+PEEK(&HBB)
40 NEXT P
When I run this on an tape-based EXTENDED BASIC CoCo (emulator) with no Disk Controller, it shows graphics memory starts at 1536 and then it toggles through each PMODE 0 page to show where each one would start:

And when DISK EXTENDED BASIC is used, the same program shows the memory locations starting 2K higher in memory:
Thank you, Juan Carlos, for telling me this. I wish I had known about this back then. I could have made my assembly program automatically find the start of the graphics screen rather than having to assembly separate versions for tape or disk systems.
Until next time…

Last year, I spent some time fooling around in Color BASIC rendering a Donkey Kong-style screen in ASCII. Since I was not using the CoCo 3 40 or 80 column screen, I was limited to the 32×16 text screen of the CoCo’s MC6847 VDG display chip.
First, here is what the arcade Donkey Kong screen looks like. (Image from Wikipedia.com)

For my first attempt, I counted how many “blocks” across the screen it would take to render this level accurately. I did this by looking at the girder patterns where they change levels. It looked like to of the “/\/\” patterns could be a block, making 14 across the screen. I could then double that to 28, which would fit into the CoCo’s 32×16 screen with some space on each side.
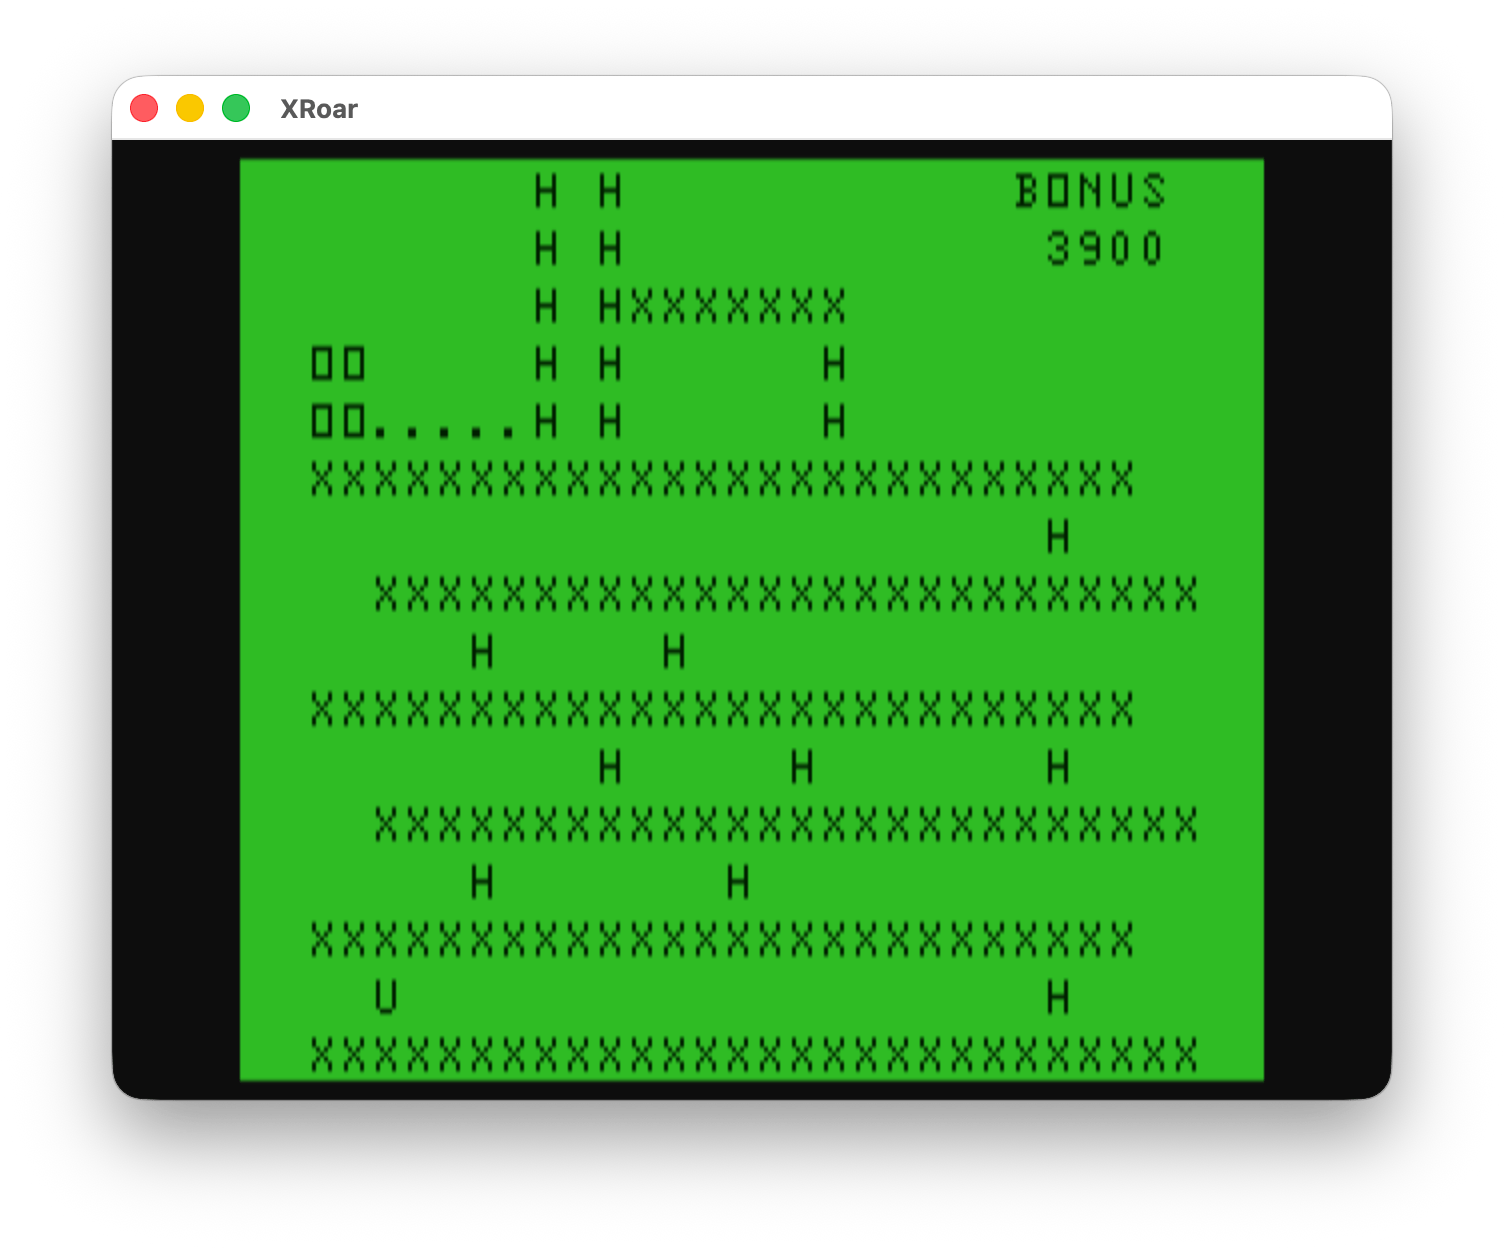
I mapped it out in a text editor, and came up with this rough approximation:
12345678901234567890123456789012
         H H            BONUS
         H H             3900
         H HXXXXXXX
  OO     H H      H
  OO.....H H      H
  XXXXXXXXXXXXXXXXXXXXXXXXXX
                         H
    XXXXXXXXXXXXXXXXXXXXXXXXXX
       H     H
  XXXXXXXXXXXXXXXXXXXXXXXXXX
           H     H       H
    XXXXXXXXXXXXXXXXXXXXXXXXXX
       H       H
  XXXXXXXXXXXXXXXXXXXXXXXXXX
    U                    H
  XXXXXXXXXXXXXXXXXXXXXXXXXXXX
12345678901234567890123456789012
The numbers at the top and bottom were the columns and not part of the screen.
I was then able to use each “block” location to position the ladders (“H”) close to where they should be, as well as where the barrels should go (“U” for the one at the bottom, “O” at the top for the ones next to kong at the top).
If I take that original arcade screen shot and grid it out to be 28×16, it looks like this:

This is when I learned something interesting. Look at how the “1UP”, “HIGH SCORE” and numbers line up to the blocks. Donkey Kong likely is using a 28x?? tile system. This website breaks apart the tiles that make up the game screens:
https://www.spriters-resource.com/arcade/dk/asset/106602
Indeed, 28 across by what looks like 32 down. As long as the screen could be done with half as many rows, it could be fairly close to the arcade. Here is what my ASCII version looks like on a CoCo emulator:
And let’s see if I can do side-by-side in WordPress:

With 32 rows in the arcade version, Mario and Pauline’s characters would be two blocks high. Since I had to half the rows to fit on the 16 row text screen, they would need to be one character block in height. A similar adjustment would have to be done for Donkey Kong.
In the arcade, Kong looks to be made up of 5×5 blocks and placed on the screen a bit lower in the grid so he stands on the top girder. From looking at arcade sprite resources, they don’t show the girder as part of the Kong graphic, so I will assume 5×5 is correct. When he is facing forward, he is centered, but when he is rolling the barrels, he extends all the way to the left or right boundary.

That is a problem, since at half height, a 5×2 row couldn’t represent Kong very well. This will be one of the major things that has to change to represent Kong on this screen. Looking at the arcade sprites, turned into the 5×4 grid, looks like this:

For my initial ASCII experiment, I came up with these:
-----
@
/=
 |\
-----
  @
 <=>
 / \
-----
    @
   =\
  /|
-----
I kept the area 5 blocks wide, but made it 3 tall and just tried to get something close to the animation the graphical version had. Since I see Kong actually reaches down to the ground, perhaps something like this might be better:
-----
(@
 /=
/ |\
-----
  @
 <=>
 / \
-----
   @)
  =\
 /| \
-----
…but I think I prefer the simplicity of the first attempt.
With every row being half the size of the arcade, instead of a rolling barrel being a full block tall, it now is half a block. I could use something like an ASCII period (“.”) I guess. And for the fireball, I could use something like an “*” or maybe “&” or “@”. It gets ugly real fast.
I am going to go think on this a bit… Comments if you have them.
Until next time…
See Also: part 1 and part 2 (coming soon).
This is a followup to a recent post I made about making a string in Color BASIC contain data from the text screen memory.
Color BASIC deals with a version of ASCII where specific numbers represent specific characters/letters:
https://en.wikipedia.org/wiki/ASCII
On the old school 8-bit home computers, not all of them used ASCII. Commodore used a variation called PETSCII, and the Atari 8-bits used ATASCII. While the trick discussed in this article might work on other systems that have a VARPTR or similar command, this discussion will be specifically about the character set in the Radio Shack Color Computer.
ASCII 65 is the uppercase letter ‘A’
PRINT CHR$(65)
A
If you POKE the value of 65 to the first position on the 32×16 text screen (location 1024), you will also see an uppercase 65.
POKE 1024,65
However, the embedded font data in the MC6847 VDG video generator chip does not follow ASCII for all of its characters. For example, CHR$(0) to CHR(31) are non printable characters. On the CoCo, two of them do something special — CHR$(8) will print a backspace and CHR$(13) will print an ENTER:
PRINT "HELLO";CHR$(8);"THERE";CHR$(13);"HOWDY"
HELLTHERE
HOWDY
It would have been nice if the CoCo could have done a beep for CHR$(7) like Apple 2s did, or clear the screen with CHR$(12) like many other systems did, but those are the only two that do anything other than “print nothing” on the CoCo.
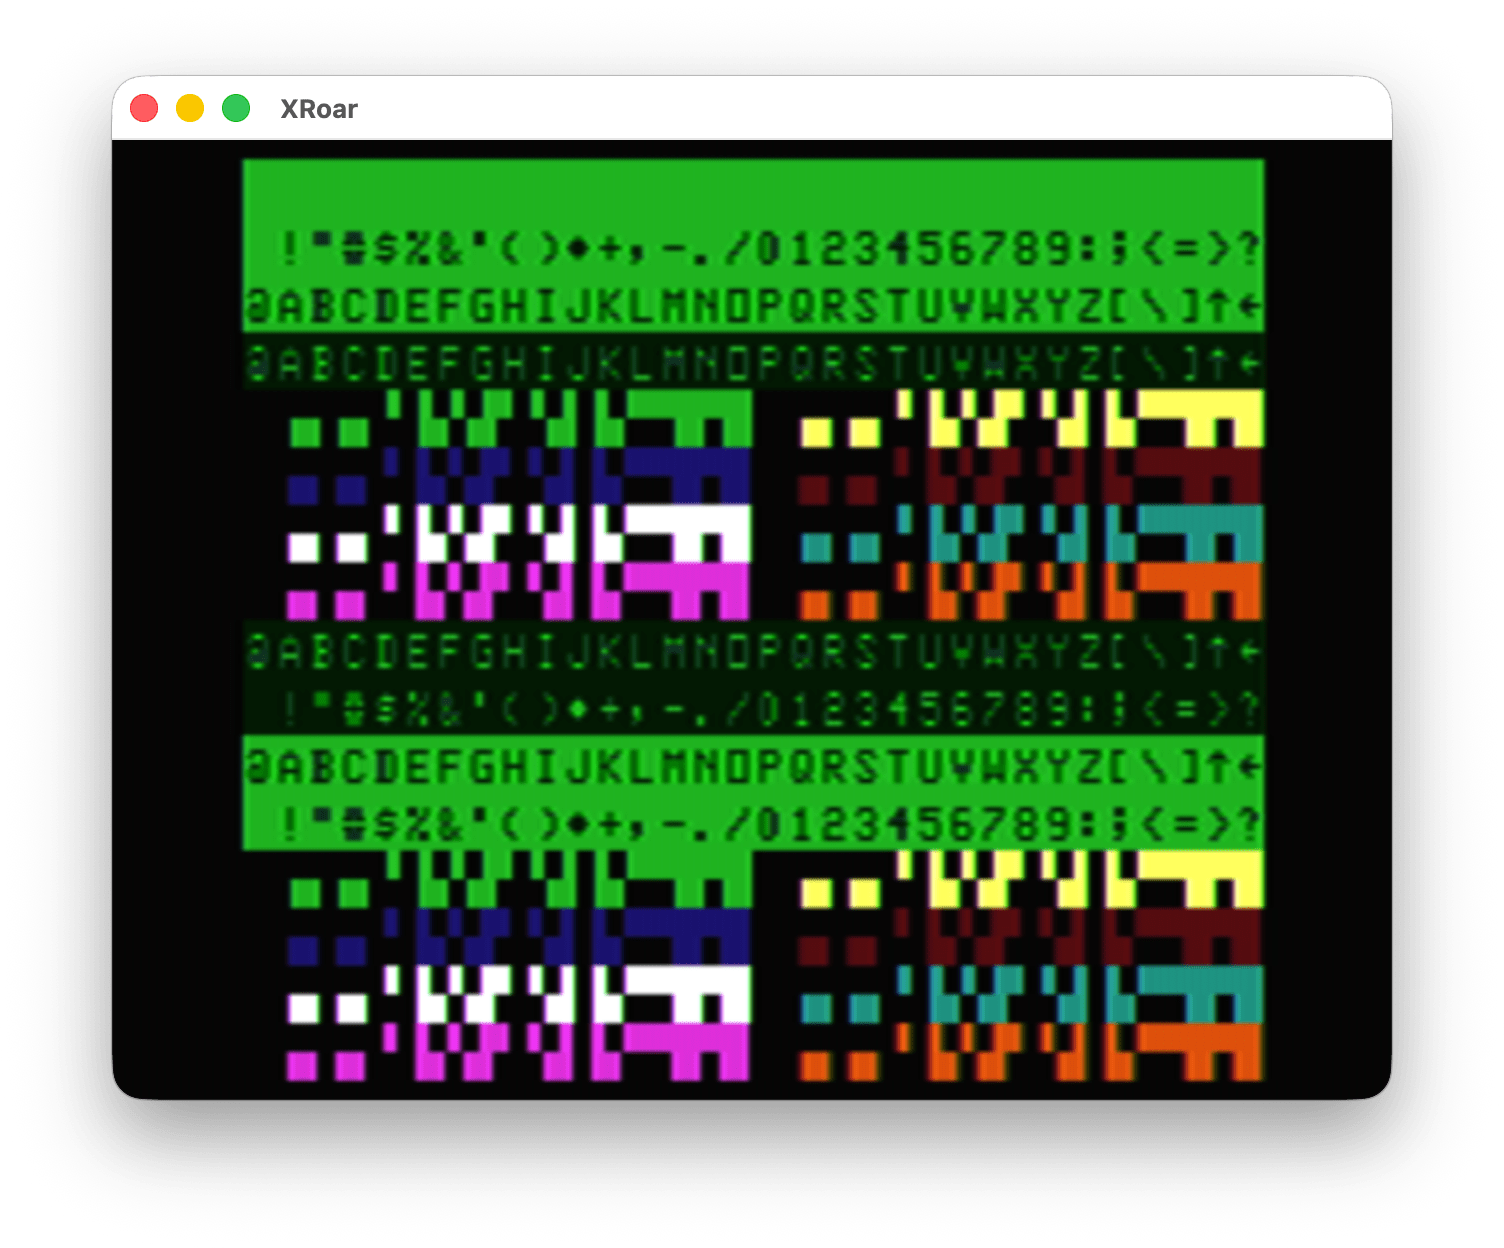
While you will not see anything if you PRINT those characters, if you POKE those values to the screen memory you will see something. For example, you could POKE characters 0 to 31 to the first row of the 32 column text screen like this:
FOR A=0 TO 31:POKE 1024+A,A:NEXT
The character set in the video chip has 0-31 representing reverse video characters “@” (AT sign) to “<-” (left arrow). We can expand that loop to POKE the first 128 characters onto the video screen:
FOR A=0 TO 127:POKE 1024+A,A:NEXT

But for PRINTing the ASCII characters, we have already established nothing shows up for characters 0-31, but things do PRINT when for 32-128:
FOR A=32 TO 127:PRINT CHR$(A);:NEXT

I put together this sloppy program that will show the differences, 32 characters at a time, of what you get when you PRINT the character values versus POKE the character values:
0 'POKEPRNT.BAS
10 CLS

20 PRINT@0,"PRINT 0-31:"
30 FOR A=0 TO 31:PRINT CHR$(A);:NEXT
40 PRINT@64,"POKE 0-31:"
50 FOR A=0 TO 31:POKE 1120+A,A:NEXT

60 PRINT@128,"PRINT 32-63:"
70 FOR A=32 TO 63:PRINT CHR$(A);:NEXT
80 PRINT@192,"POKE 32-63:"
90 FOR A=0 TO 31:POKE 1248+A,32+A:NEXT

100 PRINT@256,"PRINT 64-95:"
110 FOR A=64 TO 95:PRINT CHR$(A);:NEXT
120 PRINT@320,"POKE 64-95:"
130 FOR A=0 TO 31:POKE 1376+A,64+A:NEXT

140 PRINT@384,"PRINT 96-127:"
150 FOR A=96 TO 127:PRINT CHR$(A);:NEXT
160 PRINT@448,"POKE 96-127:"
170 FOR A=0 TO 31:POKE 1504+A,96+A:NEXT

999 GOTO 999
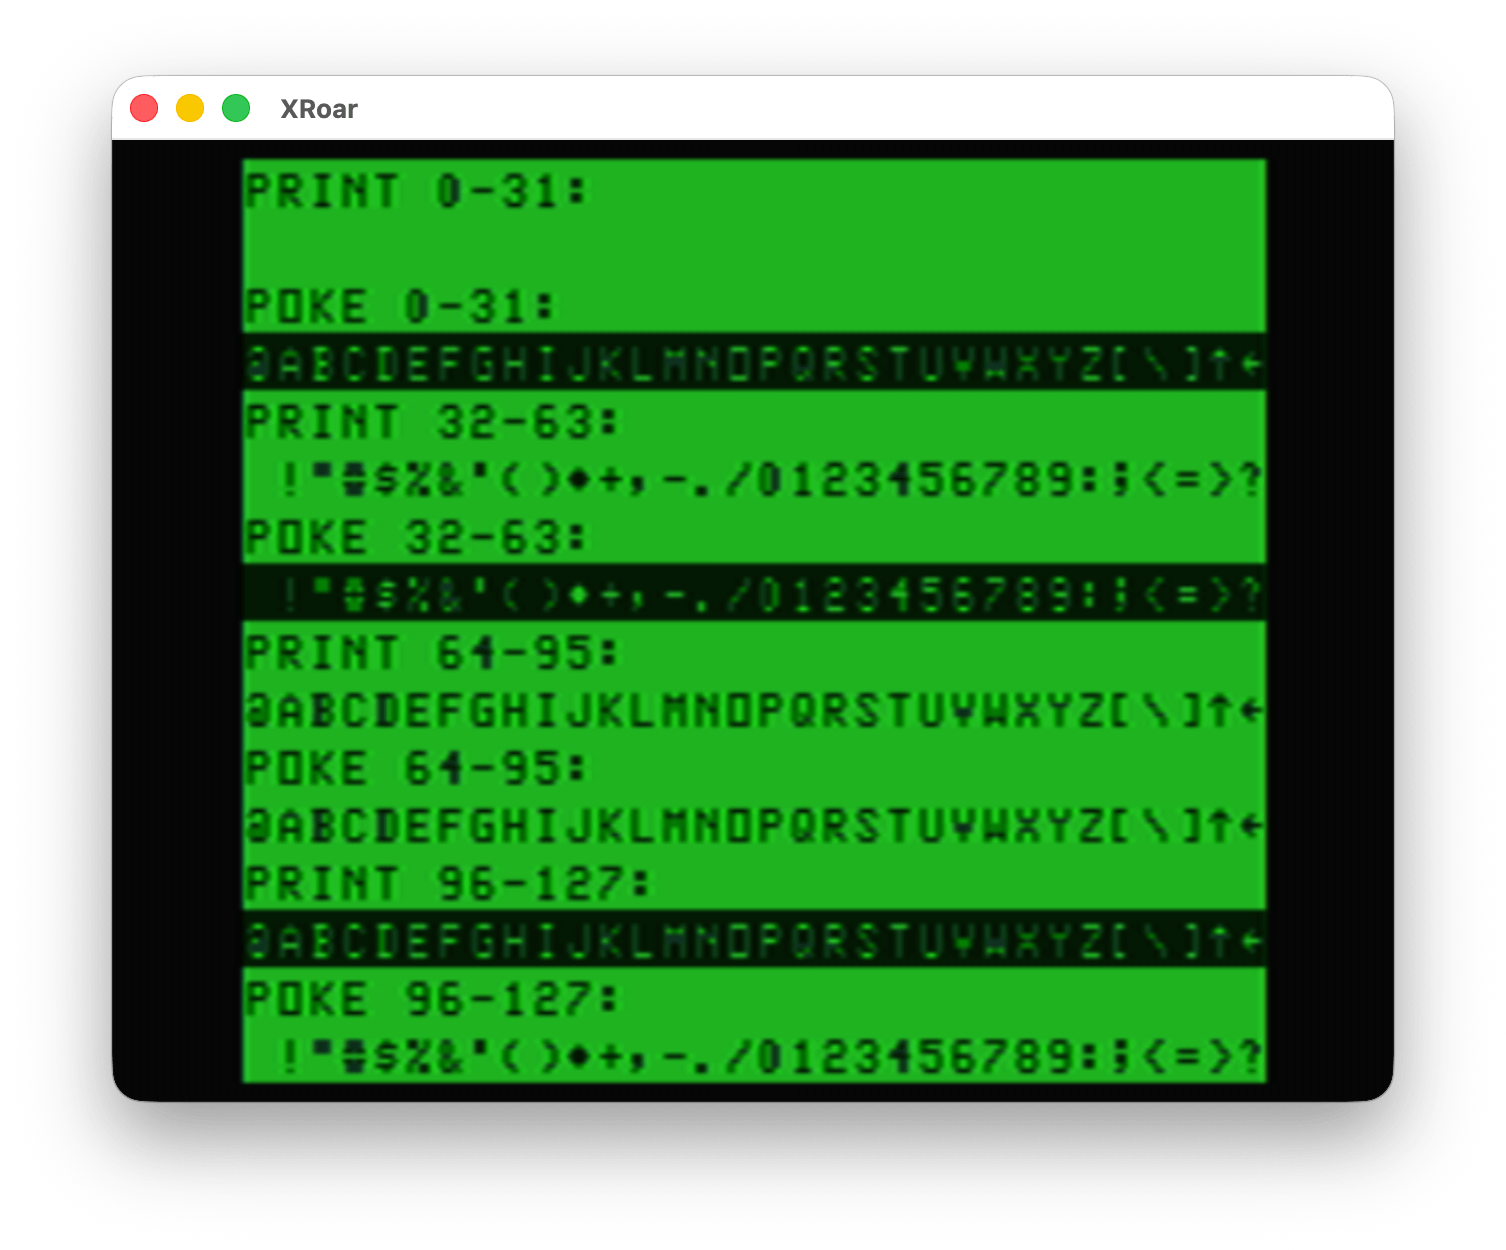
Looking at this, you can see only the characters 64-95 match between PRINT and POKE.
This means that the “copy screen to a string” concept from my earlier post doesn’t really do what we might expect. It does copy the data, but if we PRINT it back, we do not get back exactly what we started with.
This is the same thing that would happen if you tried to build a string by using PEEK from screen memory. This example prints stuff on the first line of the screen, then builds a string made of up characters using the PEEK value of that first line:
0 'PEEK2STR.BAS
10 CLS
20 PRINT "HELLO, WORLD! THIS IS A TEST."
30 FOR A=1024 TO 1024+31
40 A$=A$+CHR$(PEEK(A))
50 NEXT
60 PRINT "PEEKED STRING:"
70 PRINT A$
And running that shows this awfulness…
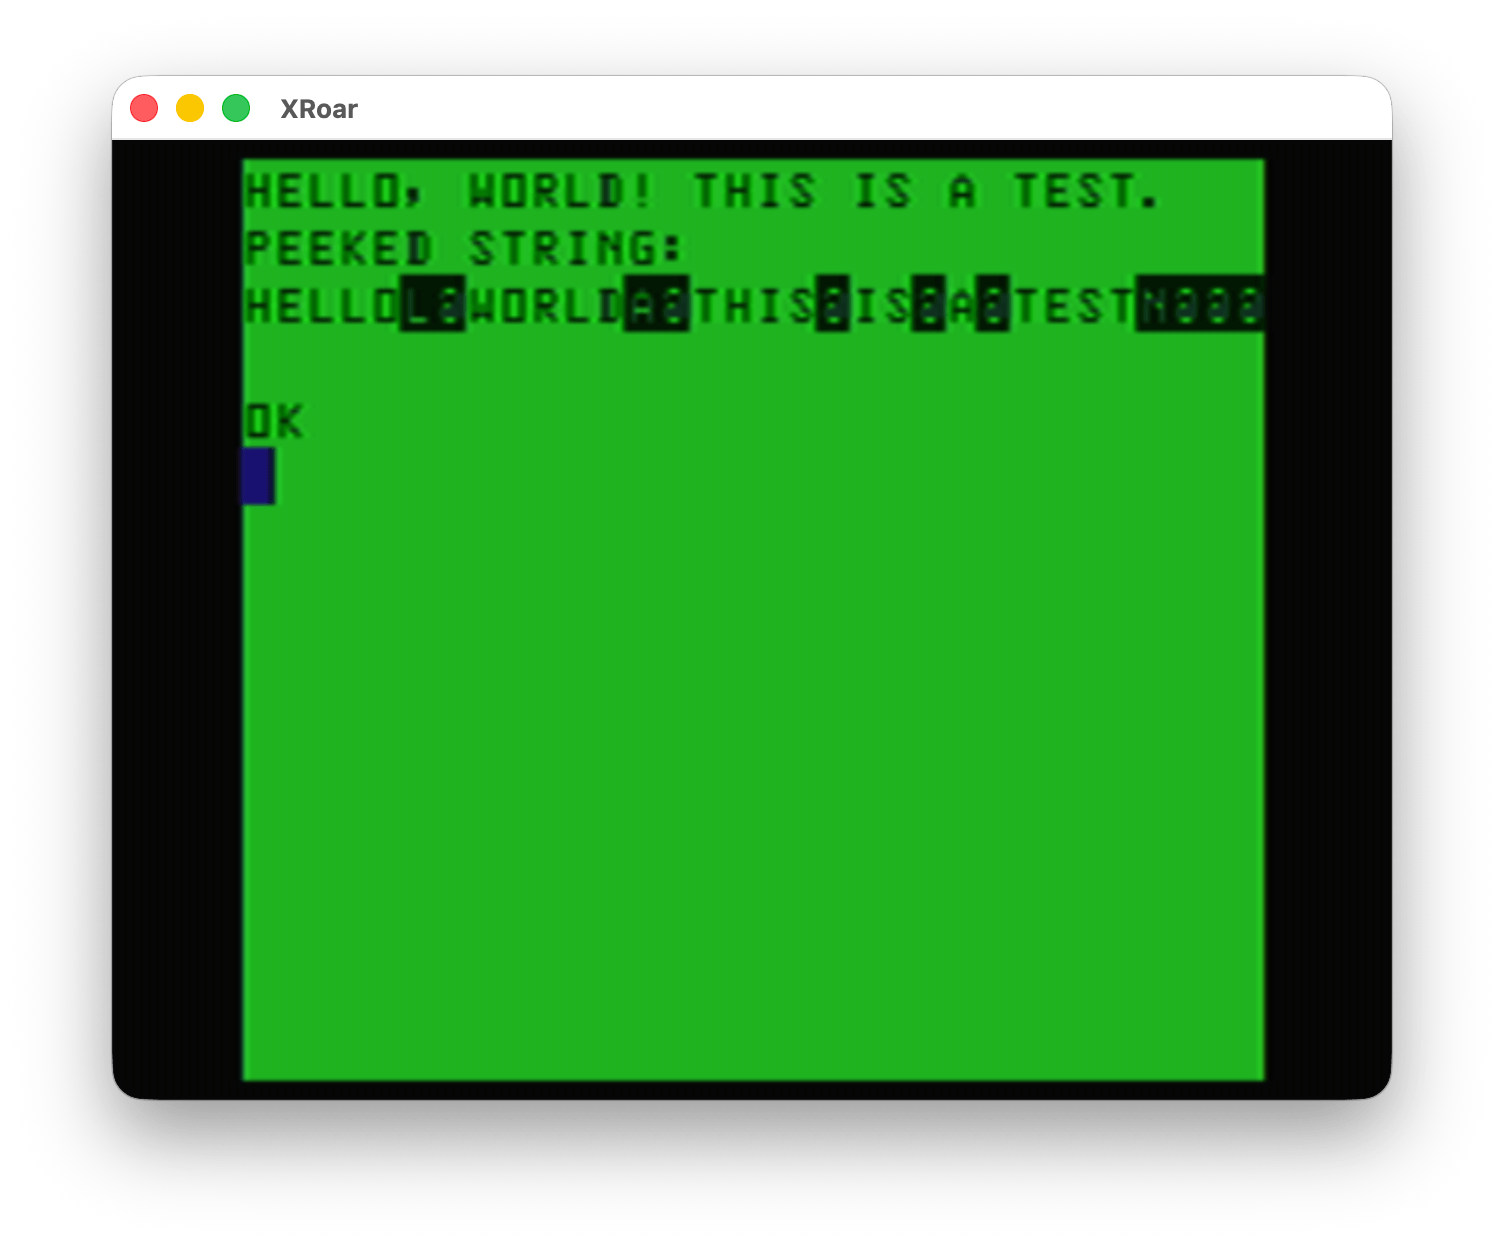
Yuck!
But that’s okay since there is not much use to copying TEXT data and then putting it back with PRINT. PRINT is fast, and we can easily PRINT that text data. Sure, there could be benefits if stuff being PRINTed is doing calculations and such to generate the output, but this trick won’t help there.
However, the semi graphics characters (128-256) are the same between PRINT and POKE.
0 'POKEPRT2.BAS
10 CLS
20 FOR A=0 TO 255
30 PRINT@A,CHR$(A);
40 POKE 1280+A,A
50 NEXT
60 GOTO 60
The top half is the PRINT CHR$ and the bottom half is the POKE:
Since there is no way on the CoCo to type those semi graphics characters into a string (pity, the later MC-10 could do this), we are forced to PRINT them like this:
PRINT CHR$(128);CHR$(128);CHR$(128)
That would print three black blocks. To speed things up, we could pre-generate a string of those three black blocks then we can PRINT that string very fast later:
A$=CHR$(128);CHR$(128);CHR$(128)
PRINT A$
And now you know why I chose to do a “splash screen” example for my demo in part 1. I initially tried it using the TEXT characters and quickly remembered why that can’t work (as explained here).
But it’s still a neat trick.
For dumb fun, here is a program that makes A$ be whatever is on the first 32 character line of the screen.
0 'DUMBSTRN.BAS
10 A$="":A=VARPTR(A$):POKEA,32:POKEA+2,4:POKEA+3,0
When you RUN that, doing a PRINT A$ will show a 32 character line that is whatever was on the first line of the screen. If you do a “CLS” to clear the screen and show “OK” on the top line, then PRINT A$, you will see “OK” followed by 30 reverse @ symbols, which is CHR$(96) — but in video memory, a 96 is an empty block (space).
And with that, I’m going to stop now.
Unit next time…
UPDATE: I believe I have found the answer, and will share it in an upcoming post. Until then, keep those comments coming. I learn so much from all of you!
This topic has been discussed here years ago, but every time something reminds me about it, I get annoyed. While my annoyance is triggered by how it works in the CoCo’s Extended Color BASIC, past research showed the behavior was the same even in much later Microsoft Visual BASIC. But why?
INSTR is a command to return the index where a target string is found in a search string. From one of the Getting Started with Extended Color BASIC manuals, it is shown as this:

What the manual did not mention is that it can also return 1 when there is no match. See this example:
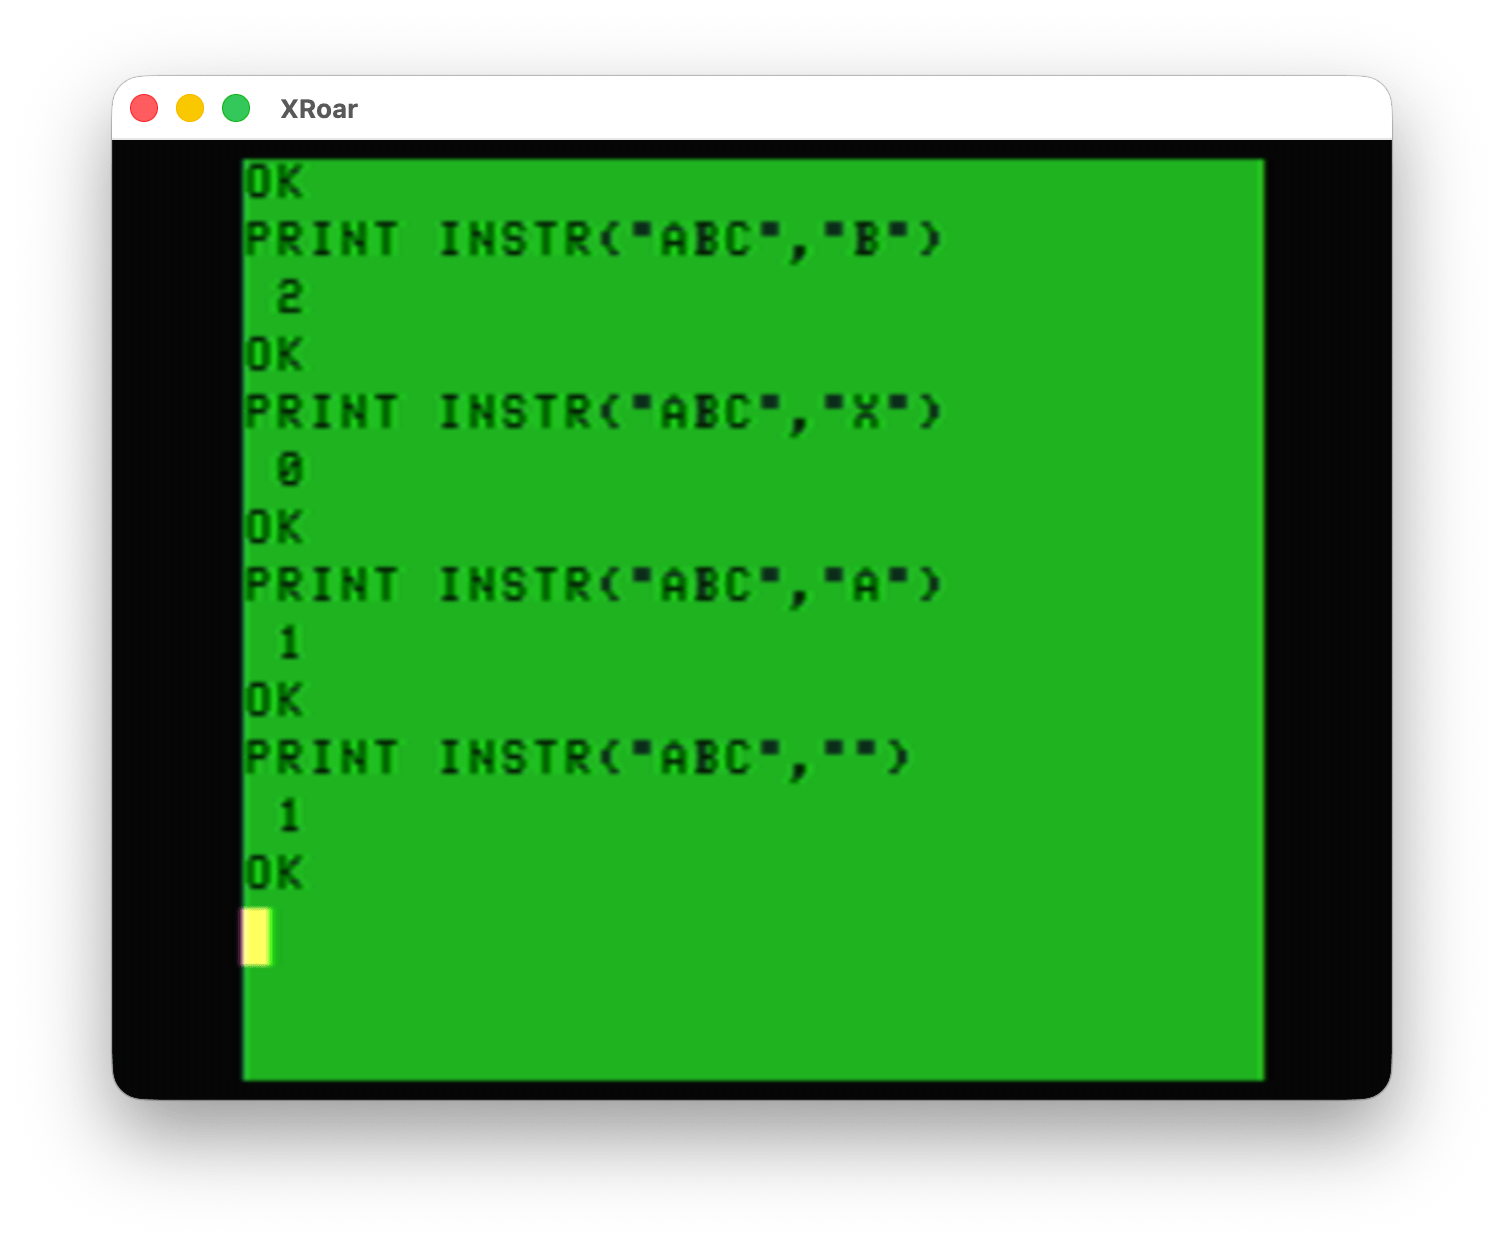
Looking for “B” in “ABC”? That’s at position 2. Good.
Looking for “X” in “ABC”? It is not there, so it returns 0. Good.
Looking for “A” in “ABC”? That’s at position 1. Good.
Looking for “” in “ABC”? Apparently “” is found at position 1. Don’t tell that to the “A” there.
I ran into this years ago when I was experimenting with various ways to handle key presses. You could have code block until a key was pressed, and then pass the key to INST and then use ON GOTO/GOSUB to get to the routine. Like this:
0 'INSTR.BAS
10 PRINT "A)BORT, R)ETRY, C)ONTINUE:";
20 A$=INKEY$:IF A$="" THEN 20
30 LN=INSTR("ARC",A$)
40 IF LN>0 THEN ON LN GOSUB 1000,2000,3000
50 GOTO 10

1000 ' ABORT
1010 PRINT"ABORT":STOP

2000 ' RETRY
2010 PRINT "RETRY":RETURN

3000 ' CONTINUE
3010 PRINT "CONT":RETURN
This was a great technique when dealing with a long list of menu options.
I had tried to optimize this by eliminating the A$ and embedding it inside the INSTR (someone in the comments may have suggested this to me; not sure if I am clever enough to have thought that up):
ON INSTR("ARC",INKEY$) GOSUB 1000,2000,3000
…but if I put that in my code replacing lines 20-40, running it immediately shows me “ABORT” as if INSTR returned 1.
Because INSTR returned 1.
The workaround suggested to me (again, from smart folks in the comments) was maybe to add a bogus value as the first search string character, and have that routine do nothing.
ON INSTR("*ARC",INKEY$) GOSUB 999,1000,2000,3000
However, for my example where I show the prompt again after it returns, it sticks in a loop printing the prompt over and over again. The code thinks the first option is being selected, then calls that routine (the empty routine that is just a RETURN in line 60) and then prints the prompt again.
0 'INSTR2.BAS
10 PRINT "A)BORT, R)ETRY, C)ONTINUE:";
20 ON INSTR("*ARC",INKEY$) GOSUB 60,1000,2000,3000
50 GOTO 10
60 RETURN

1000 ' ABORT
1010 PRINT"ABORT":STOP

2000 ' RETRY
2010 PRINT "RETRY":RETURN

3000 ' CONTINUE
3010 PRINT "CONT":RETURN
SO … it works, but the logic needs to be updated.
One quick solution is to not use RETURN and let each function decide where to go back to. When you GOSUB, BASIC has to scan forward (possibly starting at the top of the program if the line number is before the current line being parsed) to find the target. RETURN lets it “pop” back to right after the GOSUB, so that part is faster.
Also, GOSUB routines can be called from different places in the main code and they will return back to where they were called.
If these routines are never called from anywhere but the menu code, and the extra speed to GOTO back is not a problem, this this change makes it work. And, as a bonus, the fake first GOTO line can just be back to the ON INSTR again since it doesn’t need to do anything:
0 'INSTR3.BAS
10 PRINT "A)BORT, R)ETRY, C)ONTINUE:";
20 ON INSTR("*ARC",INKEY$) GOTO 20,1000,2000,3000

1000 ' ABORT
1010 PRINT"ABORT":STOP

2000 ' RETRY
2010 PRINT "RETRY":GOTO 10

3000 ' CONTINUE
3010 PRINT "CONT":GOTO 10
I am sure there are many other ways to solve this problem.
Why does INSTR behave like this? What is the benefit of not returning 0?
Hmmm, A.I. did not exist when I was first exploring this. Maybe I’ll ask one of the ‘bots and see what it knows.
Until next time…