Category Archives: Insta360 X4

YouTube and 8K video

When the Insta360 X4 came out, it upgraded the recording format from 5.7K to 8K — basically a 4K image for each of the two lenses. When folks tried to upload these files to YouTube, apparently early on 8K would appear as a choice.

Then something happened.

For the past few years I have seen this topic come up time and time again in 360 forums on Facebook, REDDIT, etc. Folks cannot get their videos to show in 8K. Up to 4K is all it offers:
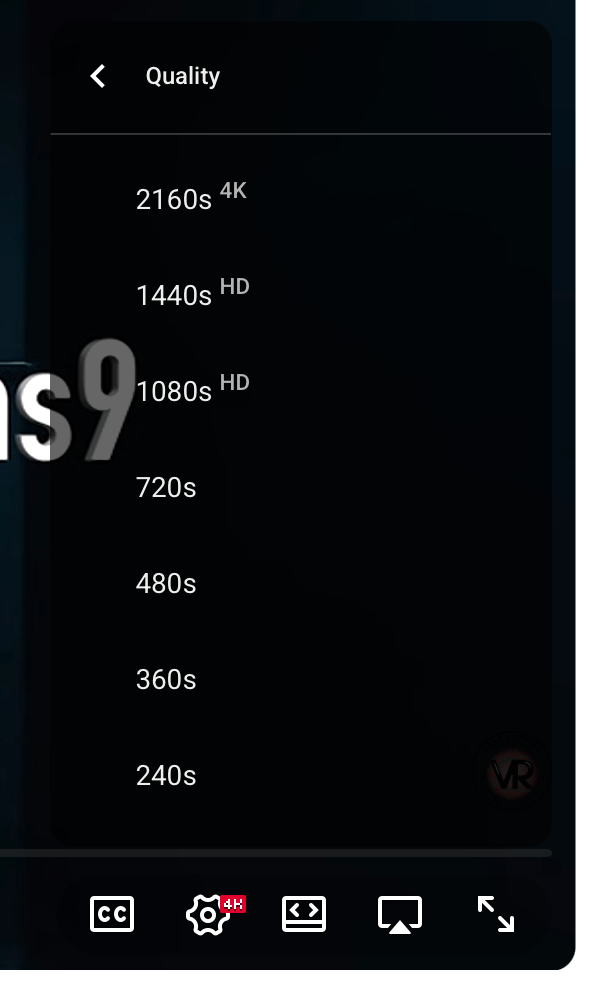
Time and time again, folks in the forum that got it to work just say “sometimes it takes awhile before it shows up.” However, the majority of us seemed to NEVER see this as an option, even months (or a year) later.

Recently, I began investigating this again. I label all my 8K videos as “8K” and it felt misleading to do so if no one could watch them in 8K.

Then I learned: YouTube used a different size for 8K, or so various “experts” claimed. Even though the Insta360 8K size of 7680×3840 worked fine as 8K in the past (for some), apparently now you had to resize the video to 7680×4320 and then and only then would YouTube show it as 8K. At least, according to many folks who were trying to make the work. Here is part of a detailed series of posts on REDDIT about this:

My attempts to do this did not produce 8K. Meanwhile, others still insisted that 8K “just worked” when directly uploading the file exported from Insta360 Studio (and, I would assume, the same size file from the DJI desktop app for the DJI Osmo 360 camera).

But not for most of us.

Does it work for anyone?

I ran into a YouTuber that was posting some 360-degree videos from amusement parks, and noticed they labeled them as 8K in their thumbnails. Yet, no 8K option when I viewed it. This led to a few exchanges in the comments, and them saying they could even see my videos show 8K.

I guess that 7680×4320 suggested by some was not important, after all… even though that is the resolution YouTube specifically mentions for 8K:

https://support.google.com/youtube/answer/6375112

When the experts disagree, you know we don’t really know what the rules are.

So why is it so many of us cannot see 8K, and others can see it just fine? I was today years old when I actually saw an 8K option or the very first time:
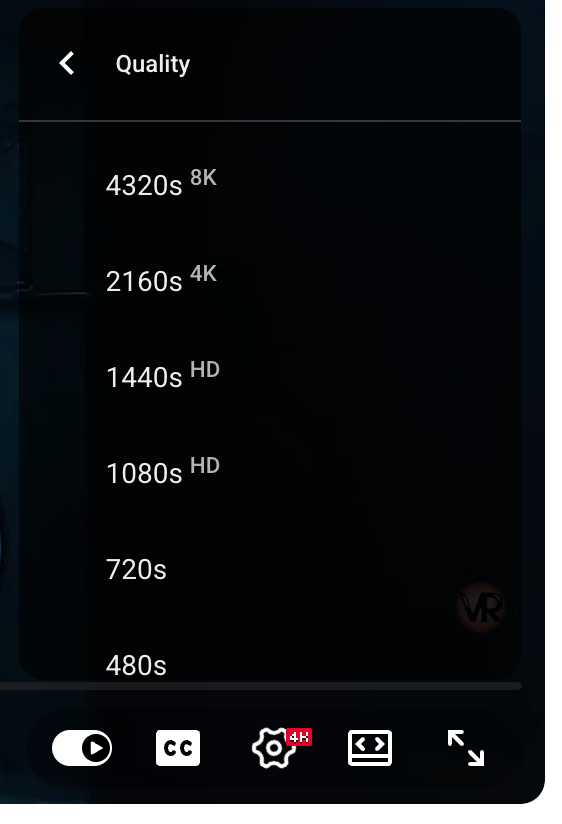
And, then I checked using a different browser on a different operating system (Edge on a Windows 11 machine) and saw it there, too.

Did something get flipped?

Please let me know if you can see an 8K option on the following video — and if you can (or can’t), tell us your browser and operating system. The PC I used was just a low end DELL with no special graphics card, and I am seeing it on an M2 Mac even though I just found a new post saying you needed an M3 or above to see them.

No one seems to know the rules. But one of you may, so let us all know. Thanks!

Experimenting with Insta360 timelapse…

A feature I have only played with a few times (on any camera) is timelapse. The first time I did it with an Insta360 camera was when I got my first one – a ONE X2 – and tested it while visiting Universal Studios Florida. While having a meal, I let the camera run . This video is on my Park Hopping YouTube channel:

Later, when I upgraded to an X3, I stuck it on the top of my car with a magnet mount and just let it record the sky.

I did a few tests like this, and they are somewhere on my Sub-Etha Software YouTube channel.

By the time I had an X4, I think I only used this feature one time — and that was just a few weeks ago. I let it record while folks where leaving Silver Dollar City at the end of the day. That video is posted on my DisneyFans.com/ParkHopping.com Facebook page, I think.

And that was the end of my experiments with timelapse…

But recently, I saw an interesting “day to night” timelapse posted by Best360:

This motivated me to began experimenting again. I used an external battery pack handle, attached to the top of my tripod, and set up my camera to record from 7:30pm until it was dark at 8:30pm.

My first attempt failed. Apparently I did not hit the button properly…

My second attempt went much better, but at the end of the timelapse, everything was still pretty bright due to the new X5 producing a brighter image. I am unsure if the camera is doing something to change modes as it gets dark — I just used the “Timelapse” mode and let it do whatever it wanted to do.

My third attempt I ran from 7:30pm to 9pm. It was even more dark, but you can see it still does not look dark in the timelapse:

It is an interesting feature, but quite boring unless you actually reframe it to pan the video and give it a bit more motion.

Have you done much with this mode? If you know of a good use for it, leave a comment.

Until next time…

Selling my X4 and tons of accessories

UPDATE: Sold for $400. Congrats to the buyer! You got a great deal!


It has been only a year since I picked up my Insta360 X4, but now that I have a new X5, I am getting rid of all my X4 gear. This includes the X4, three batteries total, quick charger, dive case, lens covers, lens guards, several carrying cases, mix wind muffs, and more — some of these items never got used. I really expected the X4 to be around for two years before the replacement model came out ;-)

The X4 by itself is $424 on Amazon, but you can buy my whole kit for less than that right now if you want, or bid and try to get it cheaper:

https://www.ebay.com/itm/335935741599?mkcid=16&mkevt=1&mkrid=711-127632-2357-0&ssspo=AvuV3Hq0Tee&sssrc=2524149&ssuid=AvuV3Hq0Tee&widget_ver=artemis&media=COPY

Insta360 X5 low light performance

Here are some raw footage clips of the Insta360 X5 camera recorded at night. For the test, I had my X4 recording in 8K 30fps Video mode, and put the X5 in 8K 30fps PureVideo mode.

One surprising thing was that even the preview screen looks much brighter on the X5:

Insta360 X4 (left) versus Insta360 X5 (right)

Here are the results:

As you can see, the X5 produces a significantly brighter image. But, freeze frame along the way and you will see it still suffers from graininess and image blur when recording in low light levels.

And since the X5 has a slightly larger image sensor, I wanted to do a comparison that I did not see in any of the pre-release YouTuber videos. For this test, I set both the X4 and X5 in normal 8K 30fps Video mode (NOT using PureVideo on the X5). I was surprised at how much brighter the X5 video is even in “normal” Video mode:

There may be a few more short tests I want to complete before selling off my X4 gear, so keep checking this site.

If you have any specific things you want to see tested, leave a comment. If I have time, I will try to do them.

Until next time…

Insta360 X5 physical changes from the X4

As my two photo gallery sites prove, I prefer sharing photos over videos. A video goes by, and if there is something interesting in it, you won’t ever find it again unless you write down a timestamp so you can replay the video and seek to that point later. But photos? You just pop into a gallery and can drill right down to find photos of what you are looking for. It is much easier for me to find something at the Branson Ferris Wheel by looking at my photos of it than looking at my videos of it.

With that in mind, here are some unprofessional cell phone pictures of the exterior of the X5 compared to the X4. Some interesting differences.

Sides

On the X4 (left), the USB port is just above the battery. On the X5 (right), only the battery is on that side and the USB port has been moved to the opposite side.

On the opposite size, you can see that the control buttons (power and Q) have been moved up a bit, and the USB port is now at the bottom. The flap that covers the USB port is very different, as well.

Bottom

Where once cameras only had the 1/4″ tripod mount, newer cameras will have indentions and such for installing “quick release” adapters. You can see how this has changed a bit between X4 and X5.

Physically, the X5 still fits in the carrying case I have for my X4 so, unlike the X3 to X4 size increase, you should be able to keep using your same camera case.

Up next … a look at the revamped (again) menu system….

Until then…

Copy files to/from Insta360 app on iPhone/iPad

Updates:

  • 2025-05-06 – Files must be in a folder called “IMPORT” then you drag that in. BUT, this is no longer documented in the X5 manual, and in testing today, it does not appear to work with the current V2 App and X5. Instead, you can create “DCIM\X5” and put files there, then drag that in (it will erase all current files on the X5). I then had to disconnect from the computer and restart the app to see them. I tested this with 10 photos today and it worked, so I will be updating this article with the new steps as soon as get a moment.
  • 2026-05-19 – In the comments, WetNoodle reports that with the current macOS 26, the “drag DCIM from phone to Mac” no longer works. I just tested it on my system running 26.5, and got the same result they did. My DCIM is 673GB so perhaps there is a size limit. SOLUTION (for me) provided by Insta360 Support: Make sure the destination has enough drive space. When I was trying to copy to my Desktop, I did not have enough space left on iCloud Drive. When I drug my 673GB DCIM folder to an external SSD with plenty of space, the copy works.

Today, I asked Microsoft Copilot if it knew how to get Insta360 files into the phone app. TO my surprise, it referenced the official Insta360 support page, and this blog post.

I decided to take a look at what I wrote, and found an issue to correct. This is the fixed version.


This topic seems to come up often, which is maybe it shouldn’t since Insta360 even documents these steps. Here is the background…

If you have an Insta360 360 camera such as the ONE X, ONE X2, X3, X4 or X5, you can run the Insta360 App and download photos/videos from the camera for editing on your phone or tablet. You can then export them out and share them as normal photos, reframed videos or even 360 photos/videos.

If you want to backup the original files your phone/tablet downloaded, you can do that too by plugging the phone/tablet up to your computer via the USB sync cable.

On macOS, when you plug in the device and allow it to connect, it will show up under the Finder. You can select it and get a series of “tabs” in the Finder on what you want to look at. By selecting Files you have access to the file system of the device:

Look for the “Insta360” app and expand it:

If you want to copy .insv/.insp files TO the phone app, you must first copy them into a folder named IMPORT. Once there, you can drag that IMPORT folder into the Insta360 app.

They will be copied via USB and placed into the location where the app will recognize them and you can edit them on your device. You will see a new status line in the bottom of the iPhone file browser:

If you want to copy files OUT of the phone, you cannot pick and choose, but you can drag the entire DCIM folder out from this window to wherever you want it copied and all the raw .insv/.insp/etc. files that have been imported into the Insta360 app will be copied there, likely much faster over USB than they would over WiFi from the camera in the first place. You will then be able to backup these files, or drag them into the desktop Insat360 app for editing.

It would be nice to have some kinda of automated script to do this (perhaps one that monitors for the phone/tablet to be connected then runs, backing up all the DCIM files automatically). If there is interest, I can look into trying to create one.

And if you want to read these instructions direct from Insat360, they are found in the manual. Here is the entry from the online X3 manual:

https://onlinemanual.insta360.com/x3/en-us/camera/filetransfer

We could do better…

That said… What would really be nice would be for Insta360 just to support the built-in Files system on iOS/iPadOS. Most of the apps I use allow me to export a file to anything mounted in my Files app. If you have installed Dropbox, OneDrive, Google Drive, etc., they show up and apps can just save a file there. If it is a cloud service, they will automatically sync to the cloud via that app. There are also FTP clients that look like drives, so you can export to a location and have it FTP to your own server. Likewise, most apps I use allow me to open from the Files app, so I can import files I have saved on Dropbox or whatever.

This also allows access to external USB hard disks or memory cards attached to the Lightning or USB-C port of the device using the appropriate adapter.

Insta360 may not be doing this because they knew they were planning to bring out their own cloud service they charge for. If they had allowed support for the native Files system, you’d be able to do all of this “for free” with any cloud service you were already using and there would be very little reason to subscribe to their subscription cloud service

But who knows… Maybe if enough of us ask them for it, we might see it. You can contact Insta360 and ask them here:

https://www.insta360.com/support

Until next time…

Why do 5.7K and 8K Insta360 X3/X4 photos/videos look so bad?

For the search engines…

I see this question come up over and over (and over and over) again on discussion groups (Facebook, REDDIT, etc.). Folks see “8K camera” or “5.7K camera” and expect that will be better than an HD camera or 4K camera.

But not with a 360 camera.

With a normal camera, you have a lens recording a square/rectangular image. An HD camera will record an image that is 1920×1080 pixels. Those pixels are used for the entire square/rectangular image.

But, a 360 camera with two lenses takes its resolution and divides that by two — one for each lens. An 8K Insta360 X4 camera is therefore shooting a 4K image out the front lens, and a 4K image out the back.

BUT, instead of shooting straight ahead, it is a wide angle fisheye style image that is actually capturing everything in front, above, below, to the left and right of that lens. The back lens is doing the same.

When you think of it that way, the number of pixels that would be for the “forward” view is a fraction of the pixels you would get with a normal non-fisheye single lens camera.

Here is my quick doodle:

Now, reality is actually much more complex than this simple drawing, but the end result is you an “reframe” 360 footage to be a view in any direction. If you only use those six main directions (forward, backwards, left, right, up and down), you are dividing the pixels of that 8K image in to 6 smaller images. If 8K video is 7680 × 4320, then each view is closer to 1280×720 — which you can see is below “full HD” of 1920×1080.

So even with an 8K 360 camera, what you get in any specific direction is still not going to be as good as a simple HD camera that only records in one direction.

(And yes, I know the reality is much more complex, but this is just greatly simplified to help new users visualize how it works.)

Until next time…

Insta360 X4 firmware 1.2.20

Updates:

  • 2024-08-01 – Fernando T. in the comments noted that there are still missing features: “I can see no control of bracketing steps and number of shots for composing HDR Photo yet…” Let’s hope that, eventually, Insta360 can make the X4 do as much as its predecessor could do.

Finally! The GPS Remote and Apple Watch may be used to control the X4. Also support for streaming. We are now getting close to the standard features we were used to with the X3.

10 minutes of Insta360 X4 VR 360 video

From my Park Hopping site, here is ten minutes of Insta360 VR 360 video.

I set the camera in various places using a Best360 tripod I purchased on Amazon. I set the camera to 8K 360 video mode and just clicked record. No manual settings – just automatic mode.

The only “editing” of the video was putting the clips together in Final Cut Pro’s 360 video editor, adding some transitions, and some overlay text. I did no color corrections or enhancements. These are the files exported out of the Insta360 desktop app and then brought into a Final Cut Pro 360 video timeline in 8K.

YouTube renders the video down to 4K, it seems, so I guess we can’t share 8K video on YouTube yet…

4/28/2024 – Butterfly Palace, Branson MO USA

More to come…