I have a Windows laptop that came with Windows 10 Home. Unfortunately, Home is missing two features I wanted to use — Remote Desktop (so I could connect to this machine from elsewhere) and Bitlocker (so I can encrypt the hard drive). Those features require upgrading to Windows 10 Pro.
I was able to do the free upgrade to Windows 11 Home, but upgrading to Windows 11 Pro was a $99 charge in the Microsoft Store. That’s quite a bit of money for two minor features I wanted to use.
Fortunately, over on the Sub-Etha Software Facebook page, Jason D. had a solution.
“If you have an old key for Win 7 Pro, it should work. Seeing as how the system has an OEM key on it now, though, who knows… You could always just bite the bullet and upgrade, I had to do that on my Surface.”
– Jason D.
I recalled I had Windows 7 Pro in the past, which I ran on my Mac under the Parallels PC emulator. I looked through my old registration files and found my activation key for Windows 7 Pro. Using it, I was able to upgrade my Windows 11 Home version to Windows 11 Pro.
Thank you, Jason, for the great idea! I’d never run that old Windows 7 install again, so this was a great way to re-use a license I already paid for. (I also have a Windows 10 Pro license, but I have to keep that one for running it on my emulator.)
Hopefully Jason’s suggestion also helps someone else…
Another day, another issue with a C compiler of questionable quality…
Consider this bit of C code, which lives in an infinite main loop and is designed to do something every now and then (based on the status of a variable being toggled by a timer interrupt):
while (timeToDoSomething == true)
{
    timeToDoSomething = false;

    // Do something.
}
The program in question was trying to Do Something every 25 ms. A timer interrupt was toggling a boolean to true. The main loop would check that flag and if it were true it would set it back to false then handle whatever it was it was supposed to handle.
While this would have worked with “while”, it would really be better as an “if” — especially if the code to handle whatever it was supposed to handle took longer than 25ms causing the loop to get stuck.
Thus, it was changed to an “if”, but a typo left the old while still in the code:
//
while (timeToDoSomething == true)
if (timeToDoSomething == true)
{
    timeToDoSomething = false;

    // Do something.
}
Since things were taking longer than 25ms, the new code was still getting stuck in that loop — and that’s when the while (which was supposed to be commented out) was noticed.
The while without braces or a semicolon after it generated no compiler warning. That seemed wrong, but even GCC with full error reporting won’t show a warning.
Because C is … C.
Curly braces! Foiled again.
In C, it is common to see code formatted using whitespace like this:
if (a == 1)
    printf("One!\n");
That is fine, since it is really just doing this:
if (a == 1) printf("One!\n");
…but is considered poor coding style these days because many programmers seem to be used to languages where indention actually means something — as opposed to C, where whitespace is whitespace. Thus, you frequently find bugs where someone has added more code like this:
if (a == 1)
    printf("One!\n");
    DoSomething ();
    printf("Done.\n");
Above, it feels like it should execute three things any time a is 1, but to C, it really looks like this:
if (a == 1) printf("One!\n");
DoSomething ();
printf("Done.\n");
Thus, modern coding standards often say to always use curly braces even if there is just one thing after the if:
if (a == 1)
{
    printf("One!\n");
}
With the braces in place, adding more statements within the braces would work as expected:
if (a == 1)
{
    printf("One!\n");
    doSomething ();
    printf("Done.\n");
}
This is something that was drilled in to my brain at a position I had many years ago, and it makes great sense. And, the same thing should be said about using while. But while has it’s own quirks. Consider these two examples:
// This way:
while (1);

// That way:
while (1)
{
}
They do the same thing. One uses a semicolon to mark the end of the stuff to do, and other uses curly braces around the stuff to do. That’s the key to the code at the start of this post:
while (timeToDoSomething == true)
if (timeToDoSomething == true)
{
    timeToDoSomething = false;

    // Do something.
}
Just like you could do…
while (timeToDoSomething == true) printf("I am doing something");
…you could also write it as…
while (timeToDoSomething == true)
{
    printf("I am doing something");
}
So when the “if” got added after the “while”, it was legit code, as if the user was trying to do this:
while (timeToDoSomething == true)
{
    if (timeToDoSomething == true)
    {
        timeToDoSomething = false;

        // Do something.
    }
}
Since while can be followed by braces or a statement, it can also be followed by a statement using just braces.
The compiler can’t easily warn about needing a brace, since it is not required to have braces. But if it braces were required, that would catch the issues mentioned here with if and while blocks.
Code that looks like it should at least generate a warning is completely valid and legal C code, and that same code can be formatted in a way that makes it clear(er):
while (timeToDoSomething == true)
    if (timeToDoSomething == true)
    {
        timeToDoSomething = false;

        // Do something.
    }
Whitespace makes things look pretty, but lack of it can also make things look wrong. Or correct when they aren’t.
I suppose the soapbox message of today is just to use braces. That wouldn’t have caught this particular typo (forgetting to comment something out), but its probably still good practice…
I love a good conspiracy theory, but usually they fizzle out within a few minutes of web searching about them. Want to get the other side? Just search for whatever it is plus “debunk.”
The Secret of Skinwalker Ranch on History, for example, doesn’t hold up very well. In the season two finale, they fly a helicopter around to take sensor readings. The radar altimeter starts alerting them that the ground is less than 50 feet below, when they were 1500 or more above it.
The helicopter pilot was (pretending to be?) mystified. It was as if there was something just below the aircraft that no one could see.
A quick search reveals tons of documentation on things that mess up radar based altimeters and give them false low readings.
Pity.
I was really hoping for an invisible UFO flying around below them.
But, do your own research. Though, it may be a funner show if you don’t.
In a language like C, you often have multiple ways to accomplish the same thing. In general, the method you use shouldn’t matter if the end result is the same.
For example:
// This way:

if (a == 1)
{
   function1();
}
else if (a == 2)
{
   function2();
}
else
{
   unknown();
}

// Versus that way:

switch (a)
{
   case 1:
      function1();
      break;

   case 2:
      function2();
      break;

   default:
      unknown();
      break;
}
Both of those do the same thing, though the code they generate to do the same thing may be different.
We might not care which one we use unless we are needing to optimize for code space, memory usage or execution speed.
Optimizing for these things can be done by trail-and-error testing, but there is no guarantee that the method that worked best on the Arduino 16-bit processor and GCC compiler will be the same for a 64-BIT ARM processor and CLANG compiler.
If you ever do make a choice like this, just be sure to leave a comment explaining why you did it in case your code ever gets ported to a different architecture or compiler.
Short circuiting
Many things in C are compiler-specific, and are not part of the C standard. Some compilers are very smart and do amazing optimizations, while others may be very dump and do everything very literally. Here is an example of something I encountered during my day job that may or may not help others.
I had code that was intended to adjust power levels, unless any of the four power generators hit a maximum level. It looked like this:
// Version 1: Do nothing if power limit exceeded.
if ((Power1 > Power1Max) ||
    (Power2 > Power2Max) ||
    (Power3 > Power3Max) ||
    (Power4 > Power4Max))
{
   // Max power hit. Do nothing.
}
else
{
   increasePower ();
}
Having conditionals lead to nothing seems odd. Wouldn’t it make more sense to check to see if we can do the thing we want to do?
// Version 2: Do something is power limit not exceeded.
if ((Power1 < Power1Max) &&
    (Power2 < Power2Max) &&
    (Power3 < Power3Max) &&
    (Power4 < Power4Max))
{
   increasePower ();
}
That looks much nicer. Are there any advantages to one versus the other?
For Version 1, the use of “OR” lets the compiler stop checking the moment any of those conditions is met. If Power1 is NOT above the limit, it then checks to see if Power2 is above the limit. If it is, we are done. We already know that one of these items is above, so no need to check the others. This works great for simple logic like this.
For Version 2, the use of “AND” requires all conditions to be met. If we check Power1 and it is below the limit, we then and check Power2. If that one is NOT below, we are done. We know there is no need to check any of the others.
Those sure look the same to me, and Version 2 seems easier to read.
The first example is basically saying “here is why we won’t do something” while the second example is “here is why we WILL do something.”
Online web emulators used to not work on tablets like the iPad due to how keyboard commands were handled. A few years ago I was working with an online emulator and the author confirmed it wasn’t possible due to the mobile browsers only sending keys, instead of “key X down, key X up” sequences (or something like that).
To my surprise, when I checked the JS Mocha CoCo emulator today, it worked on the iPad with a bluetooth keyboard! At some point, something changed and it is now possible to use an external keyboard on a tablet (at least an iPad) and use the emulators. I also spot checked the XRoar Online emulator and it works too, but since it does not currently support keyboard translation, you have to know where the CoCo keys are on a modern keyboard.
Check it out, and please let me know if this also works on android tablets.
It seems like only yesterday that you had a dozens of choices in what computer you could buy. Most were not compatible with the others — and we liked it that way. Software companies, however, probably didn’t. To reach the largest market, they had to write their program multiple times for different systems. My Radio Shack Color Computer, sadly, did not get many of these official ports.
Many things we take for granted today — such as sending text from one computer to another (via e-mail, text, etc.) — were not as simple back then. Not all systems used an industry standard character set, meaning the numeric code that represented a character on one system, might represent a different character on another.
The CoCo used ASCII – “American Standard Code for Information Interchange.” The defined numeric values represented the following characters in this clear and easy to understand chart:
ASCII table from https://en.wikipedia.org/wiki/ASCII
If that chart doesn’t help, you are not alone. Just know that characters 0 to 127 were all defined to represented a standard set of letters, numbers, punctuation, symbols and control codes (such as 8 being BACKSPACE, 13 being CARRIAGE RETURN, etc.).
System like the Atari 400/800 and Commodore PET/VIC-20/64/etc. included non-ASCII graphical symbols in their character set. Each of these systems came up with their own standard — PETSCII from Commodore (which originated on the Commodore PET in 1977), and ATASCII from Atari (which originated on the Atari 400/800 in 1979).
Before WWW there was BBS
One of the first things I ever did with a computer was use one with a modem to dial other computers over a land line telephone. (Kid’s, ask your parents…) Folks would run Bulletin Board System software that let others call their computer and post messages for other folks to read who called in later.
This presented a problem. If the character sets were different between computers, how could an ASCII CoCo user dial in to an Atari ATASCII system or a Commodore PETSCII system?
To solve this problem, some BBS programs on the non-ASCII computers would first ask you if you wanted ASCII or ATASCII (or PETSCII or whatever). For ASCII users, the BBS would then translate the character codes.
Not all systems did this, of course. There were plenty of Commodore-only and Atari-only systems that made use of the extended character set to draw fancy menus and screens that ASCII computers couldn’t view.
However, the modem “terminal programs” that non-ASCII systems ran usually had an ASCII translation mode built in. Thus, a Commodore or Atari user could call any ASCII BBS. While I am sure they existed, I never did see a terminal program for my ASCII CoCo that let it call an ATASCII or PETSCII-only system. (TwilightTerm by SockMaster is similar, allowing a CoCo 3 to view the IBM PC ANSI character set and colors.)
When I lived in Lufkin, Texas, one of the local BBSes was running on an Atari 800 (via BBS Express software) and allowed ASCII systems to call in. This was how I first learned about the differences in ATASCII versus ASCII.
Here is what ASCII characters 32-127 looked like on the CoCo 1 and 2 (characters 0-31 are control codes and such):
Radio Shack Color Computer 32-column text screen ASCII.
And here is the same set of characters on a CoCo 3 40-column screen with row and column numbers (since I had more screen room):
Tandy Color Computer 3 40-column text screen ASCII.
From wikipedia, here is what ATASCII looks like:
ATASCII from https://en.wikipedia.org/wiki/ATASCII
I think this table is much easier to read that the ASCII one, as long as you know hexadecimal.
Starting at character 32 (0x20) is a space, followed by special characters and the alphabet. Although there are some symbol differences (like the ^ on CoCo being a diamond on the Atari), the main letters, numbers and symbols are the same.
But, if I were to write up a text file and send it to the Atari BBS so they could post it, it would not work. ASCII uses 13 (CR, carriage return) as a line ending, but ATASCII uses 155 (ATASCII CR). If I translated line endings, and avoided using things like ^, brackets (or curly braces), etc., I could then have a text file the Atari BBS could use.
The amazing ASCII to ATASCII Convert program!
So I wrote a simple ASCII to ATASCII converter:
0 REM ASCII TO ATASCII CONVERT
1 REM BY ALLEN HUFFMAN
2 REM (09/02/87)
3 REM
5 CLEAR1000
10 CLS:PRINT@3,"ASCII TO ATASCII CONVERTER":PRINT@40,"BY ALLEN HUFFMAN":PRINTSTRING$(32,131)
15 PRINT@96,"ASCII FILE TO CONVERT:":LINEINPUT">";F1$:IFF1A$=""THEN15
20 PRINT@192,"NAME OF NEW FILE:":LINEINPUT">";F2$:IFF2$=""THEN15
25 PRINT@289,"CONVERTING ASCII TO ATASCII...":OPEN"I",#1,F1$:OPEN"O",#2,F2$
30 LINEINPUT#1,A$:PRINT@320,A$:PRINT#2,A$+CHR$(155);:IFEOF(1)=0THEN30
35 PRINT#2,CHR$(26);:UNLOAD
40 PRINT@422,"CONVERSION COMPLETE!":END
In line 15, it asks for an INPUT filename (F1$).
In line 20, it asks for an OUTPUT file name (F2$).
In line 25, it opens the first file as input (“I”) and the second file for output (“O”).
In line 30, it loops reading a raw line from the first file, displaying it on the screen (so the user can see what is going on), then writes the text out to the output file with a CHR$(155) at the end and NO ASCII carriage return (by using the semicolon). If end-of-file is not reached, it goes back to 30 to process the next line.
In line 35, it writes out a final CHR$(26) (control-Z) to the ATASCII output file — but I do not recall why. It then uses the UNLOAD command to close any open files.
I had to look up UNLOAD, as I had forgotten this existed. The description reads:
“Closes any open files on the disk in the drive you specify. If you do not specify a drive number, the computer uses Drive 0 (or the drive you specified in the DRIVE command).”
Disk Extended BASIC manual
Not much to it, but it worked and it let me write bulletins and such that I could upload to the Atari BBS.
I thought I would share this code in case any CoCo user out there needs to upload some text files to an Atari BBS.
…but if I convert the printf() and run the same code on an Arduino:
void setup() {
  // put your setup code here, to run once:
  Serial.begin(9600);

    uint16_t    val1;
    uint16_t    val2;
    uint32_t    result;

    val1 = 40000;
    val2 = 50000;

    result = val1 + val2;

    //printf ("%u + %u = %u\n", val1, val2, result);
    Serial.print(val1);
    Serial.print(" + ");
    Serial.print(val2);
    Serial.print(" = ");
    Serial.println(result);
}

void loop() {
  // put your main code here, to run repeatedly:

}
This gives me:
40000 + 50000 = 24464
…and this was the source of a bug I introduced and fixed at my day job recently.
Tha’s wrong, int’it?
I tend to write alot of code using the GCC compiler since I can work out and test the logic much quicker than repeatedly building and uploading to our target hardware. Because of that, I had “fully working” code that was incorrect for our 16-bit PIC24 processor.
In this case, the addition of “val1 + val2” is being done using native integer types. On the PC, those are 32-bit values. On the PIC24 (and Arduino, shown above), they are 16-bit values.
A 16-bit value can represent 65536 values in the range of 0-65535. If you were to have a value of 65535 and add 1 to it, on a 16-bit variable it would roll over and the result would be 0. In my example, 40000 + 50000 was rolling over 65535 and producing 24464 (which is 90000 – 65536).
You can see this happen using the Windows calculator. By default, it uses DWORD (double word – 32-bit) values. You can do the addition just fine:
You see that 40,000 + 50,000 results in 90,000, which is 0x15F90 in hex. That 0x1xxxx at the start is the rollover. If you switch the calculator in to WORD mode you see it gets truncated and the 0x1xxxx at the start goes away, leaving the 16-bit result:
Can we fix it?
The solution is very simple. In C, any time there is addition which might result in a value larger than the native int type (if you know it), you simply cast the two values being added to a larger data type, such as a 32-bit uint32_t:
void setup() {
  // put your setup code here, to run once:
  Serial.begin(9600);

    uint16_t    val1;
    uint16_t    val2;
    uint32_t    result;

    val1 = 40000;
    val2 = 50000;

    // Without casting (native int types):
    result = val1 + val2;

    //printf ("%u + %u = %u\n", val1, val2, result);
    Serial.print(val1);
    Serial.print(" + ");
    Serial.print(val2);
    Serial.print(" = ");
    Serial.println(result);

    // Wish casting:
    result = (uint32_t)val1 + (uint32_t)val2;

    Serial.print(val1);
    Serial.print(" + ");
    Serial.print(val2);
    Serial.print(" = ");
    Serial.println(result);
}

void loop() {
  // put your main code here, to run repeatedly:

}
Above, I added a second block of code that does the same add, but casting each of the val1 and val2 variables to 32-bit values. This ensures they will not roll over since even the max values of 65535 + 65535 will fit in a 32-bit variable.
The result:
40000 + 50000 = 24464
40000 + 50000 = 90000
Since I know adding any two 16-bit values can be larger than what a 16-bit value can hold (i.e., “1 + 1” is fine, as is “65000 + 535”, but larger values present a rollover problem), it is good practice to just always cast upwards. That way, the code works as intended, whether the native int of the compiler is 16-bits or 32-bits.
As my introduction of this bug “yet again” shows, it is a hard habit to get in to.
Once again, oddness from floating point values took me down a rabbit hole trying to understand why something was not working as I expected.
Earlier, I had stumbled upon one of the magic values that a 32-bit floating point value cannot represent in C. Instead of 902.1, a float will give you 902.099976… Close, but it caused me issues due to how we were doing some math conversions.
float value = 902.1;
printf ("value = %f\n", value);
To work around this, I switched these values to double precision floating point values and now 902.1 shows up as 902.1:
double value = 902.1;
printf ("value = %f\n", value);
That example will indeed show 902.100000.
This extra precision ended up causing a different issue. Consider this simple code, which took a value in kilowatts and converted it to watts, then converted that to a signed integer.
That looks simple enough, but the output shows it is not:
kw   : 64.600000
watts: 64600.000000
int32: 64599
Er… what? 64.6 multiplied by 1000 displayed as 64600.00000 so that all looks good, but when converted to a signed 32-bit integer, it turned in to 64599. “Oh no, not again…”
I was amused that, by converting these values to float instead of double it worked as I expected:
Apparently, whatever extra precision I was gaining from using double in this case was adding enough extra precision to throw off the conversion to integer.
I don’t know why. But at least I have a workaround.
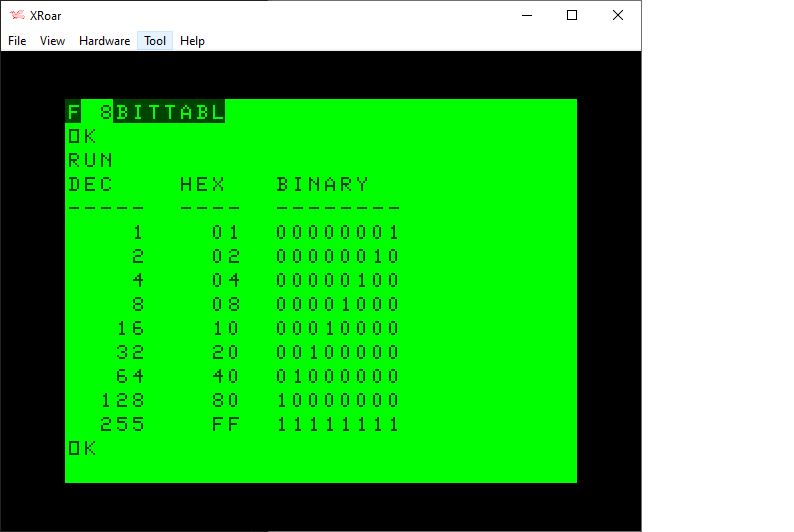
When dealing with bits in Color BASIC, we have AND, OR and NOT. Unfortunately, we can really only use these on values 15-bits or less. For example, here is a table represent various 8-bit values in the range of 0-255:
We have no problem using 8-bit values with standard Color BASIC. Here is my routine that will print out the bits of any 8-bit value:
0 REM 8BITS.BAS
10 DIM BT(7):FOR BT=0 TO 7:BT(BT)=2^BT:NEXT
20 INPUT "VALUE     ";Z
30 GOSUB 500:GOTO 20
500 REM SHOW Z AS BINARY
510 FOR BT=7 TO 0 STEP-1
520 IF Z AND BT(BT) THEN PRINT "1"; ELSE PRINT "0";
530 NEXT
540 PRINT Z:RETURN
Here is a program using that routine that will print out a similar table:
0 REM 8BITTABL.BAS
10 DIM BT(7):FOR BT=0 TO 7:BT(BT)=INT(2^BT):NEXT
20 PRINT "DEC    HEX   BINARY"
30 PRINT "-----  ----  --------"
40 FOR I=0 TO 7:Z=INT(2^I)
50 GOSUB 100
60 NEXT
70 Z=255:GOSUB 100
80 END

100 REM PRINT TABLE ENTRY
110 PRINT USING"#####    ";Z;
120 IF Z<&H10 THEN PRINT "0";
130 PRINT HEX$(Z);"  ";
140 GOSUB 500
150 RETURN

500 REM SHOW Z AS BINARY
510 FOR BT=7 TO 0 STEP-1
520 IF Z AND BT(BT) THEN PRINT "1"; ELSE PRINT "0";
530 NEXT
540 PRINT:RETURN
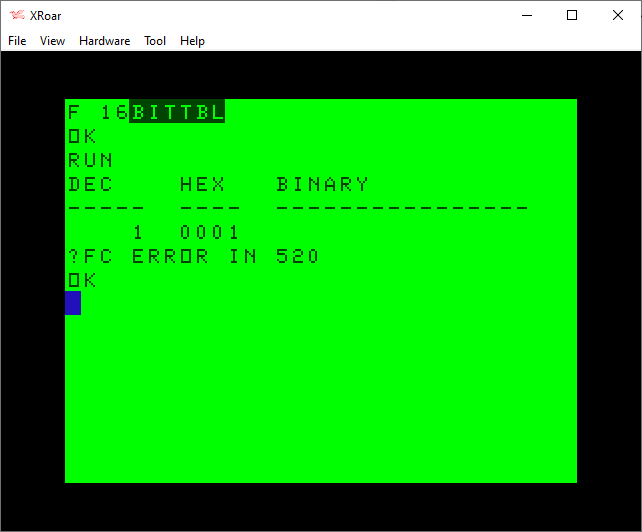
When I started experimenting with bits like this, I tried to modify my routine to work with 16-bit values. It did not work:
0 REM 8BITTABL.BAS - DOES NOT WORK!
10 DIM BT(15):FOR BT=0 TO 15:BT(BT)=INT(2^BT):NEXT
20 PRINT "DEC    HEX   BINARY"
30 PRINT "-----  ----  ----------------"
40 FOR I=0 TO 15:Z=INT(2^I)
50 GOSUB 100
60 NEXT
70 Z=255:GOSUB 100
80 END

100 REM PRINT TABLE ENTRY
110 PRINT USING"#####  ";Z;
120 IF Z<&H10 THEN PRINT "0";
121 IF Z<&H100 THEN PRINT "0";
122 IF Z<&H1000 THEN PRINT "0";
130 PRINT HEX$(Z);"  ";
140 GOSUB 500
150 RETURN

500 REM SHOW Z AS BINARY
510 FOR BT=15 TO 0 STEP-1
520 IF Z AND BT(BT) THEN PRINT "1"; ELSE PRINT "0";
530 NEXT
540 PRINT:RETURN
A bit of investigation revealed that AND could not operate on values greater than 32767 (&H3FFF in hex):
I did not understand why, but I expected it has something to do with integer values being treated as signed values, as if this was an INT16 (−32768 to +32767 range) rather than a UIN16 (0-65535 range).
rflberg to the rescue
I had recently posted a series of YouTube videos discussing bits in Color BASIC. My most recent one showed a program I wrote that demonstrated AND, OR and NOT operations:
The program I demonstrated looked like this:
0 REM ANDOR.BAS
10 DIM BT(7):FOR BT=0 TO 7:BT(BT)=INT(2^BT):NEXT
20 INPUT "VALUE     ";V
30 PRINT "(A/O/N)";
40 A$=INKEY$:IF A$="" THEN 40
50 IF A$="A" THEN M=0:PRINT "AND";:GOTO 90
60 IF A$="O" THEN M=1:PRINT "OR ";:GOTO 90
70 IF A$="N" THEN M=2:PRINT "NOT":GOTO 100
80 SOUND 1,1:GOTO 40
90 INPUT O
100 PRINT:PRINT "    ";:Z=V:GOSUB 500
110 IF M=0 THEN PRINT "AND ";:Z=O:GOSUB 500:Z=V AND O:PRINT "    ";:GOSUB 500
120 IF M=1 THEN PRINT "OR  ";:Z=O:GOSUB 500:Z=V OR O:PRINT "    ";:GOSUB 500
130 IF M=2 THEN PRINT "NOT ";:Z=NOT V:GOSUB 500
140 PRINT:GOTO 20

500 REM SHOW Z AS BINARY
510 FOR BT=7 TO 0 STEP-1
520 IF Z AND BT(BT) THEN PRINT "1"; ELSE PRINT "0";
530 NEXT
540 PRINT:RETURN
In the video I explain how it works, somewhat, but you will notice it works only on 8-bit values. Because I did not know a way to make it work.
However, in the comments, use rflberg left a few comments:
IF you want to see the full bits change the program to this:
10 DIM BT(15):FOR BT=0 TO 15:BT(BT)=2^BT:NEXT 501 IF Z<0 THEN PRINT”1″; ELSE PRINT”0″; 510 FOR BT=14 TO 0 STEP -1
rflberg (via YouTube)
I was intrigued. The modifications did not work for me, but a few additional comments help me understand the intent:
-1 is actually 1111111111111111 and 255 is 0000000011111111. It computes numbers -32768 to 32767. Negative numbers the most significant bit is a 1 and positive numbers is a 0. … -32768 is 1000000000000000 and 32767 is 0111111111111111
rflberg (via YouTube)
I experimented with this for awhile last night, and now I think I understand it. AND, NOT and OR allow you to pass in 0 to 32677 just fine. But, you can also pass in -32768 to -1 as well! It seems to be using the high bit (bit 15) to indicate a negative value. The explanation was to simply use negative values to make AND, NOT and OR see that bit.
The code modification would work if I passed in 0-32767 for the normal 15-bit range then -32768 to 1 to represent the high-bit range. I should be able to modify my routine to do this automatically.
I could use standard bit values for bits 0 to 14 (my BT array values of 1, 2, 4, 8, 16, 32, 64, 128, 256, 512, 1024, 2048, 4096, 8192, and 16384, just like in the earlier table), and then have a special case for bit 15 — a value of -32768 — which I would have in the array as BT(15)=-32768.
Then, in the print bit routine I could check to see if the value was greater than 32767, and turn it in to a negative number by subtracting 65536. (i.e., 32767 would be fine, but 32768 would turn in to -32768).
Since I print out the integer value after the bit display, I decided to make a temporary (altered) variable Z2, and retain the user’s intended Z value. This means I could pass in 32768 and it would print 32768, but would be really using -32768.
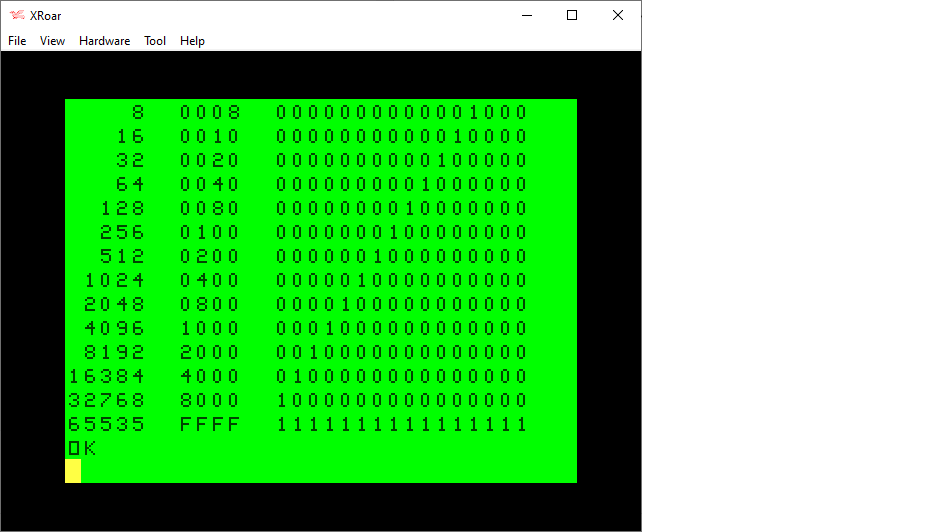
I ended up with a minor modification to my program, giving me this routine that will display the bits of any 16-bit value (0-65535):
0 REM 16BITS.BAS
1 REM WORKS THANKS TO rflberg
10 DIM BT(15):FOR BT=0 TO 14:BT(BT)=INT(2^BT):NEXT:BT(15)=-32768

20 INPUT "VALUE     ";Z
30 GOSUB 500:GOTO 20
500 REM SHOW Z AS BINARY
505 IF Z>32767 THEN Z2=Z-65536 ELSE Z2=Z
510 FOR BT=15 TO 0 STEP-1
520 IF Z2 AND BT(BT) THEN PRINT "1"; ELSE PRINT "0";
530 NEXT
540 PRINT Z;Z2:RETURN
Using this updated routine, I modified my table printing program to handle 16-bits:
0 REM 8BITTABL.BAS
1 REM WORKS THANKS TO rflberg
10 DIM BT(15):FOR BT=0 TO 14:BT(BT)=INT(2^BT):NEXT:BT(15)=-32768
20 PRINT "DEC    HEX   BINARY"
30 PRINT "-----  ----  ----------------"
40 FOR I=0 TO 15:Z=INT(2^I)
50 GOSUB 100
60 NEXT
70 Z=65535:GOSUB 100
80 END

100 REM PRINT TABLE ENTRY
110 PRINT USING"#####  ";Z;
120 IF Z<&H10 THEN PRINT "0";
121 IF Z<&H100 THEN PRINT "0";
122 IF Z<&H1000 THEN PRINT "0";
130 PRINT HEX$(Z);"  ";
140 GOSUB 500
150 RETURN

500 REM SHOW Z AS BINARY
505 IF Z>32767 THEN Z2=Z-65536 ELSE Z2=Z
510 FOR BT=15 TO 0 STEP-1
520 IF Z2 AND BT(BT) THEN PRINT "1"; ELSE PRINT "0";
530 NEXT
540 PRINT:RETURN
Tada! Thanks for those great YouTube comments, I now have a workaround to doing bit detection on all 16 bits. Thank you very much, rflberg!
How can a popular consumer product have a hard-coded WiFi password that gives access to all your photos and videos? Even worse, how can it have a non-encrypted telnet server (which even Windows and macOS have removed) that lets one log in as the root user without needing a password?
Since this information has been public for at least almost a year, and the problem remains in the most recent firmware update (dated 1/22/2022 as of this writing), either Insta360 is unaware of the problem or doesn’t think it is a problem.
Either way, I think I’m going to change the root password on mine, and a REDDIT reply says you can change the WiFi password if you don’t mind manually connecting WiFi to the camera each time.
Baby steps.
Until next time…
Additional Details
WiFi password is reportedly generated by Bluetooth, and ends up in a temporary file created each time:
/tmp/wpa_supplicant.conf
The script that generates this file is in /usr/local/share/script/
There, I see places where AP_PASSWD is set, overwriting a default of 1234567890 listed in wifi.conf/wifi.ap.conf.
ap_start.sh may be the one (AP = access point).
I will share details on if there is any easy way to alter the password from the default, assuming the Insta360 app allows that. My thought is generating a new file on startup and making it read-only so the app cannot overwrite it.