Though, when I bought it, it was significantly cheaper than today’s price.
For “some time now” (many months) I have been seeing this popup on my computer:
Sandisk ejection notice.
Until recently, I had assumed Apple changed something and when I “eject” and the icon disappears from the desktop it really was not ejected yet. Perhaps some background cleanup was being done that didn’t use to happen. I would then eject using Disk Utility instead, and wait for the item to become grey, indicating fully un-mounted.
However, now that I am watching for this, I will see multiple alerts like this piled up in my Notification Center in the morning. This one, for example, was after I cleared all my notifications yesterday. I have not touched the drive or intentionally ejected it. Meanwhile, the four other drives plugged up are behaving fine.
And this drive is plugged directly into my computer versus the others going into a Caldigit TS3 thunderbolt dock. I would have expected more issues from going though a dock than connecting directly.
I am posting this to get it into the search engines. Anyone else ran into this?
In the old 8-bit Microsoft BASICs, the tokenizer routine scans the input line and converts keywords into one or two byte tokens. This crunches the line down so it takes up less memory, and speeds up execution since the detokenizer just has to grab a token then run the related function. If BASIC were stored as ASCII text, it would have to scan the line text and parse multiple bytes to figure out it is a “PRINT” versus just looking at a one byte token.
In Color BASIC on the Radio Shack Color Computer, the tokenizer needs a space between variable names and keywords so it can tell where the variable stops and the keyword begins. For example:
IFSC=100THEN500
That line works fine, since “SC” (a score variable in this case) is followed by an equal sign. BASIC can find it easily. But if you were comparing against another variable:
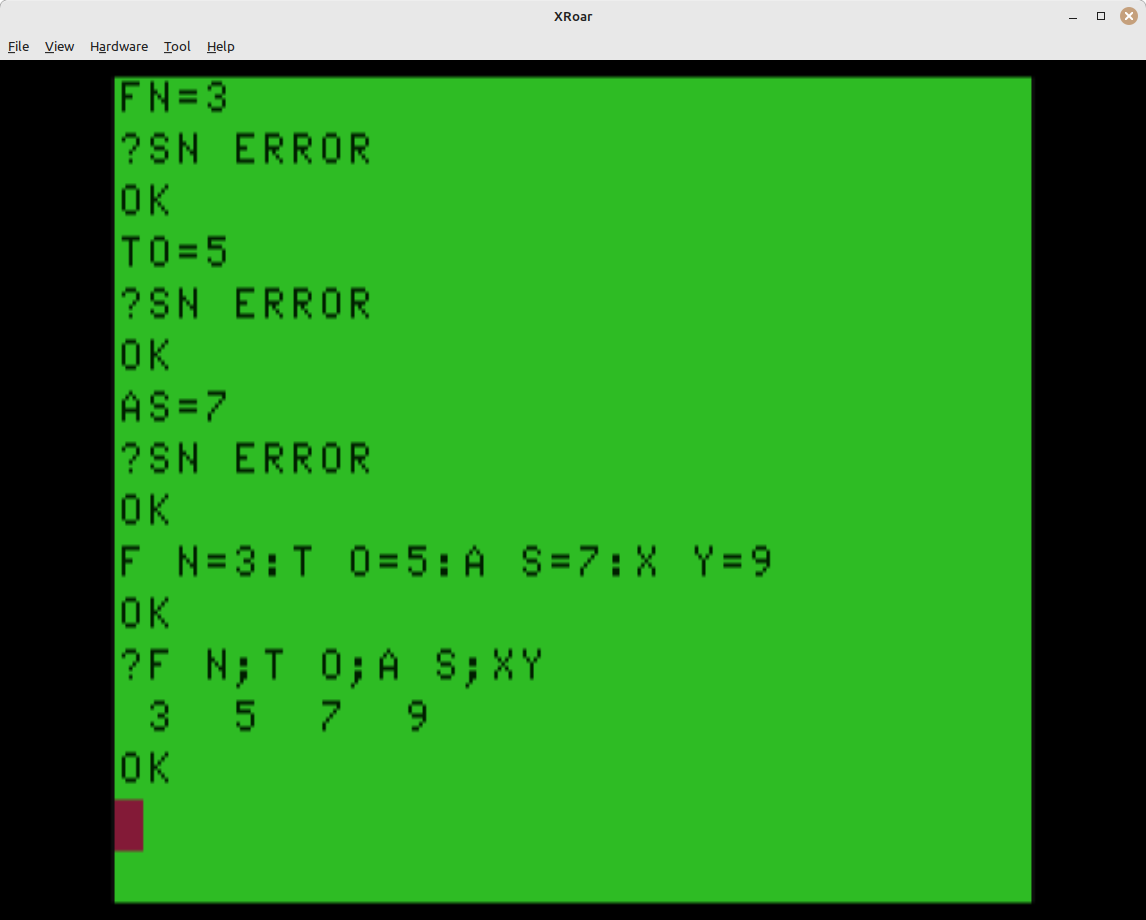
IFSC>HSTHEN500
…you would get an ?SN ERROR on that line. I believe this is because Color BASIC “supports” longer variable names, but only honors the first two characters. Thus, these are all the same variable:
LO=1
LONG=1
LONGER=1
LONGEST=1
They are recognized as LO In the “IFSC>HSTHEN500” example, how is BASIC to know that we are using “HS” versus “HST” or even “HSTHEN” as a variable? It must be scanning until it hits something that is clearly not part of a variable name.
To make things even more confusing — variable names begin with a letter and can end with a number (or numbers, that are ignored), you can make variable names like this:
HSTHEN500=10
OK

PRINT HSTHEN500
10
And with that understanding, of course a space is required after variables before the following token. You have to add one between the variable and the next keyword:
IFSC>HS THEN500
BASIC can easily figure out where SC starts since a variable cannot contain a “>”, but it needs the space to know where HS ends. Thus, a FOR/NEXT loop like this requires spaces.
I fired up the “work in progress” Tandy CoCo engine in the cool Clock Signal emulator to test it out.
And then VIC-20 enters the arena…
But my VIC-20 did not need the space. Its parser can figure this out. Once again, I used the Clock Signal emulator which also has VIC-20.
When I was relearning VIC-20 a few years ago, I ran into this difference and wondered why. As I began revisiting it recently, I thought maybe the VIC-20 does not allow longer variable names, and has a better way to tell where a variable ends? I tried to use “START=1” but got an error. “Ah, it must not!” But then I found “ST=1” also did not work, and assumed “ST” must be some kind of reserved keyword.
Oddly, “AAAAA=1” works, and shows the same value as “AABBB=5”. For that test, it works like Color BASIC.
But “LO=1” works while “LON=1” does not work. Is LON some keyword too??? I clearly never learned all the keywords when I had my VIC.
SUPERMAN=1
SUPERGIRL=2

PRINT SU
2
I guess the VIC-20 BASIC does work like Color BASIC, but with some different keywords making the VIC-20 list of forbidden variables different than the CoCo’s list of forbidden variables. (See that link — I’ve now written about this at least three times, before this post.)
When I had my VIC-20, I did not know Microsoft had created the BASIC it uses. It just says “CBM BASIC” so I’d always thought (back then) that Commodore Business Machines wrote their own BASIC. It wasn’t until the modern Internet that I learned Microsoft wrote the 6502 BASIC used by Commodore. (If you have never dug into this, check it out sometime. There is some interesting history between Microsoft and Commodore. Apparently, that’s what led Microsoft into placing hidden “MICROSOFT” easter eggs in their other BASICs to be able to prove it was their code. But I digress…)
I find this interesting. I do not know 6502 assembly, but I am tempted to try to find the VIC-20 equivalent of “Color BASIC Unravelled” and see if I can learn how the Microsoft 6502 BASIC parser works compared to their 6809 parser.
But hopefully one of you knows, and can tell us all in the comments.
Note for the pedantic: Atari’s Adventure was released in March 1980 for the Atari VCS. That machine was renamed in November 1982 to the Atari 2600. Thus, this game was released for the Atari VCS. Thank you for coming to my TED Talk.
I remember replaying Adventure at a friend’s house when I lived in Mesquite, Texas back in 1980. Although I don’t think I really figured the game out until some year(s) later, at some point I did. Even decades later, I can still fire up the game on my ATGames system and play it all the way through. At some point, I learned how to navigate the mazes and, for whatever reason, that still remains in my memory cells.
When you “master” something (no, I do not claim to be a master; I can merely win the game, eventually) you sometimes try to find other ways to amuse yourself. I am therefore compiling a list of all the Silly Atari VCS Adventure Challenges I can find.
All Objects in One Room Challenge
This is where I started. Carrying every object you find into the same room is easy enough, but you also have to deal with getting the dragons and that stupid bat there. Here is a video I made of doing this some years ago:
“I prefer to lock all the dragons and bat in the white castle and depending on my mood, sometimes with the white key inside to make it impossible for them all to get out and for you to re-enter.”
– Paul B., comment o Atari Facebook page
Well, now I have to try that. I should ask if the dragons have to be alive or dead ;-)
And more?
What other challenges do you have? There are certainly Speed Runs. Should that go here as well?
Leave a comment and let’s begin building the list.
Or, even better, just tell me someone has already done this, and I’ll just point to them. Less work for me :)
Stef, a Happiness Engineer with Jetpack, quickly responded to my support ticket. They have confirmed that my site is not commercial, and reclassified me as a personal site. This will allow me to continue viewing the Jetpack Stats without needing to pay for an upgraded commercial account. Thank you, Stef!
Normally, I don’t think it is fair to complain about “free” stuff. Jetpack does not force ads on my content, so, as far as I can tell, using their plug-in on WordPress for personal sites truly is free. I do, however, pay for a backup service they offer, so at least they get some money out of money.
Sadly, that backup plan is no longer available, and has been replaced by a more expensive offering which I would not be able to justify for a personal site like this. Still, better to have it and not need it, than need it and not have it available.
Today Jetpack Stats informed me I need to upgrade to a commercial plan for this site. For some reason, I have been flagged as a commercial site. Commercial sites can use it free if they have under 5000 visitors a month which, apparently, this humble blog exceeds. That alone is surprising, since I mostly post about a 1980s Radio Shack computer, and embedded C programming ;-)
I just wanted to assure my thousands of ‘bots that scan this site regularly that I:
Have no ads on this site.
Do not request donations.
Do not have affiliate links.
About the closest I ever get to “commercial” is when I put an Amazon link to something ;-)
I thought I’d post this so the Jetpack Support folks have something to see when/if they check out my site to verify my claim.
In Microsoft Extended Color BASIC on the Radio Shack Color Computer, high resolution graphics command were added. There were fancy commands like DRAW for drawing complex designs, then simpler command like LINE and CIRCLE.
Even simpler was the PSET command which would set an individual pixel on the screen. This was the high resolution equivalent of SET in Color BASIC for the text screen (64×32 blocks).
I had a Commodore VIC-20 at the time, but remember getting a call from my Radio Shack sales guy, Don, to tell me they had just gotten in a new Extended BASIC that I should come out. I did, and fell instantly in love with being able to do things with simple commands versus confusing POKEs on my VIC.
I read through the manual in the store, and created programs on their CoCo. One of them used PSET to randomly place dots on the screen:
Use the SCREEN 1,0 color set and you get different colors:
The PMODE 4 screen (256×192) was only two colors, white and black, but TV set (composite video, NTSC) created artifact colors that made it look weird. The emulators try to simulate this effect:
Depending on the mode the CoCo power up, even column pixels would be red and odd would be blue, or the reverse. While the CoCo 3’s video hardware could control this, on the CoCo 1 and 2 it was “random.” You could keep hitting the rest button until the colors flipped. Thus, many CoCo 1/2 games started up to a solid red (or blue) screen, expecting you to know what to do to get it the color the game wanted, or, if the programmer was fancy, it might even tell you what to do:
Paper Route by Diecom
And if the programmer was really fancy they could just handle it in software based on what you told it you saw (“Press 1 if the screen is RED, 2 if it is blue” kind of thing.)
NOTE: I wanted to include a screenshot of this but I cannot remember which games worked like that. If you know, leave a comment and I’ll update this post.
Get to the PPOINT!
PSET would put a pixel on the screen using a specific color:
The syntax is:
PSET (X, Y, C)
The C was the color, and it accepted a value of 0-8. But, you did not get nine colors on any of the high resolution screens. You got either 2 (black/green or black/buff or using the alternate color set), or 4 (green/yellow/blue/red or buff/cyan/magenta/orange using the alternate color set). You had to know the range of the 4 color values to use for the mode you were using.
Or did you?
No. The C value could be 0-8 on any graphics screen, so most programs I saw used 0-1 for two color, or 0-3 for four color. And that’s not at all how Radio Shack described it in the manual… but it worked and kept us from having to memory color ranges based on modes. (See my 2024 article, link at the top of this one, for a table showing how this worked.)
And my point is … PPOINT returns the value that “should” be used — not the value you PSET there! If you were using a screen that wanted colors 5-6-7-8 and you used colors 1-2-3-4, you could PSET color 1, but when you would PPOINT that pixel, you got back a 5 — the same color, but the value you were supposed to be using.
Thus, anyone who made use of PPOINT learned this. I did not use it, and I never learned it until 2024 in the comments to that earlier post.
So for fun, I wrote this program that cycles through each PMODE (0 to 4) and then PSETs each color value (0-8) to a pixel and then reads the pixel color back using PPOINT. It prints it out so we can see this:
The first value of the column is the C value that was used in PSET. The number after it is the return value from PPOINT. So “1) 5” means PSET(0,0,5) and P=PPOINT(0,0).
PMODE 0, PMODE 2 and PMODE 4 are a two color modes, so the range of colors you can use (0-8) are just the same two colors over and over – 0 and 5. PMODE 1 and PMODE 3 are four color modes, so you see the range repeating the same four color values over and over, different depending on the mode.
And, if you used the alternate color set (SCREEN 1,1), you got a different set of color values:
Here is the code:
10 'PPOINT0.BAS
20 'SET PIXEL USING COLOR
30 'THEN PPOINT THE COLOR
40 CLS
50 PRINT@6,"PMODES - SCREEN 1,0:"
60 PRINT STRING$(32,"-");
70 FOR M=0 TO 4
80 PMODE M,1:PCLS:SCREEN 1,0
90 PRINT:PRINT@64+M*7+1,M;
100 FOR C=0 TO 8
110 GOSUB 160
120 NEXT:NEXT

130 GOTO 130

140 'SET PIXEL WITH PSET
150 'GET PIXEL COLOR
160 PSET(0,0,C):P=PPOINT(0,0)
170 PRINT@96+M*7+32*C,USING "#) #";C;P;
180 RETURN
And slight changes for the other color set:
10 'PPOINT1.BAS
20 'SET PIXEL USING COLOR
30 'THEN PPOINT THE COLOR
40 CLS
50 PRINT@6,"PMODES - SCREEN 1,1:"
60 PRINT STRING$(32,"-");
70 FOR M=0 TO 4
80 PMODE M,1:PCLS:SCREEN 1,1
90 PRINT:PRINT@64+M*7+1,M;
100 FOR C=0 TO 8
110 GOSUB 160
120 NEXT:NEXT

130 GOTO 130

140 'SET PIXEL WITH PSET
150 'GET PIXEL COLOR
160 PSET(0,0,C):P=PPOINT(0,0)
170 PRINT@96+M*7+32*C,USING "#) #";C;P;
180 RETURN
It dawns on me now that a BASIC program could detect what screen was being used by PSETting something and then reading it back with PPOINT. Based on the number that returned, you could tell which PMODE and SCREEN was being used.
If you have followed the rebirth of Commodore, you may be aware they brought out a new Commodore 64 computer. This model was using an FPGA to simulate/recreate the hardware in the original 1980s home computer, with a claim of being 99.9% compatible with existing Commodore 64 stuff.
What came next was a surprise (and even shock) to most Commodore followers: a flip phone.
The new Commodore has already taken some heat from fans and had to change an announced policy. They initially planned to lock down their new Commodore 64 to only work with the official firmware. That decision was not popular, and they changed their plans.
It seems there has been enough puzzled comments on the new flip phone that the CEO just sent out an e-mail. Here is an excerpt:
“A few years ago, my priorities changed. I became a father. And somewhere between the night feeds and the realization that I was spending entire evenings chasing likes on a glowing rectangle, I had to reckon with the kind of person I actually wanted to be. The conversations that followed, with my partner, with myself, changed my life.
I switched to a flip phone. Not as an experiment. As a decision. It became my daily driver. And I won’t pretend the first few weeks were easy. I’d catch myself reaching for it out of habit, standing in a checkout line with nothing to scroll. So I snapped it shut, put it away, and looked up. Turns out there was quite a lot going on.
But that flip phone was too dumb. And the others available were too smart. What I wanted just didn’t quite exist. I didn’t want social media, or a browser. It let the wrong things in. But I need apps like Uber, Maps, WhatsApp, HQ Music Player, and a 4K Camera. Turns out a lot of people were wrestling with the same thing. Parents. Students. People who missed being present. People who wanted the convenience of modern apps without the endless feeds. So together with a team of engineers and partners, we started building what we couldn’t find: a phone that sits comfortably between dumb and smart.
That’s why we built the Callback.”
– e-mail from Commodore, 6/22/2026
I see device addiction all around me. It is common for someone to reach for their phone and start dealing with messages as if they were life or death and can’t possibly wait until after supper. Folks are on their phones in movie theaters, in their cars at red lights, and while in bed as soon as their alarm goes off, or before going to sleep.
Such a device might be the only way these folks could break their addictions. It took me not having cell phone service for 8 years to break mine, and I still think I use my phone too much these days ;-)
But … I just wanted to add this:
Any smart phone is a dumb phone if you don’t install TikTok, Facebook, Instagram, Angry Birds, etc.
Read that again for impact.
Any smart phone can be a dumb phone. Just do not install the apps. Or if you have them installed, delete them. But folks won’t do that.
Do we expect folks who can’t delete their favorite apps to buy a whole new phone?
We shall see.
I’d kinda like to have one, but I’d just remove all the apps from an iPhone before I’d carry a flip phone in 2026.
Unless this new Commodore flip phone has a better camera.
There are clear advantages to writing code out in the simplest and longest form. Not only is it easier to understand by programmers less talented than you (after all, you are super smart, and most people around you are super dumb), it can save time later when someone is trying to find that code. At least, in this example.
Consider this logging snippet:
if (some_condition)
{
     log ("Some condition is ACTIVE.");
}
else
{
     log ("Some condition is INACTIVE.");
}
But, you are super smart, so you write this in a more clever way. Perhaps something like this:
log ("Some condition is %s.", some_condition ? "ACTIVE" : "INACTIVE");
…or, heck, because you are super SUPER smart, maybe you save two bytes by doing it like this:
log ("Some condition is %sACTIVE.", some_condition ? "" : "IN");
I like that last one. That’s super SUPER smart.
And, in the case of embedded programming, perhaps saving a few bytes makes the difference between code compiling, or not. I have now faced multiple projects at two different companies where I had to do tricks like that just to get new code to fit in limited program space of the hardware I was using.
At my day job I was trying to figure out what was happening leading up to an entry I saw in the system log of the program. Lets pretend it was the entry in my example:
Some condition is INACTIVE.
My first instinct was to search for that phrases in the source code and see where it gets logged. If the code had been written “dumb”, I would have found it, and been working on it.
But it was not found.
Hmmm, well, let me search just for “INACTIVE”.
Had this been done the second way, I would have found it, and been working on it.
But it was not found.
Okay, let me try a third search for “Some condition is”… And I found it.
My point is, dumb code would have saved me time. And, sadly, *I* wrote this code some years ago and was doing it a “smarter” way. No big deal, just an extra minute … but I do wonder how many “extra minutes” we waste every year due to smarter code. I am pretty sure the Clean Code movement focuses on this type of stuff.
And don’t get me started on how I like to do “nicely formatted” output in source code. In C you can concat longer strings. Sppose you have some long 80 column text string like this:
char *string = "This is a really long line that I need to print in my program.";
That line could be so long it wraps around on an 80 column printout or screen. Many coding standards ask you to keep lines within 80 columns. C allows you to contact constant strings like this:
char *string = "This is a really long line that "
               "I need to print in my program.";
I have seen this at most companies I have worked for (which is actually how I became aware of this). BUT, if you were trying to search for something where the split it, like “that I need”, you won’t find it. I have certainly ran into that many times over the years ;-)
No point. No complain. No suggestions. Just pointing out that, sometimes, smarter code wastes time later.
Especially when folks not as super smart as you try to work with it ;-)
And, a side effect of the smart code is that I wasted even more time blogging about it.
TL:DNR – This is stupid. Don’t bother trying it :)
Here is another stupid thing I had to try in Color BASIC. See also my Stupid VARPTR tricks post.
Suppose you want to horizontally scroll a string across the CoCo’s 32-column text screen. You can build a long string (up to 255 characters) and then use a FOR/NEXT loop and MID$ to print 32 characters from within that longer string.
On a CoCo 3, you get a timer result of around 330-335. On a CoCo 1/2, it is slightly faster showing around 295. (There are less BASIC keyword tokens to look for so Color BASIC is faster than Exended BASIC which is faster than Super BASIC.)
When I first started benchmarking BASIC here years ago, I was using an emulator that only ran CoCo 1/2, and it never occurred to me it would be different on the CoCo 3. #TheMoreYouKnow
As I have discussed in earlier string theory articles (quite a few relating to this topic), MID$, LEFT$ and RIGHT$ all need to create a new string containing data from the original. Suppose you have this:
A$="THIS IS A TEST"
If you trim the string to the first four characters, like this:
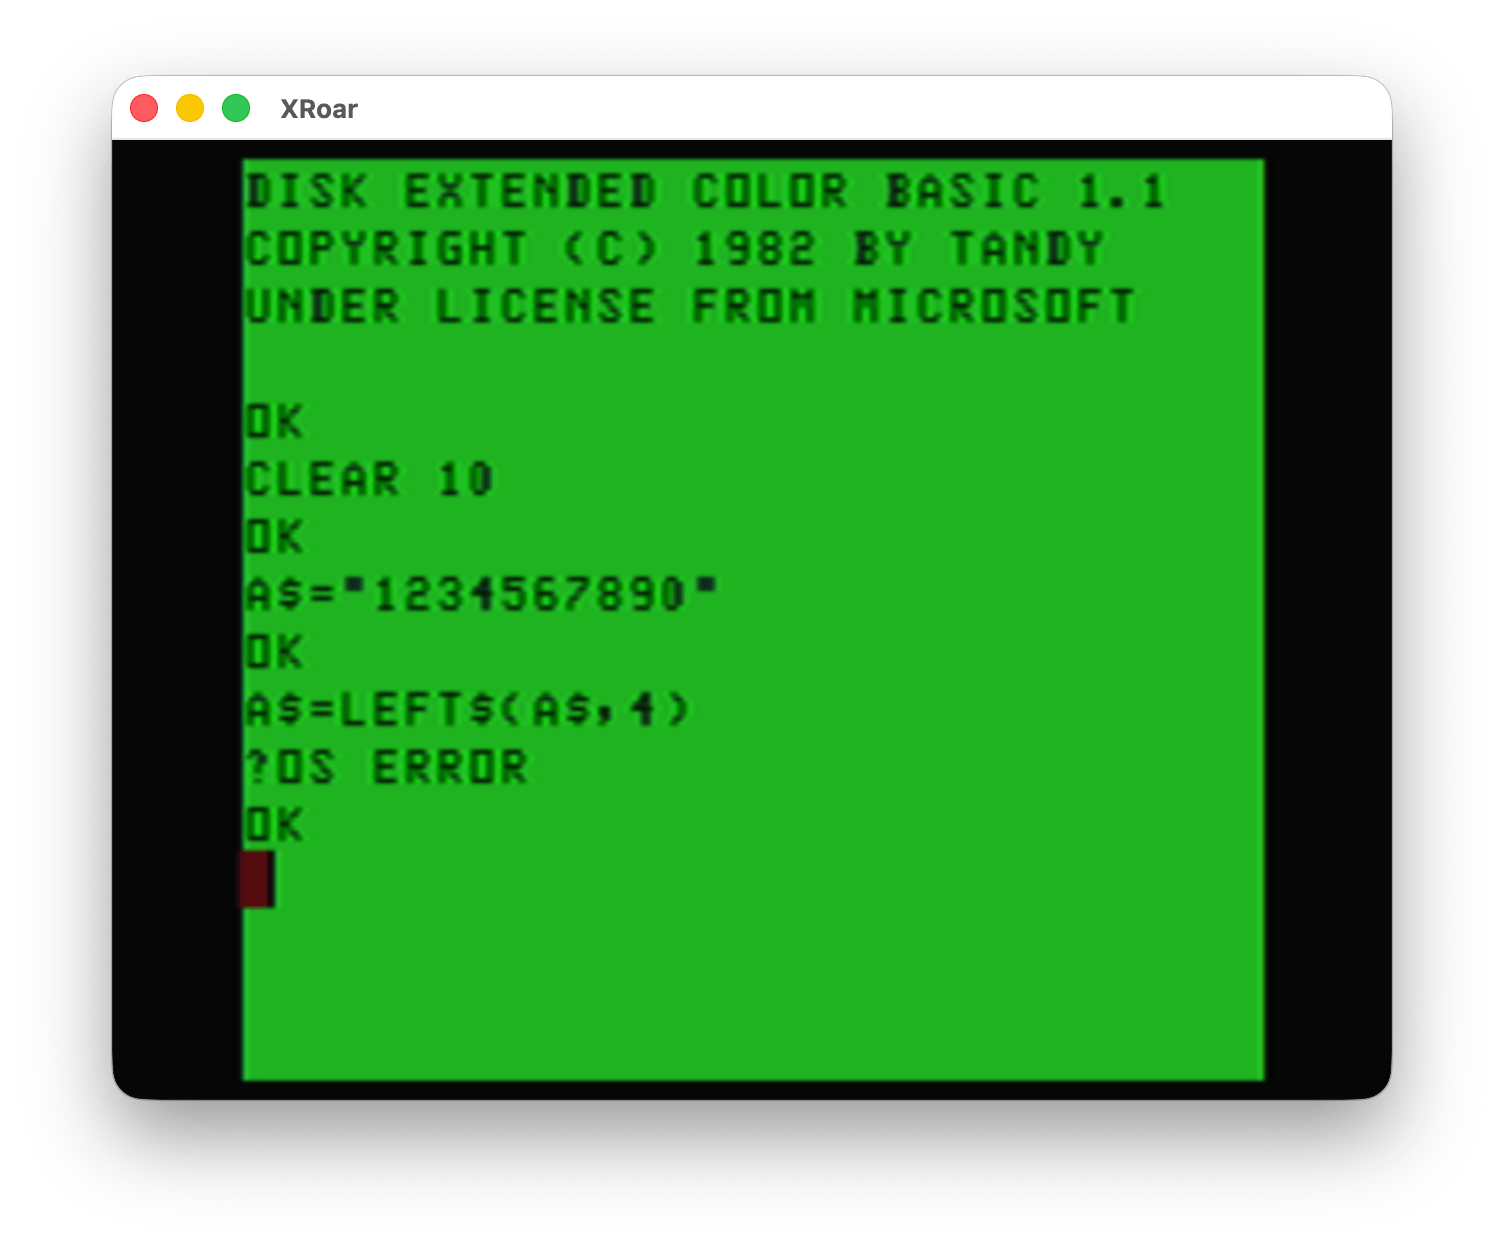
A$=LEFT$(A$,4)
…BASIC is basically doing this:
Allocate new string space for a 4 character string.
Copy the first four characters from A$ into the new string.
Make A$ point to the new string, which leaves the original A$ string memory available for cleanup.
This is why you need extra string memory to use these functions. If you clear JUST enough memory to hold a ten character string, you can’t do any MID$, LEFT$ or RIGHT$ with that string.
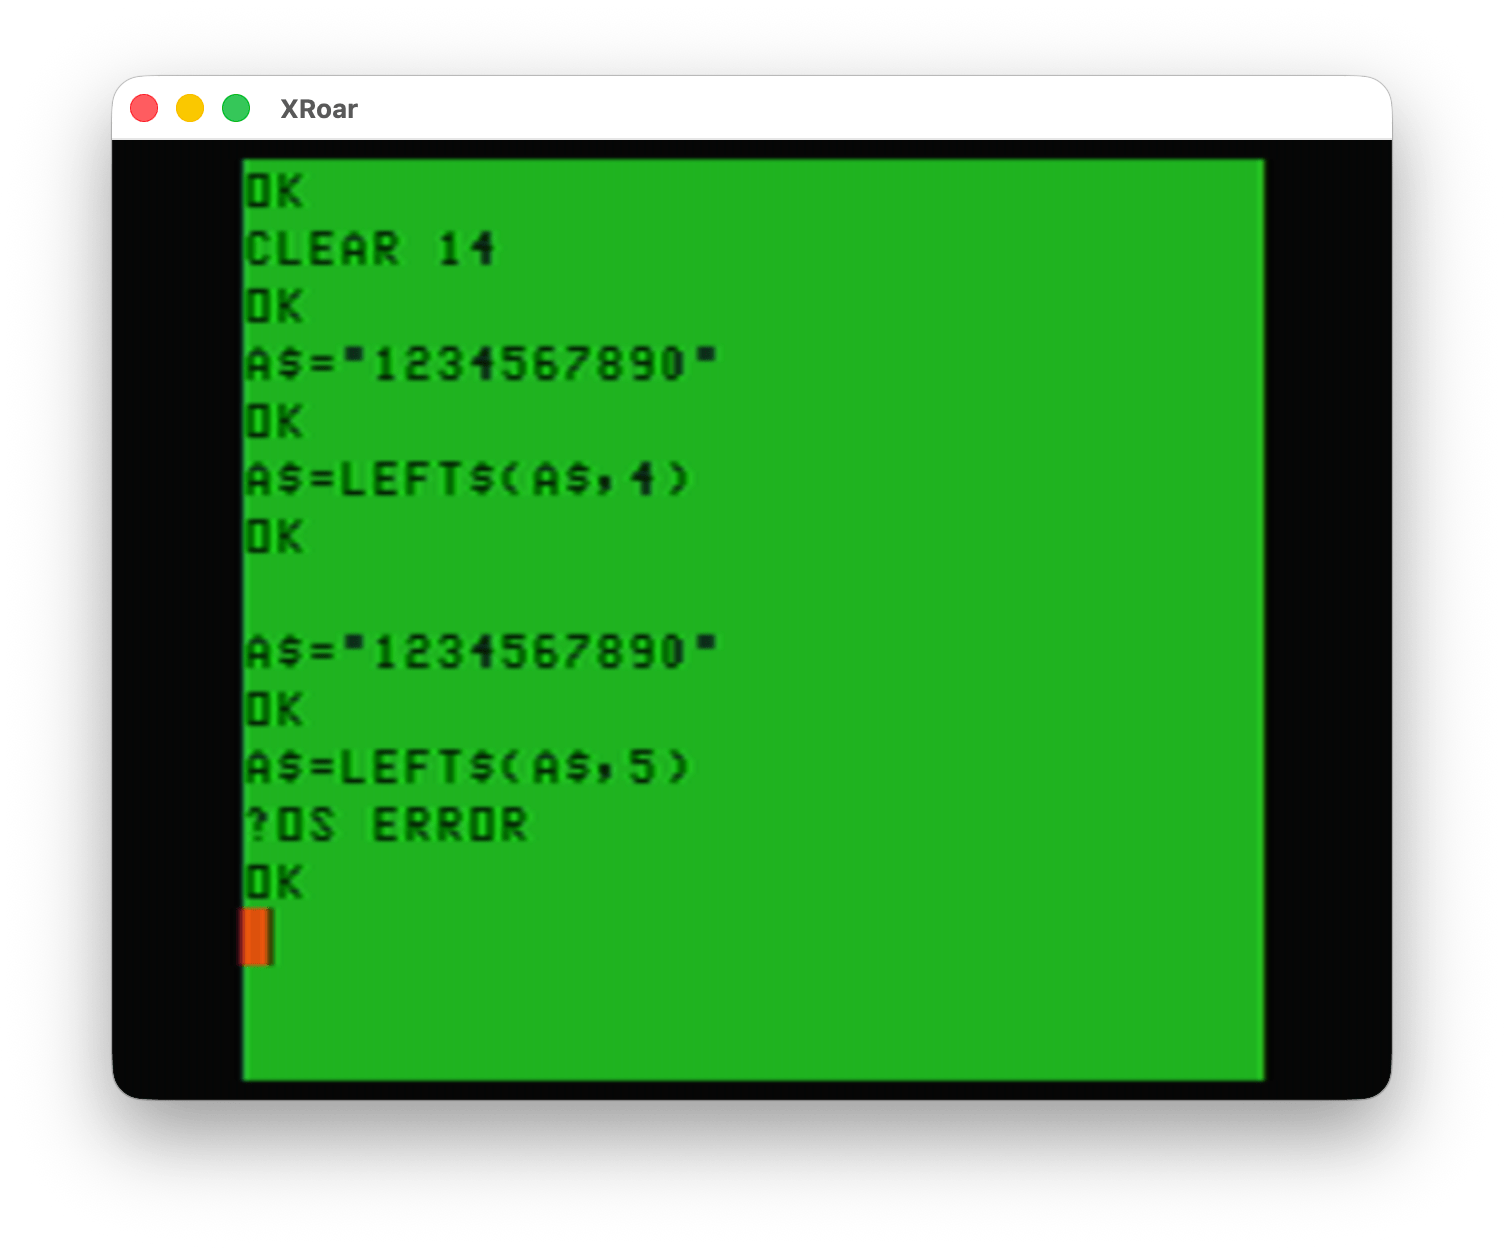
In order to make that work, you need at least 4 extra bytes reserved for string memory so LEFT$ can make the new string before deallocating the original. And if you add 4 bytes but try to use 5, you get that ?OS ERROR (out of string space) still.
So if you have a 255 character string and you use MID$(A$,0,32) to get 32 characters from that string into a new string (or use it directly with PRINT, which will directly access that string memory without a variable needed), it has to allocate 32 bytes from the reserved string memory and copy those 32 bytes over, then you can use it (PRINT or assign to a variable or whatever).
As my sample program runs, it is allocating 32 byte strings and copying 32 bytes over each time through the loop.
Here is my test program. It first builds A$ to contain character 32 (space) to character 255 (end of semigraphics characters) and then pads that with 31 black blocks to be the full 255 character string size.
Starting at line 40 is a loop that will PRINT a substring of 32 characters in a loop, starting at the first character and going to the end, making the line scroll to the left.
When done, it prints how many TIMER ticks it took to do this.
Next, starting in line 70, it makes a new B$ that is a clone of A$. (No, it doesn’t need to clone it. I could have just manipulated A$ and saved a few lines.)
It then gets the address of that string descriptor using VARPTR, and saves the size (at the first byte) and the address of the string data (third and fourth byte). This allows restoring the string after the test, since manipulating strings this way could cause problems with strings and garbage collection.
For this specific example I know that the MSB and LSB of the new string are 126 and 1 on my emulated CoCo. That means I could make the string’s starting address be one higher in that memory by incrementing the second value. Had that second value been 250, once I incremented it 5 times to 255, I’d have to increment the first one and reset the second one to 0. (Clear as mud?)
Let’s just say I got lucky enough for this test, but even if this approach DID work, it would not work on all strings based on where they are in memory. It would need extra code for that, which would slow it down even further.
I POKE to change the size of B$ to 32. Then I can go in a loop POKEing the second byte of the start address up by one each time, and simply PRINTing the string. It will print 32 bytes from wherever it thinks the string data begins. It has no idea those values are being manipulated.
When done, I print the time it took and restore the original B$ values back.
10 'VARMID.BAS
20 CLS:CLEAR 510:DIM A$
30 A$="":FORA=32TO255:A$=A$+CHR$(A):NEXT:A$=A$+STRING$(31,128)
40 TIMER=0
50 FORA=1TO224:PRINT@256,MID$(A$,A,32);:NEXT
60 PRINTTIMER
70 DIM B$,V,O2,O3,S1,S2,SS
80 ' CLONE A$. GET VARPTR OF B$.
90 ' V POINTS TO SIZE
100 ' O2-O3 POINTS TO START
110 B$=A$:V=VARPTR(B$):O2=V+2:O3=V+3
120 ' SS - SAVE SIZE
130 ' S1-S2 - SAVE START
140 SS=PEEK(V):S1=PEEK(O2):S2=PEEK(O3)
150 ' CHANGE SIZE TO 32
160 POKE V,32
170 ' CHANGE START ADDR THEN
180 ' PRINT.
190 TIMER=0
200 FORA=0TO223:POKEO3,S2+A:PRINT@256,B$;:NEXT
210 PRINTTIMER
220 ' RESTORE ORIGINAL STRING
230 POKE V,SS:POKE O2,S1:POKE O3,S2
Sadly, it is only a tiny bit faster, and if I had to take care of both address bytes in the VARPTR memory, it would be slower and, without testing this, I assume slower than just using MID$.
It was a fun experiment, but “sometimes the juice is not worth the squeeze.”


