Online web emulators used to not work on tablets like the iPad due to how keyboard commands were handled. A few years ago I was working with an online emulator and the author confirmed it wasn’t possible due to the mobile browsers only sending keys, instead of “key X down, key X up” sequences (or something like that).
To my surprise, when I checked the JS Mocha CoCo emulator today, it worked on the iPad with a bluetooth keyboard! At some point, something changed and it is now possible to use an external keyboard on a tablet (at least an iPad) and use the emulators. I also spot checked the XRoar Online emulator and it works too, but since it does not currently support keyboard translation, you have to know where the CoCo keys are on a modern keyboard.
Check it out, and please let me know if this also works on android tablets.
It seems like only yesterday that you had a dozens of choices in what computer you could buy. Most were not compatible with the others — and we liked it that way. Software companies, however, probably didn’t. To reach the largest market, they had to write their program multiple times for different systems. My Radio Shack Color Computer, sadly, did not get many of these official ports.
Many things we take for granted today — such as sending text from one computer to another (via e-mail, text, etc.) — were not as simple back then. Not all systems used an industry standard character set, meaning the numeric code that represented a character on one system, might represent a different character on another.
The CoCo used ASCII – “American Standard Code for Information Interchange.” The defined numeric values represented the following characters in this clear and easy to understand chart:
ASCII table from https://en.wikipedia.org/wiki/ASCII
If that chart doesn’t help, you are not alone. Just know that characters 0 to 127 were all defined to represented a standard set of letters, numbers, punctuation, symbols and control codes (such as 8 being BACKSPACE, 13 being CARRIAGE RETURN, etc.).
System like the Atari 400/800 and Commodore PET/VIC-20/64/etc. included non-ASCII graphical symbols in their character set. Each of these systems came up with their own standard — PETSCII from Commodore (which originated on the Commodore PET in 1977), and ATASCII from Atari (which originated on the Atari 400/800 in 1979).
Before WWW there was BBS
One of the first things I ever did with a computer was use one with a modem to dial other computers over a land line telephone. (Kid’s, ask your parents…) Folks would run Bulletin Board System software that let others call their computer and post messages for other folks to read who called in later.
This presented a problem. If the character sets were different between computers, how could an ASCII CoCo user dial in to an Atari ATASCII system or a Commodore PETSCII system?
To solve this problem, some BBS programs on the non-ASCII computers would first ask you if you wanted ASCII or ATASCII (or PETSCII or whatever). For ASCII users, the BBS would then translate the character codes.
Not all systems did this, of course. There were plenty of Commodore-only and Atari-only systems that made use of the extended character set to draw fancy menus and screens that ASCII computers couldn’t view.
However, the modem “terminal programs” that non-ASCII systems ran usually had an ASCII translation mode built in. Thus, a Commodore or Atari user could call any ASCII BBS. While I am sure they existed, I never did see a terminal program for my ASCII CoCo that let it call an ATASCII or PETSCII-only system. (TwilightTerm by SockMaster is similar, allowing a CoCo 3 to view the IBM PC ANSI character set and colors.)
When I lived in Lufkin, Texas, one of the local BBSes was running on an Atari 800 (via BBS Express software) and allowed ASCII systems to call in. This was how I first learned about the differences in ATASCII versus ASCII.
Here is what ASCII characters 32-127 looked like on the CoCo 1 and 2 (characters 0-31 are control codes and such):
Radio Shack Color Computer 32-column text screen ASCII.
And here is the same set of characters on a CoCo 3 40-column screen with row and column numbers (since I had more screen room):
Tandy Color Computer 3 40-column text screen ASCII.
From wikipedia, here is what ATASCII looks like:
ATASCII from https://en.wikipedia.org/wiki/ATASCII
I think this table is much easier to read that the ASCII one, as long as you know hexadecimal.
Starting at character 32 (0x20) is a space, followed by special characters and the alphabet. Although there are some symbol differences (like the ^ on CoCo being a diamond on the Atari), the main letters, numbers and symbols are the same.
But, if I were to write up a text file and send it to the Atari BBS so they could post it, it would not work. ASCII uses 13 (CR, carriage return) as a line ending, but ATASCII uses 155 (ATASCII CR). If I translated line endings, and avoided using things like ^, brackets (or curly braces), etc., I could then have a text file the Atari BBS could use.
The amazing ASCII to ATASCII Convert program!
So I wrote a simple ASCII to ATASCII converter:
0 REM ASCII TO ATASCII CONVERT
1 REM BY ALLEN HUFFMAN
2 REM (09/02/87)
3 REM
5 CLEAR1000
10 CLS:PRINT@3,"ASCII TO ATASCII CONVERTER":PRINT@40,"BY ALLEN HUFFMAN":PRINTSTRING$(32,131)
15 PRINT@96,"ASCII FILE TO CONVERT:":LINEINPUT">";F1$:IFF1A$=""THEN15
20 PRINT@192,"NAME OF NEW FILE:":LINEINPUT">";F2$:IFF2$=""THEN15
25 PRINT@289,"CONVERTING ASCII TO ATASCII...":OPEN"I",#1,F1$:OPEN"O",#2,F2$
30 LINEINPUT#1,A$:PRINT@320,A$:PRINT#2,A$+CHR$(155);:IFEOF(1)=0THEN30
35 PRINT#2,CHR$(26);:UNLOAD
40 PRINT@422,"CONVERSION COMPLETE!":END
In line 15, it asks for an INPUT filename (F1$).
In line 20, it asks for an OUTPUT file name (F2$).
In line 25, it opens the first file as input (“I”) and the second file for output (“O”).
In line 30, it loops reading a raw line from the first file, displaying it on the screen (so the user can see what is going on), then writes the text out to the output file with a CHR$(155) at the end and NO ASCII carriage return (by using the semicolon). If end-of-file is not reached, it goes back to 30 to process the next line.
In line 35, it writes out a final CHR$(26) (control-Z) to the ATASCII output file — but I do not recall why. It then uses the UNLOAD command to close any open files.
I had to look up UNLOAD, as I had forgotten this existed. The description reads:
“Closes any open files on the disk in the drive you specify. If you do not specify a drive number, the computer uses Drive 0 (or the drive you specified in the DRIVE command).”
Disk Extended BASIC manual
Not much to it, but it worked and it let me write bulletins and such that I could upload to the Atari BBS.
I thought I would share this code in case any CoCo user out there needs to upload some text files to an Atari BBS.
…but if I convert the printf() and run the same code on an Arduino:
void setup() {
  // put your setup code here, to run once:
  Serial.begin(9600);

    uint16_t    val1;
    uint16_t    val2;
    uint32_t    result;

    val1 = 40000;
    val2 = 50000;

    result = val1 + val2;

    //printf ("%u + %u = %u\n", val1, val2, result);
    Serial.print(val1);
    Serial.print(" + ");
    Serial.print(val2);
    Serial.print(" = ");
    Serial.println(result);
}

void loop() {
  // put your main code here, to run repeatedly:

}
This gives me:
40000 + 50000 = 24464
…and this was the source of a bug I introduced and fixed at my day job recently.
Tha’s wrong, int’it?
I tend to write alot of code using the GCC compiler since I can work out and test the logic much quicker than repeatedly building and uploading to our target hardware. Because of that, I had “fully working” code that was incorrect for our 16-bit PIC24 processor.
In this case, the addition of “val1 + val2” is being done using native integer types. On the PC, those are 32-bit values. On the PIC24 (and Arduino, shown above), they are 16-bit values.
A 16-bit value can represent 65536 values in the range of 0-65535. If you were to have a value of 65535 and add 1 to it, on a 16-bit variable it would roll over and the result would be 0. In my example, 40000 + 50000 was rolling over 65535 and producing 24464 (which is 90000 – 65536).
You can see this happen using the Windows calculator. By default, it uses DWORD (double word – 32-bit) values. You can do the addition just fine:
You see that 40,000 + 50,000 results in 90,000, which is 0x15F90 in hex. That 0x1xxxx at the start is the rollover. If you switch the calculator in to WORD mode you see it gets truncated and the 0x1xxxx at the start goes away, leaving the 16-bit result:
Can we fix it?
The solution is very simple. In C, any time there is addition which might result in a value larger than the native int type (if you know it), you simply cast the two values being added to a larger data type, such as a 32-bit uint32_t:
void setup() {
  // put your setup code here, to run once:
  Serial.begin(9600);

    uint16_t    val1;
    uint16_t    val2;
    uint32_t    result;

    val1 = 40000;
    val2 = 50000;

    // Without casting (native int types):
    result = val1 + val2;

    //printf ("%u + %u = %u\n", val1, val2, result);
    Serial.print(val1);
    Serial.print(" + ");
    Serial.print(val2);
    Serial.print(" = ");
    Serial.println(result);

    // Wish casting:
    result = (uint32_t)val1 + (uint32_t)val2;

    Serial.print(val1);
    Serial.print(" + ");
    Serial.print(val2);
    Serial.print(" = ");
    Serial.println(result);
}

void loop() {
  // put your main code here, to run repeatedly:

}
Above, I added a second block of code that does the same add, but casting each of the val1 and val2 variables to 32-bit values. This ensures they will not roll over since even the max values of 65535 + 65535 will fit in a 32-bit variable.
The result:
40000 + 50000 = 24464
40000 + 50000 = 90000
Since I know adding any two 16-bit values can be larger than what a 16-bit value can hold (i.e., “1 + 1” is fine, as is “65000 + 535”, but larger values present a rollover problem), it is good practice to just always cast upwards. That way, the code works as intended, whether the native int of the compiler is 16-bits or 32-bits.
As my introduction of this bug “yet again” shows, it is a hard habit to get in to.
Once again, oddness from floating point values took me down a rabbit hole trying to understand why something was not working as I expected.
Earlier, I had stumbled upon one of the magic values that a 32-bit floating point value cannot represent in C. Instead of 902.1, a float will give you 902.099976… Close, but it caused me issues due to how we were doing some math conversions.
float value = 902.1;
printf ("value = %f\n", value);
To work around this, I switched these values to double precision floating point values and now 902.1 shows up as 902.1:
double value = 902.1;
printf ("value = %f\n", value);
That example will indeed show 902.100000.
This extra precision ended up causing a different issue. Consider this simple code, which took a value in kilowatts and converted it to watts, then converted that to a signed integer.
That looks simple enough, but the output shows it is not:
kw   : 64.600000
watts: 64600.000000
int32: 64599
Er… what? 64.6 multiplied by 1000 displayed as 64600.00000 so that all looks good, but when converted to a signed 32-bit integer, it turned in to 64599. “Oh no, not again…”
I was amused that, by converting these values to float instead of double it worked as I expected:
Apparently, whatever extra precision I was gaining from using double in this case was adding enough extra precision to throw off the conversion to integer.
I don’t know why. But at least I have a workaround.
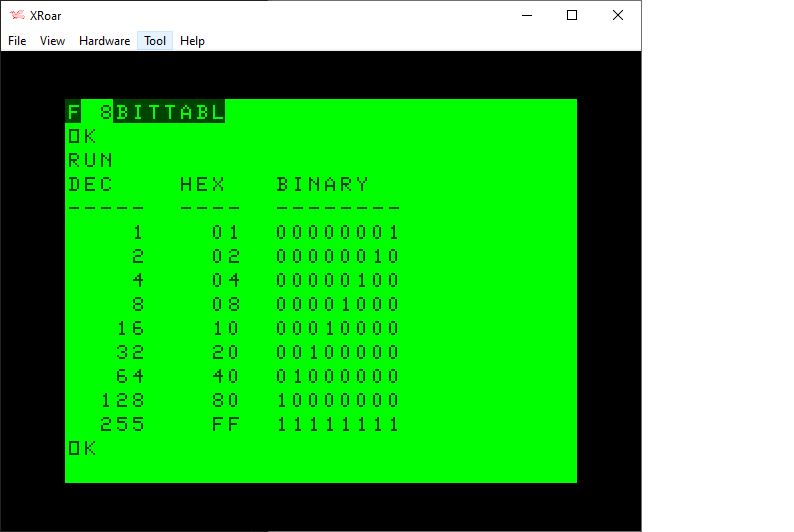
When dealing with bits in Color BASIC, we have AND, OR and NOT. Unfortunately, we can really only use these on values 15-bits or less. For example, here is a table represent various 8-bit values in the range of 0-255:
We have no problem using 8-bit values with standard Color BASIC. Here is my routine that will print out the bits of any 8-bit value:
0 REM 8BITS.BAS
10 DIM BT(7):FOR BT=0 TO 7:BT(BT)=2^BT:NEXT
20 INPUT "VALUE     ";Z
30 GOSUB 500:GOTO 20
500 REM SHOW Z AS BINARY
510 FOR BT=7 TO 0 STEP-1
520 IF Z AND BT(BT) THEN PRINT "1"; ELSE PRINT "0";
530 NEXT
540 PRINT Z:RETURN
Here is a program using that routine that will print out a similar table:
0 REM 8BITTABL.BAS
10 DIM BT(7):FOR BT=0 TO 7:BT(BT)=INT(2^BT):NEXT
20 PRINT "DEC    HEX   BINARY"
30 PRINT "-----  ----  --------"
40 FOR I=0 TO 7:Z=INT(2^I)
50 GOSUB 100
60 NEXT
70 Z=255:GOSUB 100
80 END

100 REM PRINT TABLE ENTRY
110 PRINT USING"#####    ";Z;
120 IF Z<&H10 THEN PRINT "0";
130 PRINT HEX$(Z);"  ";
140 GOSUB 500
150 RETURN

500 REM SHOW Z AS BINARY
510 FOR BT=7 TO 0 STEP-1
520 IF Z AND BT(BT) THEN PRINT "1"; ELSE PRINT "0";
530 NEXT
540 PRINT:RETURN
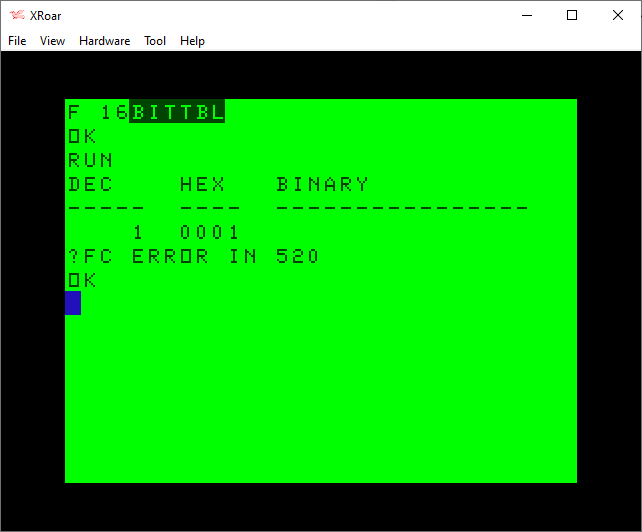
When I started experimenting with bits like this, I tried to modify my routine to work with 16-bit values. It did not work:
0 REM 8BITTABL.BAS - DOES NOT WORK!
10 DIM BT(15):FOR BT=0 TO 15:BT(BT)=INT(2^BT):NEXT
20 PRINT "DEC    HEX   BINARY"
30 PRINT "-----  ----  ----------------"
40 FOR I=0 TO 15:Z=INT(2^I)
50 GOSUB 100
60 NEXT
70 Z=255:GOSUB 100
80 END

100 REM PRINT TABLE ENTRY
110 PRINT USING"#####  ";Z;
120 IF Z<&H10 THEN PRINT "0";
121 IF Z<&H100 THEN PRINT "0";
122 IF Z<&H1000 THEN PRINT "0";
130 PRINT HEX$(Z);"  ";
140 GOSUB 500
150 RETURN

500 REM SHOW Z AS BINARY
510 FOR BT=15 TO 0 STEP-1
520 IF Z AND BT(BT) THEN PRINT "1"; ELSE PRINT "0";
530 NEXT
540 PRINT:RETURN
A bit of investigation revealed that AND could not operate on values greater than 32767 (&H3FFF in hex):
I did not understand why, but I expected it has something to do with integer values being treated as signed values, as if this was an INT16 (−32768 to +32767 range) rather than a UIN16 (0-65535 range).
rflberg to the rescue
I had recently posted a series of YouTube videos discussing bits in Color BASIC. My most recent one showed a program I wrote that demonstrated AND, OR and NOT operations:
The program I demonstrated looked like this:
0 REM ANDOR.BAS
10 DIM BT(7):FOR BT=0 TO 7:BT(BT)=INT(2^BT):NEXT
20 INPUT "VALUE     ";V
30 PRINT "(A/O/N)";
40 A$=INKEY$:IF A$="" THEN 40
50 IF A$="A" THEN M=0:PRINT "AND";:GOTO 90
60 IF A$="O" THEN M=1:PRINT "OR ";:GOTO 90
70 IF A$="N" THEN M=2:PRINT "NOT":GOTO 100
80 SOUND 1,1:GOTO 40
90 INPUT O
100 PRINT:PRINT "    ";:Z=V:GOSUB 500
110 IF M=0 THEN PRINT "AND ";:Z=O:GOSUB 500:Z=V AND O:PRINT "    ";:GOSUB 500
120 IF M=1 THEN PRINT "OR  ";:Z=O:GOSUB 500:Z=V OR O:PRINT "    ";:GOSUB 500
130 IF M=2 THEN PRINT "NOT ";:Z=NOT V:GOSUB 500
140 PRINT:GOTO 20

500 REM SHOW Z AS BINARY
510 FOR BT=7 TO 0 STEP-1
520 IF Z AND BT(BT) THEN PRINT "1"; ELSE PRINT "0";
530 NEXT
540 PRINT:RETURN
In the video I explain how it works, somewhat, but you will notice it works only on 8-bit values. Because I did not know a way to make it work.
However, in the comments, use rflberg left a few comments:
IF you want to see the full bits change the program to this:
10 DIM BT(15):FOR BT=0 TO 15:BT(BT)=2^BT:NEXT 501 IF Z<0 THEN PRINT”1″; ELSE PRINT”0″; 510 FOR BT=14 TO 0 STEP -1
rflberg (via YouTube)
I was intrigued. The modifications did not work for me, but a few additional comments help me understand the intent:
-1 is actually 1111111111111111 and 255 is 0000000011111111. It computes numbers -32768 to 32767. Negative numbers the most significant bit is a 1 and positive numbers is a 0. … -32768 is 1000000000000000 and 32767 is 0111111111111111
rflberg (via YouTube)
I experimented with this for awhile last night, and now I think I understand it. AND, NOT and OR allow you to pass in 0 to 32677 just fine. But, you can also pass in -32768 to -1 as well! It seems to be using the high bit (bit 15) to indicate a negative value. The explanation was to simply use negative values to make AND, NOT and OR see that bit.
The code modification would work if I passed in 0-32767 for the normal 15-bit range then -32768 to 1 to represent the high-bit range. I should be able to modify my routine to do this automatically.
I could use standard bit values for bits 0 to 14 (my BT array values of 1, 2, 4, 8, 16, 32, 64, 128, 256, 512, 1024, 2048, 4096, 8192, and 16384, just like in the earlier table), and then have a special case for bit 15 — a value of -32768 — which I would have in the array as BT(15)=-32768.
Then, in the print bit routine I could check to see if the value was greater than 32767, and turn it in to a negative number by subtracting 65536. (i.e., 32767 would be fine, but 32768 would turn in to -32768).
Since I print out the integer value after the bit display, I decided to make a temporary (altered) variable Z2, and retain the user’s intended Z value. This means I could pass in 32768 and it would print 32768, but would be really using -32768.
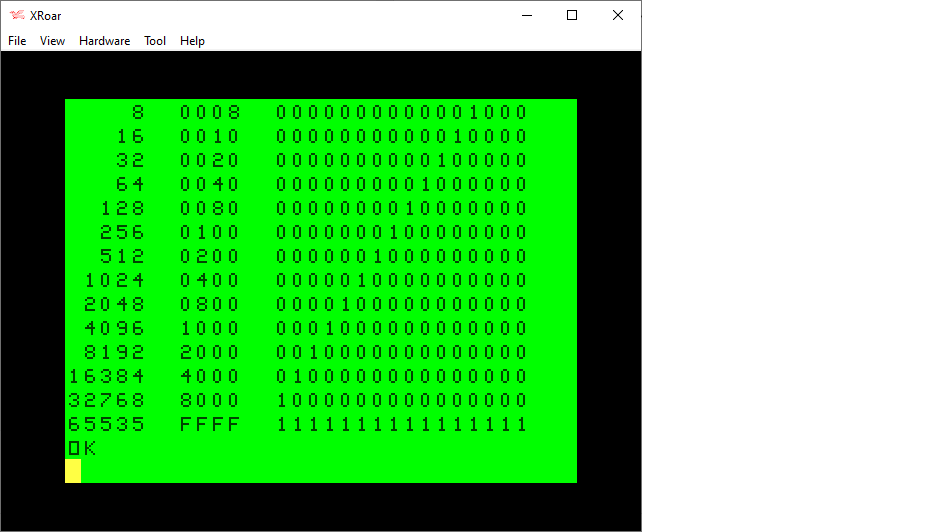
I ended up with a minor modification to my program, giving me this routine that will display the bits of any 16-bit value (0-65535):
0 REM 16BITS.BAS
1 REM WORKS THANKS TO rflberg
10 DIM BT(15):FOR BT=0 TO 14:BT(BT)=INT(2^BT):NEXT:BT(15)=-32768

20 INPUT "VALUE     ";Z
30 GOSUB 500:GOTO 20
500 REM SHOW Z AS BINARY
505 IF Z>32767 THEN Z2=Z-65536 ELSE Z2=Z
510 FOR BT=15 TO 0 STEP-1
520 IF Z2 AND BT(BT) THEN PRINT "1"; ELSE PRINT "0";
530 NEXT
540 PRINT Z;Z2:RETURN
Using this updated routine, I modified my table printing program to handle 16-bits:
0 REM 8BITTABL.BAS
1 REM WORKS THANKS TO rflberg
10 DIM BT(15):FOR BT=0 TO 14:BT(BT)=INT(2^BT):NEXT:BT(15)=-32768
20 PRINT "DEC    HEX   BINARY"
30 PRINT "-----  ----  ----------------"
40 FOR I=0 TO 15:Z=INT(2^I)
50 GOSUB 100
60 NEXT
70 Z=65535:GOSUB 100
80 END

100 REM PRINT TABLE ENTRY
110 PRINT USING"#####  ";Z;
120 IF Z<&H10 THEN PRINT "0";
121 IF Z<&H100 THEN PRINT "0";
122 IF Z<&H1000 THEN PRINT "0";
130 PRINT HEX$(Z);"  ";
140 GOSUB 500
150 RETURN

500 REM SHOW Z AS BINARY
505 IF Z>32767 THEN Z2=Z-65536 ELSE Z2=Z
510 FOR BT=15 TO 0 STEP-1
520 IF Z2 AND BT(BT) THEN PRINT "1"; ELSE PRINT "0";
530 NEXT
540 PRINT:RETURN
Tada! Thanks for those great YouTube comments, I now have a workaround to doing bit detection on all 16 bits. Thank you very much, rflberg!