CoCo 6809 assembly save/restore screen routine.

Occasionally I see a really “nice little touch” that a programmer took the time to add. For instance, some programs will restore the screen to what it looked like before the program ran. I decided I would do this for a project I was working on, and thought I’d share the super simple routine:

* Save/Restore screen.
* lwasm savescreen.bas -fbasic -osavescreen.bas --map

    org $3f00

* Test function.
start
    * Save the screen.
    bsr savescreensub   * GOSUB savescreensub

    * Fill screen.
    ldx #SCREENSTART    * X=Start of screen.
    lda #255            * A=255 (orange block).
loop
    sta ,x+             * Store A at X, X=X+1.
    cmpx #SCREENEND     * Compare X to SCREENEND.
    ble loop            * IF X<=SCREENEND, GOTO loop.

    * Wait for keypress.
getkey    
    jsr [$a000]         * Call POLCAT ROM routine.
    beq getkey          * If no key, GOTO getkey.

    * Restore screen.
    bsr restorescreensub * GOSUB restorescreensub

    rts                 * RETURN

* Subroutine
SCREENSTART equ 1024    * Start of screen memory.
SCREENEND   equ 1536    * Last byte of screen memory.

savescreensub
    pshs x,y,d          * Save registers we will use.
    ldx #SCREENSTART    * X=Start of screen.   
    ldy #screenbuf      * Y=Start of buffer.
saveloop
    ldd ,x++            * Load D with 2 bytes at X, X=X+2.
    std ,y++            * Store D at Y, Y=Y+2.
    cmpx #SCREENEND     * Compare X to SCREENEND.
    blt saveloop        * If X<=SCREENEND, GOTO saveloop.
    puls x,y,d,pc       * Resture used registers and return.
    *rts

restorescreensub
    pshs x,y,d          * Save registers we will use.
    ldx #screenbuf      * X=Start of buffer.
    ldy #SCREENSTART    * Y=Start of screen.
restoreloop
    ldd ,x++            * Load D with 2 bytes at X, X=X+2.
    std ,y++            * Store D at Y, Y=Y+2.
    cmpy #1535          * Compare Y to SCREENEND.
    blt restoreloop     * If Y<=SCREENEND, GOTO restoreloop.
    puls x,y,d,pc       * Resture used registers and return.
    *rts

* This would go in your data area.
screenbuf rmb SCREENEND-SCREENSTART+1

    end

There are two routines – savescreensub and restorescreensub – named that way just so I would know they are subroutines designed to be called by bsr/lbsr/jsr.

They make use of a 512-byte buffer (in the case of the CoCo’s 32×16 screen).

savescreensub will copy all the bytes currently on the text screen over to the buffer. restorescreensub will copy all the saved bytes in the buffer back to the screen.

Some example code is provided.

What would you change?

Until next time…

3X+1 in C#

Anyone remember when I was writing articles about the 3X+1 math problem? And then I wrote about it some more? And even more?

Apparently, I had planned to write about it even more than that. I found this unpublished source code. Writing a version in Color BASIC wasn’t enough. Apparently I tried writing it in C#, too:

// 3X+1

using System;
					
public class Program
{
	public static void Main()
	{
		while (true)
		{
			Int32 x = 0;

			Console.WriteLine();
			Console.WriteLine("Enter number:");

			x = Int32.Parse(Console.ReadLine());
			
			while (true)
			{
				Console.Write(x);
				Console.Write(" ");
				
				if (x == 1) break;
				
				if ((x & 1) == 1) // Odd
				{
					x = x * 3 + 1;
				}
				else // Even
				{
					x = x / 2;
				}
			}
		}
	}
}

So, if you’re in to that kind of thing (C# is available for Windows, Mac OS X and Linux), you can give that a try and tell me how I should have written it.

Until next time…

When there’s not enough room for sprintf…

Updates:

  • 2022-08-30 – Corrected a major bug in the Get8BitHexStringPtr() routine.

“Here we go again…”

Last week I ran out of ROM space in a work project. For each code addition, I have to do some size optimization elsewhere in the program. Some things I tried actually made the program larger. For example, we have some status bits that get set in two different structures. The code will do it like this:

shortStatus.faults |= FAULT_BIT;
longStatus.faults |= FAULT_BIT;

We have code like that in dozens of places. One of the things I had done earlier was to change that in to a function. This was primarily so I could have common code set fault bits (since each of the four different boards I work with had a different name for its status structures). It was also to reduce the amount of lines in the code and make what they were doing more clear (“clean code”).

void setFault (uint8_t faultBit)
{
    shortStatus.faults |= faultBit;
    longStatus.faults |= faultBit;
}

During a round of optimizing last week, I noticed that the overhead of calling that function was larger than just doing it manually. I could switch back and save a few bytes every time it was used, but since I still wanted to maintain “clean code”, I decided to make a macro instead of the function. Now I can still do:

setFault (FAULT_BIT);

…but under the hood it’s really doing a macro instead:

#define setFault(faultBit) { shortStatus.faults |= faultbit; longStatus.faults |= faultBit; }

Now I get what I wanted (a “function”) but retain the code size savings of in-lining each instance.

I also thought that doing something like this might be smaller:

shortStatus.faults |= FAULT_BIT;
longStatus.faults = shortStatus.faults;

…but from looking at the PIC24 assembly code, that’s much larger. I did end up using it in large blocks of code that conditionally decided which fault bit to set, and then I sync the long status at the end. As long as the overhead of “this = that” is less than the overhead of multiple inline instructions it was worth doing.

And keep in mind, this is because I am 100% out of ROM. Saving 4 bytes here, and 20 bytes there means the difference between being able to build or not.

Formatting Output

One of the reasons for the “code bloat” was adding support for an LCD display. The panel, an LCD2004, hooks up to I2C vie a PCF8574 I2C I/O chip. I wrote just the routines needed for the minimal functionality required: Initialize, Clear Screen, Position Cursor, and Write String.

The full libraries (there are many) for Arduino are so large by comparison, so often it makes more sense to spend the time to “roll your own” than port what someone else has already done. (This also means I do not have to worry about any licensing restrictions for using open source code.)

I created a simple function like:

LCDWriteDataString (0, 0, "This is my message.");

The two numbers are the X and Y (or Column and Row) of where to display the text on the 20×4 LCD screen.

But, I was quickly reminded that the PIC architecture doesn’t support passing constant string data due to “reasons”. (Harvard architecture, for those who know.)

To make it work, you had to do something like:

const char *msg = "This is my message";
LCDWriteDataString (0, 0, msg);

…or…

chr buffer[19];
memcpy (buffer, "This is my message");
LCDWriteDataString (0, 0, msg);

…or, using the CCS compiler tools, add this to make the compiler take care of it for you:

#device PASS_STRINGS=IN_RAM

Initially I did that so I could get on with the task at had, but as I ran out of ROM space, I revisited this to see which approach was smaller.

From looking at the assembly generated by the CCS compiler, I could tell that “PASS_STRINGS=IN_RAM” generated quite a bit of extra code. Passing in a constant string pointer was much smaller.

So that’s what I did. And development continued…

Then I ran out of ROM yet again. Since I had some strings that needed formatted output, I was using sprintf(). I knew that sprintf() was large, so I thought I could create my own that only did what I needed:

char buffer[21];
sprintf (buffer, "CF:%02x C:%02x T:%02x V:%02x", faults, current, temp, volts);
LCDWriteDataString (0, 0, buffer);

char buffer[21];
sprintf (buffer, "Fwd: %u", watts);
LCDWriteDataString (0, 1, buffer);

In my particular example, all I was doing is printing out an 8-bit value as HEX, and printing out a 16-bit value as a decimal number. I did not need any of the other baggage sprintf() was bringing when I started using it.

I came out with these quick and dirty routines:

char GetHexDigit(uint8_t nibble)
{
  char hexChar;

  nibble = (nibble & 0x0f);

  if (nibble <= 9)
  {
    hexChar = '0';
  }
  else
  {
    hexChar = 'A'-10;
  }

  return (hexChar + nibble);
}

char *Get8BitHexStringPtr (uint8_t value)
{
    static char hexString[3];

    hexString[0] = GetHexDigit(value >> 4);
    hexString[1] = GetHexDigit(value & 0x0f);
    hexString[2] = '\0'; // NIL terminate

    return hexString;
}

The above routine maintains a static character buffer of 3 bytes. Two for the HEX digits, and the third for a NIL terminator (0). I chose to do it this way rather than having the user pass in a buffer pointer since the more parameters you pass, the larger the function call gets. The downside is those 3 bytes of variable storage are reserved forever, so if I was also out of RAM, I might rethink this approach.

I can now use it like this:

const char *msgC = " C:"; // used by strcat()
const char *msgT = " T:"; // used by strcat()
const char *msgV = " V:"; // used by strcat()

char buffer[20];

strcpy (buffer, "CF:"); // allows constants
strcat (buffer, Get8BitHexStringPtr(faults));
strcat (buffer, msgC);
strcat (buffer, Get8BitHexStringPtr(current));
strcat (buffer, msgT);
strcat (buffer, Get8BitHexStringPtr(temp));
strcat (buffer, msgV);
strcat (buffer, Get8BitHexStringPtr(volts));

LCDWriteDataString (0, 1, buffer);

If you are wondering why I do a strcpy() with a constant string, then use const pointers for strcat(), that is due to a limitation of the compiler I am using. Their implementation of strcpy() specifically supports string constants. Their implementation of strcat() does NOT, requiring me to jump through more hoops to make this work.

Even with all that extra code, it still ends up being smaller than linking in sprintf().

And, for printing out a 16-bit value in decimal, I am sure there is a clever way to do that, but this is what I did:

char *Get16BitDecStringPtr (uint16_t value)
{
    static char decString[6];
    uint16_t temp = 10000;
    int pos = 0;

    memset (decString, '0', sizeof(decString));

    while (value > 0)
    {
        while (value >= temp)
        {
            decString[pos]++;
            value = value - temp;
        }

        pos++;
        temp = temp / 10;
    }

    decString[5] = '\0'; // NIL terminate

    return decString;
}

Since I know the value is limited to what 16-bits can old, I know the max value possible is 65535.

I initialize my five-digit string with “00000”. I start with a temporary value of 10000. If the users value is larger than that, I decrement it by that amount and increase the first digit in the string (so “0” goes to “1”). I repeat until the user value has been decremented to be less than 10000.

Then I divide that temporary value by 10, so 10000 becomes 1000. I move my position to the next character in the output string and the process repeats.

Eventually I’ve subtracted all the 10000s, 1000s, 100s, 10s and 1s that I can, leaving me with a string of five digits (“00000” to “65535”).

I am sure there is a better way, and I am open to it if it generates SMALLER code. :)

And that’s my tale of today… I needed some extra ROM space, so I got rid of sprintf() and rolled my own routines for the two specific types of output I needed.

But this is barely scratching the surface of the things I’ve been doing this week to save a few bytes here or there. I’d like to revisit this subject in the future.

Until next time…

GOTO, GOSUB, Stack Overflows and 6809 stack jumping.

While wandering through the Color/Extended/Disk BASIC Unraveled books trying to figure out how the RAM hooks worked, I came across a technique that I had never used.

So of course I’m going to digress with a bunch of other stuff first.

GOTO and GOSUB

In BASIC, you can run code using GOTO or GOSUB. GOTO jumps to a specific line number and runs from there. If that code needs to get back to the main loop, it has to do so with another GOTO.

10 REM MAIN LOOP
20 A$=INKEY$:IF A$="" THEN 20
30 IF A$="L" THEN GOTO 100
40 IF A$="R" THEN GOTO 200
50 GOTO 10

100 REM MOVE LEFT
...
190 GOTO 10

200 REM MOVE RIGHT
...
290 GOTO 10

This is fine for code that does one specific thing at one specific place, but the routines at 100 and 200 could not be used anywhere else in the program unless after such use they always resumed running at line 10.

GOSUB is often a better option, since it eliminates the need for the subroutine to know where it must GOTO at the end:

10 REM MAIN LOOP
20 A$=INKEY$:IF A$="" THEN 20
30 IF A$="L" THEN GOSUB 100
40 IF A$="R" THEN GOSUB 200
50 GOTO 10

100 REM MOVE LEFT
...
190 RETURN

200 REM MOVE RIGHT
...
290 RETURN

There are inefficiencies to the above code, as well as some potential problems, but it’s good enough for an example.

When GOSUB is seen, BASIC remembers the exact spot after the line number and saves it somewhere. It then jumps to that line number, and when a RETURN is seen, it retrieves the saved location and jumps back there to continue executing.

The location is saved on a stack, so you can GOSUB from a GOSUB from a GOSUB, as long as there is enough memory to remember all those locations.

Stack Notes

Think of the stack like a stack of POST-IT(tm) notes. When a GOSUB happens, the return location is written on a piece of paper, then that paper is placed somewhere. If another GOSUB is seen, that location is written on paper and then stuck on top of the previous one, and so on. You end up with a stack of locations. When a RETURN is seen, it grabs the top piece of paper and returns to that location, then that paper is discarded.

10 PRINT "TEST START"
20 GOSUB 100
30 PRINT "TEST END"
40 END

100 REM FIRST
110 PRINT "  FIRST START"
120 GOSUB 200
130 PRINT "  FIRST END"
140 RETURN

200 REM SECOND
210 PRINT "    SECOND START"
220 PRINT "    SECOND END"
230 RETURN

Running that program prints:

TEST START
  FIRST START
    SECOND START
    SECOND END
  FIRST END
TEST END

Test calls First which calls Second. When Second returns, it returns back to First. When First returns, it returns back to Start.

If you ever leave a GOSUB with a GOTO, that return location is still there, saved, and that memory is never returned to the BASIC program. This will crash a program:

10 PRINT X
20 X=X+1
30 GOSUB 10

Each GOSUB adds a return location to the BASIC stack, and since the program is recursively calling itself without ever RETURNing, it will eventually run out of BASIC stack space. In the test I just did, I received an ?OM ERROR (out of memory) at count 3247. On a system with less RAM available (smaller RAM, larger program, etc.) that will happen more often.

This is a STACK OVERFLOW, and languages like C, assembly, etc. can all have them. (I assume that’s where the Q&A site www.stackoverflow.com got its name from.)

Some environments have stack checking, and they will terminate the offending program with an error message when this happens. This is what happened with the ?OM ERROR. Beyond BASIC, operating systems generally take care of this stack checking. Programs written in C or 6809 assembly running under OS-9 most certainly will get terminated with a stack overflow if they try to use more than the OS reserved for them. (Ah, if I only understood this way back then. I just knew to keep adding more memory to a command until it ran without crashing…)

Assembly GOTO and GOSUB

In 6809 assembly, a GOTO equivalent would be like a BRx branch instruction or a JMP jump instruction. The earlier BASIC example might look like this in CoCo assembly:

mainloop
  jsr [$a002]   * Call ROM POLCAT routine, key comes back in A.
  beq mainloop  * If A="", GOTO mainloop.
  cmpa 'L       * Compare A to character "L".
  beq moveleft  * If A="L", GOTO moveleft.
  cmpa 'R       * Compare A to character "R".
  beq moveright * If A="R", GOTO moveright.
  bra mainloop  * GOTO mainloop.

moveleft
  ...
  bra mainloop  * GOTO mainloop.

moveright
  ...
   bra mainloop * GOTO mainloop.

For very simple logic, assembly can be quite similar to BASIC.

GOSUB would be BSR branch subroutine or JSR jump subroutine operation. Here is what the second BASIC example might look like in assembly:

  jsr [$a002]     * Call ROM POLCAT routine, key comes back in A.
  beq mainloop    * If A="", GOTO mainloop.
  cmpa 'L         * Compare A to character "L".
  bsr moveleft    * If A="L", GOSUB moveleft.
  cmpa 'R         * Compare A to character "R".
  bsr moveright   * If A="R", GOSUB moveright.
  bra mainloop    * GOTO mainloop.

moveleft
  ...
  rts             * RETURN.

moveright
  ...
  rts             * RETURN.

Very simple code like this would be a good way for a BASIC programmer to tip-toe in to the land of assembly language. It’s quite fun, until you realize how much work is needed for anything that is not as simple ;-)

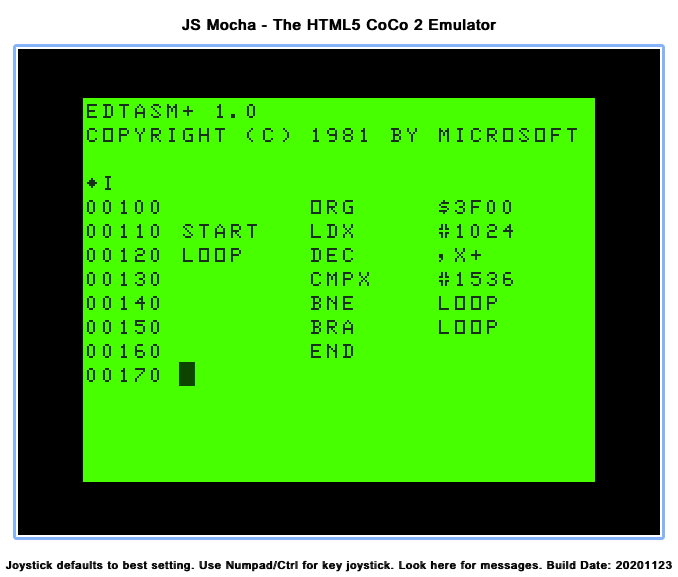
And now the third example… Since assembly does not have a PRINT command, I created a simple subroutine that uses the ROM CHROUT routine to print out whatever character is in the A register.

* lwasm jsrtest.asm -fbasic -ojsrtest.bas --map

    org $3f00

start
    * 10 PRINT "TEST START"
    ldx #teststartmsg   * X=Start of message.
    jsr print           * GOSUB print.

    * 20 GOSUB 100
    jsr first           * GOSUB first.
    ldx #testendmsg     * X=Start of message.
    
    * 30 PRINT "TEST END"
    jsr print           * GOSUB print.
    
    * 40 END
    rts                 * RETURN

first
    * 110 PRINT "  FIRST START"
    ldx #firststartmsg  * X=Start of message.
    jsr print           * GOSUB print.

    * 120 GOSUB 200
    jsr second

    * 130 PRINT "  FIRST END"
    ldx #firstendmsg    * X=Start of message.
    jsr print           * GOSUB print.
    
    * 140 RETURN
    rts                 * RETURN

second
    * 210 PRINT "    SECOND START"
    ldx #secondstartmsg * X=Start of message.
    jsr print           * GOSUB print.
    
    * 230 PRINT "    SECOND END"
    ldx #secondendmsg   * X=Start of message.
    jsr print           * GOSUB print.
    
    * 240 RETURN
    rts                 * RETURN

* PRINT subroutine. Prints the string pointed to by X.
print
    lda ,x+
    beq done
    jsr [$a002]
    bra print
done
    lda #13
    jsr [$a002]
    rts

* Data storage for the string messages.
teststartmsg
    fcc "TEST START"
    fcb 0

testendmsg
    fcc "TEST END"
    fcb 0

firststartmsg
    fcc "  FIRST START"
    fcb 0

firstendmsg
    fcc "  FIRST END"
    fcb 0

secondstartmsg
    fcc "    SECOND START"
    fcb 0

secondendmsg
    fcc "    SECOND END"
    fcb 0

Here is a BASIC loader for the above assembly routine. You can load and RUN this, then type EXEC &H3F00 to run it.

10 READ A,B
20 IF A=-1 THEN 70
30 FOR C = A TO B
40 READ D:POKE C,D
50 NEXT C
60 GOTO 10
70 END
80 DATA 16128,16267,142,63,62,189,63,45,189,63,16,142,63,73,189,63,45,57,142,63,82,189,63,45,189,63,32,142,63,96,189,63,45,57,142,63,108,189,63,45,142,63,125,189,63,45,57,166,128,39,6,173,159,160,2,32,246,134,13,173,159,160,2,57,84,69,83,84,32
90 DATA 83,84,65,82,84,0,84,69,83,84,32,69,78,68,0,32,32,70,73,82,83,84,32,83,84,65,82,84,0,32,32,70,73,82,83,84,32,69,78,68,0,32,32,32,32,83,69,67,79,78,68,32,83,84,65,82,84,0,32,32,32,32,83,69,67,79,78,68,32,69,78,68,0,-1,-1

Stack Overflow in assembly

Just for fun… Here is the GOSUB crash program in assembly. 99% of this code is just a crappy routine I had to write to print out a decimal number.

    org $3f00

start
    ldx #0              * X=0
loop
    * 10 PRINT X
    jsr printx          * GOSUB printx.

    * 20 X=X+1
    leax 1,x            * X=X+1

    * 30 GOSUB 10
    bsr loop            * GOSUB loop.

    rts                 * Return to BASIC.

*
* Crappy routine I just put together to try to print out a decimal number.
*
printx
    * Init buffer to 000000.
    lda #'0
    sta numberstring
    sta numberstring+1
    sta numberstring+2
    sta numberstring+3
    sta numberstring+4
    sta numberstring+5
  
    * X is our counter.
    tfr x,d         * Copy X to D

tenthousands    
    cmpd #10000
    blt thousands
    subd #10000
    inc numberstring
    bra tenthousands

thousands
    cmpd #1000
    blt hundreds
    subd #1000
    inc numberstring+1
    bra thousands

hundreds
    cmpd #100
    blt tens
    subd #100
    inc numberstring+2
    bra hundreds

tens
    cmpd #10
    blt ones
    subd #10
    inc numberstring+3
    bra hundreds

ones
    cmpd #0
    blt print
    subd #1
    inc numberstring+4

print
    ldy #numberstring
printloop
    lda ,y+
    jsr [$a002]
    cmpy #bufferend
    bne printloop

    lda #13
    jsr [$a002]
    rts

numberstring fcb 5  * Holds 00000-99999
bufferend equ numberstring+5

Thank you for ignoring my poorly-coded “printx” subroutine.

When I run this, it crashes after printing 08141. I believe it is a much smaller number than the BASIC one because it has much less memory for the stack. Since this program starts in memory at the 32K mark (&H3F00), the stack has from end of RAM (&HFF00) down to the end of this program. As the stack grows, without stack checking, it eventually overwrites the running assembly code, crashing the computer.

Let’s pretend we never did that.

What are we learning?

At the start of this article, I mentioned something I just learned from looking at other assembly code. I learned how to get out of an assembly GOSUB routine without needing to return. Just like BASIC, calling a subroutine recursively will cause a crash. Unlike BASIC, there is no stack checking when running raw 6809 code without an operating system, so it can really crash BASIC and require a reset of the computer.

There is a way to GOTO out of an assembly routine without leaving that GOSUB program counter memory on the stack. You simply move the stack pointer by 2 places.

For example, say you had assembly code that was like this BASIC:

10 GOSUB 100
100 GOSUB 200
200 ...

The stack would look like this:

      <- Next GOSUB would be stored here.
[200] <- Top of stack. RETURN would use this.
[100]
[ 10]

BASIC has no way to throw away whatever GOSUB entry is on the top of the stack, but it is simple to do in assembly just by adding 2 to the S (stack pointer) register.

start
    jsr first    * GOSUB first.
    rts          * RETURN

first
    jsr second   * GOSUB second.
    rts          * RETURN

second
    leas 2,S     * Move stack pointer down two bytes.

    rts          * RETURN

By the time the code gets to “second”, the assembly stack should look like this:

         <- Next bsr/jsr would be stored here.
[first]  <- Top of stack. RTS would use this.
[start]

When the second routine does “leas 2,s”, the stack pointer moves down and it looks like this:

         
[xxxxx]  <- Next bsr/jsr would be stored here.
[start]  <- Top of stack. RTS would use this.

Side Note: Data on the stack is never erased, but will be overwritten the next time something is stored there. The [xxxxx] is actually still [first].

Now if the subroutine does an RTS, it will be returning to start and not first. Thus, if you add that to the assembly and run it, the output will be:

TEST START
  FIRST START
    SECOND START
    SECOND END
TEST END

I do not know of a legal way to do the same in BASIC, but I am sure there is some POKE that could be done to achieve the same thing.

The Microsoft BASIC ROMs do this trick often, when patching in new routines that override some function.

And now it’s time for a brain break.

Until next time…

Spiraling in Color BASIC and 6809 Assembly – part 2

See also: part 1 and part 2.

In the previous installment, I shared an inefficient BASIC program that could draw a spiral pattern around the screen at whatever location and size was specified. Since the program was not very efficient, I then shared an improved version that ran almost three times faster. This is what it looked like:

YouTube video of spiralbas2.bas

Using this type of spiral pattern would make a nice transition between a title or high score screen and the actual game screen. It would be useful to have a reverse spiral that started with a solid color screen and spiraled outward to reveal the screen, but that is something for the future.

For now, I wanted to explain why the original BASIC code was written so oddly. It was written so oddly because this was not originally BASIC code. I wrote the routine in assembly, then back-ported it to BASIC. Some of you may remember the time I took one of my old BASIC programs and ported it to C. Yeah, this is kinda like that. But different.

The routine in assembly language seems quite a bit faster :-)

YouTube video of spiral.asm

In 6809 assembly, the main registers that are used include two 8-bit registers (A and B) and two 16-bit registers (X and Y). There are not enough registers to serve as all the variables needed for this program, so I made use of memory – storing values then retrieving them later. Much like my BASIC version, this assembly is not as good as it should be. Ideally, it should be routine where you load a few registers, then call the function, such as:

ldx #1024 ; start screen position
lda #32   ; width
ldb #16   ; height
bsr spiral

But I also wanted to specify the character (color) to use for the spiral, and I was out of registers. Thus, memory locations.

I used the RMB statement to remember two bytes in memory after the program:

XSTEPS rmb 1
YSTEPS rmb 1

This let me load the X and Y steps (width and height) of the spiral to draw in those memory locations, so the routine only needed a register for the character/color, and another pointing to the starting position:

 ldx #1024  ; point X to starting screen position
 lda #32    ; width...
 sta XSTEPS ; stored at XSTEPS
 lda #16    ; height...
 sta YSTEPS ; stored at YSTEPS
 ldb #255   ; b is color/character to use
 bsr right  ; start of spiral routine

I think I may redo it at some point, and use just one memory location for the color/character, then use registers A and B for the width and height. Looking at this now, that seems a bit cleaner.

But I digress…

Here is the 6809 assembly code I came up with, with the BASIC version included as comments so you can compare:

* lwasm spiralasm.asm -fbasic -ospiralasm.bas --map

    org $3f00

start:
 ldx #1024      * 10 CLS
 lda #96
 ldb #96
clearloop
 std ,x++
 cmpx #1536
 bne clearloop

                * 15 ' X=START MEM LOC
 ldx #1024      * 20 X=1024

                * 25 ' XS=XSTEPS (WIDTH)
 lda #32        * 30 XS=32
 sta XSTEPS
                * 35 ' YS=YSTEPS (HEIGHT)
 lda #16        * 40 YS=16
 sta YSTEPS
                * 45 ' B=CHAR TO POKE
 ldb #255       * 50 B=255
 bsr right      * 60 GOSUB 100

 ldx #1024      * 70 X=1024
 lda #18        * 71 XS=18
 sta XSTEPS
 lda #8         * 72 YS=8
 sta YSTEPS
 ldb #175       * 73 B=175 '143+32
 bsr right      * 74 GOSUB 100

 ldx #1294      * 75 X=1294 '1024+14+32*8
 lda #18        * 76 XS=18
 sta XSTEPS
 lda #8         * 77 YS=8
 sta YSTEPS
 ldb #207       * 78 B=207 '143+64
 bsr right      * 79 GOSUB 100

 ldx #1157      * 80 X=1157 '1024+5+32*4
 lda #22        * 81 XS=22
 sta XSTEPS
 lda #8         * 82 YS=8
 sta YSTEPS
 ldb #239       * 83 B=239 '143+96
 bsr right      * 84 GOSUB 100

goto            * 99 GOTO 99
    jsr [$a000] * POLCAT ROM routine
    cmpa #3     * break key
    bne goto
    rts

right           * 100 ' RIGHT
 lda XSTEPS     * 110 A=XS
rightloop
 stb ,x         * 120 POKE X,B
 deca           * 130 A=A-1
 beq rightdone  * 140 IF A=0 THEN 170
 leax 1,x       * 150 X=X+1
 bra rightloop  * 160 GOTO 120
rightdone
 leax 32,x      * 170 X=X+32
 dec YSTEPS     * 180 YS=YS-1
 beq done       * 190 IF YS=0 THEN 600

down            * 200 ' DOWN
 lda YSTEPS     * 210 A=YS
downloop
 stb ,x         * 220 POKE X,B
 deca           * 230 A=A-1
 beq downdone   * 240 IF A=0 THEN 270
 leax 32,x      * 250 X=X+32
 bra downloop   * 260 GOTO 220
downdone
 leax -1,x      * 270 X=X-1
 dec XSTEPS     * 280 XS=XS-1
 beq done       * 290 IF XS=0 THEN 600

left            * 300 ' LEFT
 lda XSTEPS     * 310 A=XS
leftloop
 stb ,x         * 320 POKE X,B
 deca           * 330 A=A-1
 beq leftdone   * 340 IF A=0 THEN 370
 leax -1,x      * 350 X=X-1
 bra leftloop   * 360 GOTO 320
leftdone
 leax -32,x     * 370 X=X-32
 dec YSTEPS     * 380 YS=YS-1
 beq done       * 390 IF YS=0 THEN 600

up              * 400 ' UP
 lda YSTEPS     * 410 A=YS
uploop
 stb ,x         * 420 POKE X,B
 deca           * 430 A=A-1
 beq updone     * 440 IF A=0 THEN 470
 leax -32,x     * 450 X=X-32
 bra uploop     * 460 GOTO 420
updone
 leax 1,x       * 470 X=X+1
 dec XSTEPS     * 480 XS=XS-1
 beq done       * 490 IF XS=0 THEN 600

 bra right      * 500 GOTO 100
done
 rts            * 600 RETURN

XSTEPS rmb 1
YSTEPS rmb 1

This experiment made me think about other assembly routines I’ve used, and what they would look like in BASIC. For example, I like to type this one in which will go through every byte of the 32-column text screen and increment it by one. It loops through this making a neat effect:

YouTube video of screeninc.asm

Here is that code:

    org $3f00

start ldx #1024
loop dec ,x+
 cmpx #1536
 bne loop
 bra start
 end

You can even try it yourself right in a web browser:

  1. Go to the online JS Mocha CoCo emulator.
  2. From the center list, select “EDTASM” and then click “Load Bin“. This will load the Microsoft Editor/Assembler for the CoCo.
  3. Once ESTASM 1.0 is loaded, at the “*” prompt, type “I” to go in to input mode. The prompt will change in to line number.
  4. At line number “00100”, type:
    (right arrow for tab)ORG(right arrow)$3F00(enter)
    START(right arrow)LDX(right arrow)#1024(enter)
    LOOP(right arrow)DEC ,X+(enter)
    (right arrow)CMPX(right arrow)#1536(enter)
    (right arrow)BNE(right arrow)LOOP(enter)
    (right arrow)BRA(right arrow)START(enter)
    (right arrow)END(enter)
  5. Exit the editor by pressing ESCape (break key). This returns to the “*” prompt.
  6. Assemble the program by typing “A/IM/WE“. If there are any errors, explaining how editing works in EDTASM is beyond this article, so you could just restart EDTASM and begin again.
  7. If it built with “00000 TOTAL ERRORS”, enter the Z-Bug debugger by typing “Z“. The prompt will change to a “#” symbol.
  8. Run the program by typing “G START“. The screen should do the effect shown in the YouTube video above.
JS Mocha emulator running Microsoft EDTASM+

EDTASM NOTE: The use of tabs (right arrow) is just cosmetic and makes the source code look nice. Instead of doing all the (right arrow) stuff in step #4, you could just type spaces instead. It just wouldn’t look as nice in the listing.

With that tangent out of the way, here is what a literal translation of that short program might look like in Color BASIC:

10 X=1024
20 A=PEEK(X)
30 A=A-1:IF A<0 THEN A=255
40 POKE X,A
50 X=X+1
60 IF X<>1536 THEN 20
70 GOTO 10
80 END

And if you run that, you will see it takes over twelve seconds to go through the screen each time. Thus, assembly code is really the only way to go for this type of thing.

But, if speed is not an issue, translating 6809 assembly to BASIC can certainly be done, at least for simple things like this. But why would one want to?

This example is especially slow because BASIC has no command that replicates the assembly “DEC” operation. DECrement will decrement a register value, or a byte in memory. In this case, “DEC ,X+” say “decrement the byte at location X, then increment X by one.” Thus, replicating that in BASIC takes using the PEEK and POKE commands. Also, when you INCrement or DECrement a byte in assembly, it rolls over at the end. i.e., you can increment 0 all the way up to 255, then incrementing that again rolls over to 0. For decrement, it’s the opposite — start at 255, and decrement until it gets to zero, where a decrement would make it roll over back to 255. In BASIC, subtracting one just ends up making a negative number, so the rollover has to be achieved through the extra code in line 30.

There is more that needs to be done to this spiral routine, but I’ll save that for the future…

Until next time…

Spiraling in Color BASIC and 6809 Assembly – part 1

See also: part 1 and part 2.

It seems each 80s computer system had certain styles to programs that ran on them. There was a certain “look” to the loading screens of many Commodore 64 games, for example.

On the Radio Shack Color Computer, programs often made use of the low-resolution 64×32 8-color semigraphics to create title screens. Graphical games would often drop back to text mode between levels, presenting information on the 32×16 “nuclear green” text screen.

Some programmers would create transitions between screens, such as wiping left to right with a solid color. One of my favorite transitions was a spiral pattern, where the outside drew towards the center of the screen.

Here is an example of that type of effect, albeit done quite slowing in Color BASIC by a program I wrote for this article:

spiralbas.bas

The above video shows the spiral routine being used to spiral in the full 32×16 screen (in orange), then three more spirals done at different sizes, locations and colors, just to test the routine.

The program looks like this:

0 REM SPIRAL.BAS

10 CLS
15 ' X=START MEM LOC
20 X=1024
25 ' XS=XSTEPS (WIDTH)
30 XS=32
35 ' YS=YSTEPS (HEIGHT)
40 YS=16
45 ' B=CHAR TO POKE
50 B=255
60 GOSUB 100

70 X=1024
71 XS=18
72 YS=8
73 B=175 '143+32
74 GOSUB 100

75 X=1294 '1024+14+32*8
76 XS=18
77 YS=8
78 B=207 '143+64
79 GOSUB 100

80 X=1157 '1024+5+32*4
81 XS=22
82 YS=8
83 B=239 '143+96
84 GOSUB 100

99 GOTO 99

100 ' RIGHT
110 A=XS
120 POKE X,B
130 A=A-1
140 IF A=0 THEN 170
150 X=X+1
160 GOTO 120
170 X=X+32
180 YS=YS-1
190 IF YS=0 THEN 600

200 ' DOWN
210 A=YS
220 POKE X,B
230 A=A-1
240 IF A=0 THEN 270
250 X=X+32
260 GOTO 220
270 X=X-1
280 XS=XS-1
290 IF XS=0 THEN 600

300 ' LEFT
310 A=XS
320 POKE X,B
330 A=A-1
340 IF A=0 THEN 370
350 X=X-1
360 GOTO 320
370 X=X-32
380 YS=YS-1
390 IF YS=0 THEN 600

400 ' UP
410 A=YS
420 POKE X,B
430 A=A-1
440 IF A=0 THEN 470
450 X=X-32
460 GOTO 420
470 X=X+1
480 XS=XS-1
490 IF XS=0 THEN 600

500 GOTO 100

600 RETURN

If you wanted to try this yourself, without using a real Color Computer or even having an emulator installed on your computer, you could:

  1. Save the above BASIC code to a text file.
  2. Go to the online XRoar emulator: http://www.6809.org.uk/xroar/online/
  3. Select “Machine:” of Tandy CoCo (NTSC) (or PAL if you prefer). It will even run on a Dragon, so the default machine is fine.
  4. Click its “Load…” button then browse/select the text file you just saved.
  5. From the emulator, type “CLOAD” and the program will load as if it was loading from a cassette tape.
  6. Type “RUN” and see it in all it’s 32×16 text mode glory.

The worst code is bad code.

This program is small, and it’s written in a rather odd way. While there were some BASICs that only allowed one command per line, Microsoft Color BASIC was not one of those. You could pack lines together (which reduced code size and improved speed). You will also notice it is missing using commands like FOR/NEXT. This was intentional, since this program was written like this to match a 6809 assembly implementation that I will be sharing later in this article series.

I suppose if BASIC did not have FOR/NEXT, this would be okay:

0 REM DO THIS 10 TIMES, SLOWLY
10 A=10
20 PRINT "HELLO"
30 A=A-1
40 IF A>1 THEN 20

But this is slow because it is doing variable math (A=A-1) and a comparison (A>1) each time through. Using FOR/NEXT would be much faster:

0 ROM DO THIS 10 TIMES, FASTER
10 FOR A=1 TO 10
20 PRINT "HELLO"
30 NEXT

The RIGHT/DOWN/LEFT/UP routines could be made about three times faster by changing them to FOR/NEXT loops:

100 ' RIGHT
    110 FOR A=X TO X+XS-1
    120 POKE A,B
    160 NEXT
    170 X=A+31
    180 YS=YS-1
    190 IF YS=0 THEN 600

    200 ' DOWN
    210 FOR A=X TO X+32*(YS-1) STEP 32
    220 POKE A,B
    260 NEXT
    270 X=A-33
    280 XS=XS-1
    290 IF XS=0 THEN 600

    300 ' LEFT
    310 FOR A=X TO X-XS+1 STEP -1
    320 POKE A,B
    360 NEXT
    370 X=A-31
    380 YS=YS-1
    390 IF YS=0 THEN 600

    400 ' UP
    410 FOR A=X TO X-32*(YS-1) STEP -32
    420 POKE A,B
    460 NEXT
    470 X=A+33
    480 XS=XS-1
    490 IF XS=0 THEN 600

If I set TIMER=0 at the start of the first version, and print TIMER at the end, it prints around 973 (just over 16 seconds).

The FOR/NEXT version shows 360 (about 6 seconds). “Almost” three times faster.

spiralbas2.bas

And, by packing lines together and doing some other tricks, it could be made even faster.

So, as you can see, doing it the slow way wouldn’t make sense if this article was just about doing the spiral in BASIC.

In the next installment, I will share the 6809 assembly version, unless there are enough “here is a faster way” comments to this section that I need to share them, first.

Until next time…

IF AND/OR THEN versus IF THEN IF – part 2

See also: part 1 and part 2.

Updates:

  • 2022-08-03 – Added note about “THEN ELSE” per a comment left by William Astle.

Please see the first part to understand what this is about, and why I blame Robin at 8-Bit Show and Tell for leading me down this rabbit hole.


This week, JohnD over at the CoCo Discord chat server mentioned that the Getting Started with Extended Color BASIC manual actually used “THEN IF” in an example. Indeed, on page 190 you find this example for the POS function:

THEN IF in Getting Started with Extended Color BASIC, page 190.

Meanwhile on Twitter, FUED responded to this as follows:

I still think IF THEN X and having the second condition in another X line number with its own single IF to be the fastest for action, otherwise, the IF THEN IF will save some memory if speed is not required. If speed is a must, IFs should be avoided and ON GOTO be used instead.

– @FUED_hq on Twitter

This, of course, made me want to run some benchmarks.

Skip to the end, my darling.

When Color BASIC begins parsing a line, it has to continue parsing every byte of that line even if it determines the rest of the line does not need to be executed. This means line like this are very slow when the condition is not met:

IF A=42 THEN a really long line of other stuff here

If BASIC determines that A is not 42, it still has to scan the rest of the line just in case there is an ELSE there. Even if there is not, it still has to keep scanning to know where the line ends so it can find the next line. Color BASIC do skip line data when scanning forward (i.e., GOTO xxx) — each line entry has a line number and length of that line — but it does not remember any of this once it decides it needs to parse the current line.

In part 1 I demonstrated how using “IF this AND that THEN” could be made faster by using “IF this THEN if that THEN”:

IF A=1 AND B=2 AND C=3 THEN this is slower

IF A=1 THEN IF B=2 THEN IF C=3 THEN this is faster

This is because BASIC no longer needs to do the “logical/mathematical” AND comparisons and retain the results as it moves through the line. It can just start skipping forward looking for an ELSE or end of line.

BUT, no matter what, it still has to scan the rest of the line. As FUED points out, shorter lines could be faster. Here are two examples:

30 IF A=1 THEN IF A=2 THEN IF A=3 THEN PRINT

30 IF A=1 THEN 40 ELSE 60
40 IF A=2 THEN 50 ELSE 60
50 IF A=3 THEN PRINT
60 ...

In the first version, no matter if A is “1” or “not 1”, it still will have to scan the rest of the line.

In the second version, if A is not 1 it will scan to the end of the line then start skipping lines as it looks for line 60 without needing to scan through any of the lines it is skipping.

Depending on what is faster — scanning to the end of a longer line, versus scanning a short line and skipping lines — this may be a simple way to make things faster.

Benchmark, anyone?

Here is a simple benchmark:

10 TIMER=0
20 FOR I=1 TO 1000

30 IF A=1 THEN IF A=2 THEN IF A=3 THEN PRINT

60 NEXT:PRINT TIMER,TIMER/60

Running that prints 324.

Now we try a version with short lines that will just skip any lines it doesn’t need to run:

10 TIMER=0
20 FOR I=1 TO 1000

30 IF A=1 THEN 40 ELSE 60
40 IF A=2 THEN 50 ELSE 60
50 IF A=3 THEN PRINT

60 NEXT:PRINT TIMER,TIMER/60

Running that prints 330 – just a tad slower.

This means that the overhead of skipping those lines is just a tad more than scanning to the end of one longer line.Scanning forward looking for ELSE or end of line must take less work than looking at line number entries and skipping ahead. Bummer.

But is that why it’s a tad slower? I think the main thing is it has to convert the line numbers (“60” in this case) from those two ASCII characters to BASIC’s floating point representation of them. That is probably way more overhead than just skipping bytes looking for an ELSE token.

To test, I reversed the logic to reduce the number of numbers we have to convert:

10 TIMER=0
20 FOR I=1 TO 1000

30 IF A<>1 THEN 60
40 IF A<>2 THEN 60
50 IF A=3 THEN PRINT

60 NEXT:PRINT TIMER,TIMER/60

This version gives me 315 – faster than the original! And, it’s smaller code, trading an “=” and “ELSE 60” for “<>”.

This means the real thing to consider is: Which takes more time? Scanning to the end of a long line, converting bytes in to a number, or skipping lines?

This is something that could be benchmarked and then we could predict which is better to use.

But for now, I’ll just leave this here for additional comments from readers who know more about how this works than I do.

UPDATE: In a comment left by William Astle, he mentioned you could also do “IF A=1 THEN ELSE 60” as valid Syntax. This effectively creates something similar to how C might do:

if (a == 1)
{
   // Nothing to do
}
else
{
   // Something to do
}

Looking at that in BASIC, that makes sense, though I’ve never seen it done and never used it like that. So let’s add this to the mix, going back to the version using “=” and original logic:

0 'THENBENCH.BAS
10 TIMER=0
20 FOR A=1 TO 1000

30 IF A=1 THEN ELSE 60
40 IF A=2 THEN ELSE 60
50 IF A=3 THEN PRINT

60 NEXT:PRINT TIMER,TIMER/60

This gives me 315, basically matching the “<>” version without THEN. Thus, these seem comparable:

IF A<>1 THEN 60

IF A=1 THEN ELSE 60

I expect it’s just parsing a byte for the ELSE token, versus a byte for the extra character (“>”) being similar in speed. And speaking of speed, removing the spaces in those IF lines reduces it to 310, versus 307 for the “<>” version. I think this is because the “THEN ELSE” started out with four spaces versus the “<>” version only having three.

For better benchmarks, testing the code itself, all spaces should be removed, but I usually don’t do that, just for readability in these articles.

Until next time…

Color BASIC RAM hooks – part 2

See Also: part 1 and part 2.

Updates:

  • 2022-08-02 – Minor assembly optimization using “TST” to replace “PSHS B / LDB DEVNUM / PULS B”, contributed by L. Curtis Boyle in the comments.

Since I wrote part 1, I have learned a bit more about using the Color BASIC RAM hooks. One thing I learned is that the BREAK CHECK RAM hook cannot be used to disable BREAK. This is because other parts of the BASIC ROM jump directly to the break check and do not call the RAM hook. Ah, well. If I really need to disable the break key, at least I know how to do it thanks to the 500 POKES, PEEKS ‘N EXECS for the TRS-80 Color Computer book.

I did want to revisit using the CONSOLE OUT RAM hook and do something perhaps almost useful. The MC6487 VDG chip used in the Color Computer lacks true lowercase, and displays those characters as inverse uppercase letters. Starting with later model CoCo’s labeled as “TANDY” instead of “TRS-80”, a new version of the VDG was used that did include true lowercase, but by default, BASIC still showed them as inverse uppercase.

I remembered having a terminal program for my CoCo 1 that would show all text in uppercase. This made the screen easier to read when calling in to a B.B.S. running on a system that had real lowercase. I thought it might be fun to make a quick assembly program that would intercept all characters going to the screen and translate any lowercase letters to uppercase.

Let’s start by looking at the code:

* lwasm consout2.asm -fbasic -oconsout2.bas --map

* Convert any lowercase characters written to the
* screen (device #0) to uppercase.

DEVNUM equ $6f
RVEC3 equ $167      console out RAM hook

    org $3f00

init
    lda RVEC3       get op code
    sta savedrvec   save it
    ldx RVEC3+1     get address
    stx savedrvec+1 save it

    lda #$7e        op code for JMP
    sta RVEC3       store it in RAM hook
    ldx #newcode    address of new code
    stx RVEC3+1     store it in RAM hook

    rts             done

newcode
    * Do this only if DEVNUM is 0 (console)
    *pshs b          save b
    *ldb DEVNUM      get device number
    *puls b          restore b
    tst DEVNUM      is DEVNUM 0?          
    bne continue    not device #0 (console)
uppercase
    cmpa #'a        compare A to lowercase 'a'
    blt continue    if less than, goto continue
    cmpa #'z        compare A to lowercase 'z'
    bgt continue    if greater than, goto continue
    suba #32        a = a - 32
continue
savedrvec rmb 3     call regular RAM hook
    rts             just in case...

The first thing to point out are the EQUates at the start of the code. They are just labels for two locations in BASIC memory we will be using: The CONSOLE OUT RAM hook entry, and the DEVNUM device number byte. DEVNUM is used by BASIC to know what device the output is going to.

Device Numbers

Devices include:

  • -3 – used by the DLOAD command in CoCo 1/2 Extended Color BASIC
  • -2 – printer
  • -1 – casette
  • 0 – screen and keyboard
  • 1-15 – disk

The BASIC ROM will set DEVNUM to the device being used, and routines use that to know what to do with the date being written. For example:

Device 0?

Device #0 may seem unnecessary, since it is assumed if #0 is not present:

PRINT "THIS GOES TO THE SCREEN"
PRINT #0,"SO DOES THIS"

Or…

10 INPUT "NAME";A$
10 INPUT #0,"NAME";A$

But, it is very useful if you are writing code that you want to be able to output to the screen, a printer, a cassette file, or disk file. For example:

10 REM DEVICE0.BAS
20 DN=0
30 PRINT "OUTPUT TO:"
40 PRINT"S)CREEN, T)APE OR D)ISK:"
50 A$=INKEY$:IF A$="" THEN 50
60 LN=INSTR("STD",A$)
70 ON LN GOSUB 100,200,300
80 GOTO 30

100 REM SCREEN
110 DN=0:GOSUB 400
120 RETURN

200 REM TAPE
210 PRINT "SAVING TO TAPE"
220 OPEN"O",#-1,"FILENAME"
230 DN=-1:GOSUB 400
240 CLOSE #-1
250 RETURN

300 REM DISK
310 PRINT "SAVING TO DISK"
320 OPEN"O",#1,"FILENAME"
330 DN=1:GOSUB 400
340 CLOSE #1
350 RETURN

400 REM OUTPUT HEADER TO DEV
410 PRINT #DN,"+-----------------------------+"
420 PRINT #DN,"+   SYSTEM SECURITY REPORT:   +"
430 PRINT #DN,"+-----------------------------+"
440 RETURN

That is a pretty terrible example, but hopefully shows how useful device number 0 can be. In this case, the routine at 400 is able to output to tape, disk or screen (though in the case of tape or disk, code must open/create the file before calling 400, and then close it afterwards).

Installing the new code.

The code starts out by saving the three bytes currently in the RAM hook:

init
    lda RVEC3       get op code
    sta savedrvec   save it
    ldx RVEC3+1     get address
    stx savedrvec+1 save it

The three bytes are saved elsewhere in program memory, where they are reserved using the RMB statement in the assembly source:

savedrvec rmb 3     call regular RAM hook

More on that in a moment. Next, the RAM hook bytes are replaced with three new bytes, which will be a JMP instructions (byte $7e) and the two byte location of the “new code” routine in memory:

    lda #$7e        op code for JMP
    sta RVEC3       store it in RAM hook
    ldx #newcode    address of new code
    stx RVEC3+1     store it in RAM hook

    rts             done

There is not much to it. As soon as this code executes, the Color BASIC ROM will start calling the “newcode” routine every time a character is being output. After that RAM hook is done, the ROM continues with outputting to whatever device is selected.

Color BASIC came with support for screen, keyboard and cassette.

Extended BASIC used the RAM hook to patch in support for the DLOAD command (which uses device #-3).

Disk BASIC used the RAM hook to patch in support for disk devices.

And now our code uses the RAM hook to run our new code, and then we will call whatever was supposed to be there (which is why we save the 3 bytes that were in the RAM hook before we change it).

Now we look at “newcode” and what it does.

Most printers print lowercase.

Since a printer might print lowercase just fine, our code will not want to uppercase any output going to a printer. Likewise, we may want to write files to tape or disk using full upper or lowercase. Also, you can save binary data to a file on tape or disk. Translating lowercase characters to uppercase would be a bad thing if the characters being sent were actually supposed to be raw binary data.

Thus, DEVNUM is needed so the new code will ONLY translate if the output is going to the screen (device #0). That’s what happens here:

newcode
    * Do this only if DEVNUM is 0 (console)
    tst DEVNUM      is DEVNUM 0? 
    bne continue    not device #0 (console)

If that value at DEVNUM is not equal to zero, the code just skips the lowercase-to-uppercase code.

uppercase
    cmpa #'a        compare A to lowercase 'a'
    blt continue    if less than, goto continue
    cmpa #'z        compare A to lowercase 'z'
    bgt continue    if greater than, goto continue
    suba #32        a = a - 32

For characters going to device #0, A will be the character to be output. This code just looks at the value of A and compares it to a lowercase ‘a’… If lower, skip doing anything else. If it wasn’t lower, it then compares it to lowercase ‘z’. If higher, skip doing anything. Only if it makes it past both checks does it subtract 32, converting ‘a’ through ‘z’ to ‘A’ through ‘Z’.

Lastly, when we are done (either converting to uppercase, or skipping it because it was not the screen), we have this:

continue
savedrvec rmb 3     call regular RAM hook
    rts             just in case...

The double labels — continue and savedrvec — will be at the same location in memory. I just had two of them so I was brancing to “continue” so it looked better than “bra savedrvec”, or better than saving the vector bytes as “continue”.

By having those three remembered (RMB) bytes right there, whatever was in the original RAM hook is copied there and it will now be executed. When it’s done, we RTS back to the ROM.

When this code is built and ran, it immediately starts working. Here is a BASIC loader that will place this code in memory:

10 READ A,B
20 IF A=-1 THEN 70
30 FOR C = A TO B
40 READ D:POKE C,D
50 NEXT C
60 GOTO 10
70 END
80 DATA 16128,16165,182,1,103,183,63,38,190,1,104,191,63,39,134,126,183,1,103,142,63,24,191,1,104,57,13,111,38,10,129,97,45,6,129,122,46,2,128,32,16169,16169,57,-1,-1

If you RUN that code, you can then to a CLEAR 200,&H3F00 to protect it from BASIC, and then EXEC &H3F00 to initialize it. Nothing will appear to happen, but if you try to do something like this:

PRINT "Lowercase looks weird on a CoCo"

…you will see “LOWERCASE LOOKS WEIRD ON A COCO”. To test it further, switch to lowercase (SHIFT-0 on a real CoCo, or SHIFT-ENTER on the XRoar emulator) and type a command like LIST.

If the code is working, it should still type out as “LIST” on the screen, and then give a “?SN ERROR” since it’s really lowercase, and BASIC does not accept lowercase commands.

Neat, huh?

No going back.

One warning: There is no uninstall routine. Once it’s installed, do not run it again or it will replace the modified RAM hook (that points to “newcode”) with a new RAM hook (which points to “newcode”) and then at the end of the newcode routine it will then jump to the saved RAM hook that points to “newcode”. Enjoy life in the endless loop!

To make this a better patch, ideally the code should also reserve a byte that represents “is it already installed” and check that first. The first time it’s installed, that byte will get set to some special value. If it is ran again, it checks for that value first, and only installs if the value is uninitialized. It’s not perfect, but it would help prevent running this twice.

An uninstall could also be written, which would simple restore the savedrvec bytes back in the original RAM hook.

But I’ll leave that as an exercise for you, if you are bored.

Until next time…

Migrating from Perforce to Git (BitBucket)

I am placing this information here in case it saves someone else two days of web searching. These steps cover how to do it on Windows and thus have several extra steps that are not needed for Linux and macOS users.

Prerequisites

  1. Perforce installed (with the p4 command line tools).
  2. Git installed: https://git-scm.com/download/win
  3. Python installed: https://www.microsoft.com/store/productId/9PJPW5LDXLZ5

It is assumed you have Perforce set up and authenticated so the p4 command line tool works. It is also assumed you have a remote Git repository like BitBucket also authenticated. I won’t cover those details.

Test the “git p4” command, and fix if needed.

From a command prompt, type “git p4” and see if it works. This relies on a python script called “get-p4” that may need to be edited to work with your version of Python. If you see this:

C:\>git p4
fatal: 'p4' appears to be a git command, but we were not
able to execute it. Maybe git-p4 is broken?

…you will need to edit the file and update the first line to change the reference to “python2” to just be “python”. The file is located here:

C:\Program Files\Git\mingw64\libexec\git-core\git-p4

Change the first line:

#!/usr/bin/python2

…to just be:

#!/usr/bin/python

The original is apparently designed to run only on systems where the python executable is called “python2”.

Step 1 – Clone Perforce in to a local Git repository

Create a directory that will hold your Perforce depot directories, and change in to it:

md FromPerforce
cd FromPerforce

Run the following command (where “xxx” is one of your Perforce depots — such as //depot or //Users or whatever you have). The @all will clone all revisions, and –import-labels is supposed to bring down all tags (this doesn’t seem to work for me):

git p4 clone --import-labels //XXX@all

When finished, you now have a subdirectory that is a local Git repository of all those Perforce files, including version history and commit comments.

Change in to this directory for the next step:

cd XXX

Step 2 – Create a fresh Git repository on BitBucket (or whever)

If you do not already have a Git repository on your remote server (BitBucket in this example), create one. You will need to know the URL of this repository, which is something like:

https://myusername@bitbucket.org/accountname/repositoryname.git

In BitBucket, you get this from the Clone button (it will populate a box with a git clone command line, and you can copy the URL from there).

Step 3 – Pull down the Git repository and rebase, and push the new stuff

git remote add origin https://username@bitbucket.org/accountname/XXX.git

git pull origin master --rebase

git push -u origin --all

(You can use “git remove remote origin” if you need to try this again, due to a type in the URL or something.)

Once that is done, you should be able to see all those Perforce files and their history in BitBucket.