
In the previous installment, I shared an inefficient BASIC program that could draw a spiral pattern around the screen at whatever location and size was specified. Since the program was not very efficient, I then shared an improved version that ran almost three times faster. This is what it looked like:
Using this type of spiral pattern would make a nice transition between a title or high score screen and the actual game screen. It would be useful to have a reverse spiral that started with a solid color screen and spiraled outward to reveal the screen, but that is something for the future.
For now, I wanted to explain why the original BASIC code was written so oddly. It was written so oddly because this was not originally BASIC code. I wrote the routine in assembly, then back-ported it to BASIC. Some of you may remember the time I took one of my old BASIC programs and ported it to C. Yeah, this is kinda like that. But different.
The routine in assembly language seems quite a bit faster :-)
In 6809 assembly, the main registers that are used include two 8-bit registers (A and B) and two 16-bit registers (X and Y). There are not enough registers to serve as all the variables needed for this program, so I made use of memory – storing values then retrieving them later. Much like my BASIC version, this assembly is not as good as it should be. Ideally, it should be routine where you load a few registers, then call the function, such as:
ldx #1024 ; start screen position
lda #32   ; width
ldb #16   ; height
bsr spiral
But I also wanted to specify the character (color) to use for the spiral, and I was out of registers. Thus, memory locations.
I used the RMB statement to remember two bytes in memory after the program:
XSTEPS rmb 1
YSTEPS rmb 1
This let me load the X and Y steps (width and height) of the spiral to draw in those memory locations, so the routine only needed a register for the character/color, and another pointing to the starting position:
 ldx #1024  ; point X to starting screen position
 lda #32    ; width...
 sta XSTEPS ; stored at XSTEPS
 lda #16    ; height...
 sta YSTEPS ; stored at YSTEPS
 ldb #255   ; b is color/character to use
 bsr right  ; start of spiral routine
I think I may redo it at some point, and use just one memory location for the color/character, then use registers A and B for the width and height. Looking at this now, that seems a bit cleaner.
But I digress…
Here is the 6809 assembly code I came up with, with the BASIC version included as comments so you can compare:
* lwasm spiralasm.asm -fbasic -ospiralasm.bas --map

    org $3f00

start:
 ldx #1024      * 10 CLS
 lda #96
 ldb #96
clearloop
 std ,x++
 cmpx #1536
 bne clearloop

                * 15 ' X=START MEM LOC
 ldx #1024      * 20 X=1024

                * 25 ' XS=XSTEPS (WIDTH)
 lda #32        * 30 XS=32
 sta XSTEPS
                * 35 ' YS=YSTEPS (HEIGHT)
 lda #16        * 40 YS=16
 sta YSTEPS
                * 45 ' B=CHAR TO POKE
 ldb #255       * 50 B=255
 bsr right      * 60 GOSUB 100

 ldx #1024      * 70 X=1024
 lda #18        * 71 XS=18
 sta XSTEPS
 lda #8         * 72 YS=8
 sta YSTEPS
 ldb #175       * 73 B=175 '143+32
 bsr right      * 74 GOSUB 100

 ldx #1294      * 75 X=1294 '1024+14+32*8
 lda #18        * 76 XS=18
 sta XSTEPS
 lda #8         * 77 YS=8
 sta YSTEPS
 ldb #207       * 78 B=207 '143+64
 bsr right      * 79 GOSUB 100

 ldx #1157      * 80 X=1157 '1024+5+32*4
 lda #22        * 81 XS=22
 sta XSTEPS
 lda #8         * 82 YS=8
 sta YSTEPS
 ldb #239       * 83 B=239 '143+96
 bsr right      * 84 GOSUB 100

goto            * 99 GOTO 99
    jsr [$a000] * POLCAT ROM routine
    cmpa #3     * break key
    bne goto
    rts

right           * 100 ' RIGHT
 lda XSTEPS     * 110 A=XS
rightloop
 stb ,x         * 120 POKE X,B
 deca           * 130 A=A-1
 beq rightdone  * 140 IF A=0 THEN 170
 leax 1,x       * 150 X=X+1
 bra rightloop  * 160 GOTO 120
rightdone
 leax 32,x      * 170 X=X+32
 dec YSTEPS     * 180 YS=YS-1
 beq done       * 190 IF YS=0 THEN 600

down            * 200 ' DOWN
 lda YSTEPS     * 210 A=YS
downloop
 stb ,x         * 220 POKE X,B
 deca           * 230 A=A-1
 beq downdone   * 240 IF A=0 THEN 270
 leax 32,x      * 250 X=X+32
 bra downloop   * 260 GOTO 220
downdone
 leax -1,x      * 270 X=X-1
 dec XSTEPS     * 280 XS=XS-1
 beq done       * 290 IF XS=0 THEN 600

left            * 300 ' LEFT
 lda XSTEPS     * 310 A=XS
leftloop
 stb ,x         * 320 POKE X,B
 deca           * 330 A=A-1
 beq leftdone   * 340 IF A=0 THEN 370
 leax -1,x      * 350 X=X-1
 bra leftloop   * 360 GOTO 320
leftdone
 leax -32,x     * 370 X=X-32
 dec YSTEPS     * 380 YS=YS-1
 beq done       * 390 IF YS=0 THEN 600

up              * 400 ' UP
 lda YSTEPS     * 410 A=YS
uploop
 stb ,x         * 420 POKE X,B
 deca           * 430 A=A-1
 beq updone     * 440 IF A=0 THEN 470
 leax -32,x     * 450 X=X-32
 bra uploop     * 460 GOTO 420
updone
 leax 1,x       * 470 X=X+1
 dec XSTEPS     * 480 XS=XS-1
 beq done       * 490 IF XS=0 THEN 600

 bra right      * 500 GOTO 100
done
 rts            * 600 RETURN

XSTEPS rmb 1
YSTEPS rmb 1
This experiment made me think about other assembly routines I’ve used, and what they would look like in BASIC. For example, I like to type this one in which will go through every byte of the 32-column text screen and increment it by one. It loops through this making a neat effect:
Here is that code:
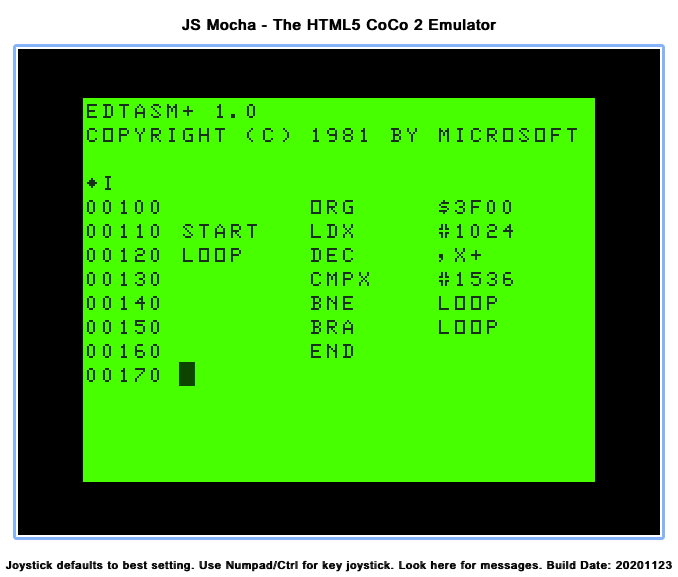
    org $3f00

start ldx #1024
loop dec ,x+
 cmpx #1536
 bne loop
 bra start
 end
You can even try it yourself right in a web browser:
- Go to the online JS Mocha CoCo emulator.
- From the center list, select “EDTASM” and then click “Load Bin“. This will load the Microsoft Editor/Assembler for the CoCo.
- Once ESTASM 1.0 is loaded, at the “*” prompt, type “I” to go in to input mode. The prompt will change in to line number.
- At line number “00100”, type:
(right arrow for tab)ORG(right arrow)$3F00(enter)
START(right arrow)LDX(right arrow)#1024(enter)
LOOP(right arrow)DEC ,X+(enter)
(right arrow)CMPX(right arrow)#1536(enter)
(right arrow)BNE(right arrow)LOOP(enter)
(right arrow)BRA(right arrow)START(enter)
(right arrow)END(enter) - Exit the editor by pressing ESCape (break key). This returns to the “*” prompt.
- Assemble the program by typing “A/IM/WE“. If there are any errors, explaining how editing works in EDTASM is beyond this article, so you could just restart EDTASM and begin again.
- If it built with “00000 TOTAL ERRORS”, enter the Z-Bug debugger by typing “Z“. The prompt will change to a “#” symbol.
- Run the program by typing “G START“. The screen should do the effect shown in the YouTube video above.
EDTASM NOTE: The use of tabs (right arrow) is just cosmetic and makes the source code look nice. Instead of doing all the (right arrow) stuff in step #4, you could just type spaces instead. It just wouldn’t look as nice in the listing.
With that tangent out of the way, here is what a literal translation of that short program might look like in Color BASIC:
10 X=1024
20 A=PEEK(X)
30 A=A-1:IF A<0 THEN A=255
40 POKE X,A
50 X=X+1
60 IF X<>1536 THEN 20
70 GOTO 10
80 END
And if you run that, you will see it takes over twelve seconds to go through the screen each time. Thus, assembly code is really the only way to go for this type of thing.
But, if speed is not an issue, translating 6809 assembly to BASIC can certainly be done, at least for simple things like this. But why would one want to?
This example is especially slow because BASIC has no command that replicates the assembly “DEC” operation. DECrement will decrement a register value, or a byte in memory. In this case, “DEC ,X+” say “decrement the byte at location X, then increment X by one.” Thus, replicating that in BASIC takes using the PEEK and POKE commands. Also, when you INCrement or DECrement a byte in assembly, it rolls over at the end. i.e., you can increment 0 all the way up to 255, then incrementing that again rolls over to 0. For decrement, it’s the opposite — start at 255, and decrement until it gets to zero, where a decrement would make it roll over back to 255. In BASIC, subtracting one just ends up making a negative number, so the rollover has to be achieved through the extra code in line 30.
There is more that needs to be done to this spiral routine, but I’ll save that for the future…
Until next time…