See Also: part 1, part 2, part 3, part 4, part 5, part 6 and part 7 (and maybe more to come…)
Source code for this series:
https://github.com/allenhuffman/CoCo_BASIC/tree/main/basic_assembly/consmove
After the last post in this series, I took a detour and learned more about how the DEF USR function works in Color BASIC. I am still not confident I am doing it properly, but for now I have “working” code that lets me toggle it on/off using the EXEC command or use DEF USR and call features using a number parameter like A=USR0(x) (returning a status variable) and even passing in a string (used for remapping the cursor movement characters) like A=USR0(“ABCD”)
Every new bit of education (most of it from Sean Conner‘s website) has me repeating: “Wish I knew then what I know now.”
Today I present the current version of the program. Other than trying to clean up the assembly source code a bit, the main thing I have done is try to make the code position independent. Normally, you build code that loads at a specific address in memory and it runs from there. If you try to move that code elsewhere in memory, it fails because the code itself is hard-coded to jump to specific memory locations.
The 6809 processor supports Position Independent Code (PIC) with instructions that are “relative” — instead of “jump to memory location XYX” you can “branch to X spots lower/earlier in the code.” These relative branches mean no matter where the code is loaded in memory, they still work.
Accessing data in the code is done in similar manner. Instead of “load register A with the value at address XYZ”, it can become “load register A with the value that is X bytes lower/earlier in the code.”
Microware’s OS-9 operating system required position independent code since you could load many programs in memory at the same time, and the OS would decide where to put them. I know I used to write quite a bit of assembly code in my CoCo OS-9 days, so at one point I knew how to do this. I mean, I wrote a full Space Invaders-type game in position independent 6809 assembly code back then!
https://github.com/allenhuffman/Invaders09
Since I no longer remembered how to do it, I am having to re-learn PIC and specifically learn how to do it with code that has to used fixed memory locations when going in and out of the Color BASIC ROM code.
Therefore, proceed with caution! My code may still have spots I missed so for now let’s just load and run it at the intended memory location of &H3E00. (You can change the source code to load wherever you want, of course.)
Here is my current version:
; lwasm consmove7.asm -fbasic -oconsmove7.bas --map --list
; decb copy -2 consmove7.bin drive0.dsk,CONSMOVE.BIN

; Allow embedded characters to move the cursor in a PRINT

;USR        SET     0           ; Support DEF USR. Comment out for just EXEC

ORGADDR     equ     $3e00       ; Where program loads in memory

;------------------------------------------------------------------------------
; Definitions
;------------------------------------------------------------------------------
UPCHAR      equ     'u          ; default character for up
DOWNCHAR    equ     'd          ; default character for down
LEFTCHAR    equ     'l          ; default character for left
RIGHTCHAR   equ     'r          ; default character for right

;------------------------------------------------------------------------------
; Absolute addresses of items in RAM variables
;------------------------------------------------------------------------------
; Direct Page
CURLIN      equ     $68         ; PV CURRENT LINE # OF BASIC PROGRAM, $FFFF = DIRECT
DEVNUM      equ     $6f         ; device number being used for I/O
CURPOS      equ     $88         ; location of cursor position in RAM
EXECJP      equ     $9d         ; location of jump address for EXEC
; Others
RVEC3       equ     $167        ; console out RAM hook
RVEC12      equ     $182        ; inputting a BASIC line
VIDRAM      equ     $400        ; VIDEO DISPLAY AREA

;------------------------------------------------------------------------------
; Absolute addresses of ROM calls
;------------------------------------------------------------------------------
CHROUT      equ	    $A002
INTCNV      equ     $B3ED
GIVABF      equ     $B4F4

            org     ORGADDR

;------------------------------------------------------------------------------
; This code can be called by EXEC, EXEC xxxx, USRx(n) or USRx("STRING")
;------------------------------------------------------------------------------
start       leay    start,pcr   ; Y=start
            cmpx    #start      ; X=start? (called by "EXEC xxxx")
            beq     toggle      ; if yes, goto toggle
            cmpx    #$abab      ; X=ABAB? (called by "EXEC")
            bne     fromusr     ; if no, goto fromusr
            ldx     <EXECJP     ; else, load X with EXECJP address
            cmpx    #start      ; X=start? (called by "EXEC xxxx")
            beq     toggle      ; if yes, goto toggle
                                ; else, must be USR
fromusr     tsta                ; compare A to 0
            beq     donumber    ; if A=0, number passed in. goto donumber
            inca                ; inc A so if 255 (string) it will be 0 now
            beq     dostring    ; if A=0 (was 255), string. goto dostring
            bra     unknown     ; else, goto unknown (this should never happen)

;------------------------------------------------------------------------------
; Restore default up, down, left and right characters
;------------------------------------------------------------------------------
defaults    lda     #UPCHAR
            sta     up,pcr
            lda     #DOWNCHAR
            sta     down,pcr
            lda     #LEFTCHAR
            sta     left,pcr
            lda     #RIGHTCHAR
            sta     right,pcr
            lbra    exitsuccess ; TODO: reorganize to use just "bra"

;------------------------------------------------------------------------------
; A=USRx("STRING")
; X will be VARPTER, B will be string length
;------------------------------------------------------------------------------
dostring    tstb                ; B=0?
            beq     defaults    ; if yes, goto defaults
            cmpb    #4          ; is B=4? (4 characters - up, down, left, right.)
            bne     exiterror   ; if no, goto exiterror
            ldy     2,x         ; load Y with address of string data
            ldd     ,y++        ; load D with UP and DOWN characters, inc Y twice
            std     up,pcr      ; store them at up and down
            ldd     ,y          ; load D with LEFT and RIGHT characters
            std     left,pcr    ; store them at left and right
            bra     exitsuccess ; goto exitsuccess

;------------------------------------------------------------------------------
; A=USRx(0)
; INTCNV will get the number parameter into the D register
;------------------------------------------------------------------------------
donumber    jsr     INTCNV      ; get passed in value in D
            cmpd    #0          ; is D=0? USRx(0)
            beq     toggle      ; if yes, goto toggle
            cmpd    #1          ; is D=1? USRx(1)
            beq     install     ; if yes, goto install
            cmpd    #-1         ; is D=-1? USRx(-1)
            beq     uninstall   ; if yes, goto uninstall

;------------------------------------------------------------------------------
; This should never happen
;------------------------------------------------------------------------------
unknown     leax    msgunknown,pcr  ; load X with address of "unknown" message
            bsr     print           ; call the print subroutine
            bra     exiterror       ; goto exiterror

;------------------------------------------------------------------------------
; EXEC would start here
;------------------------------------------------------------------------------
toggle      lda     savedrvec3,pcr      ; test if we have already installed
            bne     uninstall           ; if not 0, then gotouninstall
                                        ; else fall through to install
install     lda     savedrvec3,pcr      ; test if we have already installed
            bne     installed           ; if not 0, already installed

            ; Hijack the CONOUT routine
            lda     RVEC3               ; get RAM hook op code
            sta     savedrvec3,pcr      ; save it
            ldx     RVEC3+1             ; get RAM hook address
            stx     savedrvec3+1,pcr    ; save it

            lda     #$7e                ; op code for JMP
            sta     RVEC3               ; store it in RAM hook
            leax    newrvec3,pcr        ; address of new code
            stx     RVEC3+1             ; store it in RAM hook

            ; Hijack the LINE INPUT routine
            lda     RVEC12              ; get RAM hook op code
            sta     savedrvec12,pcr     ; save it
            ldx     RVEC12+1            ; get RAM hook address
            stx     savedrvec12+1,pcr   ; save it

            lda     #$7e                ; op code for JMP
            sta     RVEC12              ; store it in RAM hook
            leax    newrvec12,pcr       ; address of new code
            stx     RVEC12+1            ; store it in RAM hook

installed   leax    msginstalled,pcr    ; load X with address of "installed" message
            bsr     print               ; call the print subroutine
            bra     exitsuccess         ; goto exitsuccess

;------------------------------------------------------------------------------

exiterror   ldd     #-1                 ; return -1 as an error code
            bra     return              ; goto return
exitsuccess ldd     #0                  ; return 0 as an error code
return      jmp     GIVABF              ; return value back to USRx()

;------------------------------------------------------------------------------
; PRINT subroutine. Prints the 0-terminated string pointed to by X plus CR
;------------------------------------------------------------------------------
print       lda     ,x+
            beq     printdone
            jsr     [CHROUT]
            bra     print
printdone   lda     #13
            jmp     [CHROUT]            ; JMP CHROUT will do an rts.
            ;rts

;------------------------------------------------------------------------------
; Uninstall hooks and restore original ones
;------------------------------------------------------------------------------
uninstall   lda     savedrvec3,pcr      ; get saved RAM hook op code
            beq     uninstalled         ; if zero, already uninstalled
            sta     RVEC3               ; restore RAM hook op code
            ldx     savedrvec3+1,pcr    ; get saved RAM hook address
            stx     RVEC3+1             ; restore RAM hook address

            lda     savedrvec12,pcr     ; get saved RAM hook op code
            sta     RVEC12              ; restore RAM hook op code
            ldx     savedrvec12+1,pcr   ; get saved RAM hook address
            stx     RVEC12+1            ; restore RAM hook address

            clr     savedrvec3,pcr      ; zero out to mark unused

uninstalled leax    msguninstalled,pcr
            bsr     print
            bra     exitsuccess

;------------------------------------------------------------------------------
; Data storage for the string messages
;------------------------------------------------------------------------------
msginstalled fcc    "ON"
            fcb     0

msguninstalled fcc  "OFF"
            fcb     0

msgunknown  fcc     "UNK"
            fcb     0

;------------------------------------------------------------------------------
; Do this only if DEVNUM is 0 (console)
;------------------------------------------------------------------------------
newrvec3    tst     <DEVNUM         ; is DEVNUM 0?
            bne     savedrvec3      ; not device #0 (console)

            ; Do this only if NOT in Direct mode
            pshs    a               ; save A
            lda     CURLIN          ; GET CURRENT LINE NUMBER (CURLIN)
            inca                    ; TEST FOR DIRECT MODE
            puls    a               ; restore A
            beq     savedrvec3      ; if 0, in direct mode

            leas    2,s             ; remove PC from stack since we won't
                                    ; return there

; Now this is the start of what Color BASIC ROM does for PUTCHR:
; PUT A CHARACTER ON THE SCREEN
;LA30A
            PSHS    X,B,A           ; SAVE REGISTERS
            LDX     CURPOS          ; POINT X TO CURRENT CHARACTER POSITION

;checkup
            cmpa    up,pcr          ; is it the up character?
            bne     checkdown       ; if no, goto checkdown
            cmpx    #VIDRAM+32      ; compare X to start of second line
            blt     cantmove        ; if less than, goto cantmove
            leax    -32,x           ; move up one line
            bra     cursormoved     ; goto checksdone

checkdown   cmpa    down,pcr        ; is it the down character?
            bne     checkleft       ; if no, goto checkleft
            cmpx    #VIDRAM+512-32  ; compare X to start of bottom line
            bge     cantmove        ; if greater or equal, goto cantmove
            leax    32,X            ; move down one line
            bra     cursormoved     ; goto checksdone

checkleft   cmpa    left,pcr        ; is it the left character?
            bne     checkright      ; if no, goto checkright
            cmpx    #VIDRAM         ; top left of screen?
            beq     cantmove        ; if yes, goto cantmove
            leax    -1,X            ; move left one character
            bra     cursormoved     ; goto checksdone

checkright  cmpa    right,pcr       ; is it the right character?
            bne     goLA30E         ; if no, goto goLA30E
            cmpx    #VIDRAM+511     ; is it bottom right of screen?
            beq     cantmove        ; if yes, goto cantmove
            leax    1,x             ; increment X, skipping that location
            bra     cursormoved     ; goto checksdone

; This is the next instruction after PSHS X,B,A / LDX CURPOS in the ROM.
goLA30E     jmp     $A30E           ; jump back into Color BASIC ROM code

; This is the STX CURPOS / check for scroll routine in the ROM.
cursormoved jmp     $A344           ; jump back into Color BASIC ROM code.

; This is the PULS A,B,X,PC at the end of this routine in the ROM.
cantmove    jmp     $A35D           ; jump back into Color BASIC ROM code

savedrvec3  fcb     0               ; call regular RAM hook
            fcb     0
            fcb     0
            rts                     ; just in case..

;------------------------------------------------------------------------------
; William Astle: "RVEC12 would be right. You can clobber X in this case. You
; would check 2,s to see if it's $AC7F. If it is, you just set CURLIN to $FFFF
; This works around the unfortunate ordering of the instructions in the
; immediate mode loop."
;------------------------------------------------------------------------------
newrvec12   ldx     2,s             ; load X with address we were called from
            cmpx    #$ac7f          ; compare X to $AC7F
            bne     savedrvec12     ; if not that, goto savedrvec12 to return
            ldx     #$ffff          ; else, load X with $ffff (directo mode)
            stx     <CURLIN         ; update CURLINE

savedrvec12 fcb     0               ; call regular RAM hook
            fcb     0
            fcb     0
            rts                     ; just in case..

;------------------------------------------------------------------------------
; Placed at the end of the program memory for easy patching in the BASIC
; loader DATA statements
;------------------------------------------------------------------------------
up          fcb     UPCHAR
down        fcb     DOWNCHAR
left        fcb     LEFTCHAR
right       fcb     RIGHTCHAR

            end
I compiled it using the lwasm assembler written by William Astle. It can generate a BASIC loader program, which is what this is:
0 'CONSMOVE7
5 CLEAR 200,&3E00
10 READ A,B
20 IF A=-1 THEN 70
30 FOR C = A TO B
40 READ D:POKE C,D
50 NEXT C
60 GOTO 10
70 END
80 DATA 15872,16246,49,141,255,252,140,62,0,39,100,140,171,171,38,7,158,157,140,62,0,39,88,77,39,56,76,39,29,32,72,134,117,167,141,1,80,134,100,167,141,1,75,134,108,167,141,1,70,134,114,167,141,1,65,22,0,130,93,39,226,193,4,38,118,16,174,2,236
90 DATA 161,237,141,1,43,236,164,237,141,1,39,32,106,189,179,237,16,131,0,0,39,20,16,131,0,1,39,20,16,131,255,255,39,107,48,141,0,152,141,85,32,72,166,141,0,238,38,93,166,141,0,232,38,52,182,1,103,167,141,0,223,190,1,104,175,141,0,217,134,126
100 DATA 183,1,103,48,141,0,117,191,1,104,182,1,130,167,141,0,213,190,1,131,175,141,0,207,134,126,183,1,130,48,141,0,185,191,1,131,48,141,0,73,141,13,32,5,204,255,255,32,3,204,0,0,126,180,244,166,128,39,6,173,159,160,2,32,246,134,13,110,159,160
110 DATA 2,166,141,0,139,39,28,183,1,103,174,141,0,131,191,1,104,166,141,0,139,183,1,130,174,141,0,133,191,1,131,111,141,0,109,48,141,0,7,141,200,32,192,79,78,0,79,70,70,0,85,78,75,0,13,111,38,86,52,2,150,104,76,53,2,39,77,50,98,52,22,158,136
120 DATA 161,141,0,87,38,10,140,4,32,45,57,48,136,224,32,49,161,141,0,72,38,10,140,5,224,44,41,48,136,32,32,33,161,141,0,57,38,9,140,4,0,39,25,48,31,32,18,161,141,0,43,38,9,140,5,255,39,10,48,1,32,3,126,163,14,126,163,68,126,163,93,0,0,0,57,174
130 DATA 98,140,172,127,38,5,142,255,255,159,104,0,0,0,57,117,100,108,114,-1,-1
You can RUN this on a CoCo or CoCo emulator to get the code loaded into memory, Then, you have two ways you can use it:
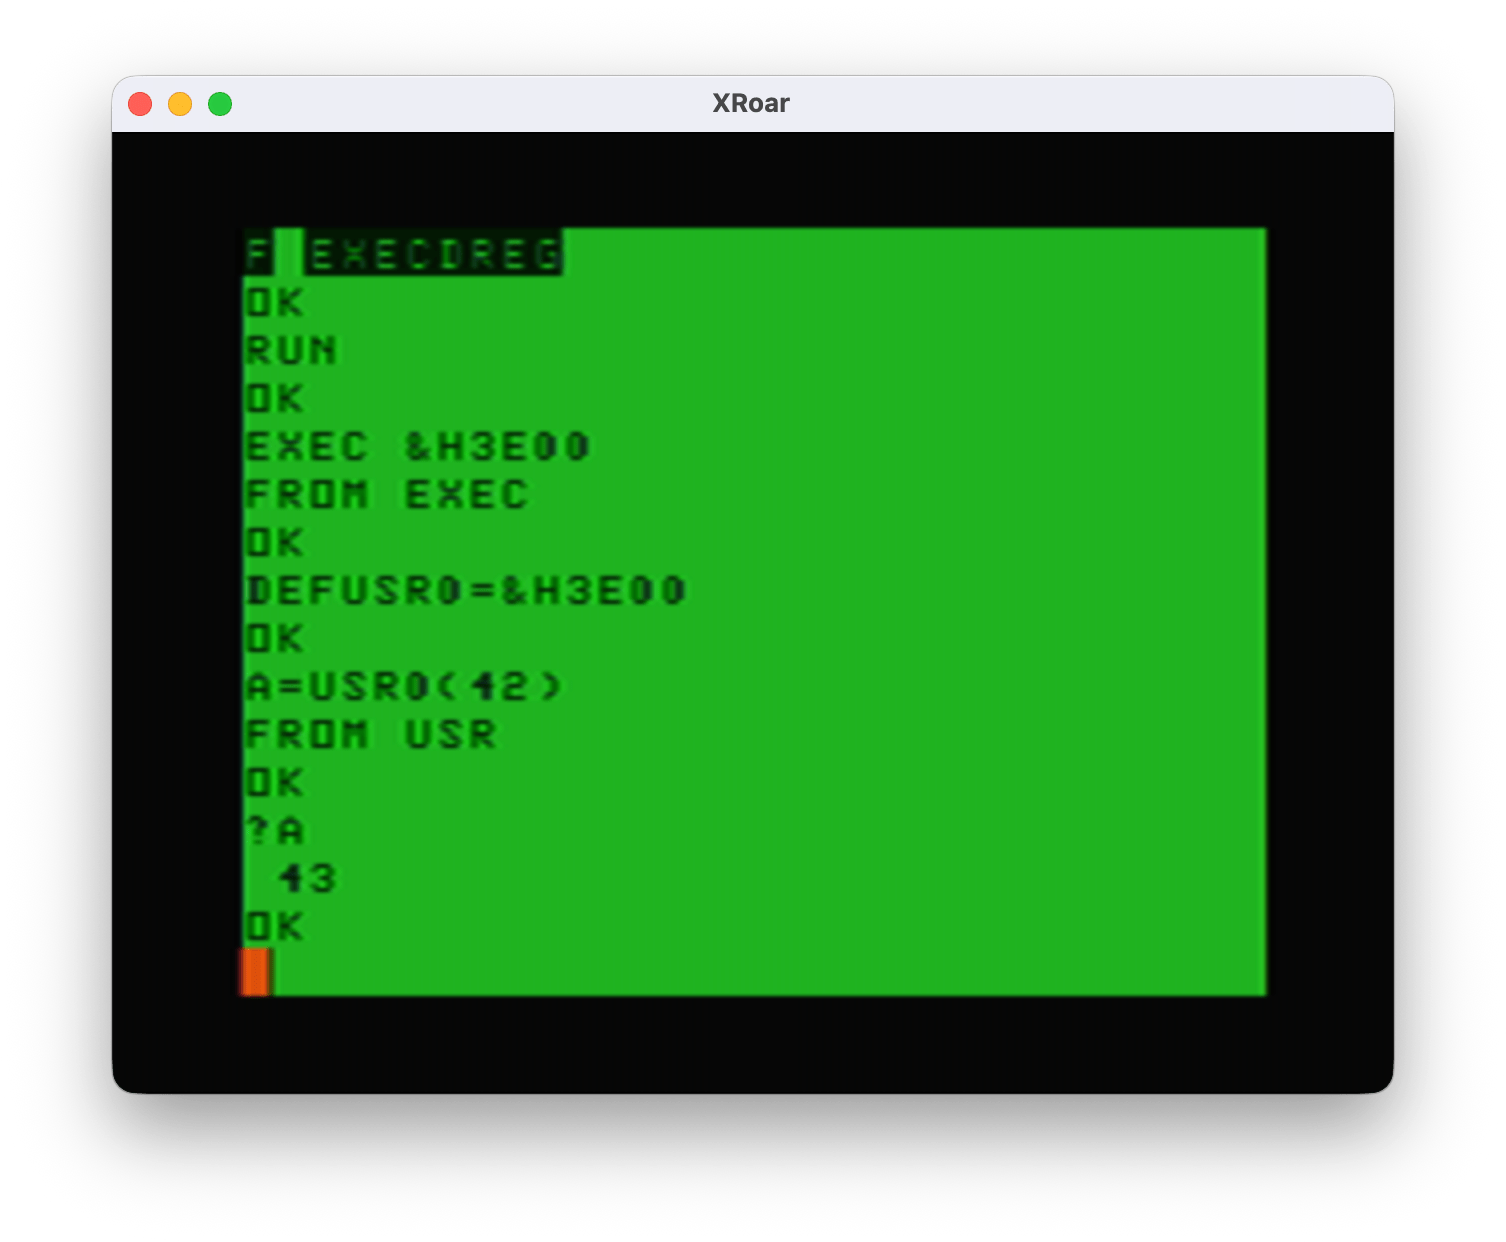
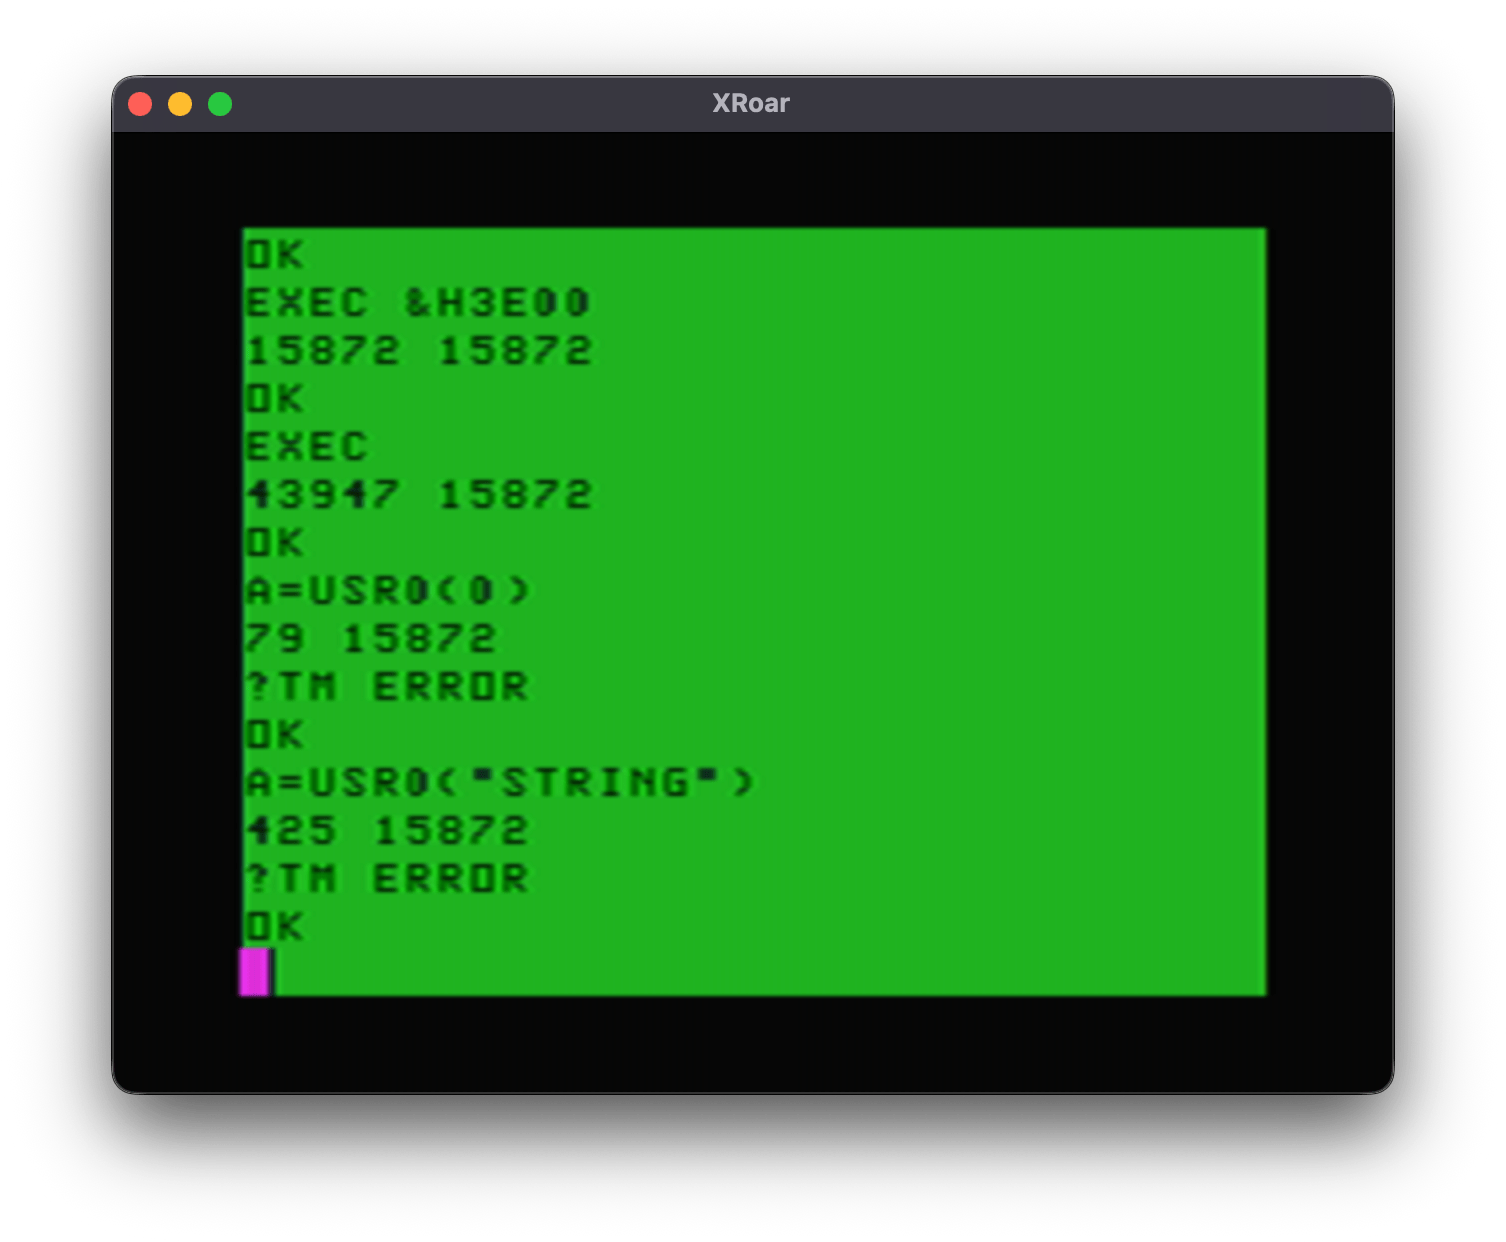
The EXEC method
Once in memory (be sure to CLEAR 200,&H3E00 to keep BASIC from overwriting this memory), you can start it by typing:
EXEC
You will see it print the word “ON” indicating that it has installed the patch. If you was to deinstall it, type EXEC again, and you will see “OFF”. Using EXEC, this is all the control you have – on or off.
The characters that move the cursor default to the lowercase letters “u” (up), “d” (down), “l” (left) and “r” (right). If you want to change them, they are the last for (non negative) numbers in the DATA statements:
120 DATA 161,141,0,87,38,10,140,4,32,45,57,48,136,224,32,49,161,141,0,72,38,10,140,5,224,44,41,48,136,32,32,33,161,141,0,57,38,9,140,4,0,39,25,48,31,32,18,161,141,0,43,38,9,140,5,255,39,10,48,1,32,3,126,163,14,126,163,68,126,163,93,0,0,0,57,174
130 DATA 98,140,172,127,38,5,142,255,255,159,104,0,0,0,57,117,100,108,114,-1,-1
The numbers 117, 100, 108 and 114 are the ASCII characters for lowercase “u”, “d”, “l” and “r”. You can change them, then RUN the program and it will use the four letters you want to move the cursor.
Now, once it is installed, any PRINT done from the program (not from direct mode) will move the cursor when it sees one of those letters. Type in:
10 CLS 0
20 PRINT@200,"XXXXdllllXrrXdllllXXXX";
30 GOTO 30
…and you will see a box made of “X” characters, with the center still showing the CLS background color. Neat.
For more control, there is another way to use this…
The DEF USR method
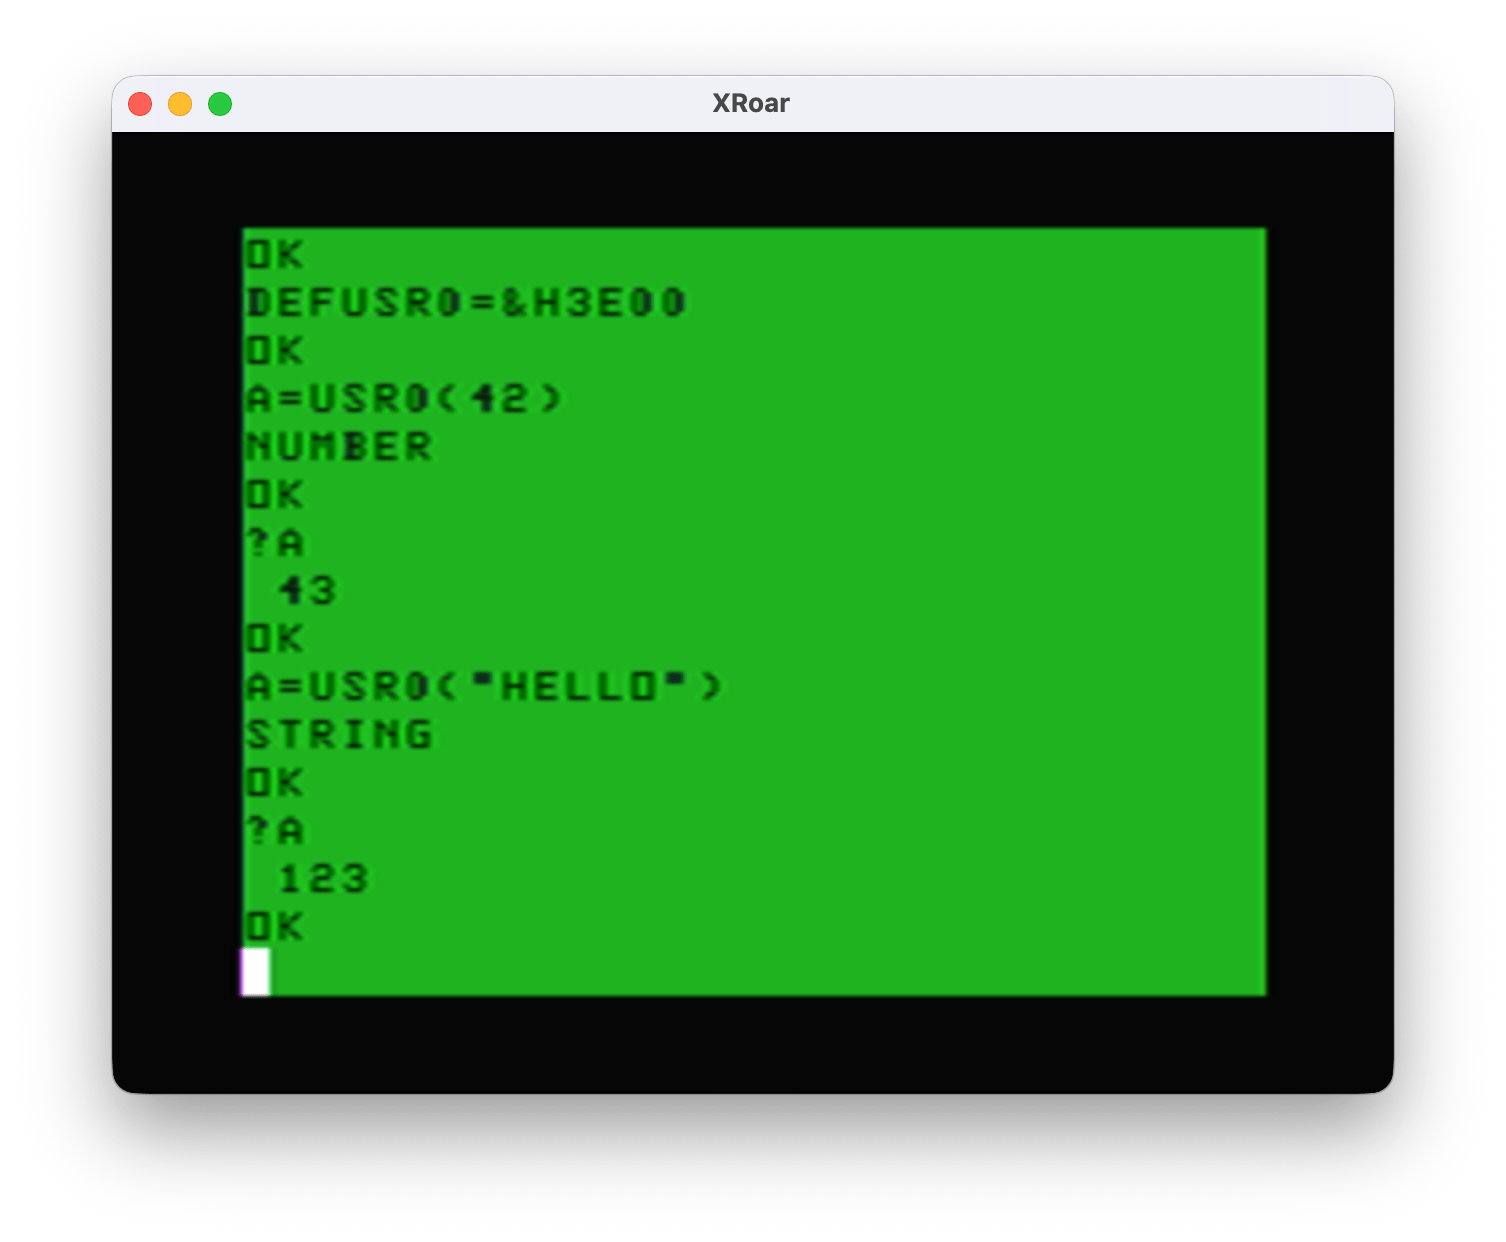
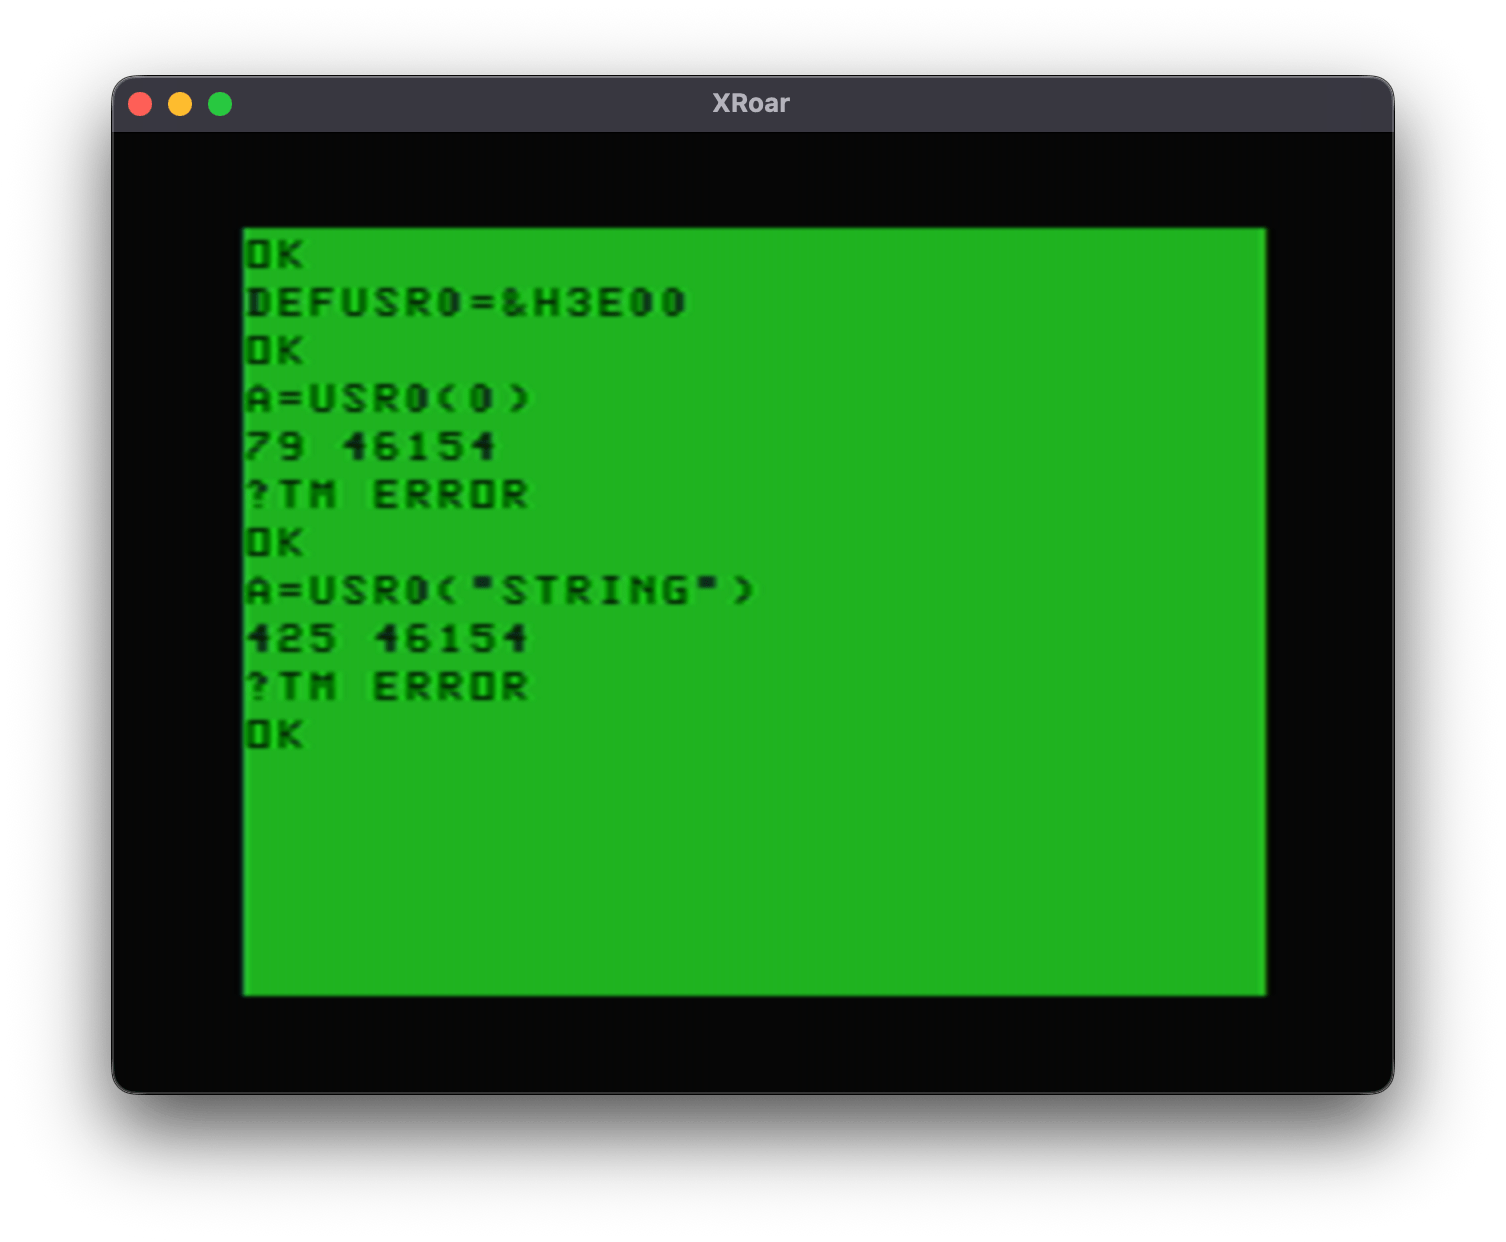
You can add this routine as a USRx() function by typing:
DEF USR0=&H300
Now you can toggle it ON/OFF (same as typing EXEC) by doing:
A=USR0(0)
Each time you do that you will see “ON” or “OFF” printed to the screen, indicating the status.
If you want to install it rather than toggle, pass in a 1:
A=USR0(1)
That will always print “ON”. It checks and if it was already installed, it just skips re-installing and prints ON.
To disable it, use -1:
A=USR0(-1)
And, if you want to customize the four characters used to move the cursor, you can pass in a four character string. If you wanted it to use uppercase letters, you could type:
A=USR0(“UDLR”)
A will come back with 0 if it worked, or -1 if it did not. If you do not pass in all four characters, you will be a -1 error value back.
And, if you want to restore back to the defaults of lowercase “udlr”, pass in the empty string:
A=USR0(“”)
What I need from you
What I need from you: Code inspection. Ideally, I want to provide this as a fully position independent program so it can be loaded anywhere in memory. Rather than give a 16K and 32K version that load at different addresses, I just want to provide one and the user can load it in memory wherever they want.
Also, if you see issues with how I am interfacing with the BASIC ROM, please let me know. I have only lightly tested this and “it seems to work for me.” Which is not at all testing ;-)
The smaller version.
As a bonus, here is a smaller version with all the USR stuff removed. If you just wanted to play with this and didn’t care about the extra features, start with this one. This one is less than 255 bytes, so I moved the start address up to $3F00 for a 16K system or you could have it at $7F00 for a 32K system.
; lwasm consmove7-exec.asm -fbasic -oconsmove7-exec.bas --map --list
; decb copy -2 consmove7-exec.bin drive0.dsk,CONSMVEX.BIN

; Allow embedded characters to move the cursor in a PRINT
; This is the small version that only supports EXEC.

; Smaller, so it can load at $3f00 (16K) or $7f00 (32K).
ORGADDR     equ     $3f00       ; Where program loads in memory

;------------------------------------------------------------------------------
; Definitions
;------------------------------------------------------------------------------
UPCHAR      equ     'u          ; default character for up
DOWNCHAR    equ     'd          ; default character for down
LEFTCHAR    equ     'l          ; default character for left
RIGHTCHAR   equ     'r          ; default character for right

;------------------------------------------------------------------------------
; Absolute addresses of items in RAM variables
;------------------------------------------------------------------------------
; Direct Page
CURLIN      equ     $68         ; PV CURRENT LINE # OF BASIC PROGRAM, $FFFF = DIRECT
DEVNUM      equ     $6f         ; device number being used for I/O
CURPOS      equ     $88         ; location of cursor position in RAM
; Others
RVEC3       equ     $167        ; console out RAM hook
RVEC12      equ     $182        ; inputting a BASIC line
VIDRAM      equ     $400        ; VIDEO DISPLAY AREA

            org     ORGADDR

;------------------------------------------------------------------------------
; This code can be called by EXEC
;------------------------------------------------------------------------------
start

;------------------------------------------------------------------------------
; EXEC would start here
;------------------------------------------------------------------------------
toggle      lda     savedrvec3,pcr      ; test if we have already installed
            bne     uninstall           ; if not 0, then gotouninstall
                                        ; else fall through to install
install     lda     savedrvec3,pcr      ; test if we have already installed
            bne     installed           ; if not 0, already installed

            ; Hijack the CONOUT routine
            lda     RVEC3               ; get RAM hook op code
            sta     savedrvec3,pcr      ; save it
            ldx     RVEC3+1             ; get RAM hook address
            stx     savedrvec3+1,pcr    ; save it

            lda     #$7e                ; op code for JMP
            sta     RVEC3               ; store it in RAM hook
            leax    newrvec3,pcr        ; address of new code
            stx     RVEC3+1             ; store it in RAM hook

            ; Hijack the LINE INPUT routine
            lda     RVEC12              ; get RAM hook op code
            sta     savedrvec12,pcr     ; save it
            ldx     RVEC12+1            ; get RAM hook address
            stx     savedrvec12+1,pcr   ; save it

            lda     #$7e                ; op code for JMP
            sta     RVEC12              ; store it in RAM hook
            leax    newrvec12,pcr       ; address of new code
            stx     RVEC12+1            ; store it in RAM hook

installed   rts

;------------------------------------------------------------------------------
; Uninstall hooks and restore original ones
;------------------------------------------------------------------------------
uninstall   lda     savedrvec3,pcr      ; get saved RAM hook op code
            beq     uninstalled         ; if zero, already uninstalled
            sta     RVEC3               ; restore RAM hook op code
            ldx     savedrvec3+1,pcr    ; get saved RAM hook address
            stx     RVEC3+1             ; restore RAM hook address

            lda     savedrvec12,pcr     ; get saved RAM hook op code
            sta     RVEC12              ; restore RAM hook op code
            ldx     savedrvec12+1,pcr   ; get saved RAM hook address
            stx     RVEC12+1            ; restore RAM hook address

            clr     savedrvec3,pcr      ; zero out to mark unused

uninstalled rts

;------------------------------------------------------------------------------
; Do this only if DEVNUM is 0 (console)
;------------------------------------------------------------------------------
newrvec3    tst     <DEVNUM         ; is DEVNUM 0?
            bne     savedrvec3      ; not device #0 (console)

            ; Do this only if NOT in Direct mode
            pshs    a               ; save A
            lda     CURLIN          ; GET CURRENT LINE NUMBER (CURLIN)
            inca                    ; TEST FOR DIRECT MODE
            puls    a               ; restore A
            beq     savedrvec3      ; if 0, in direct mode

            leas    2,s             ; remove PC from stack since we won't
                                    ; return there

; Now this is the start of what Color BASIC ROM does for PUTCHR:
; PUT A CHARACTER ON THE SCREEN
;LA30A
            PSHS    X,B,A           ; SAVE REGISTERS
            LDX     CURPOS          ; POINT X TO CURRENT CHARACTER POSITION

;checkup
            cmpa    up,pcr          ; is it the up character?
            bne     checkdown       ; if no, goto checkdown
            cmpx    #VIDRAM+32      ; compare X to start of second line
            blt     cantmove        ; if less than, goto cantmove
            leax    -32,x           ; move up one line
            bra     cursormoved     ; goto checksdone

checkdown   cmpa    down,pcr        ; is it the down character?
            bne     checkleft       ; if no, goto checkleft
            cmpx    #VIDRAM+512-32  ; compare X to start of bottom line
            bge     cantmove        ; if greater or equal, goto cantmove
            leax    32,X            ; move down one line
            bra     cursormoved     ; goto checksdone

checkleft   cmpa    left,pcr        ; is it the left character?
            bne     checkright      ; if no, goto checkright
            cmpx    #VIDRAM         ; top left of screen?
            beq     cantmove        ; if yes, goto cantmove
            leax    -1,X            ; move left one character
            bra     cursormoved     ; goto checksdone

checkright  cmpa    right,pcr       ; is it the right character?
            bne     goLA30E         ; if no, goto goLA30E
            cmpx    #VIDRAM+511     ; is it bottom right of screen?
            beq     cantmove        ; if yes, goto cantmove
            leax    1,x             ; increment X, skipping that location
            bra     cursormoved     ; goto checksdone

; This is the next instruction after PSHS X,B,A / LDX CURPOS in the ROM.
goLA30E     jmp     $A30E           ; jump back into Color BASIC ROM code

; This is the STX CURPOS / check for scroll routine in the ROM.
cursormoved jmp     $A344           ; jump back into Color BASIC ROM code.

; This is the PULS A,B,X,PC at the end of this routine in the ROM.
cantmove    jmp     $A35D           ; jump back into Color BASIC ROM code

savedrvec3  fcb     0               ; call regular RAM hook
            fcb     0
            fcb     0
            ;rts                     ; just in case..

;------------------------------------------------------------------------------
; William Astle: "RVEC12 would be right. You can clobber X in this case. You
; would check 2,s to see if it's $AC7F. If it is, you just set CURLIN to $FFFF
; This works around the unfortunate ordering of the instructions in the
; immediate mode loop."
;------------------------------------------------------------------------------
newrvec12   ldx     2,s             ; load X with address we were called from
            cmpx    #$ac7f          ; compare X to $AC7F
            bne     savedrvec12     ; if not that, goto savedrvec12 to return
            ldx     #$ffff          ; else, load X with $ffff (directo mode)
            stx     <CURLIN         ; update CURLINE

savedrvec12 fcb     0               ; call regular RAM hook
            fcb     0
            fcb     0
            ;rts                     ; just in case..

;------------------------------------------------------------------------------
; Placed at the end of the program memory for easy patching in the BASIC
; loader DATA statements
;------------------------------------------------------------------------------
up          fcb     UPCHAR
down        fcb     DOWNCHAR
left        fcb     LEFTCHAR
right       fcb     RIGHTCHAR

            end
And here is a BASIC loader for that version:
0 'CONSMVEX.BAS
5 CLEAR 200,&H3F00
10 READ A,B
20 IF A=-1 THEN 70
30 FOR C = A TO B
40 READ D:POKE C,D
50 NEXT C
60 GOTO 10
70 END
80 DATA 16128,16339,166,141,0,186,38,59,166,141,0,180,38,52,182,1,103,167,141,0,171,190,1,104,175,141,0,165,134,126,183,1,103,48,141,0,65,191,1,104,182,1,130,167,141,0,160,190,1,131,175,141,0,154,134,126,183,1,130,48,141,0,132,191,1,131,57,166
90 DATA 141,0,121,39,28,183,1,103,174,141,0,113,191,1,104,166,141,0,120,183,1,130,174,141,0,114,191,1,131,111,141,0,91,57,13,111,38,86,52,2,150,104,76,53,2,39,77,50,98,52,22,158,136,161,141,0,85,38,10,140,4,32,45,57,48,136,224,32,49,161,141,0
100 DATA 70,38,10,140,5,224,44,41,48,136,32,32,33,161,141,0,55,38,9,140,4,0,39,25,48,31,32,18,161,141,0,41,38,9,140,5,255,39,10,48,1,32,3,126,163,14,126,163,68,126,163,93,0,0,0,174,98,140,172,127,38,5,142,255,255,159,104,0,0,0,117,100,108,114
110 DATA -1,-1
Until next time…