Author Archives: Allen Huffman

About Allen Huffman

Co-founder of Sub-Etha Software.

Color BASIC and 16-bits and AND and OR and NOT

Updates:

  • 2024-01-07 – Fixed a value in one of the examples.

During #SepTandy2020, I posted a CoCo-related video each day of the month. A few of them dealt with bit operations in Color BASIC. This was when I fist learned that Color BASIC could not deal with more than 15-bit values. You can do AND/OR/NOT operations

These work:

PRINT 32767 AND 1
PRINT 32767 OR 1
PRINT NOT 32767

…but these will return ?FC ERROR:

PRINT 32768 AND 1
PRINT 32768 OR 1
PRINT NOT 32678

8-bits before 16-bits

8-bits is handled just fine. Here is an example program that will display an 8-bit value (0-255) as binary. It is very slow:

0 ' slow8bit.bas
10 FOR Z=0 TO 255
20 GOSUB 1000:PRINT
30 NEXT
40 END
1000 REM SLOW: 8-BIT Z AS BINARY
1010 FOR BT=7 TO 0 STEP-1
1020 IF Z AND 2^BT THEN PRINT "1"; ELSE PRINT "0";
1030 NEXT:RETURN

If you looked at TIMER, that one would count to 7339 (about 122.2 seconds). And here is a version that is substantially faster because it pre-calculates the AND bit values in an array:

0 ' fast8bit.bas
5 DIM BT(7):FOR BT=0 TO 7:BT(BT)=INT(2^BT):NEXT
10 FOR Z=0 TO 255
20 GOSUB 1000:PRINT
30 NEXT
40 END
1000 REM FAST: 8-BIT Z AS BINARY
1010 FOR BT=7 TO 0 STEP-1
1020 IF Z AND BT(BT) THEN PRINT "1"; ELSE PRINT "0";
1030 NEXT:RETURN

TIMER for that one would count to 1372 (about 22.8 seconds).

When I was recording those videos, I decided to make versions that handled 16-bit values. That is when I discovered you could not to that in Color BASIC.

16-bit workaround

Color BASIC seems to treat bit values as signed, so instead of 0 to 65535, it is really -32768 to 32767. That led me to a workaround where, if the high bit was set, I would subtract 65536 from the value and do the AND/OR/NOT on a negative value. And it worked!

0 ' fast16bit.bas
5 DIM BT(15):FOR BT=0 TO 14:BT(BT)=INT(2^BT):NEXT:BT(15)=-32768
10 FOR Z=0 TO 65535
20 GOSUB 1000:PRINT
30 NEXT
40 END
1000 REM SLOW: 16-BIT Z AS BINARY
1005 IF Z>32767 THEN Z=Z-65536
1010 FOR BT=15 TO 0 STEP-1
1020 IF Z AND BT(BT) THEN PRINT "1"; ELSE PRINT "0";
1030 NEXT:RETURN

The above version uses powers-of-two for the first 15 bits (1, 2, 4, 8, 16, etc.) then for bit 16 it uses -32768, which will work. When the value is passed in, if it is larger than 32767, it is turned in to a negative value which would be a 16-bit number with the high bit set, indicating negative.

I have no idea if this is “supposed” to work, or even be allowed (AND/OR/NOT on a negative), but it does.

And what about AND? (And OR, and NOT?)

For something I am working on, I wanted to use AND to get the most significant and least significant bytes of a 16-bit value. I could not, so I came up with various workarounds:

  1. To get the MSB of a 16-bit value, shift the 16-bit value right 8 bits (divide by 256).
  2. To get the LSB of a 16- bit value, subtract the MSB*256 from the original 16-bit value.
10 W=&HFFEE
20 M=INT(W/256)
30 L=W-M*256
40 PRINT HEX$(W),HEX$(M);" ";HEX$(L)

This worked fine, but required swapping variables around to preserve the original values.

In my project, I then wanted to clear the top 5-bits of the word, so I would clear them in the MSB value:

M=M AND &H07

…and then I could re-build the word variable using “W=M*256+B”.

Then I wondered: Could I somehow use the same trick I used for 16-bit binary numbers to make AND, OR and NOT just work on the value?

It turns out, yes. Yes I could.

I started with a subroutine that would take a 16-bit value in in Z and convert it, as needed, to a negative value that represented the desired bits. I did this this by manually looping through the bits and adding the appropriate bit value from the same array I used in the fast 16-bit routine shown earlier:

5 DIM BT(15):FOR BT=0 TO 14:BT(BT)=INT(2^BT):NEXT:BT(15)=-32768
...
1000 ' CONVERT 16-BIT Z TO ZC
1010 ZC=0:IF Z>32767 THEN Z=Z-65536 ELSE ZC=Z:RETURN
1020 FOR BT=15 TO 0 STEP-1
1030 IF Z AND BT(BT) THEN ZC=ZC+BT(BT)
1040 NEXT:RETURN

I could then set a value to Z and call this subroutine and then use ZC with AND/OR/NOT:

10 V=65535:A=&HFF00
20 PRINT V;"AND";A;"=";
30 Z=V:GOSUB 1000:VC=ZC
40 Z=A:GOSUB 1000:AC=ZC
50 Z=VC AND AC

Yuck. But it worked. Except, after I AND the two converted values, the value I get would be a negative if it was using more than 15-bits. If I wanted to display that as HEX, I’d get another ?FC ERROR because you cannot HEX$ a negative.

Thus, I needed a routine to convert such a 16-bit negative value back to a normal positive number:

1100 ' CONVERT ZC BACK TO Z
1110 IF Z<0 THEN ZC=Z+65536 ELSE ZC=Z
1120 RETURN

The end result was a multistep routine I could use to AND, OR or NOT and 16-bit value:

0 ' AND16.BAS
5 DIM BT(15):FOR BT=0 TO 14:BT(BT)=INT(2^BT):NEXT:BT(15)=-32768

10 V=65535:A=&HFF00
20 PRINT V;"AND";A;"=";
30 Z=V:GOSUB 1000:VC=ZC
40 Z=A:GOSUB 1000:AC=ZC
50 Z=VC AND AC:GOSUB 1100:PRINT ZC

999 END
1000 ' CONVERT 16-BIT Z TO ZC
1010 ZC=0:IF Z>32767 THEN Z=Z-65536 ELSE ZC=Z:RETURN
1020 FOR BT=15 TO 0 STEP-1
1030 IF Z AND BT(BT) THEN ZC=ZC+BT(BT)
1040 NEXT:RETURN

1100 ' CONVERT ZC BACK TO Z
1110 IF Z<0 THEN ZC=Z+65536 ELSE ZC=Z
1120 RETURN

And it works!

But is there a better way?

A better way

To avoid all the swapping with temporary variables, it might be easier to just make subroutines for AND, OR and NOT that handled two passed-in variables and returned the results in another.

I created a generic subroutine that would take V1 and V2, and convert V1 (if negative) and create a new value based on the bits of V2:

4000 ' CONVERT V1 AND V2
4010 IF V1>32767 THEN V1=V1-65536
4020 IF V2>32767 THEN V2=V2-65536
4030 ZZ=0:FOR BT=15 TO 0 STEP-1
4040 IF V2 AND BT(BT) THEN ZZ=ZZ+BT(BT)
4050 NEXT:V2=ZZ:RETURN

The program could set V1 to a value and V2 to a value for the bit operation, then GOSUB 4000. Then the program could do “V=V1 AND V2” or “V=V1 OR V2” or “V=NOT V2” to perform the operation.

Then, a GOSUB to 5000 would convert V back to the positive value (if needed):

5000 ' CONVERT V BACK, IF NEEDED
5010 IF V<0 THEN V=V+65536
5020 RETURN

This allowed a slightly less ugly way to do AND, OR and NOT on 16-bit values:

0 ' ANDORNOT16.BAS
5 DIM BT(15):FOR BT=0 TO 14:BT(BT)=INT(2^BT):NEXT:BT(15)=-32768

10 V1=&HFFFF:V2=&HFF00
20 PRINT HEX$(V1);" AND ";HEX$(V2),"=";
30 GOSUB 4000:V=V1 AND V2:GOSUB 5000:PRINT HEX$(V)

40 V1=&H8000:V2=&H0001
50 PRINT HEX$(V1);" OR  ";HEX$(V2),"=";
60 GOSUB 4000::V=V1 OR V2:GOSUB 5000:PRINT HEX$(V)

70 V2=&HF00F
80 PRINT "     NOT ";HEX$(V2),"=";
90 GOSUB 4000:V=NOT V2:GOSUB 5000:PRINT HEX$(V)

999 END

1000 ' AND 16-BIT V1 WITH V2
1010 GOSUB 4000:V=V1 AND V2:GOSUB 5000:RETURN

2000 ' OR 16-BIT V1 WITH V2
2010 GOSUB 4000:V=V1 OR V2:GOSUB 5000:RETURN

3000 ' NOT 16-BIT V1
2010 GOSUB 4000:V=NOT V2:GOSUB 5000:RETURN

4000 ' CONVERT V1 AND V2
4010 IF V1>32767 THEN V1=V1-65536
4020 IF V2>32767 THEN V2=V2-65536
4030 ZZ=0:FOR BT=15 TO 0 STEP-1
4040 IF V2 AND BT(BT) THEN ZZ=ZZ+BT(BT)
4050 NEXT:V2=ZZ:RETURN

5000 ' CONVERT V BACK, IF NEEDED
5010 IF V<0 THEN V=V+65536
5020 RETURN

It still ain’t pretty, but it still works. (Though has not been extensively tested, so your milage may vary.)

Until next time…

DEF FN for Fun and Profit

In a comment to my recent article about VARPTR, Rogelio Perea chimed in…

Still learning something new about the CoCo even after all the years, excellent article!

Would there ever be one about DEFFN? :-)

–  Rogelio Perea II, 7/19/2022

Challenge accepted.

DEF FN: Definitely Fun?

There are many features of Microsoft Color BASIC that went right over my head when I was learning to program as a junior high school kid. DEF FN was certainly one of them.

My first CoCo came with Extended Color BASIC, and that was required to use DEF FN. But what is is? According to Getting Started with Extended Color BASIC:

Extended Color BASIC has one numeric function, DEF FN, that is unlike any others we’ve talked about so far. DEF FN lets you create your own mathematical function. You can use your new function the same as any of the available functions (SIN, COS, TAN, and so on). Once you’ve used DEF FN to define a function, you may put it to work in your program by attaching the prefix FN to the name you assign to the new function. Here is the syntax for DEF FN:

DEF FN name (variable list) – formula

name is the name you assign to the function you create.
variable list contains one “dummy variable” for each variable to be used by the function.
formula defines the operation in terms of the variables given in the variable list

Note: Variable names that appear in formula serve only to define the formula; they do not affect program variables that have the same name. You may have only one argument in a formula call; therefore, DEF FN must contain only one variable.

You may use DEF FN only in a program, not in the immediate mode.

– Getting Started with Color BASIC, page 177.

I think my work here is done.

Until next time…

Okay, maybe not.

DEF FN: Define Function

There are commands in BASIC, such as PRINT and GOTO, and then there are functions that return values, such as SIN, ABS and INT.

PRINT SIN(42)
-.916521549

X=-42
PRINT ABS(X)
42

X=4.2
PRINT INT(X)
4

DEF FN allows you to create your own function that returns a value.

A simple example

We start with a simple example. What if you wanted a function that added 42 to any value you passed in? I will call this function “UA” (for “Ultimate Answer”) and define it as follows:

10 DEF FNUA(N)=N+42
20 PRINT FNUA(10)

If I run that, it will print 52. The new “function” FNUA(x) returns whatever you pass in with 42 added to it. Tada!

Function names seem to follow the same rules as variable names so you can have one or two letters (A to Z, AA to ZZ) or a letter and a number (A0 to Z9).

In the parens is a parameter that also follows the same rules of a variable. The parameter is just a placeholder so you have something to use in your new formula on the right of the equal sign. If you did DEF FNA(X) then after the equal you’d have whatever you want to happen to X. When the user calls it with FNA(123) then 123 goes to where the X was in the formula after the equals… Neat.

It’s kind of like a C function with only one parameter, now that I think about it/

// fnua(n) - return n plus 42
int fnua(float n)
{
    return n+42;
}

int main()
{
    float x = fnua(10);

    printf ("x = %f\n", x);

    return EXIT_SUCCESS;
}

You can have DEF FNA(X) or DEF FNZZ(AB) or any combination.

What can you use it for?

The manual gives an example of doing math with a long floating point value so you don’t have to have that value in your code everywhere you want to use it.

7 DEF FNR(X)=X/57.28577951
6 AA=FNR(AA): AB=FNR(AB): AC=FNR(AC)

At least I’m not the only one with code snippets that don’t really do anything.

Of course, for something like this you could have placed that number in a variable which would be faster than parsing a long number (in most cases). Still, if the formula itself is big, it could save typing, I guess.

Benchmarks, anyone?

I was curious if it would be any faster for other types of maths…

Suppose I want to use PRINT@ to put a character on the text screen, but want to use PEEK to see if it “hits” another character on the text screen. I would use the PRINT@ positions of 0-511, but I’d want to PEEK the screen memory locations of 1024-1535.

10 CLS:P=0
20 FOR I=1 TO 20:PRINT@RND(511)-1,"X";:NEXT
30 PRINT @P,"*";
40 A$=INKEY$:IF A$="" THEN 40
50 IF A$="W" THEN NP=P-32:GOTO 90
60 IF A$="A" THEN NP=P-1:GOTO 90
70 IF A$="S" THEN NP=P+32:GOTO 90
80 IF A$="D" THEN NP=P+1
90 IF NP<0 THEN 40
100 IF NP>510 THEN 40
110 IF PEEK(NP+1024)<>96 THEN 40
120 PRINT @P," ";
130 P=NP
140 GOTO 30

Above is a program that will clear the screen and put X characters in random positions. The player is an asterisk in the top left of the screen. Using the keys W (up), A (left), S (down) and D (right) will move the asterisk around the screen. Checks ensure you cannot go off the top or bottom of the screen, or run in to an X.

Line 110 does the conversion from PRINT@ position to PEEK position. Maybe we can do this:

0 ' defusr2.bas
10 CLS:P=0
15 DEF FNP(X)=X+1024
20 FOR I=1 TO 20:PRINT@RND(511)-1,"X";:NEXT
30 PRINT @P,"*";
40 A$=INKEY$:IF A$="" THEN 40
50 IF A$="W" THEN NP=P-32:GOTO 90
60 IF A$="A" THEN NP=P-1:GOTO 90
70 IF A$="S" THEN NP=P+32:GOTO 90
80 IF A$="D" THEN NP=P+1
90 IF NP<0 THEN 40
100 IF NP>510 THEN 40
110 IF PEEK(FNP(NP))<>96 THEN 40
120 PRINT @P," ";
130 P=NP
140 GOTO 30

The behavior is the same, and now I get the benefit of it not having to parse “NP+1024” each time. Parsing decimal values is slow. On Extended BASIC I could have replaced 1024 with hex &H400 and that would have been faster. For more speed, I could have used a variable and had “NP+S” or whatever.

But is it faster?

0 ' defbench1.bas
5 P=0
10 TIMER=0
20 FOR A=1 TO 1000
30 Z=P+1024
40 NEXT
50 PRINT TIMER

Doing “P+1024” 1000 times prints 481.

0 ' defbench2.bas
5 P=0
6 DEF FNP(X)=X+1024
10 TIMER=0
20 FOR A=1 TO 1000
30 Z=FNA(P)
40 NEXT
50 PRINT TIMER

That version prints 603. Not faster. The overhead of FN seems to be more than just doing it directly. In a way, this makes sense because in-lining code in assembly or C is faster than calling it as a subroutine/function.

But let’s try more… We could also include other things in the function, like the PEEK itself.

0 ' defbench3.bas
5 P=0
6 DEF FNP(X)=PEEK(X+1024)
10 TIMER=0
20 FOR A=1 TO 1000
30 Z=FNP(P)
40 NEXT
50 PRINT TIMER

That one prints 690, and if you had just done “30 Z=PEEK(P+1024)” it would have been 572.

Cool, but definitely slower. I believe this is because it’s still storing that formula in a buffer somewhere and executing it as if you’d just typed it in. Indeed, if you change the formula to use hex:

0 ' defbench3.bas
5 P=0
6 DEF FNP(X)=PEEK(X+&H400)
10 TIMER=0
20 FOR A=1 TO 1000
30 Z=FNP(P)
40 NEXT
50 PRINT TIMER

…it prints 480, which means it’s parsing that formula each time instead of converting it to a number when you define it.

Pity. It would have been really cool if this had been a way to bypass the detokenizer stuff in BASIC and speed up routines like that.

FN Conclusion

DEF FN is slower. I don’t see any example where it speeds anything up. With that said, I expect I’d use DEF FN if…

  • I had a custom function I used in multiple places, and wanted to maintain it in just one spot. This would be more efficient, perhaps, than making it a GOSUB subroutine.
  • I needed to save some bytes of BASIC memory.
  • I wanted to write an example that fix things on small lines on the screen, just for appearances.

For anything else, I think I’d just put it in and make the program a bit faster.

Where else might one use this?

More examples

Sebastian Tepper commented to another post with a more useful example for DEF FN. There are many times when we use two PEEKs to get a 16-bit value from two bytes in memory:

V=PEEK(25)*256+PEEK(27)

Sebastian mentioned using DEF FN for this:

DEF FNP(AD)=PEEK(AD)*256+PEEK(AD+1)

V=FNP(25)

That’s very cool, and something I could see myself using. I wish I had thought of that when I was doing all my “Color BASIC memory location” articles, since I typed the double PEEK lines over and over and over…

But that’s not all…

The defined function can also use other variables. You can only pass one in, but any variable that is declared at the time the FN is used may be used. You could do this:

10 DEF FNA(X)=X*Y
20 Y=10
30 PRINT FNA(Y)
RUN
50

Above, you pass in a value for “X” and it returns the value multiplied by whatever Y is at that moment. You could create more complex formulas that way, but it kind of defeats the purpose.

Speaking of defeating the purpose, here are more silly examples. Using it to replicate PEEK:

10 DEF FNP(X)=PEEK(X)
20 PRINT FNP(1024)

How about returning if something is true or not? Like, is a memory location outside screen memory?

…but that sure looks like it would be really slow. Still neat, though. You could do:

IF FNL(L) THEN PRINT"NOT IN SCREEN MEMORY"

It does make the code look neater — especially if something is being checked multiple times (such as checking four ghost in Pac-Man or whatever).

What other examples can you think of? Leave a comment.

Until next time…

Atomstack A5 Pro laser engraver and CHD340 drivers for Mac

I am in the processor reviewing an Atomstack A5 Pro laser engraver:

https://www.amazon.com/dp/B0B63CMHSJ

While I have worked with 3-D printers and large vinyl cutters, this is my first laser gadget. I already like it. A lot.

Assembly was very easy, though I had to redo a few steps because I wasn’t paying enough attention to the instructions.

To use the device, you have to download the free LaserGRBL program for Windows:

LaserGRBL for Windows

I initially tested the machine out on my old Lenovo Windows 10 machine. It was pretty easy to figure out how to do the basic things.

Next, I wanted to run it on my Mac, but LaserGRBL is Windows only. Since I run Windows 11 (Arm) on my Mac, I thought I could just do that. While LaserGRBL runs, the CH340 serial driver is not compatible with Windows/Arm. I was not able to find an Arm version of that driver, so it looks like it’s only possible to use this on an Intel PC (or Intel Mac). I guess I didn’t realize Arm windows machines like the Surface tablets couldn’t run all the same software.

Next I moved on the LightBurn, which is a commercial program available for Windows, And and Linux:

https://lightburnsoftware.com

I played with the trail a bit on an Intel Windows PC and it looked like it offered a lot of extra features that LaserGRBL did not have. When I tried it on the Mac, I couldn’t talk to the engraver because it needed the CH340 driver.

I did some searching and found a Sparkfun page with a download to “some” CH340 driver. That worked, but I wondered how up to date the driver was. I did some searching and found all kinds of places with random Chinese device drivers for the CH340.

I *think* the source of the CH340 (maybe the company that created it, originally) is this:

https://www.wch.cn/

And from there, I found a Mac 1.5 version, as well as a newer (from 2022) 1.7 version:

https://www.wch.cn/downloads/CH34XSER_MAC_ZIP.html

They also have Windows versions, but I did not see a Windows/Arm installer.

This version is much more updated from the one I got through Sparkfun. It installs an app that, when it runs, installs the driver. On modern Macs you have to do the normal “restart, tell the computer it’s okay to run this unsigned mystery driver from China” stuff to be able to use it. I found it interesting that, once it’s installed, it has an application that you just delete to remove the driver. I’m not sure how that works, unless it’s installing something that points to that application somehow.

But anyway, in case anyone else is looking for the CH340 driver for Mac, that’s where I found it.

Good luck.

And if you find an Arm version for Windows, leave a comment and let me know where you found it.

Thanks!

CoCo ROM to RAM (64K test) – part 2

See also: part 1 and part 2.

On a 64K Color Computer, the BASIC ROMs configure it so the first 32K is RAM and the second 32K is ROM. It is easy to change a memory location and cause the upper 32K to be RAM, too, but if you did that from BASIC you would suddenly find yourself without the ROM and would have a nice crash.

Machine language programs that did not rely on any ROM calls could enable the 64K RAM mode and use the full 64K memory as they wished.

At some point, someone was the first to figure out they could copy the ROMs in to RAM, and then switch to RAM mode. This would allow them to be running BASIC from RAM, and thus it would be possible to use POKEs to modify the BASIC code and do patches.

In an effort to see who first figured this out and published details, I did some searching…

March 1982 – Frank Hogg

I found something on page 18 of the March 1982 issue of Color Computer News. The article was called “MORE ON 64K by Frank Hogg of Frank Hogg Labs.

https://colorcomputerarchive.com/repo/Documents/Magazines/Color%20Computer%20News/Color%20Computer%20News%20%2307%20-%20March%201982.pdf

Last month we showed you how to access the other 32K in your Color Computer bringing it up to the full 64K, This month we’re going to discuss some additional uses for that memory, plus a program to copy the ROM Basic into RAM and run it there;

– Frank Hogg, Color Computer News, March 1982

Included was a BASIC program that loaded the machine code, with example POKEs used to modify BASIC (such as changing the PRINT command to be WRITE).

The assembly code was listed in comments:

1820 ' THE MACHINE LANGUAGE
1830 ' PROGRAM TO MOVE BASIC TO
1840 ' RAM IS AS FOLLOWS:
1850 '
1860 '
1870 ' EP   ORCC #$50 DIS. INTS.
1880 '      LDX #$8000 1ST ADDR.
1890 ' LOOP LDA ,X
1900 '      STA $FFDF MAP TYPE 1
1910 '      STA ,X+ IN RAM!
1920 '      STA $FFDE MAP TYPE 0
1930 '      CMPX #$FFOO LAST +1
1940 '      BNE LOOP
1950 '      STA $FFDF MAP TYPE 1
1960 '      ANDCC #$AF ENBL INTS
1970 '      RTS 

Was this the first such program published?

April 1983 – Frank Hogg revisted

Frank had a follow-up in the April 1983 issue, as well, on page 19. It looks like an article, but it was labeled as a paid ad called “64K KORNER“:

https://colorcomputerarchive.com/repo/Documents/Magazines/Color%20Computer%20News/Color%20Computer%20News%20%2319%20-%20April%201983.pdf

The code listed was the same, but with updated comments. He also added a copyright notice as well as a small standalone BASIC loader:

1 ' Copyright 1983 by Frank Hogg Permission to use is
2 ' given for all but commercial use.
10 CLEAR 999
20 DATA 26,80,190,128,0,183,255,222,166,128
30 DATA 183,255,223,167,31,140,224,0,37,241,57
40 FOR I=1 TO 21:READ A:A$=A$+CHR$(A):NEXT I
50 P=VARPTR(A$)+1
60 POKE P,126
70 EXEC P
80 PRINT "NOW IN RAM!"

Frank chose to store the machine language bytes as characters of a string. He then gets the pointer to the 5-byte string descriptor and adds one to it. That makes P point to the unused byte which is directly in front of the two byte address of the string in string space. The string descriptor looks like this:

        Addr of String in Mem
                 |
              +-----+
              |     |
[Siz] [N/A] [MSB] [LSB] [N/A]
        |
        P points here

He then POKEs a 126 at that P location, which I believe is a machine language JMP instructions. Then he EXECutes P, which makes for a very clever way to execute this code!

[Siz] [JMP] [MSB] [LSB] [N/A]

I would have done it the long way like this:

P=VARPTR(A$)
EXEC PEEK(P+2)*256+PEEK(P+3)

Frank did much better.

July 1987 – Rainbow article

Another ROM to RAM program showed up in the July 1987 Rainbow on page 97. Joseph Forgione submitted a small utility to change BASIC’s “OK” prompt to say “READY.” In included a short DRIVER.BAS program which was a ROM to RAM routine:

1 DATA 26,80,142,128,0,127,255,222,166,132,127,255,223,167,132,48,1,140,255,0,38,239,28,159,57
2 FORA=&HE00 TO &HE18:READX:POKEA,X:NEXTA:EXEC3584:POKE65503,0:PRINT"OS IS NOW IN RAM!"

I fed those bytes in to the 6809 Simulator at www.6809.uk to see what it looked like:

4000: 1A 50     ORCC  #$50
4002: 8E 80 00  LDX   #$8000
4005: 7F FF DE  CLR   $FFDE
4008: A6 84     LDA   ,X
400A: 7F FF DF  CLR   $FFDF
400D: A7 84     STA   ,X
400F: 30 01     LEAX  $01,X
4011: 8C FF 00  CMPX  #$FF00
4014: 26 EF     BNE   $4005
4016: 1C 9F     ANDCC #$9F
4018: 39        RTS

This is very similar to Hogg’s original, except instead of incrementing X when the byte is stored (STA ,X+) the author chose to not do that, and have a different instruction add one to X (LEAX $01,X). That makes it a few bytes larger and a few clock cycles slower, not that anyone would really notice.

Where did it come from?

I have yet to locate the one I used back on my CoCo 1, but it was probably from my pre-disk drive days and is on some old cassette tape somewhere. I had never seen Color Computer News, so my version probably came from Rainbow Magazine, or perhaps one of the few issues of Color Computer Magazine or Hot CoCo I picked up from the newstand. I was unable to locate anything obvious in the Rainbow indexes except that 1987 article.

Variations of this code seem to pop up, even to this day. In 2016, Juan Castro provided me a routine which I used in an earlier article about 64K. It was a faster one, that copied 6 bytes at a time instead of just one.

If anyone know who did this first (or at least was the first time it was in print somewhere), please leave a comment.

Until then, we’ll say it was Frank Hogg in March 1982.

Until next time…

CoCo ROM to RAM (64K test) – part 1

See also: part 1 and part 2.

Due to reasons I discussed at length in an earlier article, the Microsoft BASIC in the Color Computer recognizes no more than 32K of RAM, minus the memory used for BASIC and screen memory.

When folks figured out how to upgrade the original Color Computer to 64K (by piggybacking 32K of RAM on top of the existing chips and running some wires), BASIC could not see or use that extra memory.

Enter the Dragon

Dragon Data, which sold the CoCo “clone” Dragon computers in the U.K., improved on this limitation with their Dragon 64 computer. It would boot up in a compatibility mode with the same memory limitation as the earlier Dragon 32 machines, but allowed entering a new mode that moved things around to allow more memory for BASIC.

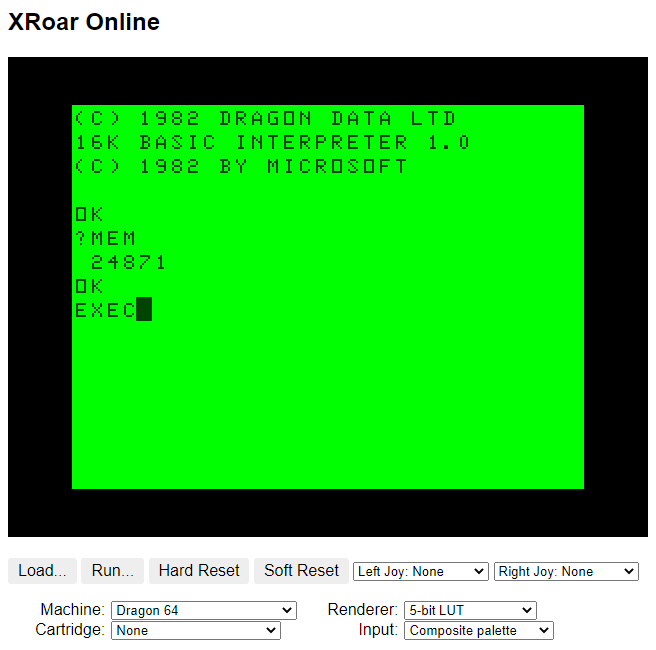
If you start up a cassette-based Dragon 64 in the XRoar Online emulator, you get 24871 bytes available to BASIC:

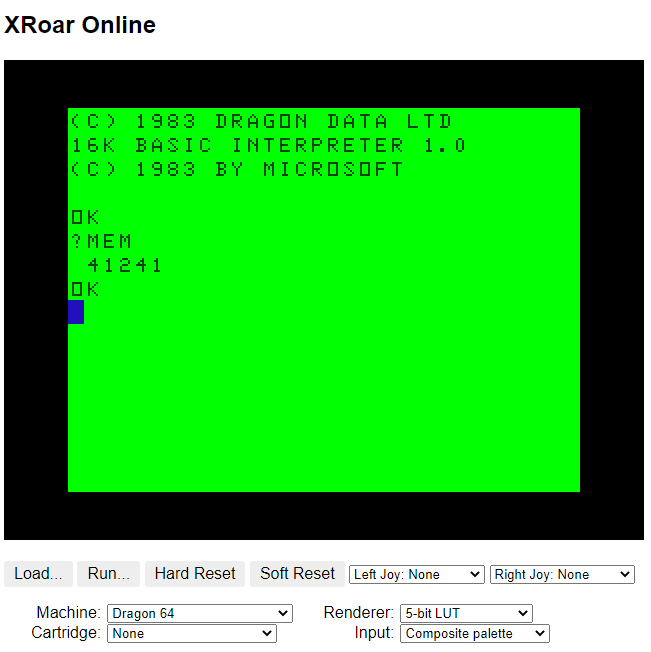
If you then typed EXEC (to execute a machine language routine), the default routine it executed would do some magic to relocate BASIC and restart it with 41241 bytes available. (Both of these values will be less if using a disk system.)

Oh how I wish we had gotten that feature added to the CoCo’s BASIC when 64K machines first came out. (There were rumors that the Deluxe Color Computer 2 would have had something like this as part of it’s new features, but that machine never came to exist beyond some mentions in the BASIC manuals.)

CoCo RAM: Don’t ask, don’t tell.

On the CoCo, once you got to 32K, the machine would show the maximum amount of memory available to BASIC — the same 24871 seen by a Dragon 32 machine.

On startup, a cassette-based CoCo has 24871 bytes available for BASIC.

If you had a 64K machine, it would still show the same value since that is all BASIC knew about. The rest of the 64K was hidden.

“Assembly Language or OS-9”

In those early years, it seemed the official line from Radio Shack was that 64K was usable only from assembly language or the OS-9 disk operating system.

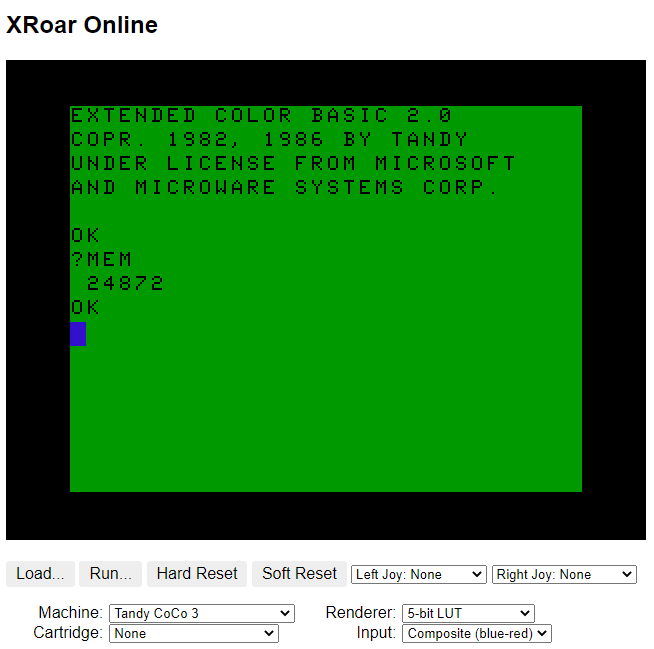
The same was true when the CoCo 3 came out in 1986. It came with 128K but could be expanded to 512K. Even though BASIC was enhanced to support the new graphics modes of the machine, it still only saw 32K available for BASIC programs. On a 512K CoCo 3, free memory for BASIC was reported as 24872:

…and now I am very curious to see where that extra byte came from.

Show me the mem’ry!

And here we are in 2022, over four decades after the first CoCo was sold in 1980, and folks are still wondering how to tell how much memory is in their machine.

One of the most suggested ways of determining if a CoCo 1 or 2 has 64K is to try to run the game Saylor Man from Tom Mix Software. It is notable for being the first CoCo game to require 64K, so if it runs … you have 64K and not just 32K.

But loading up a large program just to do a memory test isn’t the efficient way to do a memory check (even if it is the most fun way).

The second method is to run a short BASIC program that attempts to copy the BASIC ROMs in to RAM. If it works, and you can POKE to the BASIC ROM locations and change things, it proves you have 64K.

This test is convenient because it can be done by typing in a very short program in BASIC, rather than needing a way to download and transfer a tape or disk image of Sailor Man over to a CoCo.

In part 2, I’ll discuss several implementations of this “ROM to RAM” program, and then present a super simple 64K test program.

Until then…

Color BASIC string abuse – part 2

See also: part 1 and part 2.

In the first part, the following Color BASIC program was shared:

5 CLEAR 100*255
10 MX=99
20 DIM A$(MX):AL=0:DL=-1
30 SZ=RND(255):SZ=255
40 A$=STRING$(SZ,"X")
50 GOSUB 1000:GOTO 30
999 END

1000 REM
1001 REM ADD NEW STRING
1002 REM
1010 IF AL=DL THEN GOSUB 2000
1020 GOSUB 3000:IF Z<1024 THEN GOSUB 2000
1030 PRINT "ADDING";LEN(A$)"BYTES AT";AL;Z
1040 A$(AL)=A$
1050 AL=AL+1:IF AL>MX THEN AL=0
1060 IF DL=-1 THEN DL=0
1070 RETURN

2000 REM
2001 REM DELETE OLD STRING
2002 REM
2010 PRINT ,"DELETING";DL
2020 A$(DL)=""
2030 DL=DL+1:IF DL>MX THEN DL=0
2040 GOSUB 5000
2050 RETURN

3000 REM
3001 REM GET FREE STRING SPACE
3002 REM
3010 Z=(PEEK(&H23)*256+PEEK(&H24))-(PEEK(&H21)*256+PEEK(&H22))
3020 RETURN

5000 REM
5001 REM PAUSE
5002 REM
5010 PRINT"[PAUSE]";
5020 IF INKEY$="" THEN 5020
5030 PRINT STRING$(7,8);:RETURN

The program allocates enough string space to hold 100 strings of 255 bytes each. It then starts adding line after line until it detects string memory is getting low. When that happens, the oldest line is deleted (set to “”). The process continues…

The “gut feeling” was that this program should have been able to hold 100 full sized strings, but since it did use a temporary A$ (created to be 255 strings line, and the string we would be adding to the array), it seemed logical that it would have to start purging lines maybe a few entries before the end.

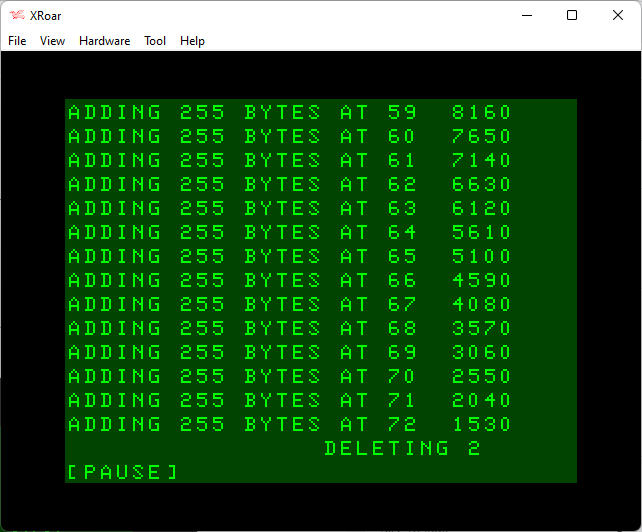
But instead, it starts deleting lines at around entry 47. And, the memory usage being printed out shows it drops by 510 byes each time instead of 255.

510 is an interesting number. That is 255 * 2. That makes it seem like each time we add a 255 byte string, we are using twice that memory.

And we are!

Strings may live again to see another day

The key to what is going on is in the main loop starting at line 30. We create a new A$ and set it to a string of 255 X’s. That string has to be stored somewhere, so it goes in to string memory. Then we do the GOSUB and add a string to the array, which copies our A$ in to the array A$(AL) entry.

When we go back to 30 for the next round, we create A$ again. The old copy of A$, in string memory, is deallocated, and a new A$ is created at the current string memory position. BASIC does not see if the old string space is large enough to be re-used. It just moves on to a new allocation of string space.

It looks like this… And note that strings fill from the end of the memory and move lower. Let’s say we have 16 bytes of reserved string memory (just to keep things fitting on this screen).

FRETOP points to where reserved string memory begins. MEMSIZ is the end of string memory. If we had done CLEAR 16, then FRETOP would be MEMSIZ-16.

STRTAB is where the next string will be added. It looks like this:

FRETOP                                     MEMSIZ
 |                                            |
[.][.][.][.][.][.][.][.][.][.][.][.][.][.][.][.]
                                              |
                                           STRTAB 

Let’s say we create a 4-byte A$=STRING(4, “X”) (“XXXX”) that we plan to add to an array. It will be stored in string memory:

FRETOP                                     MEMSIZ
 |                                            |
[.][.][.][.][.][.][.][.][.][.][.][.][X][X][X][X]
                                  |
                               STRTAB 

Later in the code, we assign that to the array, such as A$(0)=A$. Now A$(0) gets a copy of A$, and it looks like this (using lowercase ‘x’ to represent the copy of A$ that was put in A$(0)):

FRETOP                                     MEMSIZ
 |                                            |
[.][.][.][.][.][.][.][.][x][x][x][x][X][X][X][X]
                      |
                   STRTAB 

When we go back to do this again, a new A$ is created, and it gets stored next. The old string data is still there, but A$ has been updated to point to the new entry.

FRETOP                                     MEMSIZ
 |                                            |
[.][.][.][.][X][X][X][X][x][x][x][x][X][X][X][X]
          |
       STRTAB

…and so on. As you can see, the way this loop was written, it is creating a new A$ every time through, copying it to the array (a new entry for that) and so on. That is why we see 510 each time through instead of just 255.

Now, if the string was short, we could have done A$=”XXXXXXXXXXXXX”. If we did that, the string would exist in program space and not in string memory. But we wanted a 255 byte string, and you can’t type a line that long in BASIC so STRING$() was used instead, which requires putting the string in string memory.

However, since in THIS version we are just using the same 255 character A$ over and over again, let’s make one change so we don’t create it every time through the loop. Just change the GOTO 30 in line 50 to be GOTO 50:

30 SZ=RND(255):SZ=255
40 A$=STRING$(SZ,"X")
50 GOSUB 1000:GOTO 50

Now the program will create one A$, which will store at the start of string memory, and then loop over and over just making new entries in the array.

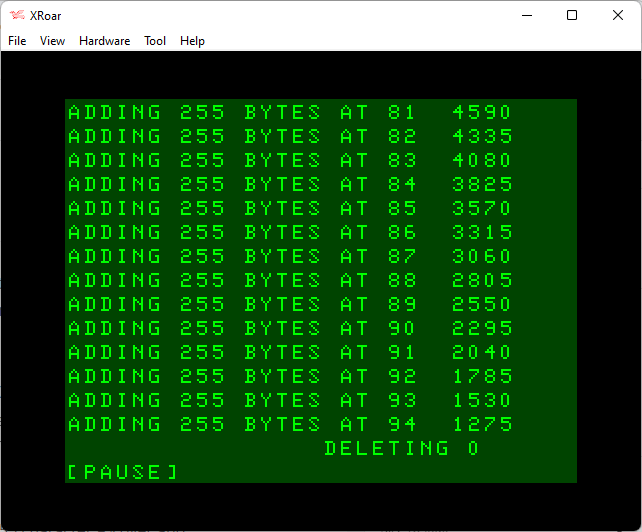
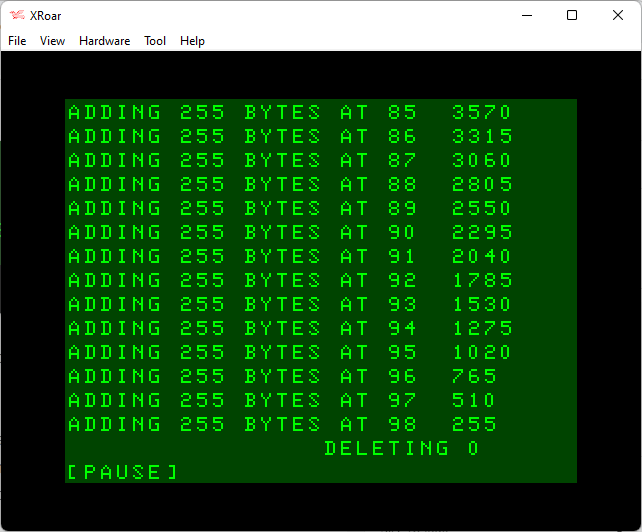
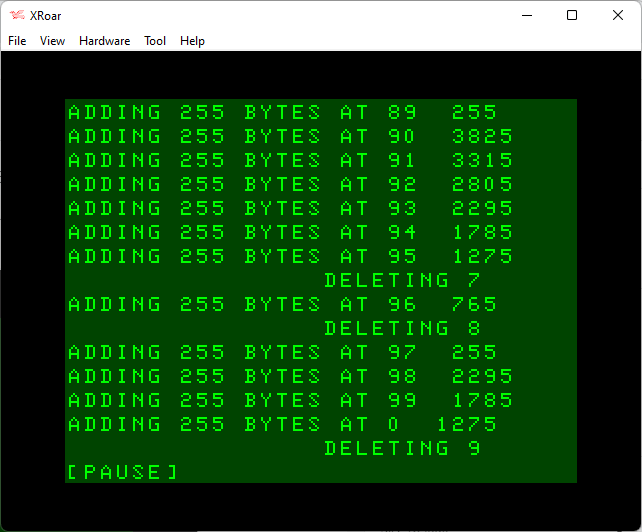
That small change will instantly change the results to be more like we might have expected. Now we get all the way to entry 94 before any string deleting happens:

And, from looking at that screen, each number is dropping by 255 bytes as we expected.

By the time it reached line 94, it saw that there were less than 1024 bytes of free string space left. 1024 would have held another four 255 byte strings, meaning actually had enough memory to have gotten to line 98 — just one line short of our max 99 before it rolls over. And that memory is where the initial 255-byte A$ is stored.

Tada! Mystery solved.

But wait! There’s more…

The reason I chose 1024 as a threshold was to allow for other temporary string use in the program. Things like LEFT$, MID$, STRING$ all make temporary strings. When you add two strings together it creates a third string that combines the first two. Be sure to check out my string theory article for more details on this — I learned quite a bit when researching it. I also learned that some things required strings that I did not expect to. Fun reads. Helps put you to sleep.

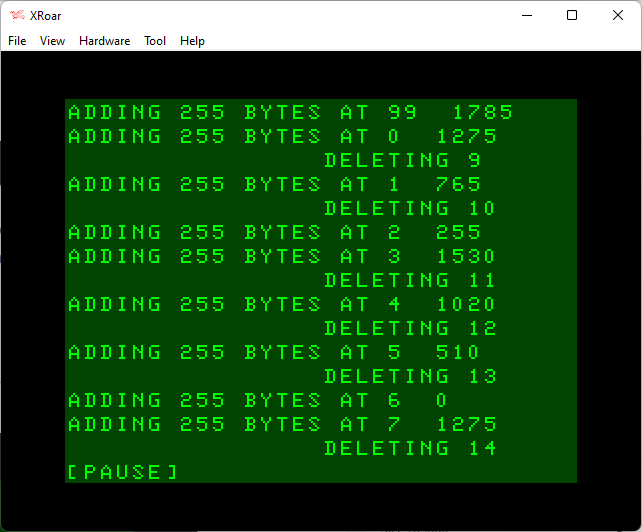
If I modify line 1020 to check for 255 bytes remaining instead of 1024, then re-run, I get this:

…and that is as perfect as it gets. Array is filled with strings 0-98, plus the temporary string, which is a total of 100 strings of 255-bytes each — and that is how much memory we set aside with CLEAR!

Now how much would you pay?

And because this program is self-aware when it comes to knowing how much string space is there, it can actually operate with much less string space. It will just delete old strings sooner.

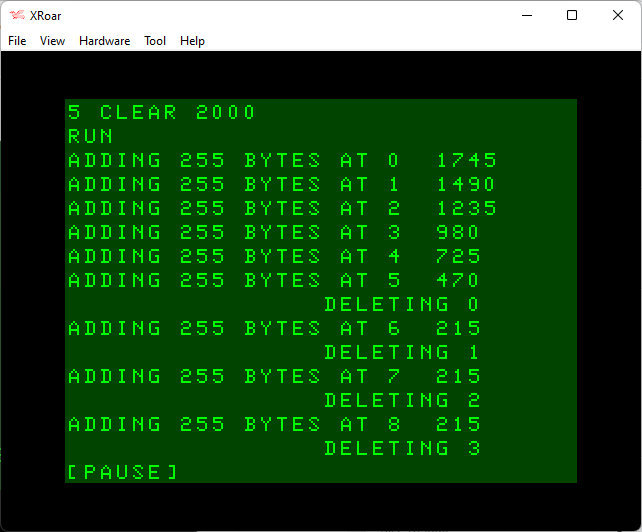
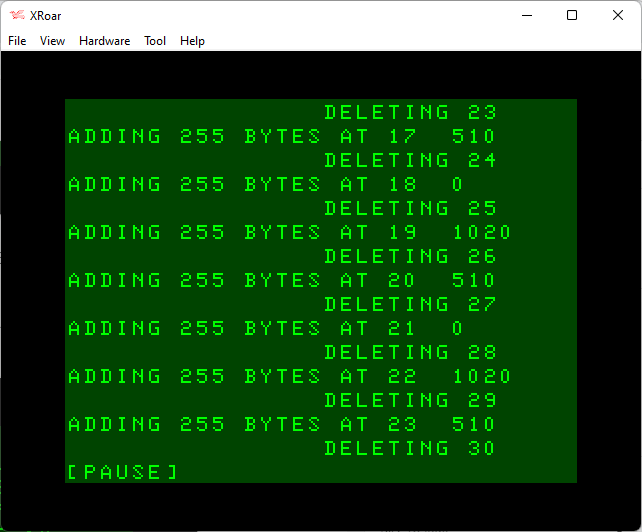
You can change the CLEAR in line 5 to something smaller, like 2000, and it will still work. But, 2000/255 is 7, so it has room for the A$ plus six array entries. I expect it would DELETE every 6 lines. Let’s try…

Bingo! After lines 0-5 (six lines) it deleted and old one, then since everything was now full, it had to delete every time it added something new.

And the point is…?

Well, let’s just say I wish I knew about this back in 1983 when I wrote my cassette-based Bulletin Board System, *ALLRAM*.

I always wanted to write version 2.0.

Until next time…

Color BASIC string abuse – part 1

See also: part 1 and part 2.

This program demonstrates Color BASIC’s string garbage collection. As strings are manipulated, string memory used will continue to grow until BASIC decides to clean up the string space and move things around a bit.

The program creates a string array and fills each entry up with string data. Using code that checks how much string space is remaining, it will delete old strings if string memory is low.

Watching it run reveals some curious things…

The Program

On an Extended or Disk BASIC system, you will need to do a PCLEAR 1 to get enough memory to run it.

  • Initialization
    • Line 5 – We CLEAR enough string space to hold 100 lines at their largest size of 255 characters. Note that when you use DIM to set an array size, it is base-0. Doing a DIM A$(99) gives you A$(0) to A$(99) — 100 elements. Thus, the CLEAR uses 100, but the DIM in the next line uses 99.
    • Line 10 – MX represents the maximum number of lines in the array.
    • Line 20 – DIM A$(MX) creates an array of 0-99 entries (100). AL is set to 0, and will be the line (array entry) we will ADD next. DL will be used to track the next line (array entry) we need to delete. DL is set to -1 for “nothing to delete yet.”
  • Main Loop
    • Line 30 – SZ is set to the length of the string we want to add. It has an unused RND at the start, but then SZ is hard-coded to 255. The program was designed to test random lengths of strings, but for this demo, we will be overriding that and making every string the maximum size.
    • Line 40 – GOSUB 1000 goes to a routine that will ADD a line. Then we GOTO 30 to create a new line and do it again.
  • Add New String subroutine
    • Line 1010 checks to see if the ADD line has caught up to the DELETE line. If it has, we GOSUB 2000 to handle deleting the delete line.
    • Line 1020 – GOSUB 3000 will return the amount of free string space in Z. If Z is less than 104, GOSUB 2000 is called to delete a string.
    • Line 1030 – It prints how long of a string is being added to which line, followed by the current free string space before the add.
    • Line 1040 – The string is added to the A$ array at position AL.
    • Line 1050 – AL (add line) is incremented by 1, moving it to the next line of the array. If AL is larger than the MX (max array entries), it will wrap around to entry 0.
    • Line 1070 – Returns.
  • Delete Old String subroutine
    • Line 2010 – Print which line is about to be deleted (set to “”).
    • Line 2020 – The A$ entry at position DL is set to “”, releasing the string memory it was using.
    • Line 2030 – DL (delete line) is incremented by one. If DL is larger than MX (max array entries), it will wrap around to entry 0.
    • Line 2040 – GOSUB 5000 is a pause routine so we can see what just happened.
  • Get Free String Space routine
    • Line 3010 – Z is calculated as the difference between the FRETOP (start of string storage) memory location and the STRTAB (start of string variables) in the reserved string area. This gives us how many bytes of unused string memory is available.
    • Line 2030 – Returns.
  • Pause subroutine
    • Line 510 – Print the message “[PAUSE]” with no carriage return at the end.
    • Line 5020 – If INKEY$ returns nothing (no key pressed), keep checking.
    • Line 5030 – Prints a string of 7 CHR$(8)s (backspace character) which will erase over the “[PAUSE]” prompt.

Based on the intent, one might think that running this would fill strings up to around entry 100, and then it would start deleting the old string

But is that what it will do?

Let’s run it and find out.

5 CLEAR 100*255
10 MX=99
20 DIM A$(MX):AL=0:DL=-1
30 SZ=RND(255):SZ=255
40 A$=STRING$(SZ,"X")
50 GOSUB 1000:GOTO 30
999 END

1000 REM
1001 REM ADD NEW STRING
1002 REM
1005 IF AL=DL THEN GOSUB 2000
1006 GOSUB 3000:IF Z<1024 THEN GOSUB 2000
1010 PRINT "ADDING";LEN(A$)"BYTES AT";AL;Z
1020 A$(AL)=A$
1030 AL=AL+1:IF AL>MX THEN AL=0
1040 IF DL=-1 THEN DL=0
1050 RETURN

2000 REM
2001 REM DELETE OLD STRING
2002 REM
2010 PRINT ,"DELETING";DL
2020 A$(DL)=""
2030 DL=DL+1:IF DL>MX THEN DL=0
2035 GOSUB5000
2040 RETURN

3000 REM
3001 REM GET FREE STRING SPACE
3002 REM
3010 Z=(PEEK(&H23)*256+PEEK(&H24))-(PEEK(&H21)*256+PEEK(&H22)):RETURN

5000 REM
5001 REM PAUSE
5002 REM
5010 PRINT"[PAUSE]";
5020 IF INKEY$="" THEN 5020
5030 PRINT STRING$(7,8);:RETURN

Running the Program

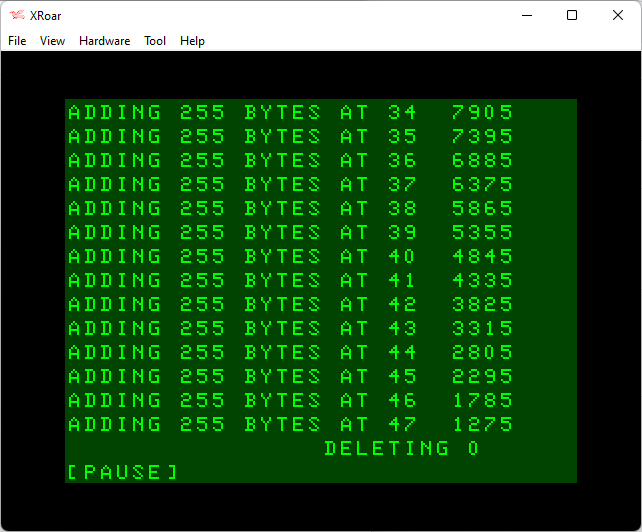
After a PCLEAR 1 and RUN, the program starts filling lines and we can see string memory going down. When it gets to line 47, there is only 1275 bytes of string space left.

And if we check those values, the difference between each one isn’t the 255 we might have expected. We clearly added a new 255 byte string, but memory went from 7905 to 7395 (510 bytes less) and continued down to 1785 to 1275 (510 bytes less). It appears each time we add a 255 byte string, it takes 510 bytes of string memory.

As we get to line 47, we must have had less than 1024 bytes of string memory left and the DELETE LINE subroutine is called. It deletes the oldest line, which is currently line 0. That should free up 255 bytes of string memory.

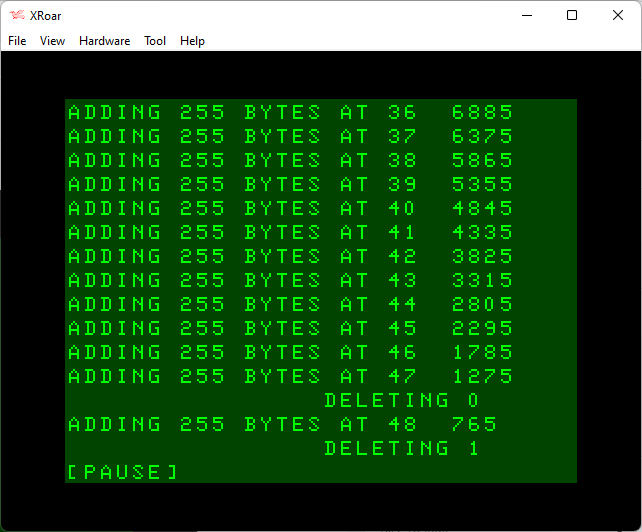
After pressing a key, we see the next few entries:

After deleting 0, memory has gone from 1275 to 756 (5120 bytes), so DELETE is called again. This time it deletes line 1.

We press a key and let it scroll a bit more until the next DELETE:

Here we see that, at some point, some string cleanup was done and our free string space grew larger. The trend of reducing by 510 bytes for each ned 255 byte string added continues…

And the process repeats, until eventually we roll over at line 99.

From here on, things get a bit more predictable, with a DELETE happening almost every line — though sometimes every two lines.

Eventually things settle in to a pattern of basically DELETING for every line ADDED.

Is it broken? Is it just poorly implemented? Or is it behaving exactly like it is supposed to?

Tune in next time for the exciting conclusion…

Perforce to BitBucket Git migration – rename $File$ RCS keywords in source files

After migrating from Perforce to Git (BitBucket, in our case) at work, I learned that Git does not support any embedded source code keywords for replacement on check in. In our case, we use things like:

/*-------------------------------------------------------------------------------
 *      File Name: $File$
 *  Creation Date: $DateTime$
 *         Author: $Author$
 *       Revision: $Revision$
 *    Change List: $Change$

…and at the end of the files…

// End of $File$

On Submit, Perforce will replace those keywords with useful information, such as the username ($Author$) that did the submit, the data and time of the submit ($DateTime$) and the filename ($File$). I find this very useful when looking at source code outside of Perforce, since it tells me how new or old the code is. (Anyone who’s ever had to print out a ton of code for a group code review knows how easy it is to end up looking at the wrong version of the file… Usually not discovered until someone finds a bug you know you already fixed ;-)

Since Git does not support this, I wanted to at least search/replace “$File$” to be the actual filename of the source file. I am sure there are many ways to do this, but I ended up using a PowerShell script, based on code I found some web searches (probably on Stack Exchange or similar):

Get-ChildItem "*.h" -Recurse | ForEach-Object {
echo Processing: $_.FullName
$content = Get-Content $_.FullName
$newtext = ((Get-Content -path $_.FullName -Raw) -replace '\$File\$',$_.Name)
[system.io.file]::WriteAllText($_.FullName,$newtext)
}

In this case, this code specifically targets “.h” files at or below the directory you run the script in. I expect you can make a multi-filter that does .c and .h at one time, but I only needed to do this once so I ran it like this, then edited the “*.h” to be “*.c” and ran it again. (You’d change it to whatever your source file extensions are, like .cs or whatever.)

The [system.io.file] tip came from someone who noticed the other output would always add a blank line at the end of the file. This method re-writes the file as-is.

WARNING: I did notice that some files get messed up if they contain special characters. It would put some garbage (when viewing in a text editor) in place of things like weird apostrophes and such, so if you use this, make sure to diff your files before checking them back in and revert any goofs that “-replace” causes. I had to revert about one dozen blocks in my code.

I also had to run a command to grant my Windows 11 machine permission to even execute a PowerShell script.

Hope this helps someone else, and saves them a few hours of research…

Insta360 X3 firmware bug list

Updates:

  • 2022-09-21 – Added link to firmware. Added placeholder for 1.0.04 release.
  • 2022-09-25 – open WiFi.
  • 2022-11-12 – The default password can now be changed in the app.

The new InstaX3 was announced on 9/8/2022, and made instantly available on Amazon. It shipped with beta firmware, but had a 1.0.00 update available to install during activation.

If you have found any bugs, please leave a comment with the version and details and I will add them to this list. As workarounds are discovered, I will update this list.

As a new version of firmware is released, these bugs will be re-tested. When they work for some, and not for others, a note will be added to that effect.

Latest X3 firmware: https://www.insta360.com/download/insta360-x3?r_from=%2Fx3%2Fen-us%2Fcamera%2Ffirmwareupdate

X3

Initially, the camera shipped with pre-1.0.00 beta software. It would prompt to upgrade to 1.0.00 on activation from the app.

2022-9-9 – v1.0.00

  • TBAvarious crashes, settings being changed, etc.

2022-09-19 – v1.0.04

  • TBA
  • Open WiFi – a poorly implemented WiFi system has the camera broadcast itself as a WiFi hotspot to anyone within range, and allows users that know the default WiFi password all X3 cameras have to access and download any files on the memory card from a web browser… or worse. (Suggested by commenter, yt)

Insta360 X3 speed benchmarks

Firmware v1.0.00

Raw notes… will be cleaned up and made purty with more details, soon.

X3: up to 30 seconds between taking photos via app, and more timing notes.

Some notes on timing, for those who want to compare against your existing camera. This is with the current firmware that the camera will install when you activate it (v1.0.00). Recommended Sandisk Extreme 32GB card.

App (on iPhone 13 Pro):

360 Photo, 72MP, 2:1 – there is nearly 4-5 second delay between the time you press the on screen button and the time the X3 clicks. It takes a total of about 15 seconds before the UI updates and you can take the next photo.

360 Photo, 18MP, 2:1 – 4-5 delay, and a total of about 9 seconds.

360 HDR Photo – 3-4, then about 13 seconds total.

150 Photo, 36MP, 16:9 – 3-4, about 11 seconds total.

150 Photo, 9MP, 16:9 – 3-4, about 8 seconds total.

I did have one instance where it took almost 30 seconds to be ready for the next shot.

Camera Button:

Using the button on the camera is almost instant (within a second) and ready for the next photo in about 6-7 seconds total.

In 360 Photo mode, 72MP, pressing the button on the camera makes the click sound between 2-3 seconds later, and it takes a total of 14 seconds before the screen comes back on for the next photo.

In 360 Photo mode, 18MBP, it takes about a second to take the picture, and a total of about 5-6 before you can take the next shot.

In 360 HDR Photo mode, 18MP, it takes about a second to take the picture, and a total of 9-10 seconds before you can take the next shot.

Some of this feels like the timer is on, which isn’t being shown in the app or on the camera. earlier, I used the Quick button and had selected that mode. It seems it may be remembering settings that have since been turned off.

More to come…