

When I was writing my recent post about sequential and direct access files in Disk BASIC, I noticed something in the manual about the Disk BASIC WRITE command:

It was almost identical to the description of how to use PRINT for disk access, except PRINT mentioned a semicolon:

I don’t remember if I used PRINT or WRITE back then, but “knowing what I now know” I wondered if this Disk BASIC command would work with other device numbers, such as tape (#-1) or screen (#0). I gave it a try, and found it did work with #0 to print a message to the screen. This is how I learned the difference between WRITE and PRINT:

It appears WRITE will enclose the string in quotes. When I tested with a numeric variable, it looked the same as PRINT output. I also noticed you couldn’t end a WRITE line with a semicolon (thus, maybe, the reference to PRINT being able to use a semicolon in the manual).
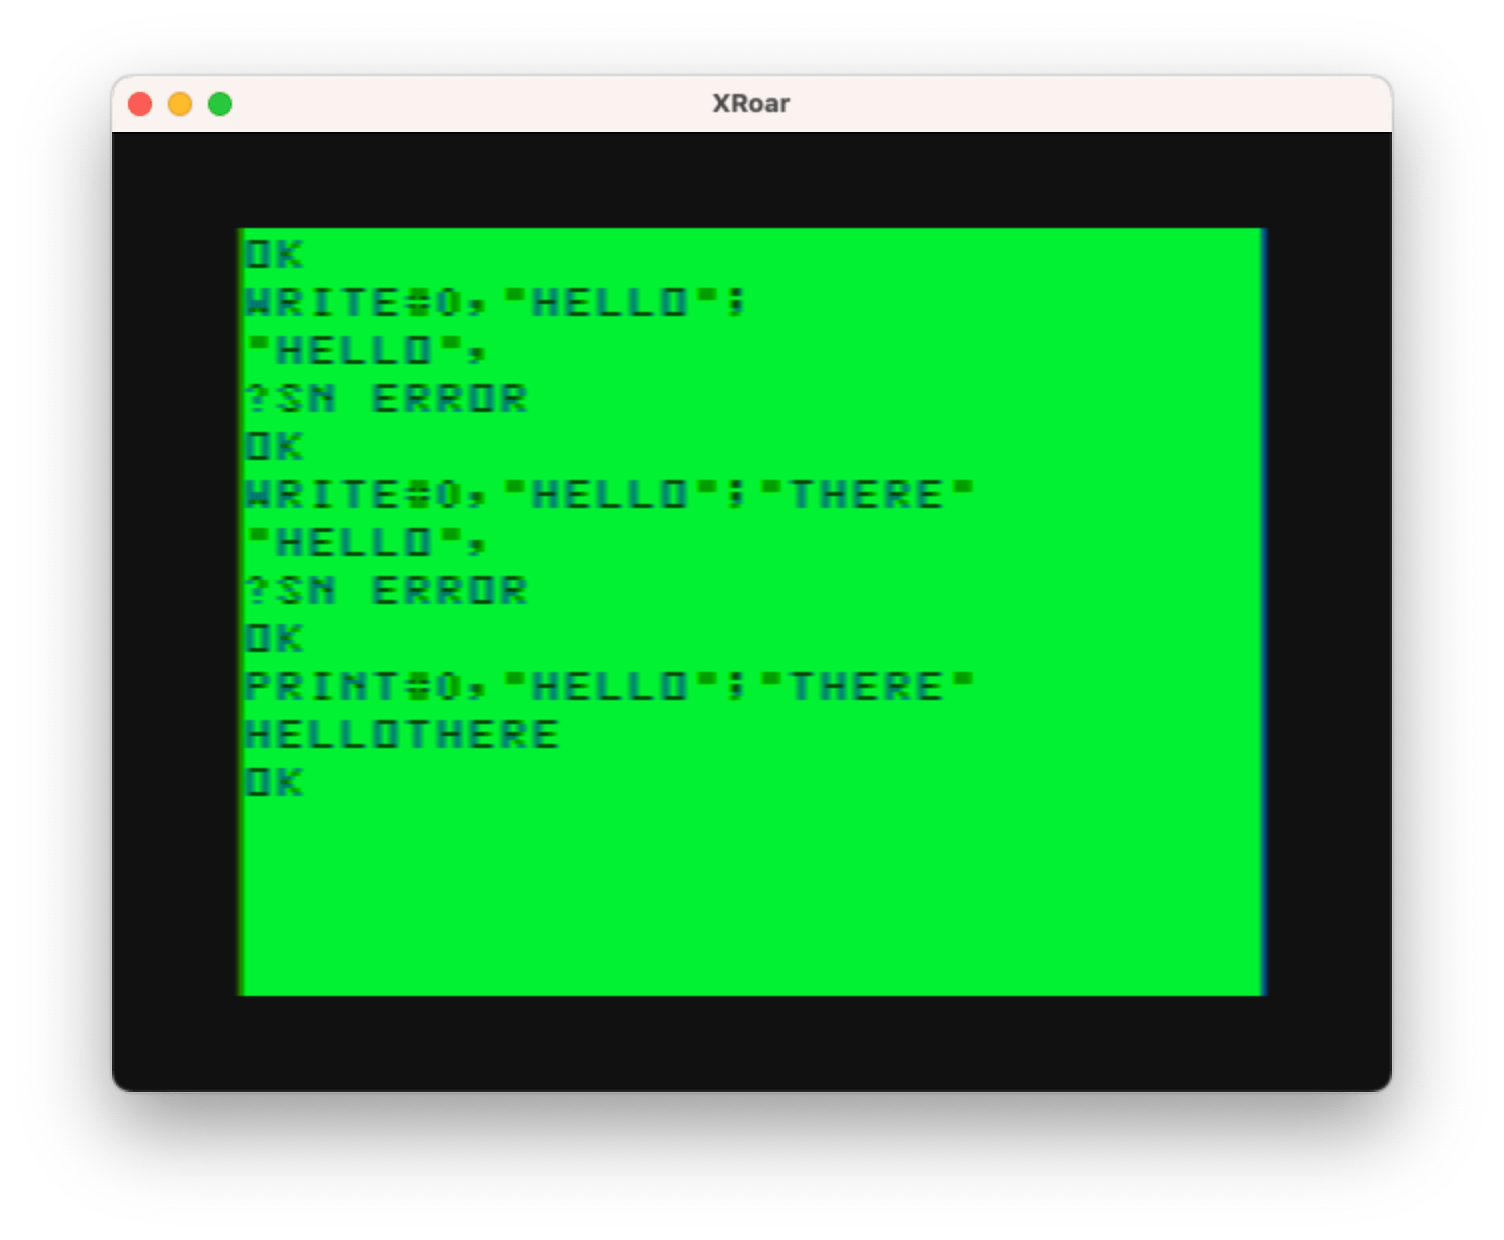
If you look above, you will also see WRITE was trying to add a comma, which led me down a rabbit hole trying to figure out what all was going on.
Comma little bit closer
Some quick experiments showed me that WRITE was doing much more than just acting like a PRINT replacement that could not use a semicolon. WRITE ignores TAB positions, which normally happen when you try to PRINT something separated by a comma. For the CoCo’s 32-column screen, the comma uses 16 for the tab position so if you print…
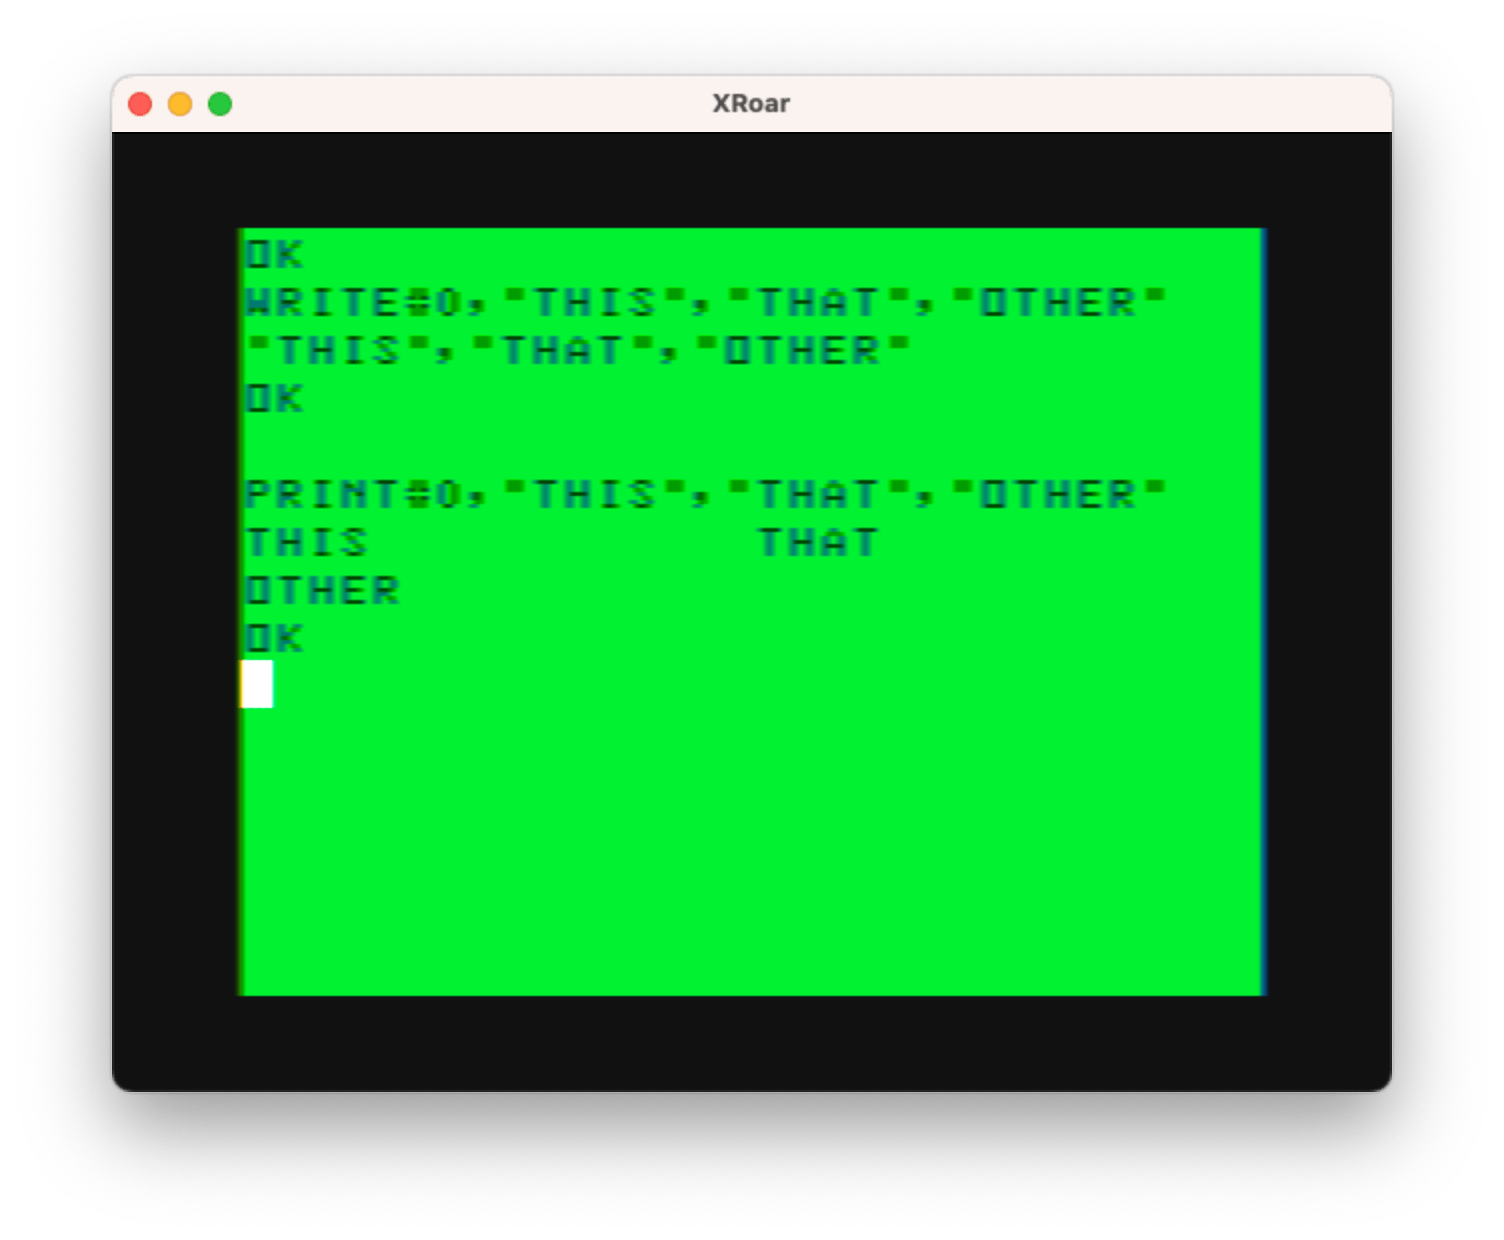
PRINT "THIS","THAT"
…you will get something like this:
 12345678901234567890123456789012
+--------------------------------+
|THIS            THAT            | 32-col screen
|                                |
If you use PRINT to put messages in a file on tape or disk, I expect they would have the tab spaces inserted in the file as well.
Tangent testing
Obviously I had to test that. I decided to take my hexdump program I shared last time and modify it to dump the bytes in a file I wrote to using PRINT and commas to see what was in it. The program looks like this:
0 'DUMPFILE.BAS
10 ' CREATE TEST FILE
20 OPEN "O",#1,"TEST"
30 PRINT #1,"THIS","THAT","OTHER"
40 CLOSE #1
50 ' DUMP TEST FILE
60 OPEN "D",#1,"TEST",1
70 FIELD #1,1 AS BT$
80 OF=0:C=0
90 FOR R=1 TO LOF(1)
100 IF C=0 THEN PRINT:PRINT USING"#### ";OF;
110 GET #1,R
120 BT=ASC(BT$)
130 IF BT<&H10 THEN PRINT "0";
140 PRINT HEX$(BT);" ";
150 C=C+1:IF C>7 THEN C=0
160 OF=OF+1
170 NEXT
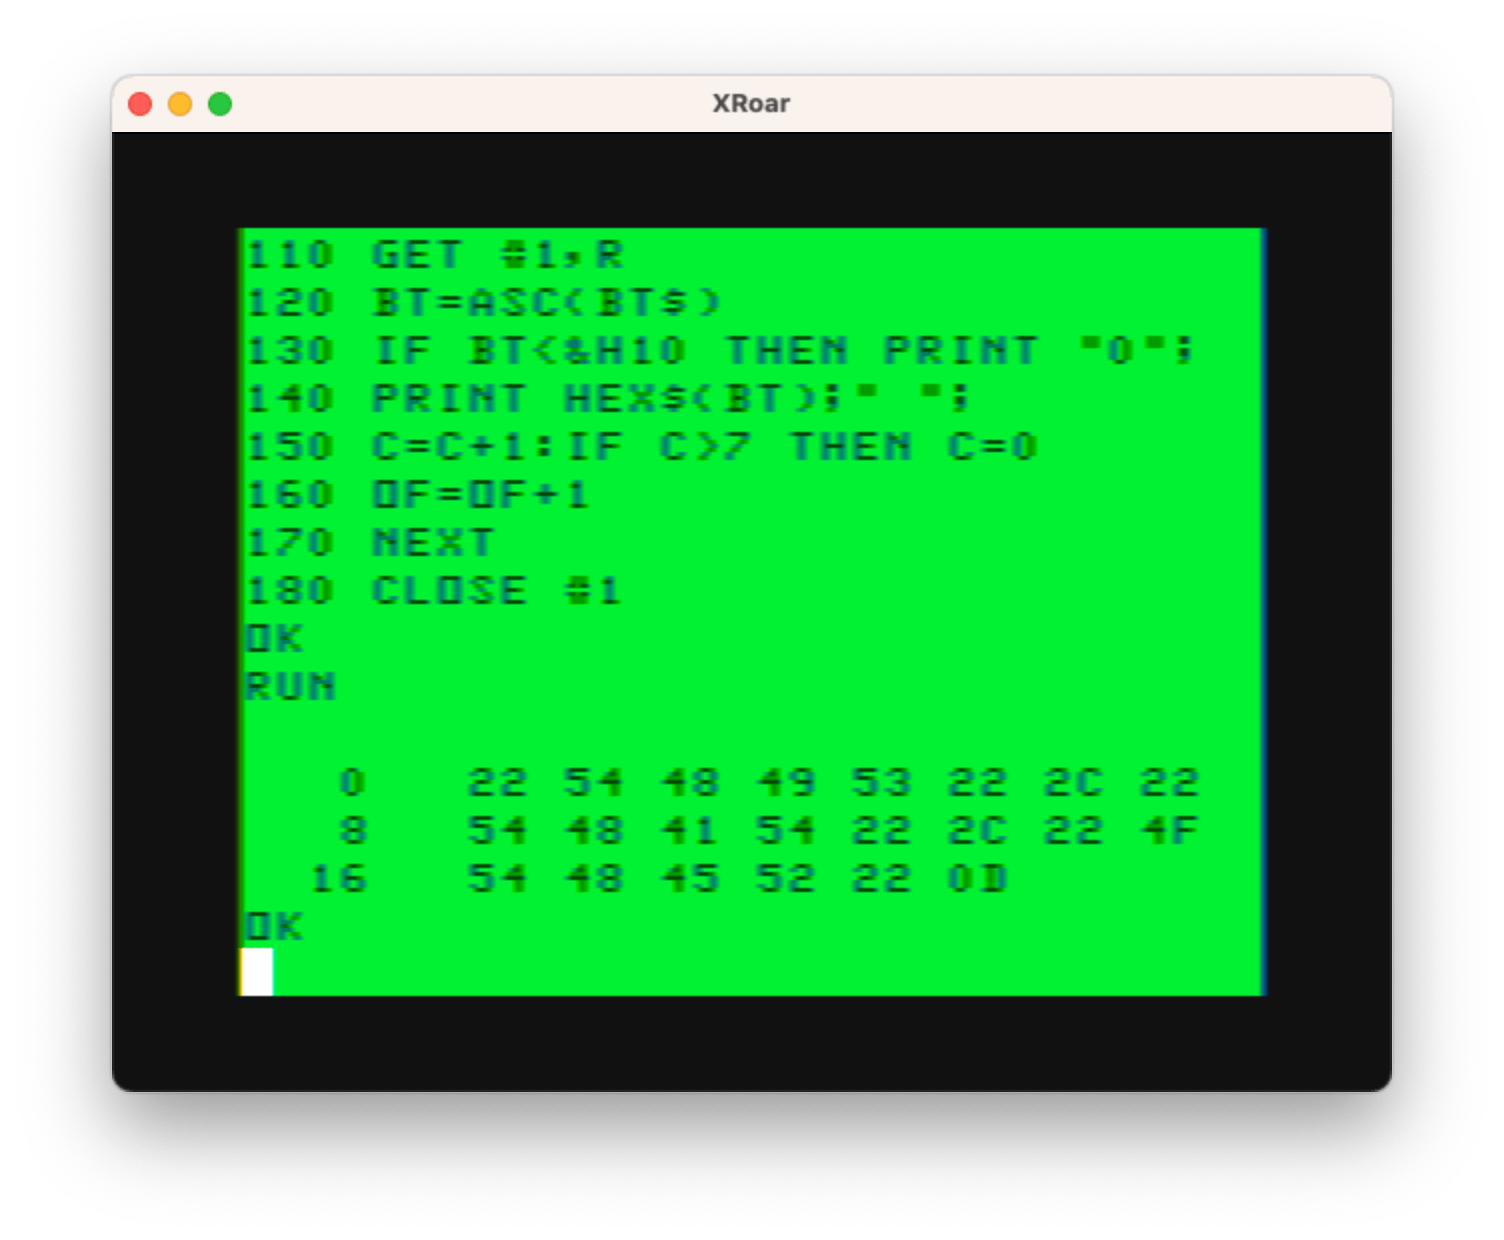
180 CLOSE #1When I ran that, I did see that it was padding the words with spaces out to the 16 character tab position:

Above, I PRINTed “THIS”, “THAT” and “OTHER” to the file, separated by commas. In the hex dump output, the hex values 54 38 39 53 are “THIS”, followed by hex value 20s (space). You can see it goes all the way to the end of the second line. Each hex dump line represents eight characters, so the comma tabbed out to the 16th character.
At offset 16 are hex values 54 48 41 54 which is “THAT”, followed by spaces out to the next 16th tab position (end of line four).
At offset 32 there is just 4F 54 48 45 52 which is “OTHER” followed by 0D which is CHR$(13) for ENTER.
Checks out! But I digress…
PRINT versus WRITE versus COMMAS
WRITE, on the other hand, will put string items in quotes and output a comma character rather than tab spaces. Here’s an example of WRITE versus PRINT:
With this understood, the difference between WRITE and PRINT now becomes clear.
SIDE NOTE: Just like with PRINT, you don’t need to specify device #0. You can simply do WRITE “HELLO, WORLD!” and you will get a nicely quoted “HELLO, WORLD!” message to the screen.
If I were to modify the test program to use WRITE instead of PRINT, it would look like this:
0 'DUMPFILE2.BAS
10 ' CREATE TEST FILE
20 OPEN "O",#1,"TEST"
30 WRITE #1,"THIS","THAT","OTHER"
40 CLOSE #1
50 ' DUMP TEST FILE
60 OPEN "D",#1,"TEST",1
70 FIELD #1,1 AS BT$
80 OF=0:C=0
90 FOR R=1 TO LOF(1)
100 IF C=0 THEN PRINT:PRINT USING"####   ";OF;
110 GET #1,R
120 BT=ASC(BT$)
130 IF BT<&H10 THEN PRINT "0";
140 PRINT HEX$(BT);" ";
150 C=C+1:IF C>7 THEN C=0
160 OF=OF+1
170 NEXT
180 CLOSE #1
And if I run that, I expect we’d see the addition of the quote character around each word, and a comma character in place of the run of spaces that PRINT added. Let’s try:
It looks like it works as predicated. Hex 22 must be the quote character, then 54 48 49 53 is “THIS”, then a closing quote 22, followed by a 2C which must be the comma, then another quote 22 and “THAT” followed by a quote 22, then another comma 2C, then a quote 22 and “OTHER” with a final quote 22 and ENTER 0D.
That really packs the data much better than using PRINT. I had no idea when I was PRINTing comma separated numbers to a file it was padding them out with all those spaces! Apparently, when you INPUT the data back, it must be checking for the spaces to know where the next value starts or something, or maybe that won’t work at all. I need to test this, sometime, too…
There’s no time like sometime
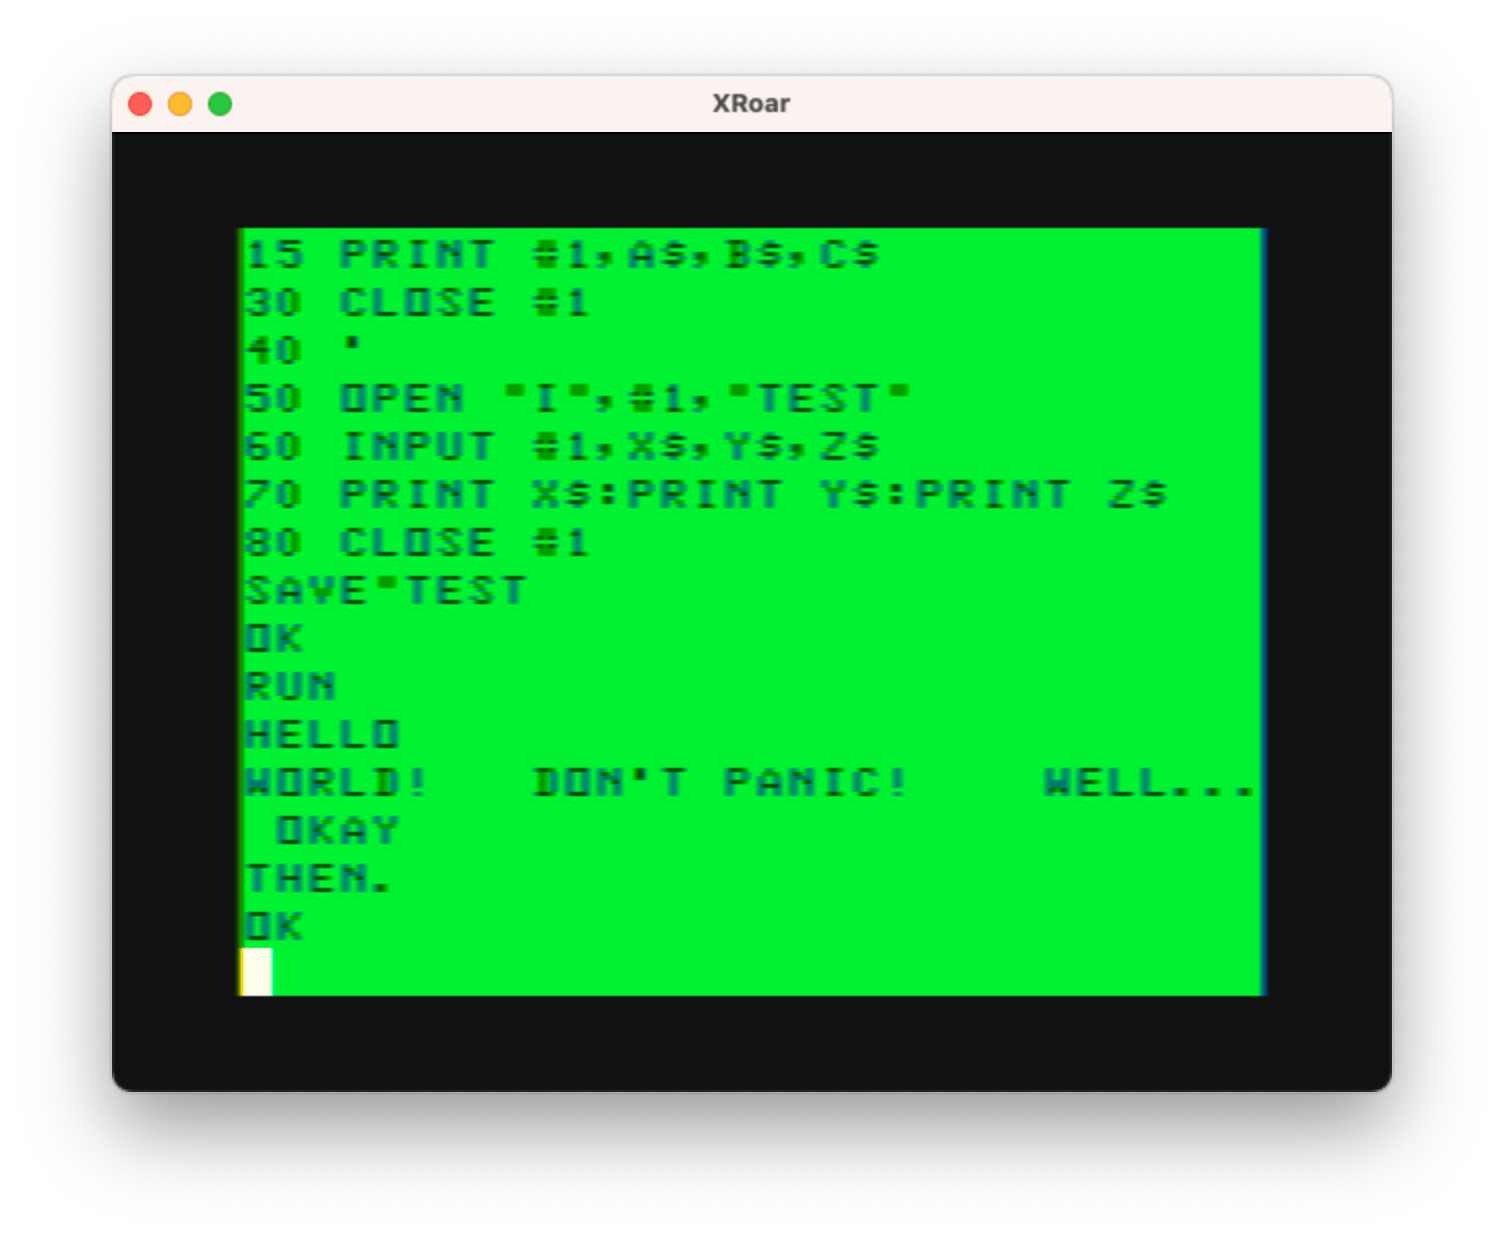
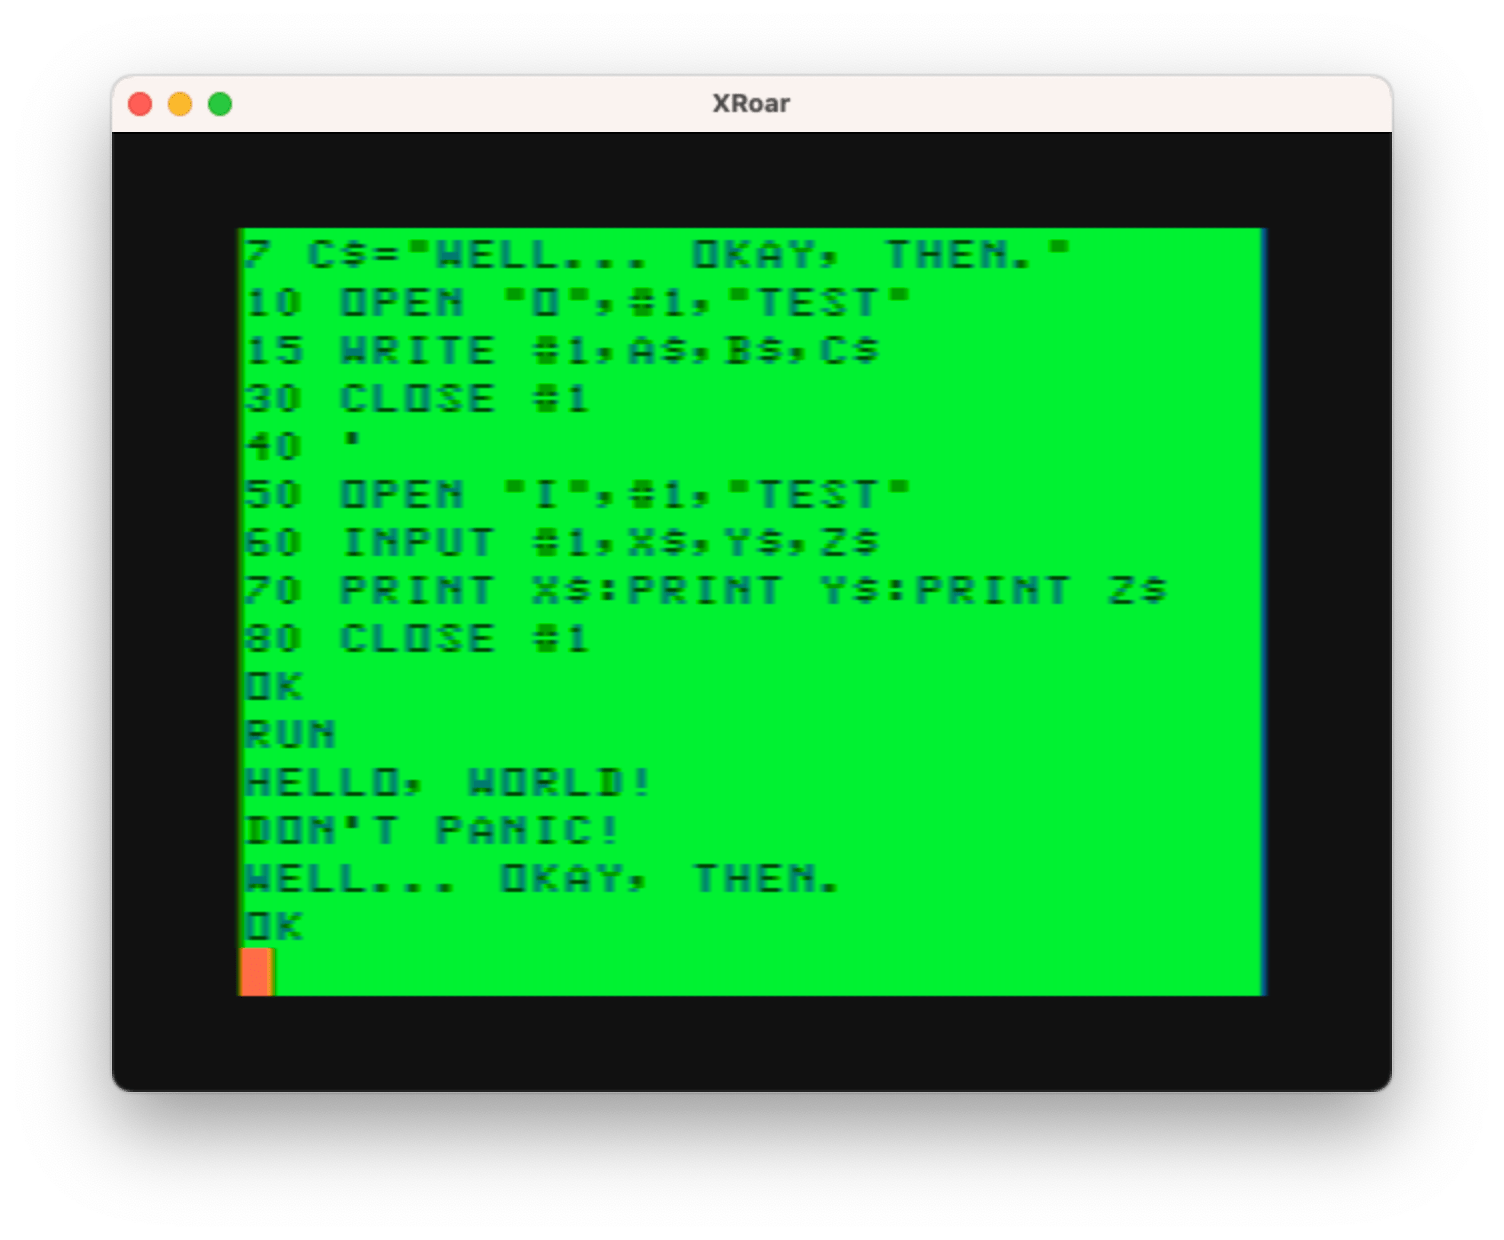
I wrote a simple program that PRINTs out three strings separated by commas and reads them back.
0 'PRINTREAD.BAS
5 A$="HELLO, WORLD!"
6 B$="DON'T PANIC!"
7 C$="WELL... OKAY, THEN."
10 OPEN "O",#1,"TEST"
20 PRINT #1,A$,B$,C$
30 CLOSE #1
40 '
50 OPEN "I",#1,"TEST"
60 INPUT #1,X$,Y$,Z$
70 PRINT X$:PRINT Y$:PRINT Z$
80 CLOSE #1
Running this gives me results I do not want:
This is because INPUT separates things by a comma, so if the string is:
HELLO, WORLD!
…doing INPUT A$,B$ would put “HELLO,” in A$, and “WORLD!” in B$. But the output above doesn’t quite look like that, and that’s due to there being no commas between the three strings we PRINTed. Instead, it was adding spaces to the next TAB position. Therefore, if we looked at the contents of the file as if it was the screen, the data might look like:
 12345678901234567890123456789012
+--------------------------------+
|HELLO, WORLD!   DON'T PANIC!    |
|WELL... OKAY####################| <- end
WHEN “INPUT #1,A$,B$,C$” sees that, it’s as if we did a normal INPUT to the screen and the user typed in:
10 INPUT A$,B$,C$
RUN
? HELLO, WORLD!   DON'T PANIC!    WELL... OKAY
BUT! If you type that in and hit enter, you will then see “?? ” as a prompt, because BASIC is looking for the third parameter. It found an element, then a comma (that was the first so it goes in to A$), then a bunch of stuff and an end of line (that goes in to B$) and still wants to find the C$. If you do:
10 INPUT A$,B$,C$
20 PRINT A$:PRINT B$:PRINT C$
And RUN that, you can type each of those three items on a line by itself and it will work.
RUN
? THIS
?? THAT
?? OTHER
THIS
THAT
OTHER
BUT, if you are doing an INPUT from a file, there is no way to prompt the user that something is missing, so apparently INPUT just skips it and returns what it was able to find.
To make INPUT accept a comma as part of what you type, you can surround it by quotes. That would let you do this:
RUN
? "HELLO, WORLD!"
?? "I THINK, THEREFORE..."
?? "BUT, WAIT!"
HELLO, WORLD!
I THINK, THEREFORE...
BUT, WAIT!
INPUT requires the quotes so it doesn’t split up a string that might contain a comma. Which means you could have typed them all on one line like this:
RUN
? "HELLO, WORLD!","I THINK, THEREFORE...","BUT, WAIT!"
HELLO, WORLD!
I THINK, THEREFORE...
BUT, WAIT!
In order to output a quoted string to a file, you would have had to manually add the quote characters using CHR$(34) like this:
PRINT #1,CHR$(34)"THIS WILL BE QUOTED"CHR$(34)
And, when using output to cassettes, I guess that’s how you had to do it, since there was no WRITE command in Color BASIC or Extended Color BASIC!
And, since the first example didn’t have enough commas to use to separate the string values, you cannot use PRINT like that for strings and expect INPUT to read them back:
0 'NOWORKY.BAS
10 OPEN "O",#1,"TEST"
20 PRINT #1,"THIS","THAT","OTHER"
30 CLOSE #1
40 '
50 OPEN "I",#1,"TEST"
60 INPUT #1,A$,B$,C$
70 PRINT A$:PRINT B$:PRINT C$
80 CLOSE #1
The above program will produce an ?IE ERROR IN 60 because it never found a comma and therefore only sees one long entry that looks like those three words with a bunch of spaces between each of them. The only reason the previous example got as far as it did was due to having a comma in one of the strings. #TheMoreYouKnow
Input Crosses the Line
Extended BASIC added the LINE INPUT command which can only input strings, and drops support for the comma. It treats everything as a literal string (which can contain commas and even quotes). It is a superior INPUT for strings. You can do:
10 LINE INPUT "TYPE:";A$
20 PRINT A$
…and then you can type things that contain a comma and it works just fine:
RUN
TYPE:THIS, MY FRIENDS, IS COOL.
THIS, MY FRIENDS, IS COOL.
It also allows you to have quotes in the string:
RUN
TYPE:"I AM QUOTED!"
"I AM QUOTED!"
While you can use LINE INPUT on tape or disk files (if you have Extended or Disk BASIC), you can no longer separate data with commas. This means only one entry per line in the file.
If you want to use INPUT so you can have multiple items on each line, you either need to make sure they don’t contain commas or, if they do, quote them, and put commas between each quoted string.
PRINT #1,CHR$(34)"THIS"CHR$(34)","CHR$(34)"THAT"CHR$(34)","CHR$(34)"AND, OF COURSE, OTHER"CHR$(34)
Or use WRITE and it takes care of that for you.
WRITE #1,"THIS","THAT","AND, OF COURSE, OTHER"
Changing the example to use WRITE instead of PRINT works nicely:
And that, in a nutshell, is the difference between using WRITE and PRINT, and why you might want to use WRITE/PRINT versus PRINT/LINE INPUT.
Bonus Tip
In a comment to the previous entry, William “Lost Wizard” Astle added:
You can also use “R” for random files. It’s exactly the same as “D”.
– William Astle
So I guess OPEN “R”,#1,”FILE” and OPEN “D”,#1,”FILE” do the same thing. If I ever knew that, I don’t now. Well, except now I do, again or for the first time, thanks to William.
Until next time…


