The story so far…
In 1982 (possibly 1981?), I received my first computer, a Commodore VIC-20.
I taught myself BASIC and ended up sending in a simple game to a newsletter called VIC-NIC News.
Recently, someone sent me a scan of my program submission, ending a quest I had been on for almost a decade.
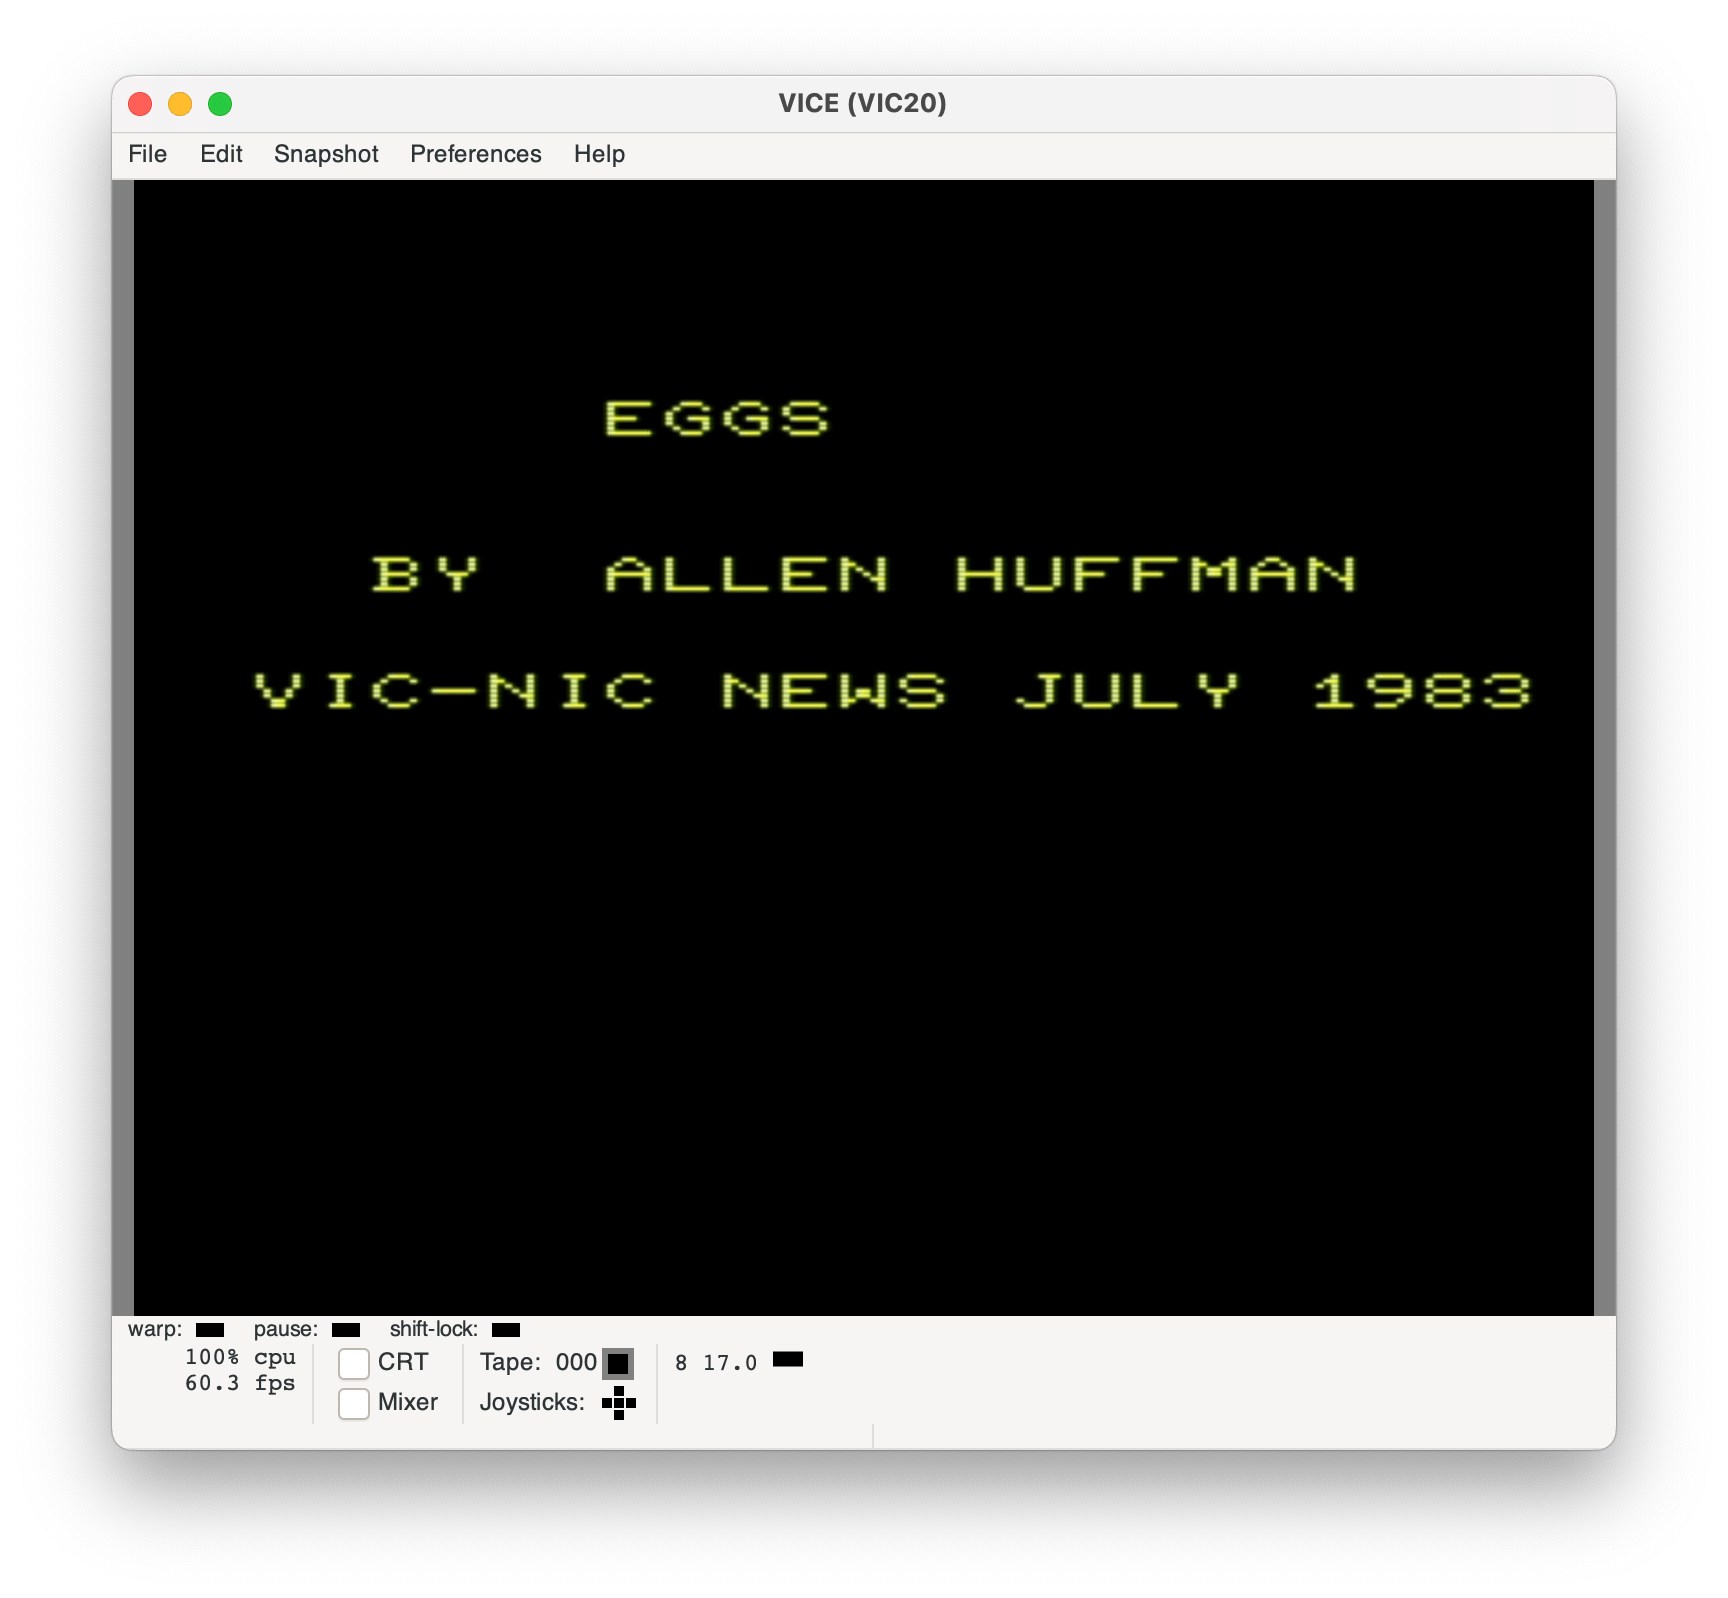
Here is that article from VIC-NIC News #6 (Volume 2, Number 4) from July/August 1983:

I thought it would be fun to walk through the program and see what it does…
0 rem 2024/2/11 fixed joystick
I added this line when I “fixed” the joystick routine so it could properly read the RIGHT direction. That fix, and the two numbers checked for moving the cup left or right, will be different than the original version published back in 1983.
1 print"{clear}{down*3}      eggs"
2 print"{down*3}  by  allen huffman"
3 print"{down*2}vic-nic news july 1983"
4 forj=1to5000:next
I believe these lines were added by the VIC-NIC NEWS. The {words} in curly braces are ASCII notation for the Commodore escape codes you could put in PRINT statements. {clear} is the code for clearing the screen, and {down} is the code for moving the cursor down one line. Therefore, that clears the screen then moves down three lines before spacing over to print the game title. The text would print in UPPERCASE and the code appears in UPPERCASE on an actual VIC-20. These lines just print a simple title screen, then wait for a few seconds before starting the game.
5 poke36879,8:printchr$(147)
Heh. I remember joking that everything on the VIC-20 used the POKE command, and sure enough, the very first thing I do in my program was a POKE. I consulted a useful VIC-20 memory map document to find this:
900F     36879    Screen and border color register
                   bits 4-7 select background color
                   bits 0-2 select border color
                   bit 3 selects inverted or normal mode
The value of 8 is bit 3 , so I was leaving “normal” mode on and setting background and border colors to 0. I don’t recall what this does, so I tried it in the VICE VIC-20 emulator and see it makes the screen black with blue text:

Checking the PEEK value of 36879 on startup shows it defaults to 27, which is the bit pattern 00101011.
36879    Screen and border color register

7 6 5 4 3 2 1 0
---------------
0 0 1 0 1 0 1 1
| | | | | | | |
| | | | | +-+-+- bits 0-2 select border color
| | | | +------- bit 3 selects inverted or normal mode
+-+-+-+--------- bits 4-7 select background color

Border Color = 011 (3)
Inverted/Normal = 1 (normal?)
Background Color = 0010 (2)
As I searched for information on the colors, I found the wikipedia page for the VIC’s video chip. It lists the 16 colors the VIC-20 could produce as follows:
0 — black
1 — white
2 — red
3 — cyan
4 — purple
5 — green
6 — blue
7 — yellow
8 — orange
9 — light orange
10 — light red
11 — light cyan
12 — light purple
13 — light green
14 — light blue
15 — light yellow
With only three bits for the border color, the border can only use colors 0-7 (black through yellow). The background color uses four bits, so it can be any of the sixteen colors (0-15). I may have known this at the time, but if so, I had forgotten that the border could not be set to match all the possible screen colors.
In my case, setting the background and border to 0 makes it black.
If I had taken the original value (00101011, 27) and just cleared bit 3 (invert/normal, 00100011, 19), I see that it changes the text/foreground to inverted video:

Interesting. So I guess we are seeing inverted video on a black screen with black border? I really don’t know why, and I suspect I just saw that POKE in a magazine and liked it.
The print of CHR$(147) is the escape code that clears the screen. (Yep, there was not even a CLS type command in Commodore BASIC.)
10 b=8130:m=3:sc=0
15 e=int(rnd(1)*20)+7703
Two of these variables deal with locations within screen memory:
1E00-1FFF 7680-8191 Screen memory
B is the memory location of the player’s bucket. This is some spot on the bottom line of the screen. 7680 represents the top left character of the VIC’s 22×23 text screen. If you do the math, that is 506 bytes of memory used to represent the screen. But, screen memory of 7680-8191 is 512 bytes. The actual last visible byte on the screen is 8185. The player’s bucket is at 55 spots earlier, which is two full lines (22 bytes each) and 11 (half way in a 22 line screen). I am not sure why I started the game on the third line UP from the bottom, but I did.
M is how many men are left. Video games were very male-centric in the early days, I guess. Actually, in the early years, I don’t recall ever knowing a single girl that played video games, and do not recall seeing any in the arcades I went to, either.
SC is the score, which starts at 0.
E is the memory location of the falling egg. It starts at 7703 (the second byte of the second line) and then adds a random value of 0-19to it. This means I left out the left and right column of the screen for some reason. Looking at how I designed my later Factory TNT game, where the game had a border on the left and right and also a few lines at the bottom of conveyor belt graphics…

…it makes me wonder if I was already planning something like that for Eggs, but left it out to make the program smaller and easier to type in from a newsletter. (Above, you see I start the cup in Factory TNT 5 lines up, instead of 3 like Eggs, but it also limits the falling bombs under the spigots not using the left and right side of the screen. Curious.)
20 printchr$(19);chr$(5);"score:";sc
CHR$(19) homes the cursor to the top left. This would be like doing “PRINT@0,;” on the CoCo. The “SCORE:” is then printed with the current value.
25 pokeb,21:pokee,81
The character of 21 (a letter “U”) is POKEd to the player location, and a character 81 (filled circle) is POKEd to the falling egg location.
30 poke37154,127
35 j=(not((peek(37152)and128)/8+(peek(37137)and60)/4))+32
40 poke37154,255
This code, which I must have gotten from some magazine, is the joystick code. The code in the original article used incorrect memory locations, and was unable to read the “right” direction. I must not have known why, and just changed the published version to use UP and DOWN to move left and right (or, maybe it worked for me, but VIC-NIC NEWS couldn’t get it to work due to a typo and changed the directions?). Either way, memory location 37152 contains the “right” joystick switch, and 37137 contains the “up, down, left and fire” switches. The bits in one of these gets used for different things, to the POKEs to 37154 are used to toggle one of the bytes from joystick mode to keyboard mode. When you do that POKE, part of the keyboard stops working, so it has to be POKEd back at the end.
Because of how this works — if you BREAK the program at the wrong time, during those lines when it is POKEd to joystick, you won’t be able to type all the characters on the keyboard. A frustrating issue ;-)
45 ifj=0then80
50 pokeb,32
55 ifj=4thenb=b-1
60 ifj=16thenb=b+1
The joystick line basically takes the 4-bits (up, down, left and fire) from one memory location and the 1-bit (right) from the other location and combines them in to one byte. Because the bits read “1” when NOT pressed, and “0” when pressed, the code also inverts the results so “1” now means ON.
This IF statements check for directions. J=0 means nothing is pressed, so skip the rest. J=4 means the left button is pressed, so decrement the bucket location by one (moving it one to the left). J=16 means the right button is pressed, so increment the bucket location by one (moving it to the right).
65 ifb=8120thenb=b+1
70 ifb=8141thenb=b-1
These two checks make sure the bucket did not move too far left or right. B=8120 checks to see if the new position is in the first column. If so, too far, so move it back to the right one place. B=8141 is checking for the right column and if it is there, it moves it back left one. With am minor change, I could have made it so you could “wrap around” the screen, where if you moved to the right it would reset the position to the left, and vise versa. That might be an interesting update or option. (Allowing you to quickly “warp” from the left side of the screen to the right to catch an egg you might have otherwise missed.)
Hmm, thinking about this, maybe I shortened the number of rows that the egg drops so ensure you always had less time to move and catch it, increasing the challenge?
75 pokeb,21
80 pokee,32
85 e=e+22
90 pokee,81
At line 75, the player’s basket location has been updated so we POKE the “U” character (21) back on the screen. We then POKE a space (32) to where the egg is, erasing it. The Egg location is incremented by 22, moving it down to the next line, then the Egg character (81) is POKEd back to that new location.
95 ife=>8120ande=bthen110
100 ife=>8120ande<>bthen115
105 goto25
Much like how the basket is checked against the left and right column of the screen, some checks for the falling egg location are done here. If the egg location is at or greater than 8120 (first character of three lines from the bottom of the screen) then it is checked to see if it is the same position of the basket (the player caught the egg).
I’d have to benchmark this and see if that “e>=8120” even needs to be there. If that condition is not true, it would just skip quickly to the end of the line and move on. I’m expecting the overhead of checking “e=b” is less (no long number to parse) so it would probably be faster to just always check “e=b”. If the egg was caught, GOTO 110 happens to increment the score.
There is another check for >=8120 and then “e<>b” skipping to another line. This is poorly coded. If the check for “bottom” line was needed, something like this might be better:
IF E>8120 THEN xxx
IF E=B THEN 110 (player caught it)
...else, player did not, handle here
xxx continue on...
Something like that would simplify the logic, speed it up, and reduce the program size. But hey, I was just learning BASIC.
After this, if the egg did not reach the bottom and get caught or not caught, it goes back up to line 25 to continue the program loop.
110 sc=sc+10:pokee,32:goto15
This is where we go when the player catches an egg. Score is incremented by 10, the egg is erased by POKEing a space there, and then we go to line 15 where a new egg position will be created and the process will start over.
115 m=m-1:pokee,32
120 ifm=0then135
125 goto15
115 is where we end up if the egg reaches the bottom and the player did NOT catch it. The “men left” variable will be decremented, and the egg erased.
If M gets to 0, then game over, which is handled at line 135.
Otherwise, we go back to line 15 to make a new falling egg and continue.
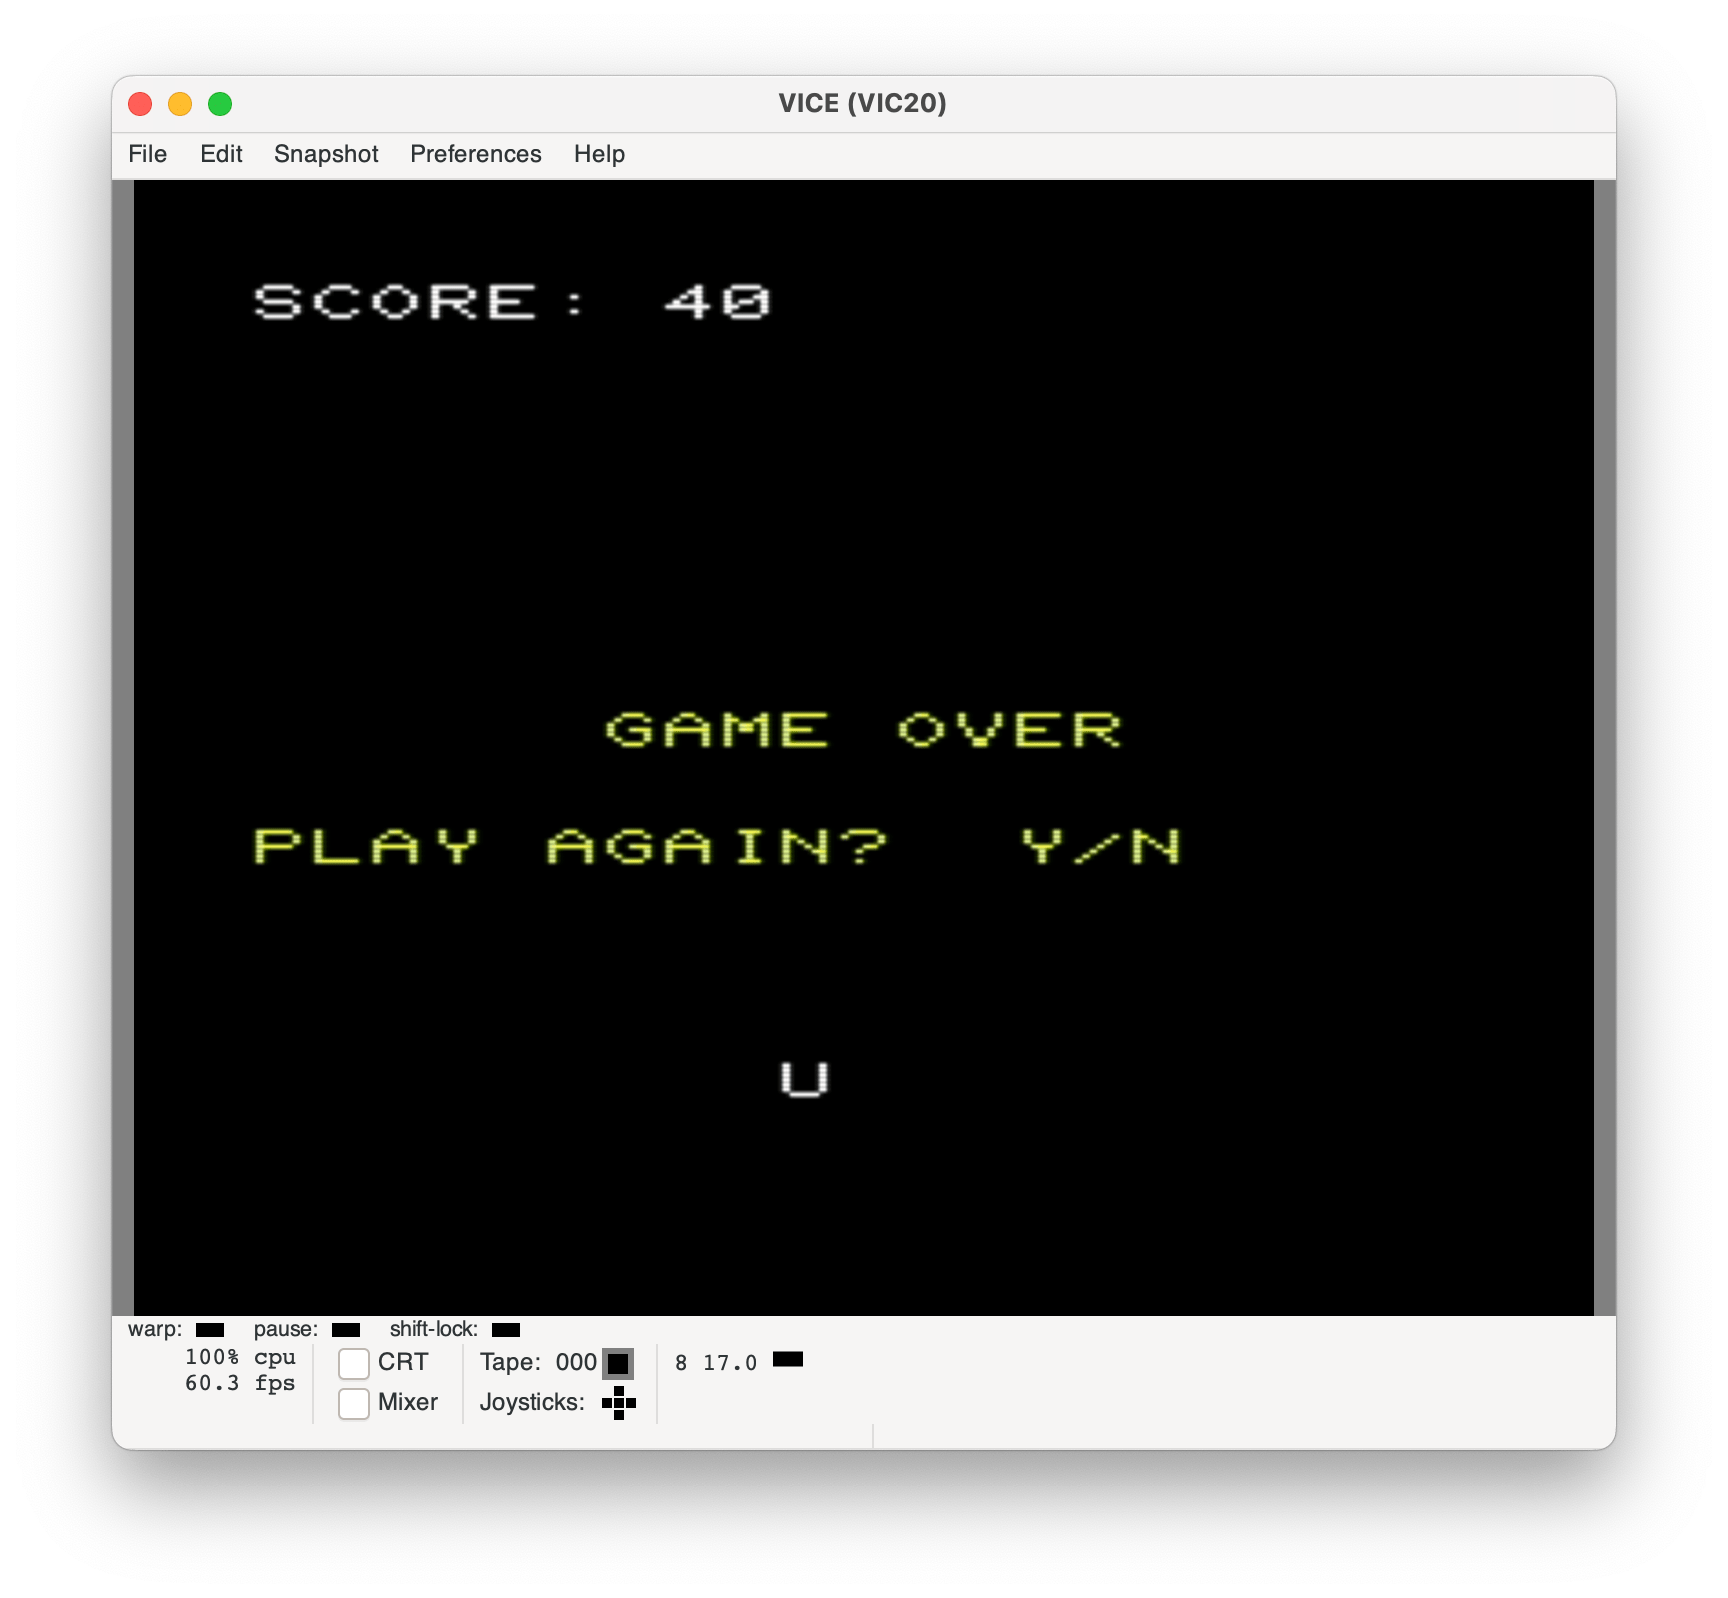
135 fort=1to5:printchr$(17):next
140 fort=1to6:printchr$(32);:next
145 printchr$(158);"game over"
150 print"{down*2}play again? y/n"
155 geta$:ifa$="y"thenrun
160 ifa$="n"thenend
165 goto155
CHR$(17) is the escape code to move the cursor down one line, so the first line moves down five lines.
CHR$(32) is a space, so the second line prints six spaces over.
CHR$(158) sets the text color to yellow, it seems, and prints “GAME OVER”.
Then, for some reason, I don’t use the CHR$(17) to move down, and instead use the embedded screen code. This makes me wonder if I did this, or if it was changed by the VIC-NIC NEWSLETTER folks.
My choice of looking for “Y” or “N” is interesting. This works, and is short, but it is not how I would do it today. If GET A$ catches a “Y” we just RUN to start everything over. If it is an “N” we just END and stop right there. Otherwise we go back and check again.
This is kinda clever, since I would have thought of writing it like:
xxx GET A$:IF A$="" THEN xxx
IF A$="Y" THEN RUN
IF A$="N" THEN END
GOTO xxx
…and that would be larger. Was I smarter then?
And that, my friends, is my first published program. I do not know how close this code is to what became Factory TNT (it would have been trivial to rewrite from scratch) but I can definitely see similarities — it is effectively the same program, just with more graphics, sound and such added in the Factory TNT version.
And now I guess that is all I can possibly write about this program.
Until next time, that is…