

I created a new category for MC-10 and Micro Color BASIC for this one…
If you do not recognize the name Jim Gerrie, start here:
You will find dozens … hundreds … thousands (?) of programs there for the Radio Shack TRS-80 MC-10 computer, as well as the Color Computer. I believe he is by far the most prolific programmer in our community.
Recently, he shared a video on his YouTube channel of a 1979 Star Trek game he ported to the MC-10:
I am always fascinated at his porting efforts. He has done some amazing arcade conversions scaled down to fit the 32×16 text screen (ahem, 64×32 “graphical” blocks).
What caught my attention on this one was how he prints out the header row and column:

The Motorola MC6847 VDG chip used by the MC-10 and the Color Computer had a limited font of uppercase letters and numbers, with no lowercase versions. Instead of lowercase, the VDG contained the same set of characters but in reverse mode. I’ve posted about this in the past:

Now, I knew that the Micro Color BASIC of the MC-10 had some extra features we never got on Color BASIC for the CoCo. The MC-10 keyboard had the 2×2 graphic block characters by the keys, and you could type them with the keyboard. Here is what the MC-10 keyboard looks like, via an image from the online MC-10 emulator:

I believe SHIFT+LETTER would produce that graphical block. To change the colors, CONTROL-0 would toggle through them. This allowed you to embed these colorful block characters in a PRINT statement or string. Nice!
Heck, the CoCo didn’t even HAVE a Control key until the CoCo 3 came out in 1986, and our “Super” Extended Color BASIC did nothing with the extra keys they added.
But I digress.
I thought maybe there was some way to type reverse video directly from the keyboard. On the CoCo and MC-10, SHIFT-0 toggles between UPPERCASE and lowercase (which is represented by reverse video). BUT, spaces, numbers, and special characters still print normally. It is a “lowercase” mode, after all, and there is no such thing as a lowercase 7.
I left a comment to the video, asking how this is done. Jim responded with this:
0 DIMC1,C2,M$:M=16384:GOTO10
– Jim Gerrie via YouTube https://www.youtube.com/watch?v=o08AfAIfThM
7 C1=(PEEK(17024)AND1)*256+PEEK(17025)+16383:FORC2=1TOLEN(M$):POKEC1+C2,ASC(MID$(M$,C2))AND63:NEXT:?@C1-M+C2,;:RETURN
10 PRINT:INPUT M$:GOSUB7:GOTO10
The Coco peeks are: 136 (17024) and 137 (17025). And of course swap 1024 for 16384.
It appears to be a custom display routine that will take what is in M$ and POKE the values to the screen in inverted format. I expected the 136 and 137 locations had something to do with screen cursor position. I headed over to Color BASIC Unravelled to take a look…
136 is 0x88 in hex (eh, &H88 to Extended BASIC), so I searched for that in the book’s memory map and confirmed:
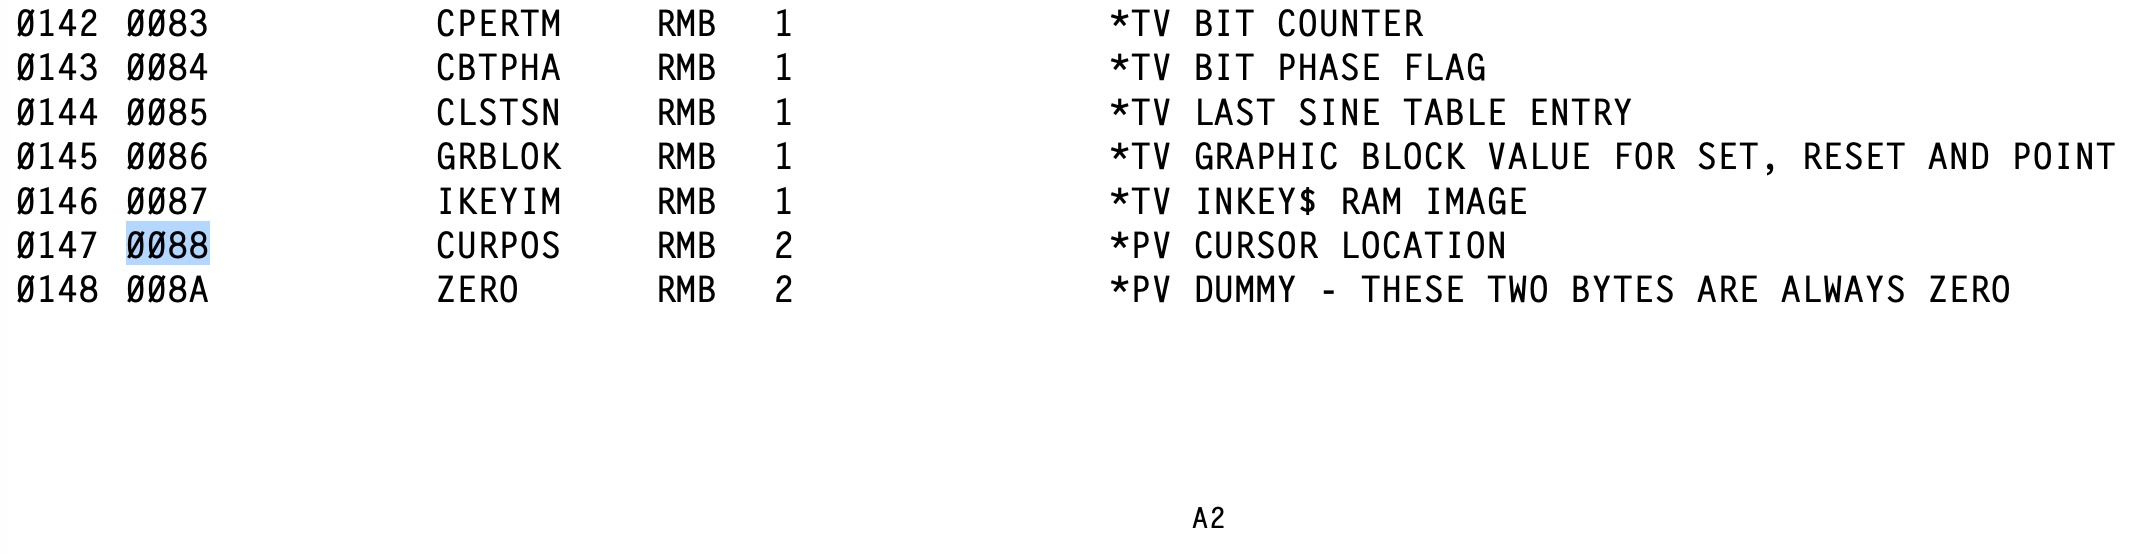
CURPOS for the win!
Dissecting the code…
0 DIMC1,C2,M$:M=16384:GOTO10
7 C1=(PEEK(17024)AND1)*256+PEEK(17025)+16383:FORC2=1TOLEN(M$):POKEC1+C2,ASC(MID$(M$,C2))AND63:NEXT:?@C1-M+C2,;:RETURN
10 PRINT:INPUT M$:GOSUB7:GOTO10
…goes like this:
- LINE 0 – Pre-allocated variables C1, C2 and M$. BASIC will dynamically allocate variables when they are first used, but you can use DIM to allocate them ahead of time, and in the order you specify. Variables at the start of the variable table are found quicker than variables at the end because BASIC has to scan through table to find the variable each time it is used. M points to the start of the text screen on the MC-10 (that would be 1024 for the CoCo). GOTO10 would be replaced by whatever line number is the program startup/initialization. Jim is very aware of how the BASIC interpreters work, so he puts his subroutines at the top of the pgoram. Anywhere you are in the program, whether that is line 100 or line 63000, GOSUB 7 will be able to find that routine by only having to skip through any lines from 0-6 to get there. Sadly, we learned to put subroutines at the end of our programs, so every GOSUB had to scan forward through every line until it found the subroutine line.
- LINE 10 – Skipping ahead, this is the “program” for this example. PRINT to skip a line, then INPUT to input a string, then a GOSUB 7 to display that string, and GOTO 10 to repeat.
- LINE 7 – Now the fun begins. C1 is … uh … okay, let’s take a quick break.
In Jim’s YouTube comment, he mentioned that 136/137 are the CoCo values, and 17024/17025 were the MC-10 values. These correspond to the 16-bit value stored there, which represents where in memory the cursor currently is. On a CoCo, if you use CLS to clear the screen and home the cursor, that position will be 1024. Let’s see if that matches:
CLS:PRINT PEEK(136)*256+PEEK(137)
 1024
OK
Checks out. On the MC-10, that would be “CLS:PRINT PEEK(17024)*256+PEEK(17025)” and that will display 16384 – the start of the MC-10s text screen in memory.
So far so good. Jim’s code starts out by getting those two values and adding 16383 to them for some reason. He also does an “AND 1” to the first peek, which should mask off all the bits in that 8-bit value except for the first one, meaning it should be either a 1 or a 0. But why?
On the MC-10, when the cursor is at the top left of the screen, 17024 and 17025 should represent 16384. That would be 64*256+0. As the cursor moves forward, that second value goes from 0 to 255, halfway in to the screen memory. Then, that second number flips back to zero and the first number goes up by one.
The first half of the screen is 64*256+(0 to 255) then the second half is 65*256+(0 to 255). This program will poke an orange block to the first byte of the screen, and the last byte:
10 REM MC-10
20 CLS
30 POKE 64*256+0,255
40 POKE 65*256+255,255
But Jim is doing something with that “AND 1”. 64 AND 1 is 1, since bit 0 is set. 65 AND 1 is zero, since bit 0 is clear for an odd number. Thus, his code is using 0 for the first half of the screen, and 1 for the second half, so he adds 16383 to the value which puts it back into the screen memory range of 16384 to 16895.
But why? If Jim is doing this, there has to be a reason. I wrote this test to find out.
0 REM MC-10 REVERSE1.BAS
10 FOR P=0 TO 510
20 CLS:PRINT@P,".";:PRINT@P,;
30 L=PEEK(17024)*256+PEEK(17025)
40 PRINT@500,L;
50 IF INKEY$="" THEN 50
60 NEXT
This will clear the screen, print a dot at a position, then move the cursor position back to where the dot is. This lets me “see” where the location is. It then PEEKs to get the current cursor position, and prints it on the bottom row. Hit a key, then it repeats. You can see the dot walk across the screen as the value at the bottom increases.
Okay.
Modifying the program to use the AND 1 would look like this:
0 REM MC-10 REVERSE2.BAS
10 FOR P=0 TO 510
20 CLS:PRINT@P,".";:PRINT@P,;
30 L=(PEEK(17024)AND1)*256+PEEK(17025)+16383
40 PRINT@500,L;
50 IF INKEY$="" THEN 50
60 NEXT
And running that looks … the same.
And that’s when I realized what this code does! The AND 1 makes it return values 0-511 for the curious position — the PRINT@ locations. He must use this code with AND 1 (without the +16383) when he is using PRINT@. If he wanted the POKE location, he would leave out the AND 1 and the +16383, and just have the POKE positions.
I feel dumb that I did not realize it. But this was fun anyway. This may be the first MC-10 program I have ever written.
Moving back to the code…
- LINE 10
- C1 is set to the memory location of the current cursor position.
- C2 is then used as a loop from 1 to the length of the M$ to display.
- POKE C1 (current cursor position) plus C2 makes the POKE location move forward with the loop.
- For what to POKE, he uses ASC to get the ASCII value of the corresponding character in the string. He is using a trick here. We all learned MID$(A$,5,1) to get the 1 character at position 5. But if you leave off that third parameter, it will return a new string that starts at position 5 and goes to the end of the string, the same as a RIGHT$ would do. But ASC doesn’t care. If you ASC(“HELLO”) it gives you ASCII of the first character, “H”. A nice shortcut.
- After this, that ASCII value is AND 63 which masks off higher bits, to the value will be 0-63. And if you POKE those values to the screen, you get reversed video. That is the trick to how this works.
- After that is a PRINT@ to move the cursor to where the new position should be (POKEing bytes to the screen bypasses BASIC so the cursor would still be where it was). Even though C1 is a screen POKE location, M was the start of the screen, so he can subtract that to turn it back into a PRINT@ location.
That’s cool. So let’s try it on the CoCo:
0 DIMC1,C2,M$:M=1024:GOTO10
7 C1=(PEEK(136)AND1)*256+PEEK(137)+1023:FORC2=1TOLEN(M$):POKEC1+C2,ASC(MID$(M$,C2))AND63:NEXT:?@C1-M+C2,;:RETURN
10 PRINT:INPUT M$:GOSUB7:GOTO10
Tada!
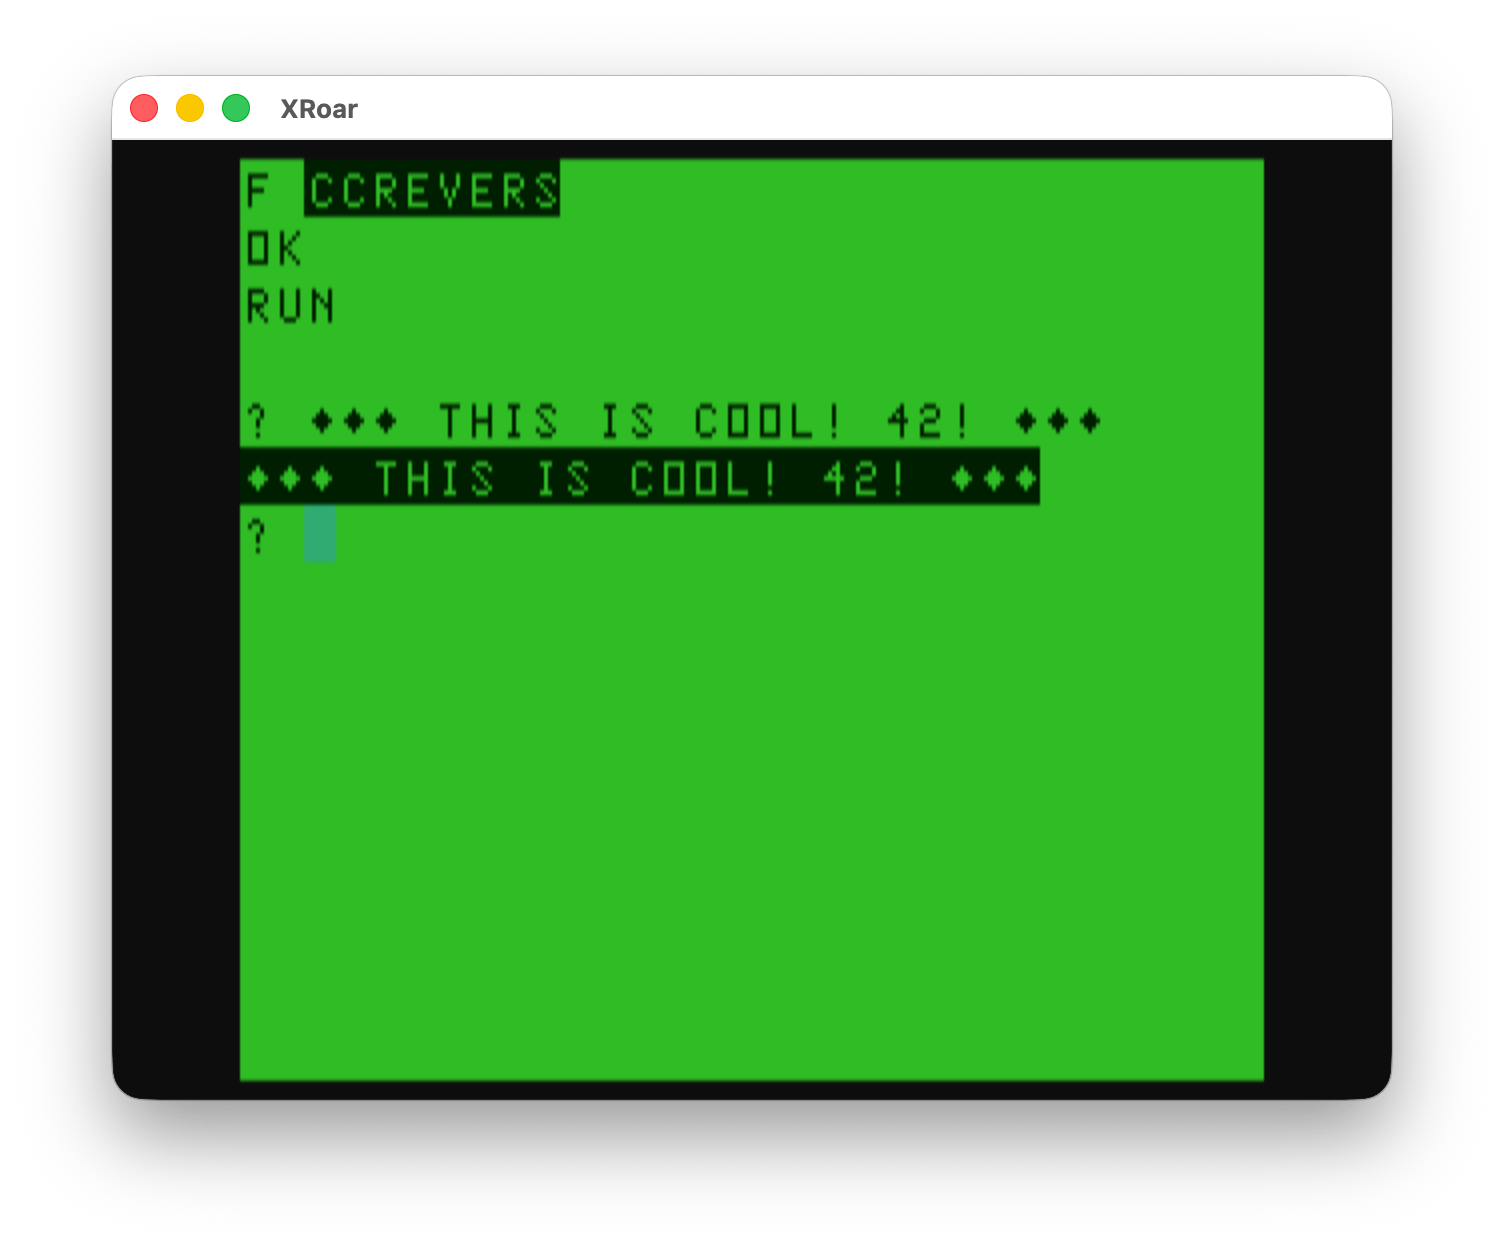
I wish I had thought of that back in the 1980s. I could have made my CoCo programs look spiffier.
Thanks for sharing, Jim!
Until next time…