Last year, I posted an article dealing with Optimizing Color BASIC. In it, I covered a variety of techniques that could be done to speed up a BASIC program. While this was specifically written about the Microsoft Color BASIC on the Radio Shack Color Computers, I expect it may also apply to similar BASICs on other systems.
James J. left an interesting comment:
Oh yeah. If anyone cares to experiment with modifying the BASIC interpreter, it might be fun to make the symbol table “adaptive”. When you find a variable in the symbol table, if it’s not the first one, swap it with its predecessor. The idea is that the more frequently looked up symbols migrate towards the front and thus are more quickly found. The question is whether the migration improves things enough to make up for the swapping. – James J.
This got me curious as to how much of a difference this would make, so I did a little experiment.
In this Microsoft BASIC, variables get created when you first use them. Early on, I learned a tip that you could define all your variables at the start of your program and get that out of the way before your actual code begins. You can do this with the DIM statement:
DIM A,B,A$,B$
Originally, I thought DIM was only used to define an array, such as DIM A$(10).
I decided to use this to test how much of a difference variable placement makes. Variables defined first would be found quicker when you access them. Variables defined much later would take more time to find since the interpreter has to walk through all of them looking for a match.
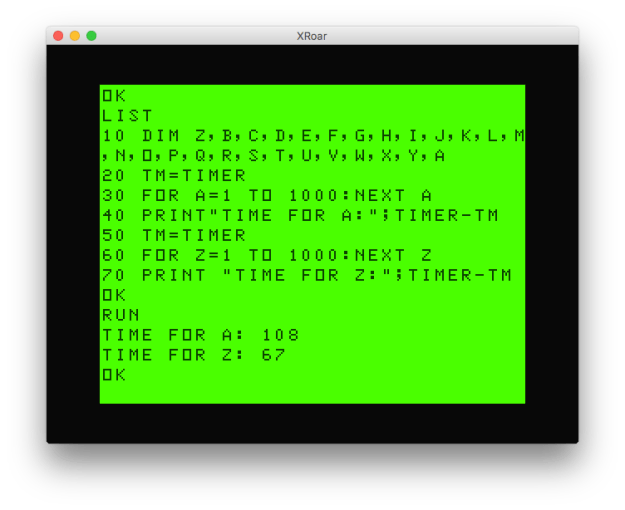
Using the Xroar CoCo/Dragon emulator, I wrote a simple test program that timed two FOR/NEXT loops using two different variables. It looks like this:
In BASIC, variables defined earlier are faster.
As you can see, with just two variables, A and Z, there wasn’t much difference between the time it takes to use them in a small FOR/NEXT loop. I expect if the loop time was much later, you’d see more and more difference.
But what if there were more variables? I changed line 10 to define 26 different variables (A through Z) then ran the same test:
In BASIC, variables defined last take more time to find, so they are slower.
Now we see quite a bit of difference between using A and using Z. If I knew Z was something I would be using the most, I might define it at the start of the DIM. I did another test, where I defined Z first, and A last:
In BASIC, define the most-used variables first to speed things up.
As expected, now the Z variable is faster than A.
Every time BASIC has to access a variable, it makes a linear (I assume*) search through all the variables looking for a match.
Side Note: * There is an excellent Super/Disk/Extended/Color Basic Unraveled book set which contains fully commented disassemblies of the ROMs. I could easily stop assuming and actually know if I was willing to take a few minutes to consult these books.
However, when I first posted these results to the Facebook CoCo group, James responded there:
Didn’t realize it made that much difference–doesn’t the interpreter’s FOR loop stack remember the symbol table entry for the control variable? – James J.
Indeed, this does seem to be a bad test. FOR/NEXT does not need the variable after the NEXT. If you omit the variable (just using NEXT by itself), it does not need to do this lookup and both get faster:
NEXT without a variable is faster.
I guess I need a better test.
How about using the variable directly, such as simple addition?
Variable addition is slower for later variables.
Z, being defined at the end, is slower. And if we reverse that (see line 10, defining Z first), Z becomes faster:
Variable addition is faster for earlier variables.
You can speed up programs by defining often-used variables earlier.
James’ suggestion about modifying the interpreter to do this automatically is a very interesting idea. If it continually did it, the program would adapt based on current usage. If it entered a subroutine that did a bunch of work, those variables would become faster, then when it exited and went back to other code, those variables would become faster.
I do not know if the BASIC language lasted long enough to ever evolve to this level, but it sure would be fun to apply these techniques to the old 8-bit machines and see how much better (er, faster) BASIC could become.
JohnStrong (StrongWare) chimed in on Facebook with another improvement to the screen clearing assembly code. He suggested using a 16-bit register to blast bytes to the screen instead of doing it 8-bits at a time. It looks like this:
* CLEARX.ASM v1.02
* by Allen C. Huffman of Sub-Etha Software
* www.subethasoftware.com / alsplace@pobox.com
*
* 1.01 use TSTA instead of CMPD per L. Curtis Boyle
* 1.02 use STDD for 16-bit copy per John Strong
*
* DEFUSRx() clear screen to character routine
*
* INPUT:   ASCII character to clear screen to
* RETURNS: 0 is successful
*         -1 if error
*
* EXAMPLE:
*   CLEAR 200,&H3F00
*   DEFUSR0=&H3F00
*   A=USR0(42)
*   PRINT A
*
ORGADDR EQU $3f00

INTCNV EQU $B3ED   * 46061
GIVABF EQU $B4F4   * 46324

       org  ORGADDR
start  jsr  INTCNV * get passed in value in D
                   * D is made up of A and B, so if
                   * A has anything in it, it must be
		   * greater than 255.
       tsta        * test for zero
       bne  error  * branch if it is not zero
       ldx  #$400  * load X with start of
loop   stb  ,x+    * store B register at X and increment X
       tfr  b,a    * transfer B to A
loop   std  ,x++   * store D (A and B) then increment X twice
       cmpx #$600  * compare X to end of screen
       bne  loop   * if not there, keep looping
       bra  return * done
error  ldd  #-1    * load D with -1 for error code
return jmp  GIVABF * return to caller

* lwasm --decb -o clearx3.bin clearx3.asm
* lwasm --decb -f basic -o clearx3.bas clearx3.asm
* decb copy -2 -r clearx3.bin ../Xroar/dsk/DRIVE0.DSK,CLEARX3.BIN
This change takes the byte to clear the screen to (in register B) and duplicates it (to register A), which affects the 16-bit register D since it is made up of A and B combined. Thus, if the desired byte is $2A (42), register D ends up being $2A2A.
Then, instead of copying one byte at a time, the loop copies two bytes at a time. The end result should be a faster screen clear. This ends up being two bytes larger than the second version, but still one byte smaller than my original version:
So far, we have looked at interfacing assembly language with BASIC to do some useless things (add one to a number), questionably useful things (clear screen to any given character), and actually useful things (high speed uppercasing of text).
In this installment, we will try to do something else actually useful: move the screen around.
But first, let me digress a bit.
The cross compiler I use, lwtools by Lost Wizard Enterprises, is able to compile code to run under COLOR BASIC or OS-9/NitrOS-9. It also has some other options I just learned about (thanks, William!) that I wanted to mention.
Previously, I shared a small bit of assembly that would clear the 32-column screen to any specified character:
ORGADDR EQU $3f00

GIVABF EQU  $B4F4  * 46324
INTCNV EQU  $B3ED  * 46061

       org  ORGADDR
start  jsr  INTCNV * get passed in value in D
                   * D is made up of A and B, so if
                   * A has anything in it, it must be
                   * greater than 255.
       tsta        * test for zero
       bne  error  * branch if it is not zero
       ldx  #$400  * load X with start of screen
loop   stb  ,x+    * store B register at X and increment X
       cmpx #$600  * compare X to end of screen
       bne  loop   * if not there, keep looping
       bra  return * done
error  ldd  #-1    * load D with -1 for error code
return jmp  GIVABF * return to caller
NOTE: This article is using version 2, from the previous article, and does not include John Strong’s updates.
I have been compiling these to .BIN files, copying them over to a disk image, and then loading them in the XRoar emulator. It turns out, the lwasm also has another output option: BASIC. It will actually generate a short BASIC program that will POKE that assembly code in to memory! You use the format (-f) option like this:
lwasm --decb -f basic -o clearx2.bas clearx2.asm
This would assemble clearx2.asm and output it as a BASIC program! It looks like this:
10 READ A,B
20 IF A=-1 THEN 70
30 FOR C = A TO B
40 READ D:POKE C,D
50 NEXT C
60 GOTO 10
70 END
80 DATA 16128,16151,189,179,237,77,38,12,142,4,0,231,128,140,6,0,38,249,32,3,204
,255,255,126,180,244,-1,-1
The assembly is turned in to data statements, and it appears this is even capable of handling programs with multiple ORG statements. The DATA begins with the start memory location and the end memory location for a block of code, and then the actual code bytes. Clever.
This would be an easy way to add assembly code to your BASIC program without needing to LOADM/CLOADM a separate .BIN file. It will also give us a simple way to test this code in the XRoar emulator without copying files to a disk image (more on this in a moment).
But I digress.
Scroll With It, Baby
In all the examples I have shown so far, any parameter passed in was used to do something — a value to add to, a character to clear the screen to, or a string to print in uppercase.
The USR command allows for up to 10 functions to be defined (USR0 through USR9). This lets you easily have ten different assembly routines to call. However, you can also just use the parameter passed in to handle multiple functions.
Suppose you wanted to write a simple maze game using the 32 column text screen. You could limit your maze to be 32×16 (the size of the screen), or you could try to have a much larger maze and scroll it within the viewable screen area.
Scrolling UP is easy … you just print something at the bottom of the screen, and BASIC moves the whole screen up. Try this:
10 PRINT TAB(RND(30));".":GOTO 10
That code will tab over a random number of spaces (0 to 30) and print a period. Over and over and over. If you run this, you see a cheesy scrolling star field (if stars were black and space was nuclear green).
Scrolling stars!
There was a famous Commodore BASIC program that did something similar using the PETASCII slash characters to generate a maze. There has even been an entire book written about this one liner:
The CoCo does not have the Commodore character set, but we do have “/” and “\” so we could try this:
10 PRINT CHR$(47+(RND(2)-1)*45);:GOTO 10
This will print either CHR$(47) (a slash) or randomly add 45 to print CHR$(92) (a backslash). We get a similar endless maze that scrolls up, but doesn’t look nearly as nice as the one on the Commodore.
Scrolling maze… Sorta.
See? Easy.
I expect I wasn’t the only kid who wrote simple space games like this, with the ship at the top and objects traveling up the screen towards it.
I think I may be digressing again, so let me get back to the main point.
If we wanted to scroll in the other direction, we could try to do it in BASIC by copying every byte down one line. Here is an attempt to do that by using PEEK and POKE:
10 CLS
20 REM SCROLL UP
30 FOR A=1 TO 100
40 PRINT TAB(RND(30));"."
50 NEXT
60 REM SCROLL DOWN
70 FOR A=1 TO 100
80 PRINT@0,TAB(RND(30));"."
90 GOSUB 2000 'DOWN
100 NEXT
999 GOTO 999
2000 REM SCROLL DOWN
2010 FOR Z=1535-32 TO 1024 STEP-1
2020 POKE Z+32,PEEK(Z)
2030 NEXT
2040 RETURN
XROAR TIP: If you want to try this out in the XRoar emulator, save the above listing out as a text file with the extension of .asc (“scrolldown.asc”). If you do that, in XRoar you can do “File -> Load” and point it to this file. Then, that file will act like a cassette with an ASCII program on it! You can then type “CLOAD” and load the program, without needing to transfer it to a disk image.
This program will let the stars scroll up the screen (100 lines worth) using normal PRINT, then it will try to make them scroll down the screen (100 times) using a PEEK/POKE subroutine.
Scrolling down is painfully slow this way. You can see this would be no way to write a game.
Side Note: If I were trying to write a “space ship flying through space” game, I would just draw the individual stars and other objects, moving them each time, instead of redrawing the entire screen. But that’s not the point of this silly code.
And, if we wanted to also scroll the screen left and right, we’d need similar (and painfully slow) code. Here is a brute-force BASIC program that attempts to move the screen in each direction using POKE and PEEK:
10 CLS
20 FOR A=1 TO 14
30 PRINT @32*A+A,"SCROLLING IS HARD"
40 NEXT
50 GOSUB 1000 'UP
60 GOSUB 2000 'DOWN
70 GOSUB 3000 'LEFT
80 GOSUB 4000 'RIGHT
999 GOTO 999
1000 REM SCROLL UP
1010 FOR A=1024+32 TO 1535
1020 POKE A-32,PEEK(A)
1030 NEXT
1040 RETURN
2000 REM SCROLL DOWN
2010 FOR A=1535-32 TO 1024 STEP-1
2020 POKE A+32,PEEK(A)
2030 NEXT
2040 RETURN
3000 REM SCROLL LEFT
3010 FOR A=1024+1 TO 1535-1
3020 POKE A,PEEK(A+1)
3030 NEXT
3040 RETURN
4000 REM SCROLL RIGHT
4010 FOR A=1535-1 TO 1024 STEP-1
4020 POKE A+1,PEEK(A)
4030 NEXT
4040 RETURN
If you run this, you see it prints a message down the screen, then SLOWLY moves every byte up, then back down, then left, then right. It is very slow. It also leaves leftover characters on the edge of the screen, with the idea being you would be drawing new characters over there if you were making a maze or something scroll.
It’s not elegant, nor is it pretty. Or useful.
Obviously, doing this to scroll a screen is not practical. Clever programmers will try to make large strings and then just print them in the proper position. It’s mush faster letting the BASIC ROM do the work for you. Here’s an example that will scroll a PAC-MAN maze up and down the screen:
10 DIM MZ$(31)
20 FOR A=0 TO 30:READ MZ$(A):NEXT
30 CLS
40 REM SCROLL MAZE DOWN
50 FOR ST=0 TO 15
60 FOR LN=0 TO 15
70 PRINT @LN*32,MZ$(LN+ST);
80 NEXT:NEXT
90 REM SCROLL MAZE UP
100 FOR ST=15 TO 0 STEP-1
110 FOR LN=0 TO 15
120 PRINT @LN*32,MZ$(LN+ST);
130 NEXT:NEXT
140 GOTO 40
999 GOTO 999
1000 DATA "XXXXXXXXXXXXXXXXXXXXXXXXXXXX"
1010 DATA "X            XX            X"
1020 DATA "X XXXX XXXXX XX XXXXX XXXX X"
1030 DATA "X XXXX XXXXX XX XXXXX XXXX X"
1040 DATA "X XXXX XXXXX XX XXXXX XXXX X"
1050 DATA "X                          X"
1060 DATA "X XXXX XX XXXXXXXX XX XXXX X"
1070 DATA "X XXXX XX XXXXXXXX XX XXXX X"
1080 DATA "X      XX    XX    XX      X"
1090 DATA "XXXXXX XXXXX XX XXXXX XXXXXX"
2100 DATA "     X XXXXX XX XXXXX X     "
2110 DATA "     X XX          XX X     "
2120 DATA "     X XX XXXXXXXX XX X     "
2130 DATA "XXXXXX XX X      X XX XXXXXX"
2140 DATA "          X      X          "
2150 DATA "XXXXXX XX X      X XX XXXXXX"
2160 DATA "     X XX XXXXXXXX XX X     "
2170 DATA "     X XX          XX X     "
2180 DATA "     X XX XXXXXXXX XX X     "
2190 DATA "XXXXXX XX XXXXXXXX XX XXXXXX"
3200 DATA "X            XX            X"
3210 DATA "X XXXX XXXXX XX XXXXX XXXX X"
3220 DATA "X XXXX XXXXX XX XXXXX XXXX X"
3230 DATA "X   XX                XX   X"
3240 DATA "XXX XX XX XXXXXXXX XX XX XXX"
3250 DATA "XXX XX XX XXXXXXXX XX XX XXX"
3260 DATA "X      XX    XX    XX      X"
3270 DATA "X XXXXXXXXXX XX XXXXXXXXXX X"
3280 DATA "X XXXXXXXXXX XX XXXXXXXXXX X"
3290 DATA "X                          X"
4200 DATA "XXXXXXXXXXXXXXXXXXXXXXXXXXXX"
If you run this, you will see an ASCII maze that is 31 lines tall get scrolled up and down the 16 line screen. Using PRINT to blast out a string of bytes is much faster than PEEK and POKE.
Fancy BASIC programmers would use this trick, storing all their characters in strings and printing them on the screen. If you want to add left and right scrolling, you could do that with longer strings and MID$ to just print the middle 32 characters of the string.
But I digress. Again.
While there are ways to do simulate screen scrolling somewhat fast in BASIC, assembly language will still be much faster. I present this simple code that has assembly versions of the BASIC code I presented earlier. Instead of having four different subroutines to GOSUB to, you can call it by using USR0(z) and giving it a direction code (1=up, 2=down, 3=left and 4=right).
It looks like this:
* SCRNMOVE.ASM v1.00
* by Allen C. Huffman of Sub-Etha Software
* www.subethasoftware.com / alsplace@pobox.com
*
* DEFUSRx() screen moving function
*
* INPUT:   direction (1=up, 2=down, 3=left, 4=right)
* RETURNS: 0 on success
*         -1 if invalid direction
*
* EXAMPLE:
*   CLEAR 200,&H3F00
*   DEFUSR0=&H3F00
*   A=USR0(1)
*
ORGADDR EQU $3f00

INTCNV EQU  $B3ED * 46061
GIVABF EQU  $B4F4 * 46324

UP     EQU  1
DOWN   EQU  2
LEFT   EQU  3
RIGHT  EQU  4
SCREEN EQU  1024 * top left of screen
END    EQU  1535 * bottom right of screen

     org   ORGADDR

start jsr  INTCNV * get incoming param in D
     cmpb  #UP
     beq   up
     cmpb  #DOWN
     beq   down
     cmpb  #LEFT
     beq   left
     cmpb  #RIGHT
     beq   right
     bra   error

up   ldx   #SCREEN+32
loopup lda  ,x
     sta    -32,x
     leax   1,x
     cmpx   #END
     ble    loopup
     bra    return

down ldx    #END-32
loopdown    lda ,x
     sta    32,x
     leax   -1,x
     cmpx   #SCREEN
     bge    loopdown
     bra    return

left ldx    #SCREEN+1
loopleft    lda ,x
     sta    -1,x
     leax   1,x
     cmpx   #END
     ble    loopleft
     bra    return

right ldx   #END-1
loopright   lda ,x
     sta    1,x
     leax   -1,x
     cmpx   #SCREEN
     bge    loopright
     bra    return

error ldd   #-1    * load D with -1 for error code
     bra    exit

return ldd  #0
exit jmp  GIVABF

* lwasm --decb -9 -o scrnmove.bin scrnmove.asm
* lwasm --decb -f basic -o scrnmove.bas scrnmove.asm
* decb copy -2 -r scrnmove.bin ../Xroar/dsk/DRIVE0.DSK,SCRNMOVE.BIN
If I use the “-f basic” option, I can produce a BASIC loader with DATA statements that contain the assembly language routines. I then renumbered them and made them a subroutine so at the top of the example program I can GOSUB to it, then install and use the routine.
1 CLEAR 200,&H3F00
2 GOSUB 1000
3 DEFUSR0=&H3F00
10 CLS
20 FOR A=1 TO 14
30 PRINT @32*A+A,"SCROLLING IS HARD"
40 NEXT
50 Z=USR0(1) 'UP
60 Z=USR0(2) 'DOWN
70 Z=USR0(3) 'LEFT
80 Z=USR0(4) 'RIGHT
999 GOTO 999
1000 REM LOAD ASM ROUTINE
1010 READ A,B
1020 IF A=-1 THEN 1070
1030 FOR C = A TO B
1040 READ D:POKE C,D
1050 NEXT C
1060 GOTO 1000
1070 RETURN
1080 DATA 16128,16225,189,179,237,193,1,39,14,193,2,39,27,193,3,39,40,193,4,39,52,32,66,142,4,32,166,132,167,136,224,48,1,140,5,255,47,244,32,54,142,5,223,166,132,167,136,32,48,31,140,4,0,44,244,32,37,142,4,1,166,132,167,31,48,1,140,5,255,47,245,32,21
1090 DATA 142,5,254,166,132,167,1,48,31,140,4,0,44,245,32,5,204,255,255,32,3,204,0,0,126,180,244,-1,-1
If you run this, you will see the screen jump and then it will look like the original example looked…it just happens almost instantly instead of taking minutes.
Now let’s try the star scrolling example again. Instead of GOSUBing to slow BASIC routines, we will use the assembly scroll up and down routines:
1 CLEAR 200,&H3F00
2 GOSUB 1000
3 DEFUSR0=&H3F00
5 SP$=STRING$(31," ")
10 CLS
20 REM SCROLL UP
30 FOR A=1 TO 100
35 PRINT @32*15,SP$;
40 PRINT @32*15,TAB(RND(30));".";
45 Z=USR0(1) 'UP
50 NEXT
60 REM SCROLL DOWN
70 FOR A=1 TO 100
80 PRINT@0,TAB(RND(30));"."
90 Z=USR0(2) 'DOWN
100 NEXT
110 GOTO 20
999 GOTO 999
1000 REM LOAD ASM ROUTINE
1010 READ A,B
1020 IF A=-1 THEN 1070
1030 FOR C = A TO B
1040 READ D:POKE C,D
1050 NEXT C
1060 GOTO 1000
1070 RETURN
1080 DATA 16128,16225,189,179,237,193,1,39,14,193,2,39,27,193,3,39,40,193,4,39,52,32,66,142,4,32,166,132,167,136,224,48,1,140,5,255,47,244,32,54,142,5,223,166,132,167,136,32,48,31,140,4,0,44,244,32,37,142,4,1,166,132,167,31,48,1,140,5,255,47,245,32,21
1090 DATA 142,5,254,166,132,167,1,48,31,140,4,0,44,245,32,5,204,255,255,32,3,204,0,0,126,180,244,-1,-1
You will notice scrolling up and down now go at the same speed, but it is slightly slower than the normal BASIC PRINT scroll up. This is because of line 35 and 75 that use a PRINT statement to erase a line before the screen scrolls. This is because my simple assembly routines don’t bother to do this (neither did the BASIC version).
If the usage is known, the assembly can easily be made to clear out whichever roll of column is being moved. Doing it inside the routine will be much faster than using a PRINT command (and, PRINT doesn’t help us if the screen is scrolling left or right).
Can we do better? I think so.
Next time … let’s make another pass over this screen scrolling routine and see if we can make it do something more useful.
A quick update on some code listed in the previous installment. I mentioned that the user was passing in an integer that represented which character (a byte) the screen would be cleared to. It would be passed in as a 16-bit value (register D). Since the screen characters were one byte, a check was added in case the value passed in was larger than 255 (cmpd #255).
In the comments, Justin chimed in:
You could also just do a clra to force the issue and avoid the compare and branch. – Justin
Justin’s suggestion would make the code smaller and ignore the first byte of register D. Thus, if the user did pass in anything higher, it would just chop off the excess. In binary, if the user passed in a value from 0-255, only bits would be set in register B. When the value was larger than 255, it would start setting bits in register A:
     Reg A     |     Reg B
0 0 0 0 0 0 0 0|0 0 0 0 0 0 0 0 = Reg D is 0
0 0 0 0 0 0 0 0|0 0 0 0 0 0 0 1 = Reg D is 1
0 0 0 0 0 0 0 0|1 1 1 1 1 1 1 1 = Reg D is 255
0 0 0 0 0 0 0 1|0 0 0 0 0 0 0 0 = Reg D is 256
If we just “clra”, we ensure the routine will never get a value greater than 8-bits. However, the user will get unexpected results. If they tried to pass in 256 (see above), register A would be cleared, and the value the routine would use would be 0. “Garbage in, garbage out!”
However, if error checking is desired, we still need to do a compare. L. Curtis Boyle suggested:
You could use TSTA. instead of CMPA #$00 to save a byte. – L. Curtis B.
I looked up the TST instruction, and it seems to test a byte in memory location or the A or B register and set some condition code register (CC) bits. If the high bit 7 is set, the CC register’s N bit will be set (testing for a negative value). If any bits are set, the CC register’z Z (zero) bit will be set (not zero). Hopefully I have that correct. The key point here is you can use TST to check for zero, and TSTA is a smaller instruction than CMPD. Here is the code:
* CLEARX.ASM v1.01
* by Allen C. Huffman of Sub-Etha Software
* www.subethasoftware.com / alsplace@pobox.com
*
* 1.01 use TSTA instead of CMPD per L. Curtis Boyle
*
* DEFUSRx() clear screen to character routine
*
* INPUT: ASCII character to clear screen to
* RETURNS: 0 is successful
* -1 if error
*
* EXAMPLE:
* CLEAR 200,&H3F00
* DEFUSR0=&H3F00
* A=USR0(42)
* PRINT A
*
ORGADDR EQU $3f00

GIVABF EQU  $B4F4  * 46324
INTCNV EQU  $B3ED  * 46061

       org  ORGADDR
start  jsr  INTCNV * get passed in value in D
       cmpd #255   * compare passed in value to 255
       bgt  error  * if greater, error
                   * D is made up of A and B, so if
                   * A has anything in it, it must be
                   * greater than 255.
       tsta        * test for zero
       bne  error  * branch if it is not zero
       ldx  #$400  * load X with start of screen
loop   stb  ,x+    * store B register at X and increment X
       cmpx #$600  * compare X to end of screen
       bne  loop   * if not there, keep looping
       bra  return * done
error  ldd  #-1    * load D with -1 for error code
return jmp  GIVABF * return to caller

* lwasm --decb -o clearx2.bin clearx2.asm
* decb copy -2 -r clearx2.bin ../Xroar/dsk/DRIVE0.DSK,CLEARX2.BIN
When I build this in to a .BIN file, the original showed 37 bytes, and this version shows 34 bytes. Here are the hex bytes that were generated:
It appears to save three bytes. Curtis mentioned saving one byte which I think is the case between a “CMPA #0” and “TSTA”.
Best of all, with this change, it still works and rejects larger values:
CLEARX2: Electric Boogaloo
Thanks, Justin and Curtis, for those suggestions.
By the way, I know programmers often don’t bother with error checking. I mean, our code is perfect, right? And, clearing a screen is hardly anything that requires error checking. And while I agree, I noticed that even COLOR BASIC has error checking for it’s CLS command:
CLS with a value greater than 255 returns a Function Call error.
And, since the CoCo’s VDG chip supported nine colors, you only get colors for CLS 0 through CLS 8. If you try to clear to any value between 9 and 255, you get an easter egg:
CLS 9 through 255 present a Microsoft easter egg.
Bonus Question: There is also an additional CLS easter egg in the CoCo 3’s BASIC, Do you know what it is?
But I digress…
String Theory
You can really speed up a BASIC program by using assembly routines. For instance, while BASIC has great string manipulation routines, doing something simple like converting a string to uppercase can be painfully slow.
Suppose you were trying to write a text-based program and you wanted it to work on all Color Computer models. The original Color Computer 1 and early Color Computer 2 models could not display true lowercase – they displayed inverse characters instead. Later Tandy-branded CoCo 2s and the CoCo 3 could support lowercase.
To work on all systems, you might simply choose to put all your menu text in UPPERCASE. Or, you might store every string twice with an uppercase and mixed case version, and use a variable to know which one to print:
IF UC=1 PRINT "ENTER YOUR NAME:" ELSE PRINT "Enter your name:"
That would be one brute-force way to do it, but if your program used many strings, it would needlessly increase the size of your program. Instead, it might make sense to store all the strings in mixed case, and convert them to uppercase on output if needed.
Here is a very simple brute-force subroutine that does just this:
BASIC uppsercase subroutine.
And it works just fine…
Output of BASIC uppercase subroutine.
…but it’s slow. If no conversion is needed, the mixed case text instantly appears, but when conversion is needed, it crawls through the line character-by-character at speeds we haven’t seen text display at since the days of dial-up BBSes.
In an earlier series of articles, we discussed word-wrap routines in BASIC. Several folks contributed their versions, and we ranked them based on code size, RAM size and speed. There were many different approaches to the same thing, and the same applies to uppercasing a string, so please don’t take my brute-force example as the best way it can be done. It certainly isn’t, and can surely be improved.
But even the fastest BASIC routine won’t compare to doing the same thing in assembly.
Unfortunately, the USRx() command only allows you to pass in a numeric value, and not a string, so we can’t simply do something like:
A$=USR0("Convert this to all uppercase.") 'THIS WILL NOT WORK!
Pity. But, I was able to find the solution, and it involves another BASIC command known as VARPTR. This command gets the address of a variable in memory. You may recall that Darren Atkinson (creator of the CoCoSDC interface) used VARPTR in his version of the word-wrap routine:
This is our solution to passing in a string to USRx(). We can pass in the address of the string, and then the assembly code can figure it out from there. Here is how it works:
A$="This is a string in memory"
X = VARPTR(A$)
PRINT "A$ IS LOCATED AT ";X
If you run that code, you will see the address of that string in memory. We just need to understand how a string is stored.
The address does not point to the actual string data. Instead, it points to a few bytes of information that describe the string and where it is.
The first byte where the string is stored will be the size of that string:
A$="THIS IS A STRING IN MEMORY"
X = VARPTR(A$)
PRINT "A$ IS LOCATED AT";X
PRINT "A$ IS";PEEK(X);"LONG"
I forget what the second byte is used for, but bytes three and four are the actual address of the string character data:
PRINT "STRING DATA IS AT";PEEK(X+2)*256+PEEK(X+3)
On my system, it looks like this:
VARPTR of a string.
Once you know the actual starting place for the string data, you can see what that is in memory. In my case, the string length was 26 bytes, and the data started at 32709. I could use a FOR/NEXT loop and display the contents of that memory:
VARPTR string data example.
You will notice that the string information (length of string, location of string characters) is nowhere near the actual string data is. This is because the string characters could actually be in your program code, rather than in string memory. For example:
10 A$="THIS STRING IS IN THE PROGRAM"
Somewhere in RAM will be a string identification block with the length of the string and an address that points inside the program space. This makes it sort of an “embedded string” that lives inside your program. However, if you manipulate this string, BASIC will then make a copy of it in other memory and make the pointer go there. Thus, if you have a 10 character string like this:
10 A$="1234567890"
…and inside your code you do something like this:
20 A$=A$+"!"
…at that point, BASIC will no longer be pointing A$ to inside your code. It will be copied (pluy the “!”) to a new memory location inside of string space:
Here you can see that the location of the string (initially inside the program code space) moves to higher string memory RAM:
VARPTR shows you where the string moves to.
You won’t see memory decrease when this happens, because print MEM is showing you available program space. Strings live in a special section at the end of program memory. You may have seen the CLEAR command uses to reserve space for strings like this:
CLEAR 200
I believe 200 is the default if you don’t specify. In this case, the string started out inside the program’s code space and was not using any of that 200 bytes, and then after altering the string, it was copied in to the 200 bytes of string space.
Thus, if you want to see the impact, try running with “CLEAR 0” so there is NO ROOM for strings!
5 CLEAR 0 ' NO STRING SPACE
Now when we run that program, we see that the initial string works, because it is stored inside the program space, but the moment we try to add one character to it, there is no string memory available to copy the string to and it fails with an ?OS ERROR (out of string space).
?OS ERROR showing strings move from code space to string space.
This is something to be aware of if you are ever writing large programs with many strings. Rather than do something like this:
…which would then allocate string space to hold the length of A$, B$ and C$, you could keep those strings in program code space by just printing them out each time:
40 PRINT A$;B$;C$
The trick is to avoid BASIC having to allocate string memory and copy things over. If you need to do this, you can re-use a temporary string:
40 TS$=A$+B$+C$:GOSUB 1000:TS$=""
I think something like that would create a temporary string (TS) and copy all those code space strings over, then you could use it, and then setting it back to “” at the end would release that memory. If string memory is limited, tricks like this can really help out.
But I digress.
Now that we know how strings are stored, we can create an assembly routine that will serve as a UPPERCASE PRINT command.
Our assembly routine will be passed the address of the string, and then use byte 1 to get the length, and bytes 3 and 4 to get the location of the actual string characters. We can then walk through that memory and use the CHROUT ROM routine to output each character one-by-one, the same way BASIC does for PRINT.
Here is the routine:
* UCASE.ASM v1.00
* by Allen C. Huffman of Sub-Etha Software
* www.subethasoftware.com / alsplace@pobox.com
*
* DEFUSRx() uppercase output function
*
* INPUT: VARPTR of a string
* RETURNS: # chars processed
*
* EXAMPLE:
* CLEAR 200,&H3F00
* DEFUSR0=&H3F00
* A$="Print this in uppercase."
* PRINT A$
* A=USR0(VARPTR(A$))
*
ORGADDR EQU $3f00
dir
GIVABF EQU   $B4F4    * 46324
INTCNV EQU   $B3ED    * 46061
CHROUT EQU   $A002

       org   ORGADDR
start  jsr   INTCNV   * get passed in value in D
       tfr   d,x      * move value (varptr) to X
foo    ldb   ,x       * load string len to B
       ldy   2,x      * load string addr to Y
       beq   null     * exit if strlen is 0
       ldx   #0       * clear X (count of chars conv)
loop   lda   ,y       * load char in A
       cmpa  #'a      * compare to lowercase A
       blt   nextch   * if less, no conv needed
       cmpa  #'z      * compare to lowercase Z
       bgt   nextch   * if greater, no conv needed
lcase  suba  #32      * subtract 32 to make uppercase
       leax  1,x      * inc count of chars converted
nextch jsr   [CHROUT] * call ROM output character routine
       leay  1,y      * increment Y pointer
cont   decb           * decrement counter
       beq   exit     * if 0, go to exit
       bra   loop     * go to loop
exit   tfr   x,d      * move chars conv count to D
       bra   return   * return D to caller
null   ldd   #-1      * load -2 as error
return jmp   GIVABF   * return to caller

* lwasm --decb -o ucase.bin ucase.asm
* decb copy -2 -r ucase.bin ../Xroar/dsk/DRIVE0.DSK,UCASE.BIN
W will call our assembly routine like this:
A$="Convert this to uppercase."
A=USR0(VARPTR(A$))
And it should work on upper and lowercase strings automatically:
Uppercase output routine in assembly.
Now our uppercasing output routine is lightning fast.
Previously, we took a look at using the EXTENDED COLOR BASIC DEFUSR command to interface a bit of assembly language with a BASIC program. The example I gave simply added one to a value passed in:
Using DEFUSR to call assembly from BASIC.
That’s not very useful, so let’s do something a bit more visual.
One of my favorite bits of CoCo 6809 assembly code is this:
      org  $3f00
start ldx  #$400 * load X with start of 32-column screen
loop  inc  ,x+   * increment whatever is at X, then increment X
      cmpx #$600 * compare X with end of screen
      bne  loop  * if not end, go back to loop
      bra  start * go back to start
This endless loop will start incrementing every byte on the screen over and over making a fun display. I ran this code in the Mocha emulator (which has EDTASM available):
http://www.haplessgenius.com/mocha
Then I compiled it (“A/IM/WE/AO” – assemble, in memory, wait for errors, absolute origin – how can I still remember this???), and ran it in the debugger (“Z” for debugger, then “G START” to start it):
Mocha emulator running silly screen code.
This inspired me to make a small assembly routine to do something similar from BASIC. The CLS command can take an optional value (0-8) to specify what color to clear the screen to. Let’s make an assembly routine that will allow specifying ANY character to clear the screen to:
ORGADDR EQU $3f00

GIVABF EQU  $B4F4  * 46324
INTCNV EQU  $B3ED  * 46061

       org  ORGADDR
start  jsr  INTCNV * get passed in value in D
       cmpd #255   * compare passed in value to 255
       bgt  error  * if greater, error
       ldx  #$400  * load X with start of screen
loop   stb  ,x+    * store B register at X and increment X
       cmpx #$600  * compare X to end of screen
       bne  loop   * if not there, keep looping
       bra  return * done
error  ldd  #-1    * load D with -1 for error code
return jmp  GIVABF * return to caller
First, I added a bit of error checking so if the user passed in anything greater than 255, it will return -1 as an error code. Otherwise, it returns back the value passed in (that the screen was cleared to.)
Side Note: Hmmm. Since I know register D is register A and B combined, all I really need to do is make sure A is 0. i.e, “D=00xx”. If anything is in A, it is greater than the one byte value in B. I suppose I could also have done “cmpa #0 / bne error”. Doing something like that might be smaller and/or faster than comparing a 16-bit register. Anyone want to provide me a better way?
Since the 16-bit register D is made up of the two 8-bit registers A and B, I can just use B as the value passed in (0-255).
Here is what it would do with a bad value:
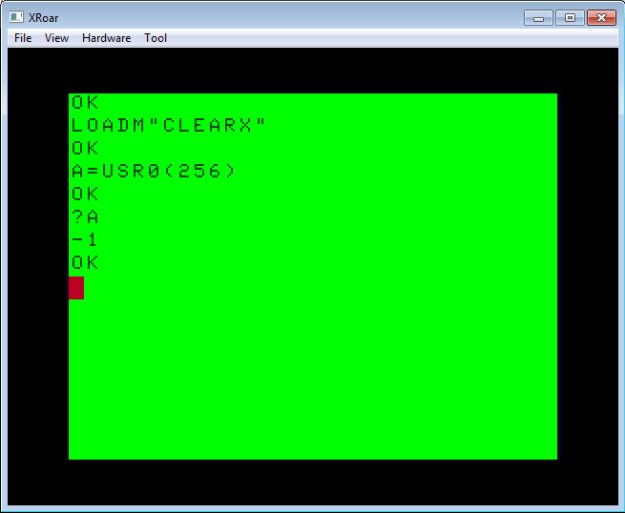
Clear X routine, bad value error.
And here is it with a valid value of 42:
Clear X with a value of 42.
So far so good.
In the next part, we’ll look at how to pass in a string instead of an integer.
This article series will demonstrate how to interface some 6809 assembly code with Microsoft BASIC on a Tandy/Radio Shack TRS-80 Color Computer.
BASIC on the Color Computer is easy, but not fast. 6809 assembly language is fast, but not easy. Fortunately, it’s easy (and fast?) to combine them, allowing you to write a BASIC program that makes use of some assembly language to speed things up.
Assembly code can be loaded (or POKEd) in to memory at a specific address and then invoked by the EXEC command. This is fine for a “go do this” type of routine. But, if you want the assembly code to interact with BASIC by returning values or modifying a variable or string, you can use a special BASIC command designed for this purpose.
The Color Computer’s original 1980 COLOR BASIC had a USR command which could be used to call an assembly language routine via a BASIC interface. From the Wikipedia entry:
USR(num) calls a machine language subroutine whose address is stored in memory locations 275 and 276. num is passed to the routine, and a return value is assigned when the routine is done
This allowed passing a numeric parameter in to the assembly routine, and getting back a status value.
When EXTENDED COLOR BASIC came out, USR was enhanced to allow defining multiple routines. It looks like this:
DEFUSR0=&H3F00
A=USR0(42)
That code would define USR0 to call an assembly routine starting at memory location &H3F00 and pass it the value of 42. That routine could then return a value back to the caller which would end up in the variable A.
There are two ROM routines that enable receiving a value from BASIC, and returning one back:
INTCNV will convert the integer passed in the USRx() call and store it in register D.
GIVABF will take whatever is in register D and return it to the USR0() call.
Here is a very simple assembly routine that would receive a value, add one to it, and return it.
ORGADDR EQU $3f00

GIVABF EQU $B4F4   * 46324
INTCNV EQU $B3ED   * 46061

       org  ORGADDR
start  jsr  INTCNV * get passed in value in D
       tfr  d,x    * transfer D to X so we can manipulate it
       leax 1,x    * add 1 to X
       tfr  x,d    * transfer X back to D
return jmp  GIVABF * return to caller
Using the lwtools 6809 cross compiler, I can compile it in to a .BIN file that is loadable in DISK BASIC:
lwasm --decb -o addone.bin addone.asm
I could then use the toolshed decb command to copy the binary to a .DSK image to run in an amulator such as Xroar. In my case, I have an image called DRIVE0.DSK I want to copy it to:
While the NitrOS-9 project does contain drivers for the KenTon and LR-Tech hard drive interfaces, they are not built or included by default. I wanted to document the steps I took to build and use the KenTon interface under the current NitrOS-9.
Basically, you will be modifying a few makefiles to enable the building of the low level booter, device drivers and device descriptors. If I recall, the changes are the same for each of these makefiles, but you only need to make them for the one you are using. If you are only using the KenTon drivers under NitrOS-9 Level 2 on a CoCo 3, just do that makefile.
nitros9/level1/coco1/modules/makefile
nitros9/level2/coco3/modules/makefile
nitros9/level3/coco3/modules/makefile
Step 1 – Add “KTLRFLAGS”.
These generate the define used inside the generic SCSI source code so it knows which code to build.
This makes it a dependency so make will look for it and try to build it. I added it in the middle of the list so when you get updates, it will be easier for the “diff” tool to see what has changed.
Now those modules should be built and made available for including in your bootfile. You could do this by editing the bootlist you are using:
nitros9/level1/coco1/bootlists/standard.bl
nitros9/level2/coco3/bootlists/standard.bl
nitros9/level3/coco3/bootlists/standardL3.bl
Or you could use a bootfile editor like ezgen to add them to your current bootfile. Or, if you were just doing something temporary (like I was, to pull data from hard drives), you could just merge the needed modules together and dynamically load them when you need to use the SCSI drive.
In case you missed it, in December 2016, a software update to CoCoSDC and SDC-DOS was released. You can find it under “Latest Firmware” on this page:
http://cocosdc.blogspot.com/
SDC-DOS is now up to version 1.14 and includes the following changes:
AUTOEXEC. If “AUTOEXEC.BAS” if found on a mounted disk image, it will automatically run on startup. Holding down SPACE on startup will bypass this. (I think Kenton’s RGB-DOS did this?)
EXP. A new “EXP” command has been added. It will mount an image called “SDCEXP.DSK” and, if present, run “AUTOEXEC.BAS” from that image.
DEF DW. You can now specify DriveWire baud rates.
WRITE/COPY MEM. These commands can now write to flash pages $FExx on a CoCo 3.
RUN @bank. Code to select and execute one of the virtual ROM banks has been rewritten to make it more compatible with various ROMs.
DSKINI. Fixes a bug where drive motor could remain on when using a CoCoSDC and a real floppy controller at the same time.
The update comes with a .DSK image that you mount and then run a utility which will take care of the upgrade.
Nice! I just started setting my CoCo system back up, and will be trying this out soon.
2016/05/12 –This is a work-in-progress article I originally wrote on February 8, 2015, but never completed. The other night I was trying to look up my notes to help Curtis B. with a NitrOS-9 boot disk and I realized I never completed this. I will try to finish it when I have a moment.
Summary
To get DriveWire 4 server running on a Raspberry Pi, you will do the following:
Download the DriveWire server to the Pi and unzip it: wget http://sites.google.com/site/drivewire4/download/DriveWire4_4.3.3.zip unzip DriveWire4_4.3.3.zip cd DriveWire4_4.3.3.zip
Edit the config.xml file to default to your serial port on your Pi in <deviceType> and <serialDevice>. (i.e., “serial” and “/dev/ttyUSB0“)
Run the server with no user interface: java -jar DW4UI.jar -noui
On the CoCo, load the needed DriveWire modules from NITROS9/6x08L2/MODULES/RBF: dwio.sb, rbdw.dr, x0.dd up to x3.dd
Use the “dw” command to test things by creating a blank disk image: dw disk create 0 /home/pi/test.dsk format /x0 dir /x0
Customize your boot disk to include the modules you want and read the documentation to learn how to use all the cool virtual terminals, MIDI and other neat features.
And now, the long version…
Materials Needed
Raspberry Pi B (or B+, or probably the Pi 2 B). I did all these steps on a B.
USB keyboard (a mouse makes things easier, but I do not have one so all of these tips will just use a Pi, keyboard and HDMI TV/monitor).
Compatible* 8GB SD card (or larger).
Ethernet cable to hook the Pi to the Internet. (Required if you plan to do the network install of NOOBS LITE).
WiFi (with a supported USB dongle) or Ethernet is needed later for downloading the DriveWire software and updates, but there are ways to do all of this without any Internet access if you start with the full NOOBs installer.
Compatible* USB serial adapter (or TTL->RS232 converter for use with the built in UART pins of the Pi).
…
Preparation on Windows/Mac/Linux
Download the “NOOBS” installation for Raspberry Pi (currently 1.3.12). You can get the full NOOBS (780MB, just unzip and copy to the SD card and boot), or the NOOBS LITE (22.8MB) version.
NOOBS LITE can also be used. It is a much smaller download, but requires the Pi to be hooked up to the internet via Ethernet to download the rest of the OS files which is about 2355MB. http://www.raspberrypi.org/downloads/
Unzip the files, then copy them over to a freshly formatted SD card.
Preparation on the Raspberry Pi
Boot the Pi using this card. You will see a menu of operating systems you can install. Choose “Raspbian [RECOMMENDED]” at the top by using the arrow keys and SPACE to select. You may also wish to hit “l” for Language and set it to “English (US)” or your preference, and “9” for Keyboard and select yours. Once Raspbian is selected, press “I” for install. It will ask if you are sure you wish to overwrite the SD card. Select “Y” for yes.
NOOBS LITE: The Pi will then download the Raspbian image (2.3GB), then install.
NOOBS: The Pi will then install.
The Pi will (eventually) reboot and after a bit, you get a DOS-like screen for the raspi-config utility. Arrow over to Finish and press ENTER. You will not be at the Pi shell prompt. pi@raspberrypi ~ $
At this point, I like to do a full reboot to make sure everything is working properly: sudo reboot
On a reboot, you won’t go directly to a shell prompt. You will get a login prompt. The default account is: username: pi password: rasbperry.
Log in and you will get back to the shell prompt. You will be in the home directory for user “pi”.
Now we need to download the DriveWire 4 software. Note the filename will change when DriveWire is updated, so check the official site if this does not work. wget http://sites.google.com/site/drivewire4/download/DriveWire4_4.3.3.zip
After the zip file is download, you can extract it by typing: unzip DriveWire4_4.3.3.zip
DriveWire 4 is set up to run with a nice GUI with mouse control. This requires a keyboard and mouse, and the Pi to be set up with X-Windows running. Since I do not have a mouse, and plan to run the Pi headless with nothing hooked up to it but power and the CoCo, this is not an option for me. Instead, I need to manually edit the configuration file to tell it what Linux serial port I will be using. cd DriveWire4_4.3.3 copy config.xml config.xml.org (always keep a backup!)
pico config.xml
The editor will open, and you want to look for a few entries:<instance category=”instance” desc=”Autocreated 2013-03-24 23:57:53.831″ name=”TCP connection via TCP“>
…
<DeviceType category=”device” list=”serial,tcp-server,tcp-client,dummy” type=”list”>tcp-server</DeviceType>
…
<SerialDevice category=”device” type=”serialdev”>COM14</SerialDevice>The first entry is just the name of the connection. You could change that to “Serial Connection” or whatever. The second “tcp-“server” should be changed to “serial”, and the “COM14” entry should be changed to your serial port device. On my Pi, when I plug in a single USB RS232 adapter, it shows up as /dev/ttyUSB0 so that is what I use.
Save your changes back to the file (Ctrl-X, Y) and now you are ready to run the server without a user interface. (Getting the user interface to run requires installed two more additional packages, and I will make a tutorial for that soon, if anyone wants me to.) java -jar DW4UI.jar -noui
After a bit, Java will load and the DriveWire 4 server will start. Java is big, and the Pi is small, so it can be quite sluggish. Now, with the USB cable connected between the Pi and the CoCo, you can start testing.
Preparation on NitrOS-9
This tutorial is being written for someone who already has an active NitrOS-9 system and wants to add DriveWire support to it. If you have no customized
If you are using one of the default NitrOS-9 disk images for you system, it should have a NITROS9 directory, and inside of it will be various device drivers and descriptors, including the ones used by DriveWire. Ultimately, you would want to make a custom boot disk that includes these modules, but here is a simple way to merge them together and just load them when you want to use them. From OS-9:
If you are running a stock CoCo 3 with the standard 6809 processor, go here:
cd /dd/NITROS9/6809L2/MODULES
…and if you have upgraded your CPU with a Hitachi 6309, go here: cd /dd/NITROS9/6309L2/MODULES
The modules you want depend on what you plan to do. Here is the list:
drio.sb – this module handles all communication with the DriveWire server.
rbdw.dr – RBF device driver that uses DriveWire for disk access instead of disk hardware
ddx0.dd, x0.dd, x1.dd, x2.dd, x3.dd – device descriptors for the DriveWire disk drives (/x0 to /x3, with ddx0.dd being a /dd descriptor for DriveWire).
scdwp.dr – printer driver
p_scdwp.dd – device descriptor /p for scdwp.dr
scdwv.dr – virtual serial port driver
n_scdwv.dd, n1_scdwv.dd to n13_scdwv.dd – serial port descriptors. /n is the “next available” descriptor, similar to /w for windows. /n devices may also be used for MIDI.
midi_scdwv.dd – this is n14 but named /midi for MIDI programs that are hard coded to look for that name.
term_z_scdwv.dt, z1_scdwv.dd to z7_scdwv.dd – (??? not in the doc wiki)
For my example, I am only concerned about the disk drives, so I would merge the following modules together: chd RBF merge dwio.sb rbdw.dr x0.dd x1.dd x2.dd x3.dd >/dd/dw
This gives me a single file called “dw” I can load to get DW support instantly. First, I need to set the attributes to allow that: attr /dd/dw e
…then I can just load it when I want to use DriveWire: load /dd/dw
If this worked, you should now be able to use the DriveWire command, “dw”, to communicate with the server. Type “dw” and it should report back a list of commands: config disk log midi net port server
…and you can then type “dw config” or “dw disk” to see what all it can do.
Using DriveWire
Here is an example of creating an empty disk image and formatting it:
dw create 0 /home/pi/test.dsk
format /x0
dir /x0
If you look on the Pi, you will see a new file “test.dsk” there. You can now use this disk like any other OS-9 disk. In my test, I copied my NITROS9 directory over to it just for fun:
chd /dd/NITROS9 dsave /x0 ! shell
DriveWire’s performance is not as good as you’d get from a No Halt floppy controller like the Disto Super Controller 2 or a hard drive interface like the Cloud-9 SuperIDE or KenTon SCSI. As disk activity is going on, interrupts are masked while data is blasted out of the bitbanger port. Still, it did a remarkable job keeping up with my typing. Quite impressive for a cheap cable and a $35 computer with a serial port.
TO DO
Make the DriveWire 4 server auto-start.
Update the DriveWire 4 software from the command line (is this even possible?).
Update the Raspberry Pi software.
Problems
One issue I immediately ran in to was a bunch of ERROR #207 (Memory Full) errors. mfree still showed 352K free, and it wasn’t the #237 (RAM Full) that happens when there isn’t enough room left in the main 64K memory map.
2-20-2025 – Updated location of NitrOS9 project, and changing instructions to use “git” instead of Mercurial for that step.
Since I have to relearn all the steps, I thought I would post them as I go through them. The NitrOS-9 website has a tutorial on building it, but here are my steps with some specifically for Mac OS X:
Install the Command Line Tools for Mac OS X.
We need the command line versions of the Mac OS X compiler so we can build the tools that are then used to build NitrOS-9. If you have XCODE installed, you may already have them. An easy way to do this is from a Terminal prompt:
xcode-select --install
That will launch the Apple Mac App Store installer and get the tools for you. Cool.
Installing the Mac OS X command line tools.
Download Mercurial.
The NitrOS-9 repository now uses git as version control. You will need to download a git client, or use the GitHub Desktop app. I just learned about this change today (Feb 2025) so I need to update these steps.
Toolshed and LWTools use Mercurial, so you will need to download that as well. On macOS, you should be able to install it using “brew install mercurial”:
brew install mercurial
Download LWTools.
These are the cross-compiler tools used to build 6809 source code from Mac/Windows/Linux systems. From a Terminal prompt, find a directory you want to download the lwtools to. I chose a poor location — “CoCo” inside my Downloads folder:
pwd
/Users/allenh/Downloads/CoCo
From this directory, use the “hg” command to obtain and build the tools. It will build the directory you specify from the command line (“lwtools”):
hg clone http://lwtools.projects.l-w.ca/hg/ lwtools
cd lwtools
make
sudo make install
cd ..
Build Toolshed.
Next we want to build Toolshed. This is a series of command-line utilities that operate on CoCo/OS-9 disk images (like those used with emulators and the CoCoSDC interface). Once again, I do these steps from my “Downloads/CoCo” directory:
hg clone http://hg.code.sf.net/p/toolshed/code toolshed
cd toolshed
sudo make -C build/unix install
cd ..
(Note: I had to use “sudo make…” here to get it to build on my system.) The different build/make process shows the different styles of the various developers that made these tools. (Note: Mine seems to fail looking for a command “markdown” at the very end. Not sure what this is, but it seems to be building HTML documentation or something.)
Build NitrOS-9.
Now we are ready to download and build NitrOS-9. Once again, I start in my “Downloads/CoCo” directory, and issue the following git commands to download all the NitrOS-9 stuff:
git clone https://github.com/nitros9project/nitros9.git
cd nitros9
make dsk
This will build absolutely everything, including tons of ports and disk images you likely do not want. After this, you will have all the sources, and have built all (or some) of the sample disk images for various types of hardware (CoCo 1/2, CoCo 3, 6809 or 6309, CoCoSDC controller versus floppy or IDE hard drive, etc.).
If you are only interested in a CoCo 3 6809 setup, why build all the CoCo 1/2 and Dragon versions, or any of the 6309 stuff? I always build everything, but you can also specify to build just a specific port. For my CoCo 3/6309 build, I could do this instead:
make dsk PORTS=coco3_6309
For stock 6809 CoCo 3:
make dsk PORTS=coco3
Updating NitrOS-9 and the Tools.
Later, if you want to update your sources, you can use this command from the “nitros9” directory:
git pull
make ask
For updating LWTools and Toolshed, use this:
hg pull
hg update
…then the build steps, shown earlier.
NOTE: David Ladd has pointed out that you may want to clean out old files before rebuilding. For Toolshed, I needed to do this first:
hg pull
hg update
make -C build/unix clean
make -C build/unix
I do this occasionally to get the “latest and greatest.” You can do this for the other tools, too, by changing in to their directory then issuing the “pull” and “update”, then the appropriate make command.
TODO: This next section was from when NitrOS9 was at SourceForge and used Mercurial. I have not had a merge conflict using git yet, so I don’t know what those look like. I will try to update this document later.
If you get a merge conflict because you changed something locally, you might see this:
hg update
abort: outstanding merge conflicts
You can use this command to see what files have been changed on your local repository that conflict with the master files. This happens if, for instance, you tweak a makefile or build list or source code:
hg resolve -l
U 3rdparty/utils/tlindner/sdir.asm
This reminded me that I already Tim’s “sdir” source code (for CoCoSDC) so enable built in help and such. I have to revert those changes if I want to update, or learn how to use the merge too… I forgot!
These steps should get you everything you need to begin playing with NitrOS-9 on a real CoCo with the CoCoSDC interface, or an emulator. If you plan to use real floppies, you can use toolshed utilities to format and then copy disk image .DSK files over to the physical floppy, but I don’t have any way to hook a 360K Floppy drive to my Mac so I have never done this. CoCoSDC is the way to go there.
Tandy/Radio Shack TRS-80 Color Computer fans, take note. This weekend (April 23-24, 2016), the Glenside Color Computer Club will be hosting the 25th annual “Last” Chicago CoCoFEST! in Lombard, Illinois (near Chicago).
I attended the first “Last” CoCoFEST! there back in 1992, flying up from Lufkin, Texas with a CoCo friend of mine, Mark. That 1992 event was presented by Dave Myers of CoCoPro, and Glenside was the host club for it. Dave had gotten in to the CoCo convention scene in 1990 when he held his first CoCoFest in Atlanta, Georgia, with the Atlanta Computer Society as the host club there.
These CoCoFests were being started just as the long-running RainbowFests were winding down. Rainbow Magazine was the premier Color Computer publication, starting out as a photocopied newsletter and growing to a 300+ page monthly periodical. Rainbow had years where they held several events across America, but their last event was in Chicago in 1991.
Dave first stepped in to offer an event “down South” in 1990. Rainbow had held only one southern event in Ft. Worth, Texas. When the final RainbowFest was held, Dave decided to continue the tradition with a new event in its place.
Though CoCoPro would exit the convention scene after that 1992 event, the CoCo clubs continued. Atlanta Computer Society kept CoCoFests going there through 1995. The Glenside CoCo Club has continued to host events ever since the original CoCoPro event in 1992 (and they were host club for the RainbowFests before that). But this year is the last one. Again.
Dave chose the “Last” (in quotes) moniker for his first Chicago-area event knowing it could be the final event, and it become the “2nd annual ‘Last'” event the following year when Glenside took over.
Then the 3rd … and 4th … and 5th…
It’s hard to believe that was 25 years ago!
I last got to visit the CoCoFEST! in 2013. I would like to at least day trip to this one. Several long-time CoCo folks from the past are showing up (including our own monk, Brother Jeremy, and our Canadian pal L. Curtis Boyle). I have had several generous offers to provide lodging if I wanted to stay overnight, and even offers to fund my gas. These are some of the people I have called friends longer than just about anyone else I still have in my life.
If you can make it, and I am there, be sure to say hi. If I am not there, be sure to take photos and let me know what I missed.