Note: A slightly updated version of this article appeared earlier on Vintage is the New Old.
I asked:
can you write a program in Microsoft BASIC that encodes a message and can decode it later?
– me, to chat.openai.com
It initially showed me this:
REM This is a simple program that uses a substitution cipher to encode and decode a message in Microsoft BASIC

REM Define the alphabet and the substitution key
DIM alphabet(26)
DIM key(26)
alphabet = "ABCDEFGHIJKLMNOPQRSTUVWXYZ"
key = "QWERTYUIOPASDFGHJKLZXCVBNM"

REM Define the message to encode
DIM message(40)
message = "HELLO, WORLD!"

REM Define the encoded message
DIM encoded(40)

REM Define the decoded message
DIM decoded(40)

REM Encode the message
FOR i = 1 TO LEN(message)
  encoded(i) = key(INSTR(alphabet, UCASE$(message(i))))
NEXT

REM Print the encoded message
FOR i = 1 TO LEN(encoded)
  PRINT encoded(i);
NEXT

REM Decode the message
FOR i = 1 TO LEN(encoded)
  decoded(i) = alphabet(INSTR(key, UCASE$(encoded(i))))
NEXT

REM Print the decoded message
FOR i = 1 TO LEN(decoded)
  PRINT decoded(i);
NEXT
Well, that might be some type of BASIC, but it wasn’t what I meant. So I added:
convert that to older interpreted BASIC, which requires line numbers. Make sure no variables are longer than two characters. All variables should be in uppercase.
– me, to chat.openai.com
It took a few back-and-forths as it generated code that wasn’t quite compatible with my CoCo. It initially was using strings similar to how C works, declaring a string array for the number of letters in the string. It would then try to access them as A$(1), A$(2), etc. That seemed silly, and I told it so.
It removed the DIMs and just started using strings normally.
When it was trying to build a string that way, I’d tell it “my BASIC can’t do that. use MID$ instead” and it would switch out.
A few rounds of this, and is had created a program that almost worked. There were some errors, caused by the INSTR command returning 0. I told it “if the string is not found, INSTR returns 0 which cannot be used in that MID$”.
It corrected that.
It worked, but I didn’t like the output, so I told it:
print the original message at the start. you can remove the ; on teh PRINT statements so they print a carraige return
– me to chat.open.ai
And at least, this AI-generated masterpiece was complete. And I didn’t write a line of it — I just told it when something wouldn’t work on my BASIC…
10 REM Simple substitution cipher
20 A$="ABCDEFGHIJKLMNOPQRSTUVWXYZ"
30 K$="QWERTYUIOPASDFGHJKLZXCVBNM"
40 M$="HELLO, WORLD!"
50 PRINT "Original message: "; M$
60 E$=""
70 FOR I=1 TO LEN(M$)
80 C=INSTR(A$,CHR$(ASC(MID$(M$,I,1))))
90 IF C>0 THEN E$=E$+MID$(K$,C,1) ELSE E$=E$+MID$(M$,I,1)
100 NEXT
110 PRINT "Encoded message: "; E$
120 D$=""
130 FOR I=1 TO LEN(E$)
140 C=INSTR(K$,CHR$(ASC(MID$(E$,I,1))))
150 IF C>0 THEN D$=D$+MID$(A$,C,1) ELSE D$=D$+MID$(E$,I,1)
160 NEXT
170 PRINT "Decoded message: "; D$
And, I could have kept giving it more suggestions on what to do. Make them in to subroutines? Sure! Change the encoding method? No problem.
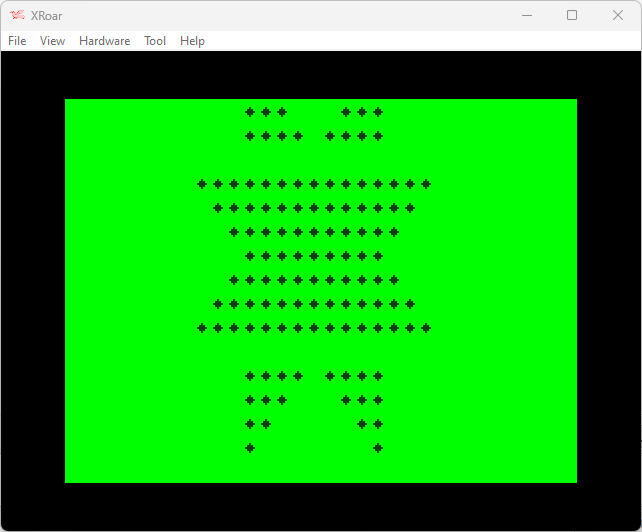
The design is one row taller than will fit on the CoCo’s 32×16 text screen, but it would easily fit on the 40 or 80 column screen of the CoCo 3. For this article, I am going to stick with the standard text screen and just let it scroll one row off the top of the screen. When I have something figured out, it might only require modifying the centering code to display on the 40/80 column screen.
Let there be code!
At this stage, the design is being centered using the TAB command. Putting a “TAB(7)” at the start of each string takes up 3 bytes of programming space. It seems “TAB(” is tokenized, then there is the 3 character, followed by the “)” character. I had thought using PRINT@ might save some space, but the “@” takes a byte, then the screen position numbers follow it, and a comma is required. “PRINT@7,” takes the same amount of code space as “PRINTTAB(7)” so no savings there.
The biggest savings is going to come from eliminating the repeated use of the “* characters in the strings. Since the entire image is made up of spaces or asterisks, it could be represented by data that says how many spaces then how many asterisks then how many spaces, etc.
Here is what the image looks like centered to 32-columns:
The first line has 11 spaces, 1 asterisks, 7 spaces, then 1 asterisk.
The second line has 11 spaces, 1 asterisks, 5 spaces, then 2 asterisks.
And so on… The first line could be represented in DATA to tell how many repeating groups of spaces and asterisks there are such as 11,1,7,1,0 (using 0, to indicate the end of the line).
For something this small, I could have just counted up the spaces and asterisks myself, but it’s more fun to spend ten minutes writing a BASIC program to do what would have taken me 60 seconds to do manually.
I converted the pattern in to DATA statements and created a program that would scan each line looking for repeated characters. When the character changes, it prints how many of the previous repeating characters it saw and resets the counter.
Rather than explain how the program works, like I often try to do, I just submitted this code to the OpenAI ChatGPT system and let it do the work for me:
This BASIC program reads in a series of strings, one at a time, and outputs the number of times each character appears in the string.
Here is a brief explanation of the code:
Lines 10-16: This is the main loop of the program, where each string is read in, processed, and output.
Line 11: This line initializes the LC$ variable to the first character of the string and the DC variable to 1.
Lines 12-14: This is a FOR loop that iterates through each character of the string.
Line 13: This line compares the current character with the last character (stored in LC$). If they are the same, it increments the DC variable. If they are different, it outputs the value of DC and then resets DC to 1 and LC$ to the current character.
Line 15: This line outputs the value of DC after the loop has finished processing the string.
Lines 50-220: These are the data lines that contain the strings to be processed.
Line 220: This is the sentinel value that indicates the end of the data.
Note that this code uses a number of built-in BASIC functions, such as LEFT$, MID$, and LEN, which may not be available in all versions of BASIC. You may need to modify the code to use equivalent functionality if it is not available in the version of BASIC you are using.
– chat.openai.com
Seriously, folks. You have to go play with ChatGPT. It’s amazingly fun.
OpenAI ChatGPT Digression
After showing this program to ChatGPT, I asked “is there a way to do it better?” It responded with:
There are a few ways that this routine could be improved. Here are a few suggestions:
Use a DO loop instead of a GOTO statement to control the main loop. This would make the code easier to read and maintain.
Use a SELECT CASE statement to handle the different cases in line 13 instead of an IF statement. This would make the code more concise and easier to read.
Use a DICTIONARY or MAP data structure to store the counts of each character instead of using separate variables for each character. This would make the code more efficient and allow it to handle an arbitrary number of characters without having to hard-code variables for each one.
Add error-checking to the code to handle cases where the input data is invalid (e.g. empty strings, strings with invalid characters, etc.). This would make the code more robust and prevent it from crashing or producing incorrect results in these cases.
Here is an example of how the code could be modified to incorporate some of these changes:
– chat.openai.com
The code it provided was not something that would work on ancient Microsoft BASIC, but it was interesting to see:
DO
  READ A$
  IF A$="END" THEN EXIT DO

  ' Initialize the character counts to 0
  CHAR_COUNTS = DICTIONARY()

  ' Loop through each character of the string
  FOR i = 1 TO LEN(A$)
    ch = MID$(A$, i, 1)
    IF ch = " " THEN CONTINUE ' Skip whitespace

    ' Increment the count for this character
    IF CHAR_COUNTS.EXISTS(ch) THEN
      CHAR_COUNTS[ch] = CHAR_COUNTS[ch] + 1
    ELSE
      CHAR_COUNTS[ch] = 1
    END IF
  NEXT

  ' Output the counts for each character
  FOR ch = "A" TO "Z"
    PRINT CHAR_COUNTS[ch]; ",";
  NEXT
  PRINT "0"
LOOP

50 DATA"    *       *"
60 DATA"    **     **"
70 DATA"    ***   ***"
80 DATA"    **** ****"
90 DATA"*****************"
100 DATA" ***************"
110 DATA"  *************"
120 DATA"   ***********"
130 DATA"    *********"
140 DATA"   ***********"
150 DATA"  *************"
160 DATA" ***************"
170 DATA"*****************"
180 DATA"    **** ****"
190 DATA"    ***   ***"
200 DATA"    **     **"
210 DATA"    *       *"
220 DATA "END"
I have no idea what version of BASIC that code would work on, and the program it wrote doesn’t really look like it’s doing the same thing, but still neat. In a future article (provided they continue to give us access to this AI), I plan to share some of the interesting things it can do with BASIC programs (including writing them from scratch).
But I digress…
Driving Miss Data
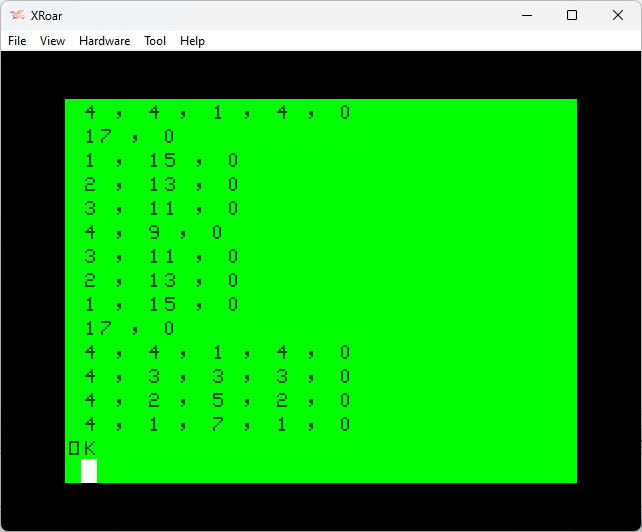
When I run the program, it starts printing out rows of numbers. Since there are seventeen rows of the graphic, it prints out seventeen lines of numbers. I needed to pause the program mid-printing so I can write down the numbers before they scroll off. (A fancier way would have been to have the program write out an ASCII BASIC program with the line numbers and DATA statements already in it which I could load back later. I think I showed how I do that in an earlier article somewhere on this site.)
Now that we have numbers for our DATA statements, a new version of the program could be written to generate the image using them. I will make use of the STRING$ that creates a string of a specific character of a specific length…
0 ' LOGIKER6.BAS
10 CLS
15 CH=32:PRINTTAB(7);
20 READ A:IF A=-1 THEN 220
25 IF A=0 THEN PRINT:GOTO 15
30 PRINT STRING$(A,CH);
35 IF CH=32 THEN CH=42 ELSE CH=32
40 GOTO 20
50 DATA 4,1,7,1,0
60 DATA 4,2,5,2,0
70 DATA 4,3,3,3,0
80 DATA 4,4,1,4,0
90 DATA 17,0
100 DATA 1,15,0
110 DATA 2,13,0
120 DATA 3,11,0
130 DATA 4,9,0
140 DATA 3,11,0
150 DATA 2,13,0
160 DATA 1,15,0
170 DATA 17,0
180 DATA 4,4,1,4,0
190 DATA 4,3,3,3,0
200 DATA 4,2,5,2,0
210 DATA 4,1,7,1,0
215 DATA -1
220 GOTO 220
Obviously those data statements could be combined in to fewer lines, but for this version I wanted them to match the same line number the original PRINT was on. You can easily compare the results:
50 DATA"    *       *"
50 DATA 4,1,7,1,0

60 DATA"    **     **"
60 DATA 4,2,5,2,0

70 DATA"    ***   ***"
70 DATA 4,3,3,3,0

80 DATA"    **** ****"
80 DATA 4,4,1,4,0
Before I show you the results, can you see the flaw in my program?
I’ll give you a hint… Line 170.
Close but no cigar
My program assumes each line starts with a space, so the first value will be printed as spaces, then the next value as asterisks, and so on. This causes a problem when it gets to the row that is entirely the asterisk it reads the first number and prints it as spaces, giving me this incorrect result:
I can think of several ways to solve this:
Use a different value other than 0 for “end-of-line” and make 0 mean “nothing to print, just switch to the astrisk”. That would change line 170 to be “DATA 0,17,X” (where “X” is the new end-of-line marker. This would probably require a new bit of IF logic to handle.
Make each group of data two bytes that specifies the character to print, and how many. Printing 17 asterisks would be “17,42”. Printing four spaces would be “4,32”. This would make the program logic simpler, but would double the size of the data. Depending on how much smaller the logic is, this might be a winner. (And I can think of optimizations to that as well, such as using 0 and 1 for the data to print and just printing “32+X*10” so it prints either 32 (if the value is 0) or 42 (if the value is 1). This is normally how I would have started, but I was trying to make the data as small as possible.
I could just encode the leading spaces at the start of each line rather than using TAB(7). By doing this, every line would start with a space. This would work for this specific challenge, but not be flexible for patterns that don’t start with a space.
For now, let’s make a quick change and try #3 by simply adding 7 to the first number in each DATA statement, and adding a 7 to line 170 which is the row that doesn’t have a space at the start. I think it would look like this:
0 ' LOGIKER7.BAS
10 CLS
15 CH=32
20 READ A:IF A=-1 THEN 220
25 IF A=0 THEN PRINT:GOTO 15
30 PRINT STRING$(A,CH);
35 IF CH=32 THEN CH=42 ELSE CH=32
40 GOTO 20
50 DATA 11,1,7,1,0
60 DATA 11,2,5,2,0
70 DATA 11,3,3,3,0
80 DATA 11,4,1,4,0
90 DATA 7,17,0
100 DATA 8,15,0
110 DATA 9,13,0
120 DATA 10,11,0
130 DATA 11,9,0
140 DATA 10,11,0
150 DATA 9,13,0
160 DATA 8,15,0
170 DATA 7,17,0
180 DATA 11,4,1,4,0
190 DATA 11,3,3,3,0
200 DATA 11,2,5,2,0
210 DATA 11,1,7,1,0
215 DATA -1
220 GOTO 220
Running this program produces the desired results! But, it has a drawback:
The data size grew. Not only did we add “7,” (two bytes) to line 170, but eleven other lines went from a 1-digit value to a 2-digit value. This means our data grew by 13 bytes. If we saved 13 bytes in the decoding routine, this is a win. If we did not, it is not an acceptable fix.
When I load the previous version of the program in to the XRoar emulator and PRINT MEM, it shows 22425 free. When I do the same with this version, I get 22416 — less memory free, so a larger program. This is bad, but the previous version is still missing the code to handle that line 170.
Perhaps, instead of adding 7 to each line to center on the screen, each line could just add 1 (so it doesn’t create two-digit values) and we can use TAB(6). That would look like this:
0 ' LOGIKER8.BAS
10 CLS
15 CH=32:PRINTTAB(6);
20 READ A:IF A=-1 THEN 220
25 IF A=0 THEN PRINT:GOTO 15
30 PRINT STRING$(A,CH);
35 IF CH=32 THEN CH=42 ELSE CH=32
40 GOTO 20
50 DATA 5,1,7,1,0
60 DATA 5,2,5,2,0
70 DATA 5,3,3,3,0
80 DATA 5,4,1,4,0
90 DATA 1,17,0
100 DATA 2,15,0
110 DATA 3,13,0
120 DATA 4,11,0
130 DATA 5,9,0
140 DATA 4,11,0
150 DATA 3,13,0
160 DATA 2,15,0
170 DATA 1,17,0
180 DATA 5,4,1,4,0
190 DATA 5,3,3,3,0
200 DATA 5,2,5,2,0
210 DATA 5,1,7,1,0
215 DATA -1
220 GOTO 220
Doing a PRINT MEM on that one shows 22421, so it is four bytes larger than the original, and still smaller than the “add 7” version. Perhaps that is good enough for now?
Combining all the lines to make a smaller program would look like this:
0 ' LOGIKER9.BAS
10 CLS
15 CH=32:PRINTTAB(6);
20 READ A:IF A=-1 THEN 220 ELSE IF A=0 THEN PRINT:GOTO 15
30 PRINT STRING$(A,CH);:IF CH=32 THEN CH=42 ELSE CH=32
40 GOTO 20
50 DATA 5,1,7,1,0,5,2,5,2,0,5,3,3,3,0,5,4,1,4,0,1,17,0,2,15,0,3,13,0,4,11,0,5,9,0,4,11,0,3,13,0,2,15,0,1,17,0,5,4,1,4,0,5,3,3,3,0,5,2,5,2,0,5,1,7,1,0,-1
220 GOTO 220
Better! But we can make it more better.
In the next installment, we will do something that I learned from studying the Atari 2600’s Adventure program…
With my initial success using the CMOC compiler to build a CoCo program, I wanted to automate my steps (build and copy to disk image).
Back in my OS-9 days, I used an OS-9 shell script called “doit” that would manually do the steps to build whatever project it was designed for. This would do the compile, optimize, link, etc. steps for me.
I wanted to make a shell that let me specify the C file then build and copy it to some emulator disk image. I thought it might be like:
doit hello.c
I couldn’t remember how to pass parameters in to a shell script, so instead of doing a websearch, I just asked ChatGPT:
“how can you pass a parameter to a unix shell script?
To pass a parameter to a Unix shell script, you can use the $1, $2, $3, etc. variables, which correspond to the first, second, third, etc. arguments passed to the script. For example, if you want to pass a filename as a parameter to your script, you could use the following syntax:
./myscript.sh myfile.txt
Then, in the script, you can access the parameter using the $1 variable, like this:
#!/bin/bash# Print the filename passed as a parameterecho "The filename is: $1"
Alternatively, you can use the shift command to access all of the arguments passed to the script, like this:
#!/bin/bash# Print all of the arguments passed to the scriptecho "The arguments are: $@"# Shift the arguments to the left, so that $1 now refers to the second argument, $2 now refers to the third argument, etc.shift# Print all of the arguments again, after shiftingecho "The arguments are now: $@"
In this example, the shift command is used to move all of the arguments to the left by one position, so that the second argument is now accessible using the $1 variable, the third argument is accessible using the $2 variable, and so on. This can be useful if you want to access all of the arguments passed to the script, but you don’t know in advance how many arguments will be passed.
– chat.openai.com
That was quicker than a Google search! I decided to just tell it what I wanted to do:
Write a shell script that takes one parameter (a name) and then runs “cmoc name” and then “decb copy name.bin C.DSK,NAME.BIN -2r”
Here is an example of a Unix shell script that takes one parameter (a name) and then runs the cmoc and decb commands using that parameter:
#!/bin/bash# Get the name parametername=$1# Run the cmoc command using the name parametercmoc $name# Run the decb command using the name parameterdecb copy $name.bin C.DSK,$name.BIN -2r
In this script, the first line specifies the shell interpreter to use (in this case, /bin/bash), and the second line uses the $1 variable to retrieve the first argument passed to the script (i.e., the name parameter). The third and fourth lines use the cmoc and decb commands, respectively, to perform the specified operations using the name parameter.
To run this script, you would use the following command:
./myscript.sh myname
Replace myscript.sh with the name of your script file, and myname with the name you want to use as the parameter. The script will then run the cmoc and decb commands using the specified name.
– chat.openai.com
Well, if it can do that, maybe it an make it even better…
update that script so the parameter’s extension is removed and replaced with .bin for the copy
To update the script so that the extension of the parameter is removed and replaced with .bin for the decb copy command, you can use the basename and dirname commands to extract the base name and directory path of the parameter, respectively, and then use the sed command to remove the extension from the base name. Here is an example of how you could do this:
#!/bin/bash

# Get the name parameter name=$1

# Use the basename and dirname commands to extract the base name and directory path of the parameter
dir=$(dirname $name) base=$(basename $name)

# Use the sed command to remove the extension from the base name
name_without_ext=$(echo $base | sed -e "s/\.[^.]*$//")

# Run the cmoc command using the name parameter
cmoc $name

# Run the decb copy command using the modified name
decb copy $name_without_ext.bin $dir/C.DSK $name_without_ext.BIN -2r
In this updated script, the basename and dirname commands are used to extract the base name and directory path of the parameter. The sed command is then used to remove the extension from the base name, and the modified name is used as the argument to the decb copy command.
To run this script, you would use the same command as before:
./myscript.sh myname
This time, however, the decb copy command will use the modified name (i.e., the name with the extension removed and replaced with .bin) instead of the original name. For example, if you pass myfile.txt as the parameter, the decb copy command will use myfile.bin as the destination filename.
– chat.openai.com
And maybe even more better than that!
can you uppercase the second $name_without_ext in the decb line?
To uppercase the second instance of $name_without_ext in the decb line, you can use the tr command to convert the string to uppercase. Here is an example of how you could do this:
#!/bin/bash

# Get the name parameter
name=$1

# Use the basename and dirname commands to extract the base name and directory path of the parameter
dir=$(dirname $name)
base=$(basename $name)

# Use the sed command to remove the extension from the base namename_without_ext=$(echo $base | sed -e "s/\.[^.]*$//")

# Use the tr command to convert the name to uppercase name_upper=$(echo $name_without_ext | tr "[:lower:]" "[:upper:]")

# Run the cmoc command using the name parameter
cmoc $name

# Run the decb copy command using the modified name decb copy $name_without_ext.bin $dir/C.DSK,$name_upper.BIN -2r
In this updated script, the tr command is used to convert the $name_without_ext variable to uppercase, and the resulting string is stored in the $name_upper variable. The $name_upper variable is then used as the second argument to the decb copy command, so the second instance of the name will be uppercase.
To run this script, you would use the same command as before:
./myscript.sh myname
This time, the decb copy command will use the uppercase version of the name as the second argument. For example, if you pass myfile.txt as the parameter, the decb copy command will be run as follows:
decb copy myfile.bin mydir/C.DSK,MYFILE.BIN -2r
Notice that the second instance of the name (i.e., MYFILE.BIN) is now in uppercase.
– chat.openai.com
It worked great! But it didn’t tell me what it was doing, so…
Make it print what is happening at the cmoc and decb steps
To make the script print what is happening at the cmoc and decb steps, you can simply add some echo statements to the script. Here is an example of how you could do this:
#!/bin/bash

# Get the name parameter
name=$1

# Use the basename and dirname commands to extract the base name and directory path of the parameter
dir=$(dirname $name) base=$(basename $name)

# Use the sed command to remove the extension from the base name
name_without_ext=$(echo $base | sed -e "s/\.[^.]*$//")

# Use the tr command to convert the name to uppercase name_upper=$(echo $name_without_ext | tr "[:lower:]" "[:upper:]")

# Print a message before running the cmoc command
echo "Running cmoc on $name..."

# Run the cmoc command using the name parameter
cmoc $name

# Print a message before running the decb copy command
echo "Running decb copy on $name_without_ext.bin..."

# Run the decb copy command using the modified name
decb copy $name_without_ext.bin $dir/C.DSK,$name_upper.BIN -2r
In this updated script, two echo statements have been added to print a message before running the cmoc and decb copy commands, respectively. These messages will be printed to the console and will indicate what is happening at each step of the script.
To run this script, you would use the same command as before:
./myscript.sh myname
When you run the script, you should see the following output:
Running cmoc on myname...
(output from cmoc command)
Running decb copy on myfile.bin...
(output from decb copy command)
The output from the cmoc and decb copy commands will be shown after the messages indicating what is happening at each step.
Starting with that un-optimized version, I will change it to work on the CoCo 1/2/3’s 32-column screen by adjusting it to be properly centered on that display.
Unfortunately, this design is 17 rows tall, and the CoCo’s standard display is only 16. It won’t fit:
We should still be able to enter the challenge by having the program print this pattern, even if it scrolls off the screen a bit. To get one extra line there, we can get rid of the line feed at the end of the final PRINT statement in line 210 by adding a semi-colon to the end:
210 PRINT" * *";
And so it begins…
And so it begins
The goal is to make this as small as possible. There were many ways to approach last year’s Christmas tree challenge, and you can read about the results and a follow-up with suggestions folks gave to save a byte or two.
A simple thing is to remove the spaces at the front and replace them with the TAB() command:
Although this only looks like it saves a character per line (“TAB(8)” versus “seven spaces”), the code itself will be smaller since the TAB command tokenizes down to one (or maybe two?) bytes.
Also, the ending quote is not needed if it’s the last thing on a line, so they could be removed:
But, each line number consumes 5-bytes on it’s own, so a better way to save space would be to pack the lines together. Each line you eliminate saves five bytes. That would become pretty unreadable though, but let’s do it anyway:
This could still be made better, since the text lines were kept under the input buffer limitation size, but when you enter that line, BASIC compresses it (tokenizes keywords like PRINT, TAB and GOTO) making it take less space. You can then sometimes EDIT the line, Xtend to the end and type a few more characters.
That may or may not be allowed for the Logiker challenge. And since I want to provide code here you could copy and then load in to an emulator, I’ll keep it to the limit of what you could type in.
In the next installment, I’ll see if my brane can figure out a way to generate this code using program logic rather than brute-force PRINT statements.
A few years back, Color Computer community member Rietveld Rietveld took an Arcade1Up Rampage cabinet and converted it so I could run other software — such as emulators. Images have been shown of it running the Color Computer emulator and software.
Now, with the official 1.0 release of the NitrOS9 “Ease of Use”, that has been installed on this arcade machine and, by request, my OS-9 game Invaders09 has been ran on it.
I never imagined that my “arcade” game would eventually be running on a (sorta) arcade machine. Thanks, Rietveld!
The clear subroutine in this code is used to clear the screen and initialize it with a grid of green squares. The subroutine begins by loading the value 96 into the accumulator register A using the LDA instruction. This value represents the color value for green, which will be used to fill the screen with green squares.
Next, the LDX instruction is used to load the value 1024 into the X register. This value is the memory address of the top left corner of the screen, and it will be used as the starting point for the POKE operations that will be used to fill the screen with green squares.
The loop label marks the start of a loop that will be used to fill the screen with green squares. Inside the loop, the STA ,X+ instruction is used to store the value in the accumulator register A at the memory location pointed to by the X register, and then increment the X register by one. This has the effect of setting the value at the current memory location to the color value for green, and then moving to the next memory location on the screen.
The CMPX instruction is then used to compare the value in the X register to the value 1536. If the X register is less than 1536, it means that there are still memory locations on the screen that need to be filled with the color value for green. In this case, the BNE instruction is used to branch to the loop label, causing the loop to be repeated and the next memory location on the screen to be filled with the color value for green.
If the X register is equal to 1536, it means that all of the memory locations on the screen have been filled with the color value for green, and the loop can be exited. In this case, the BNE instruction will not be executed, and the RTS instruction will be executed, causing the subroutine to return to the main program. This completes the execution of the clear subroutine.
– ChatGPT AI
Now, it may have figured some of this out because I previously fed it a longer (and fully commented) bit of 6809 code that contained that routine as one of its several functions. That’s the only way I can see it knew the screen location and a green block.
Recently on LinkedIn, I saw a post by Rogelio Perea about his Tandy Model 102 portable computer. Although I never owned one, I remember this machine well. I always wanted one. Having a “portable” computer really wasn’t a thing back in those days, and this one even had a modem built in!
I recalled how, when I worked for Radio Shack, I wrote a program on our display Model 102 that we used to track our customer repairs. We had to have everything on paper in those days, but would type things in to the computer so we could find them quicker when a customer inquired about their repair status. I wish I had a copy, but I think the only place it ever existed was the memory of that specific computer.
I do, however, have the program it was based on. It started out as a PEN-PAL program for the Radio Shack Color Computer:
*ALLRAM* used BASIC arrays to store the userlog and message base in memory, and would load/save them to tape. My Pen-Pal program did the same thing, but was updated to load from either Tape or Disk.
That Pen-Pal program was also the basis for a custom program I wrote for a lady who ran a large newspaper route where I lived at the time. Her name was Laverne Ricks, and I remember this because I put it on the title screen of the program I wrote for her:
According to comments in the source code, I wrote this on 7/8/1987. This was the summer after I graduated high school, and I had just moved to Lufkin, Texas. Since this was before I got a job at Radio Shack, I am not sure how she and I got connected (possibly through the Lufkin Area CoCo Club or someone at Radio Shack).
The initial version of the program has a menu very similar to the Pen-Pal program:
You can see I had made it look a bit nicer by using graphical black block characters instead of rows of equal signs ;-)
I also found a second version, where I added built-in help:
THIS must be why I wrote the BASIC windowing routine I have written about before. It offered several screens of help:
Neat!
The program has ways to Add a new record:
Ah, the days before spell checkers. You should see the misspellings in my furniture store inventory program I did a year or so later… But I digress.
And you could use arrow keys to flip through them:
Y
You could Delete entries, Edit them, and Insert new ones (at the location you were currently viewing, which was important since a Paper Route was organized by delivery location rather than alphabetical or whatever). There was a way to Jump to a specific entry as well.
And, of course, you could Search by field:
Looking at it 35 years later, I’m pretty impressed with the features it offered. I have no idea what I based all of this on since I’d only owned a VIC-20 and a CoCo at that point and certainly had never worked with any kind of database software that I can recall.
Side note: A short while later, I would do something like this again for someone who ran a garbage collection route, though I think it was for a Tandy 1000 and was using a Deskmate Database.
This is what let me to search out Laverne Ricks and see where she was these days. Sadly, she passed away in 2011.
Earlier this month, I received a message on my Sub-Etha Software Facebook page from author (and former/current CoCo programmer) Carl England:
I knew CHR$(13) was a carriage return, so this was creating a file name that contained carraige returns. What would that do?
I typed it in to find out…
How appropriate, because the first thing I said when i saw this code was “weird.”
Of course, now I have a file on my disk that would be hard to delete. Carl said just doing:
KILL A$
…would take care of it. Provided, of course, you did that after running the program, while A$ still existed. Otherwise you’d have to manually type that line again and replace the SAVE with KILL.
Fun.
Character 8 is a backspace, so I could sorta see what this was doing. “TEST” then four backspaces, then a period, then three more backspaces?
Well.
Also weird.
I could have had so much fun with this trick back when I was swapping disks with friends.
Welcome back to the days when an IBM Compatible PC required a floppy disk just to start up. You would boot to PC-DOS (on an actual I.B.M. machine) or MS-DOS (for a clone, like the Tandy 1000 that had just come out in 1984 as the first PC compatible for under $1000). And … then what?
Just like there wasn’t much you could do with a PC with only a DOS boot disk, having just OS-9 is rather limited as well. Beyond typing some commands, what could you do?
There was a simple line-based text editor that would let you make text files. You could then “list” the text file and have that redirected to a printer, if you had one.
I guess you could say this was very limited word processing. Just without much word processing (though the EDIT command has search and replace functions).
There was also a 6809 assembler and debugger. You could write programs in 6809 assembly language.
And that was the very first time I ever wrote an OS-9 Level 1 assembly language program, and also the first time I ever used the asm assembler. I was more familiar with the rma assembler that came out for OS-9 Level 2 on the CoCo 3.
What else? Well, just like DOS, if you wanted to do more, you’d need software. Initially, Radio Shack didn’t sell anything for OS-9 other than BASIC09. Investing in that would allow someone who knew normal BASIC to start writing programs for OS-9. (I plan to do a “Converting Color BASIC to BASIC09” series at some point.)
But it was still neat.
Multi-User
Multi-user support is great, but if you only have one keyboard it won’t get you very far. But, OS-9 came with drivers for the CoCo’s banger RS-232 port, and also a “time sharing monitor” program that could monitor such serial port and then launch the “login” program if a terminal was hooked up to such serial port.
You could plug up an RS232 terminal to the CoCo’s serial port, and then launch “tsmon /t1 &” (the ampersand made the program run in the background so the shell prompt would return immediately). Now both you at the keyboard and another user via the serial port could be using the system at the same time. (Albeit at 300 baud.)
Cool.
If that terminal was another CoCo, then a remote login might look like this:
Above, I added a new entry to the PASSWD file for “ALLEN” with a password, and made new directories /D0/USERS/ALLEN. I set that login entry to point to that directory so when I logged in, I would have been changed in to /d0/USERS/ALLEN ready to make new files there.
It’s a bit more work than this to be useful, but that’s basically the idea. It was really a game changer compared to using BASIC in ROM.
Conclusion
So what could you do with this 1984 OS-9 Level 1? Write programs in assembly, or buy BASIC09 and write programs in that langauge.
However, since text-based OS-9 applications were compatible across hardware, there were actually existing OS-9/6809 programs that could run on the CoCo. Third party software specifically for CoCo OS-9 would soon follow, which was interesting because CoCo OS-9 could do graphics.