
NOTE: I originally started writing this in November 2025, but kept thinking I’d do more work on it. I haven’t gotten around to it, so here you go…
Here is a Color BASIC 6809 assembly quickie… (That ended up not being very quick by the time I finished working through all of this…)
Recently I began working on an assembly language Color BASIC extension that makes certain characters move the cursor around the screen rather than just printing those characters (similar to what my VIC-20 could do). Initially, I created the 6809 assembly routine you could load into memory and EXEC. Next I decided to let it be called from DEF USR so I could pass in parameters and return a status code like A=USR0(-1). Next next I decided I wanted it to still work with EXEC so the user could use it either way–just use defaults with EXEC, or customize things using USR.
Then I ran into a snag…
USRx(n) or EXEC?
If the USR routine ONLY expected a number parameter, the code to handle both USR and EXEC seems easy. When calling a routine with EXEC, the D register will be zero (it seems). If it wasn’t zero, I could then do the JSR INTCNV call which would process the parameter in BASIC and put it in the D register.
My startup code looked something like this:
; lwasm execdreg.asm -fbasic -oexecdreg.bas --map
; decb copy -2 execdreg.bin drive0.dsk,EXECDREG.BIN

; Show if routine is being called with USRx(n) or EXEC

ORGADDR     equ     $3e00       ; Where program loads in memory.

; Absolute addresses of ROM calls.
CHROUT      equ	    $A002
INTCNV      equ     $B3ED
GIVABF      equ     $B4F4

            org     ORGADDR

; This code expects to have been called by USRx(x) or EXEC xxxx.
start       cmpd    #0          ; called from EXEC?
            beq     fromexec    ; if yes, goto fromexec
fromusr     jsr     INTCNV      ; else, get USR number parameter in D
            pshs    d           ; save D
            leax    usrmsg,pcr  ; display "called from USR" message
            bsr     print
            puls    d           ; restore D
            addd    #1          ; add one to D
            jmp     GIVABF      ; return back to USR call.

fromexec    leax    execmsg,pcr ; display "called from EXEC" message
            bsr     print
            rts

; PRINT subroutine. Prints the 0-terminated string pointed to by X plus CR.
print       lda     ,x+
            beq     printdone
            jsr     [CHROUT]
            bra     print
printdone   lda     #13
            jsr     [CHROUT]
            rts

usrmsg      fcc     "CALLED FROM USR"
            fcb     0

execmsg     fcc     "CALLED FROM EXEC"
            fcb     0

            end
When the routine starts, it checks to see what D is set to. If 0, it assumes it was called from EXEC and jumps to code that just prints “FROM EXEC” then ends.
If not 0, it assumes it was called from USR and the code calls the ROM INTCVT routine to parse the parameter and place it in D, then it prints “FROM USR”, increments D (just so we can verify it passed something back), and returns it back to BASIC.
Here it is in operation:
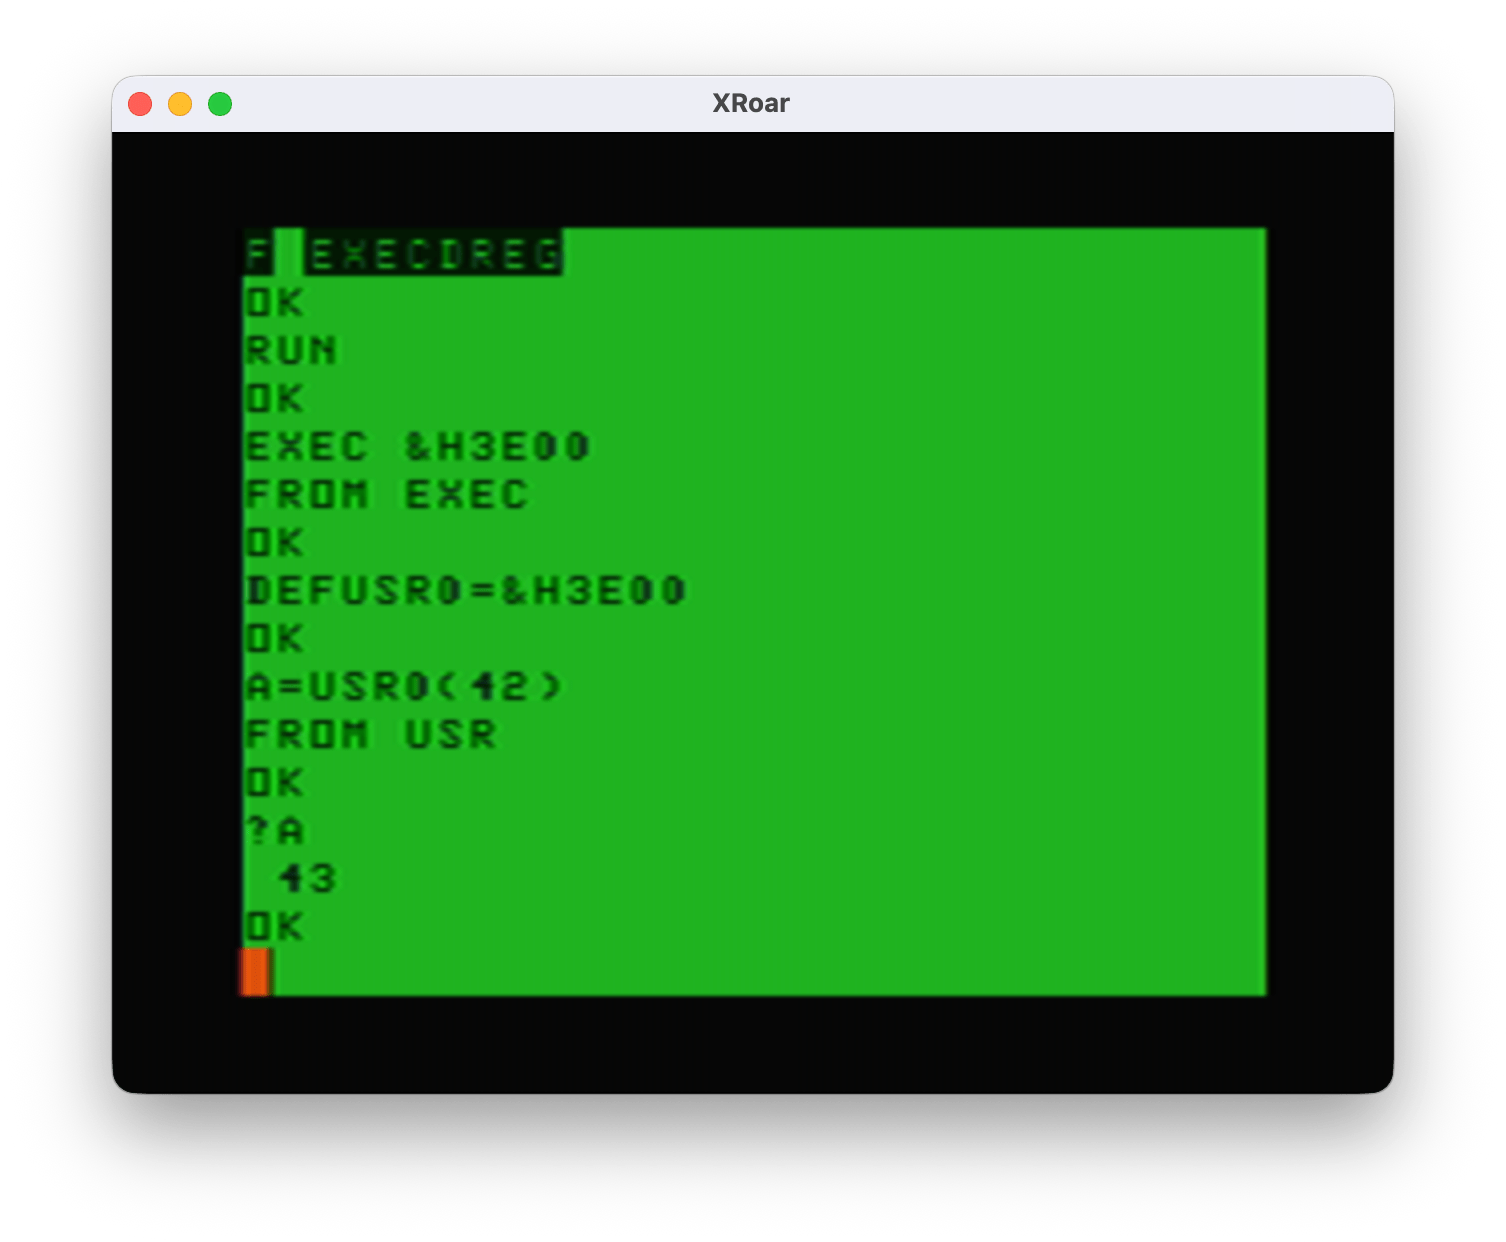
And all was right in the world… Until I tried just using EXEC by itself. After using it first with the address (“EXEC &H3E00”) BASIC will remembers that address so when you just type “EXEC” next it uses the previous address:
EXEC &H3E00
FROM EXEC

EXEC
?TM ERROR
Making the user always have to provide the EXEC address each time is not optimal. My solution was clearly not a solution.
But wait! There’s more…
I also learned about Sean Conner documenting how USR can also take a string parameter instead of just a number. If you are interested in USR, be sure to check out that link. He also has a cool 6809 compiler (“a09”) I just started playing with. It has some unique features not available in other compilers I have tried.
USRx(n) or USRx(“STRING”)
With this new knowledge, I had an idea to make my USR routine also be able to take a string for a special configuration function. I could let the user specify the four characters that will move the cursor by doing something like A=USR0(“udlr”). But, if you pass in a string and it calls INTCNV, that routine will check the parameter type and, if not a number, return with a ?TM ERROR (type mismatch).
This required me to learn how to tell whether USR was being called with a number or a string.
Under Extended Color BASIC (the original Color BASIC did things differently, see Sean’s page for details), the ROM code sets up some registers when calling the USR function. Sean documented these in his excellent blog post on USR. Basically, register A would be 0 if the USR parameter was a number, or 255 if it was a string. If it was a string, register X would have the address of the string descriptor (the location in memory that VARPTR returns) and register B would be the length of the string.
That is really convenient. Now you can have code that detects if it is being called from USR with a number or a string. My test code looked like this:
; lwasm execdreg2.asm -fbasic -oexecdreg2.bas --map
; decb copy -2 execdreg2.bin drive0.dsk,EXECDRG2.BIN

; Show if USR is being called with a number or a string.

ORGADDR     equ     $3e00   ; Where program loads in memory.

; Absolute addresses of ROM calls.
CHROUT      equ	    $A002
INTCNV      equ     $B3ED
GIVABF      equ     $B4F4

            org     ORGADDR

; This code expects to have been called by USRx(x) or USRx("STRING")
start       tsta                    ; A=0 is USR(0), A=255 is USR("...")
            bne     usrstring       ; if not 0, goto usrstring
usrnumber   pshs    d,x             ; save D and X
            leax    numbermsg,pcr   ; display "number" message
            bsr     print
            puls    d,x             ; restore D and X
            jsr     INTCNV          ; else, get USR number parameter in D
            addd    #1              ; add one to D
            jmp     GIVABF          ; return back to USR call.

usrstring   leax    stringmsg,pcr   ; display "string" message
            bsr     print
            ldd     #123            ; load D with return value
            jmp     GIVABF          ; return back to USR call.

; PRINT subroutine. Prints the 0-terminated string pointed to by X plus CR.
print       lda     ,x+
            beq     printdone
            jsr     [CHROUT]
            bra     print
printdone   lda     #13
            jsr     [CHROUT]
            rts

stringmsg   fcc     "STRING"
            fcb     0

numbermsg   fcc     "NUMBER"
            fcb     0

            end
And here it is in operation:
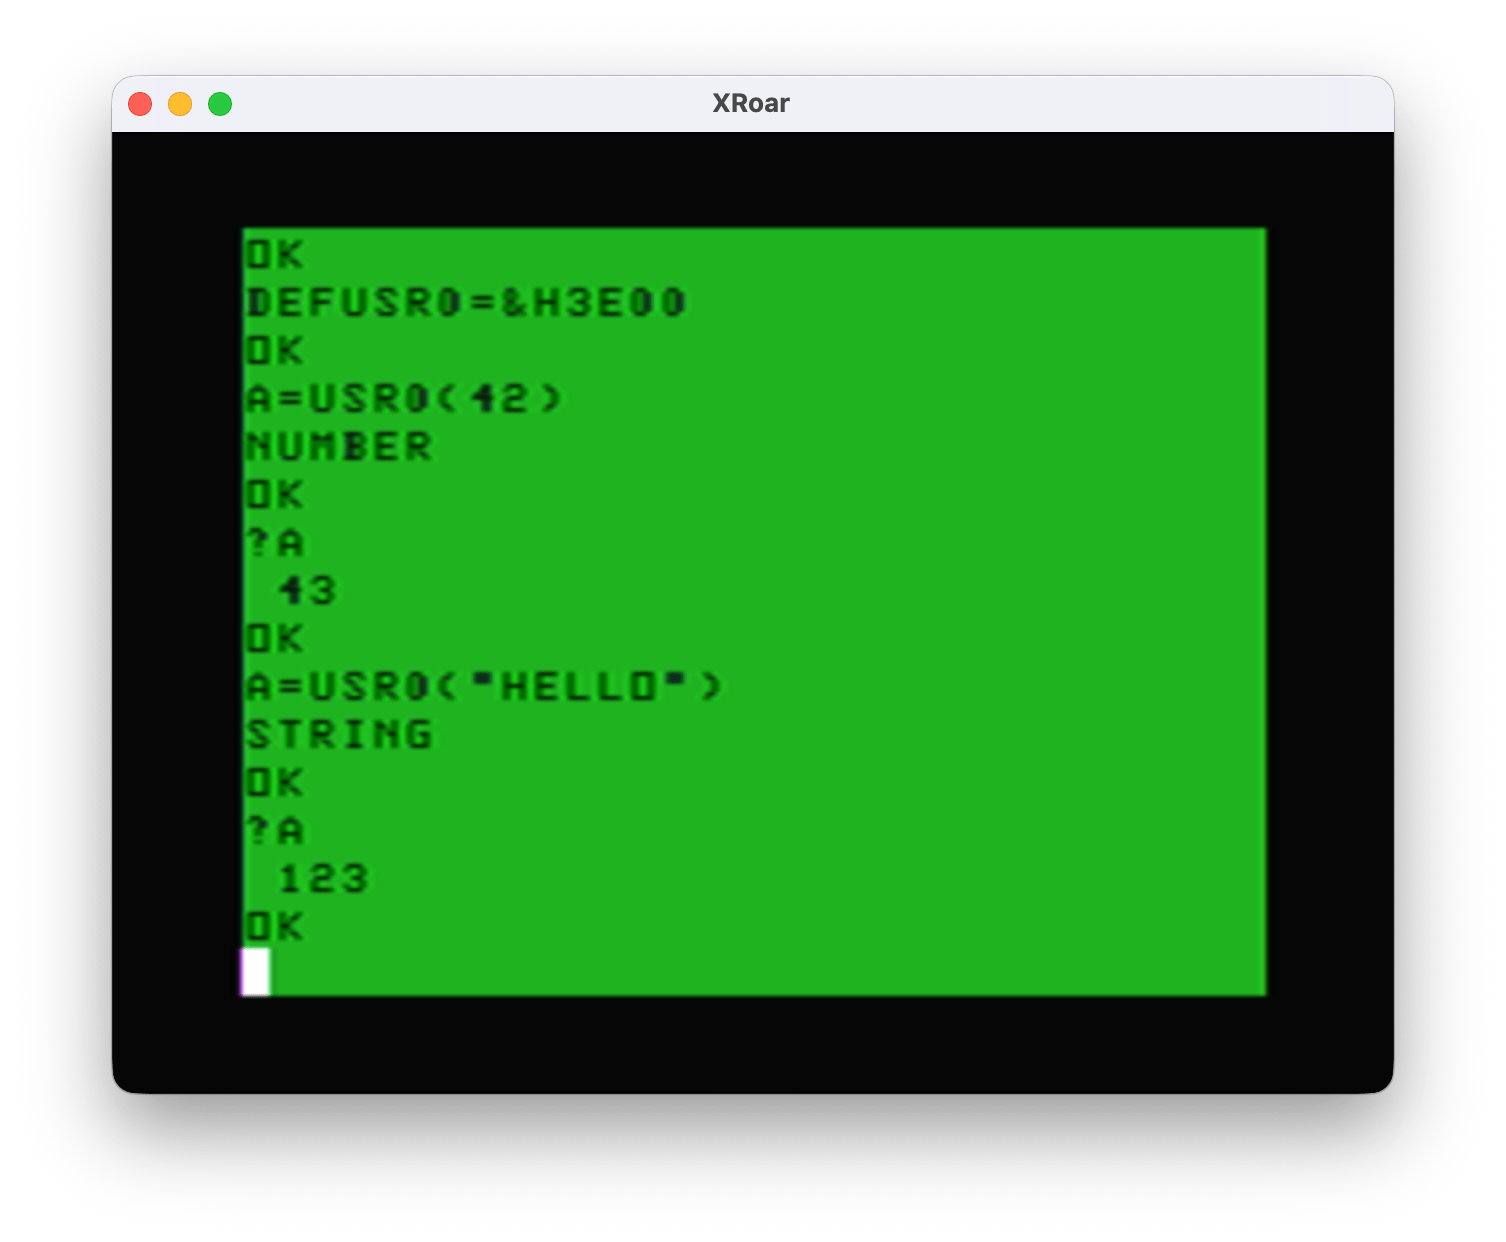
Now I know how to detect a USRx(number) versus EXEC, and how to detect a USRx(number) versus a USRx(string). But, this has the same problem if called by EXEC with no address:
EXEC &3E00
NUMBER
EXEC
NUMBER
?TM ERROR
It appears that using EXEC with the address after it sets registers up differently than using EXEC with no address (where it uses the last address EXEC used). While both end up at the code path for USRx(number), is seems that plain EXEC thinks it is returning an invalid type and the ?TM ERROR is displayed.
EXEC or EXEC xxxx or USRx(n) or USRx(“STRING”)
Can both routines be combined? On the CoCo mailing list, this all started when I asked: Is there a way to tell if a routine was called from USR versus EXEC? It was Sean’s reply that got me going down this rabbit hole:
Maybe.
Address $9D contains the address EXEC uses to jump to your code, so that
should be called address. Also, X will also be this address (implementation
detail).For Color BASIC, you need to know you are running under Color BASIC.
Address $112 is the address for USR, so this should point to your code.
Also, upon calling, X should be equal to $AA2F and B should be 6 (both are
implementation details).For Extended Color BASIC, you need to know you are running under Extended
Color BASIC (16 bits at $8000 are $4558). Addresses $013E through $0150
contain the USRn addresses, so one of these 10 addresses should point to
your code. Also, A will equal the contents of address $06. If A=0, then
X=$4F; if A=255, then X is pointing elsewhere (the string descriptor).For Disk Extended Color BASIC, you need to know you are running under Disk
Extended BASIC (16 bits at $C000 are $444B). The USRn addresses are now
$095F through $0971, but other than that, it’s the same as Extended Color
BASIC.Based on all that, I think the best method might be (completely untested):
mycode cmpx #mycode
beq called_by_exec
; otherwise, assume called by USR/USRnGood luck.
-spc
– Sean Conner via the CoCo Mailing List
This gave me a lot of think about. I did some tests to see what register X looked like when being called by EXEC with or without an address, as well as looking at what was stored in the $9D memory location which is the address EXEC (with no address after it) will use. I created a simple program that would print the value of the X register and the value of $9D so I could test it and see what the pattern was. This code uses an undocumented ROM call that will print the value of the D register. (I learned about this call from Sean’s pages.)
; lwasm showstuff.asm -fbasic -oshowstuff.bas --map
; decb copy -2 showstuff.bin drive0.dsk,SHOWSTUF.BIN

ORGADDR     equ     $3e00       ; Where program loads in memory.

; Absolute addresses of items in RAM variables.
EXECJP      equ     $9d         location of jump address for EXEC

; Absolute addresses of ROM calls.
REGDOUT     EQU     $BDCC       ; Convert the value in ACCD into a decimal
                                ; number and send it to CONSOLE OUT.

            org     ORGADDR

start       tfr     x,d         ; X=D
            jsr     REGDOUT
            lda     #32         ; space
            jsr     [CHROUT]
            ldd     EXECJP      ; load D with EXEC address
            jsr     REGDOUT
            rts

            end
Now I could load this into memory, set up a DEFUSR0=&H3E00 and do some tests:
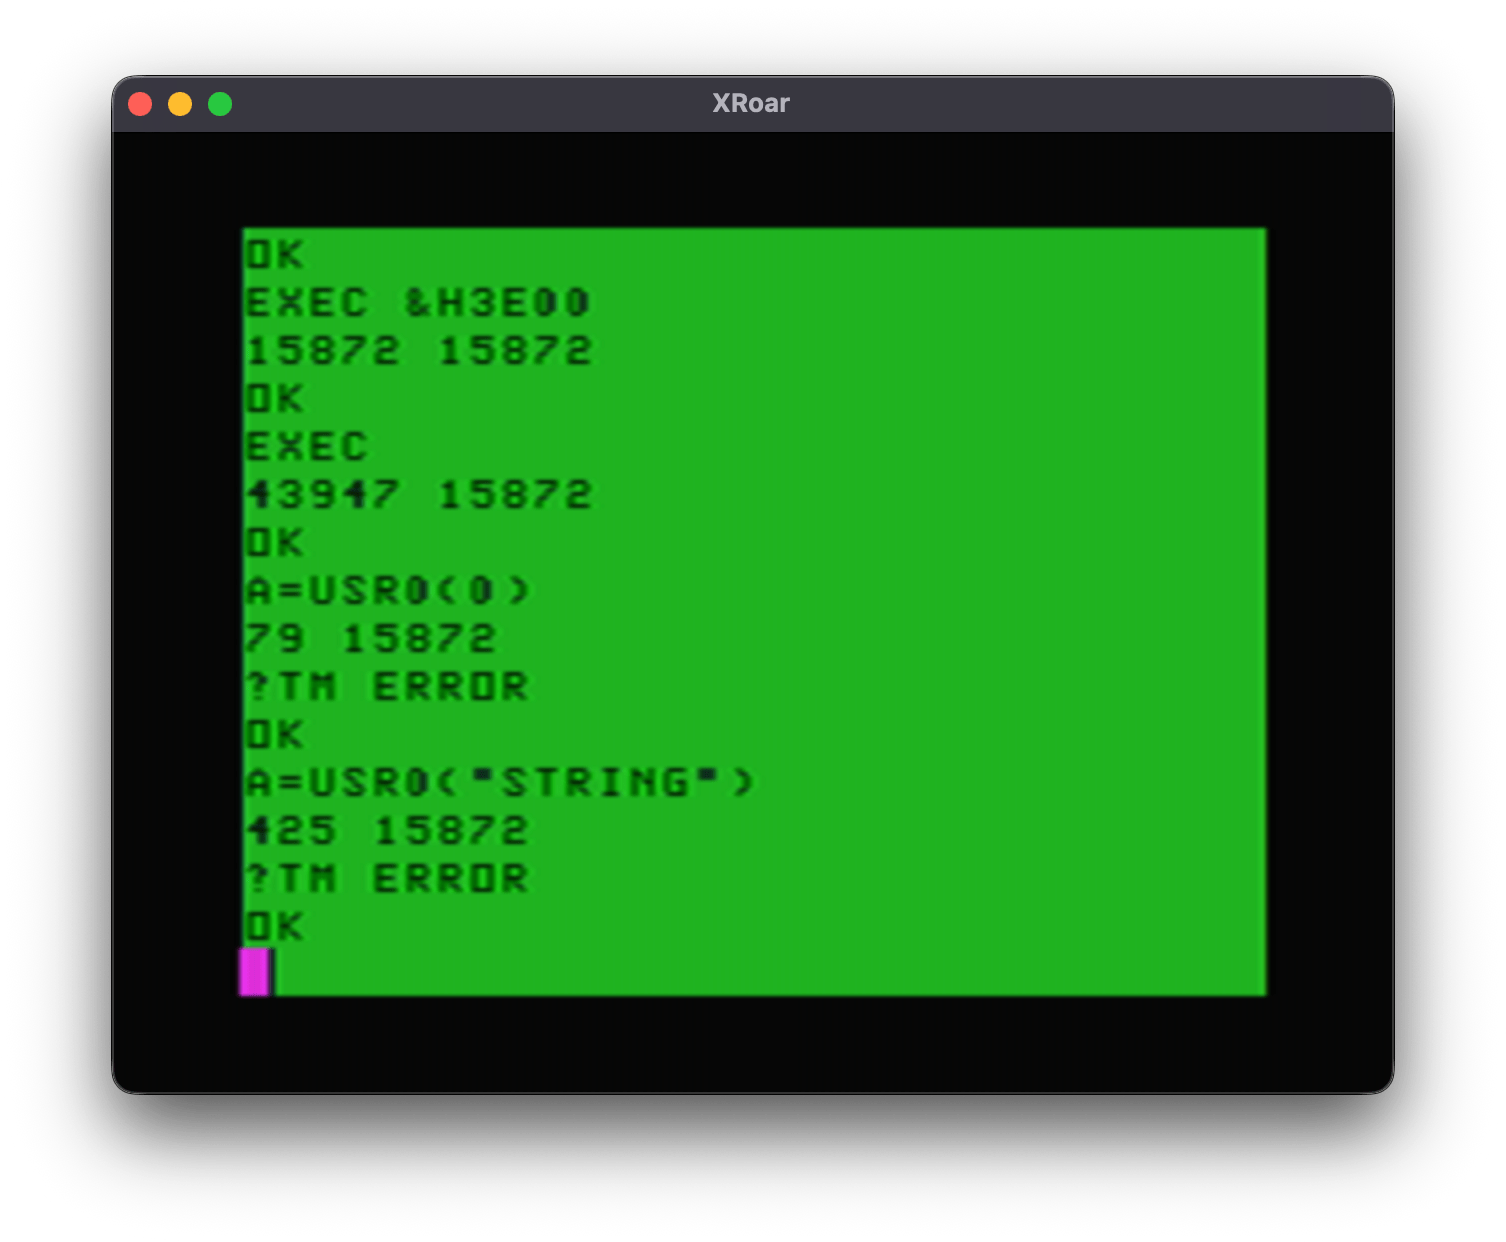
15872 ($3E00) is the start of my user program. EXEC with that address will have both X and the $9D memory location containing that value.
EXEC without an address will have 43947 ($ABAB) in X, and 15872 ($3E00) as the address of the last EXEC address specified. But what is $ABAB? Looking at the Color BASIC Unravelled book, that address is where the EXEC token is:
ABAB FDB EXEC
I did not dive into this, but I expect X was is used for the token scanning and since that was the last thing it found (no address after it to parse) that is what was in the register when it jumps to the user code.
When I tested A=USR0(0), I got a 79 in register X, and $9D still had the last EXEC address used. It then errored out with a ?TM ERROR due to this code not setting up a clean return back to a USR call.
And lastly, A=USR0(“STRING”) put 425 in register X, and $9D was still the last EXEC address used.
Now, had I done the USR calls first, that $9D would not be set up yet and it would look like this:
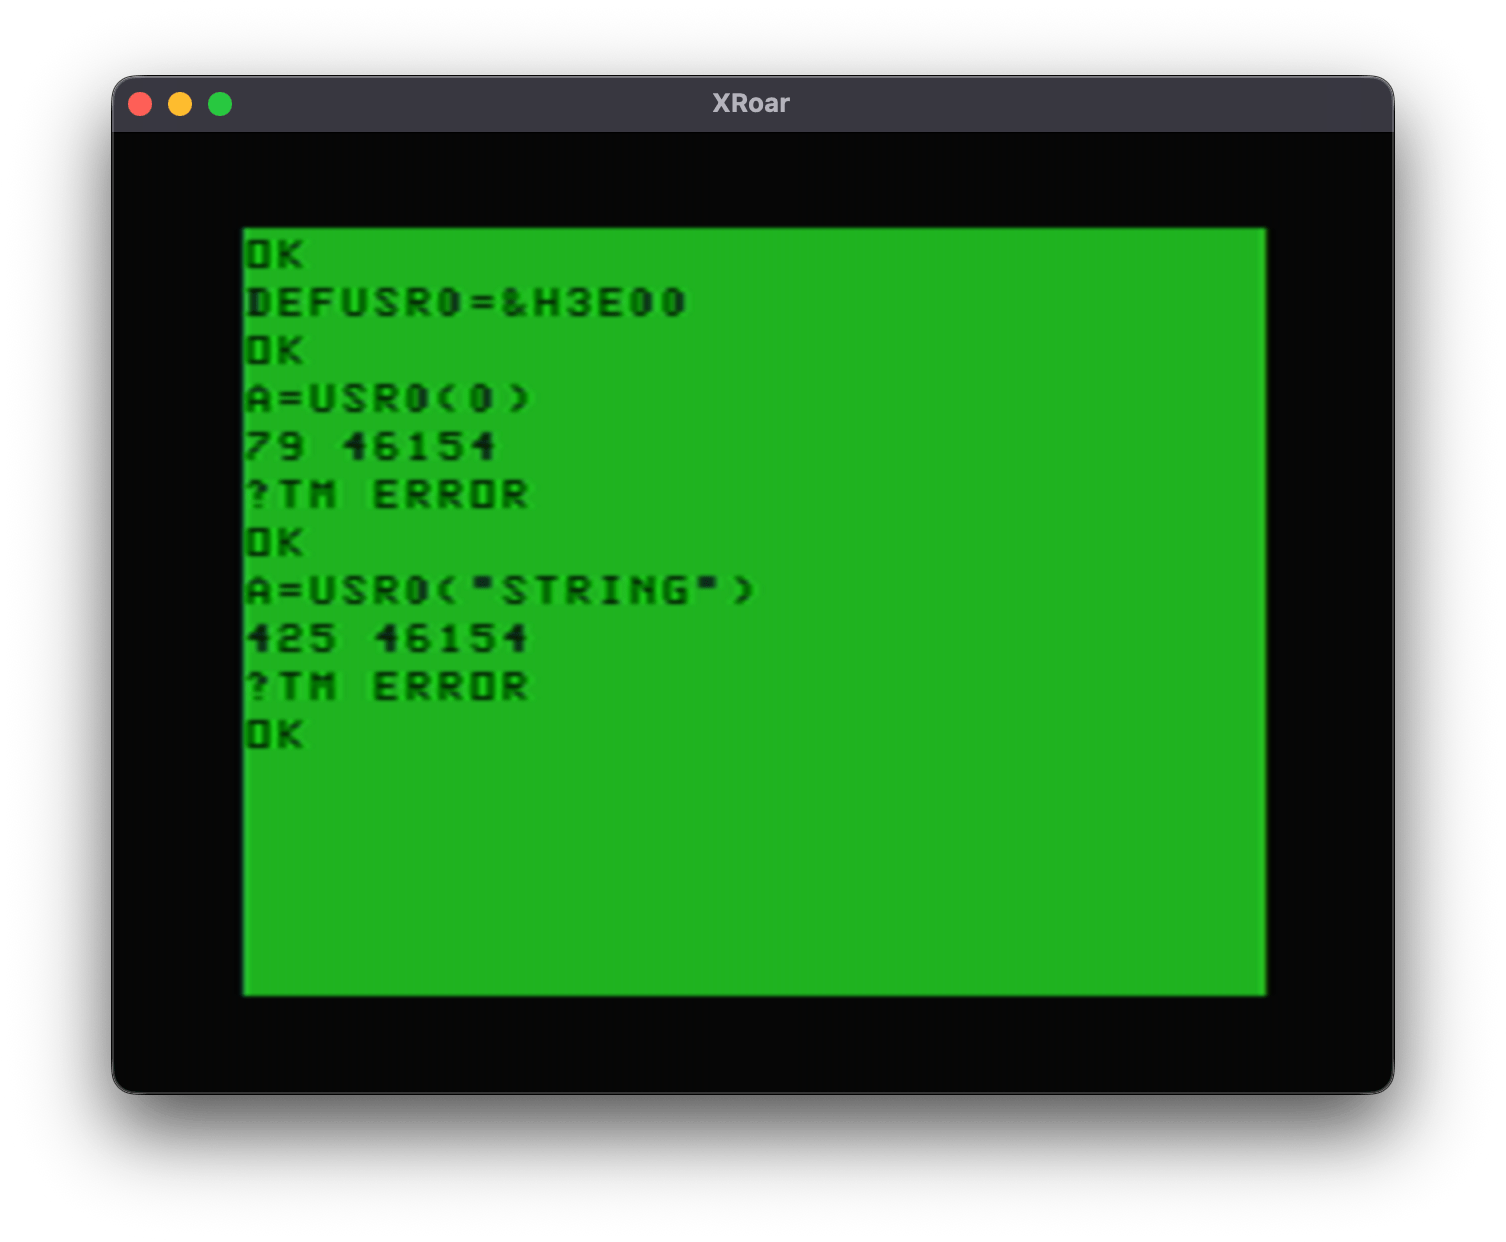
46154 ($B44A) appears to be the default value EXEC will use. By default, EXEC points to the routine that prints ?FC ERROR:
B44A FDB LB44A ARGUMENT OF EXEC COMMAND - SET TO ‘FC’ ERROR
So on a power cycle, typing EXEC is the same as typing EXEC &HB44A:
EXEC &HB44A
?FC ERROR
Having this value there is not useful for any of my checks since all that means is that the user has not done an EXEC with an address yet.
BUT, now that I see what happens with register X, I should be able to check it, and the $9D exec location and determine if I am being called by EXEC, EXEC xxxx, or a USRx command. Here is my test program:
; lwasm whocalled.asm -fbasic -owhocalled.bas --map
; decb copy -2 whocalled.bin drive0.dsk,WHOCALLD.BIN

ORGADDR     equ     $3e00       ; Where program loads in memory.

; Absolute addresses of items in RAM variables.
EXECJP      equ     $9d         location of jump address for EXEC

; Absolute addresses of ROM calls.
CHROUT      equ	    $A002

            org     ORGADDR

; This code expects to have been called by USRx(x).
start       cmpx    #start      ; called by "EXEC xxxx"?
            beq     fromexec    ; if yes, goto fromexec
            cmpx    #$abab      ; called by "EXEC"?
            bne     fromusr     ; if no, must be USR. goto fromusr
            ldx     EXECJP      ; get EXEC address
            cmpx    #start      ; called by "EXEC xxxx"?
            beq     fromexec    ; if yes, goto from exec
fromusr     leax    usrmsg,pcr
            lbsr    print
            rts
fromexec    leax    execmsg,pcr
            lbsr    print
            rts

; PRINT subroutine. Prints the 0-terminated string pointed to by X plus CR.
print       lda     ,x+
            beq     printdone
            jsr     [CHROUT]
            bra     print
printdone   lda     #13
            jsr     [CHROUT]
            rts

usrmsg      fcc     "FROM USR"
            fcb     0

execmsg     fcc     "FROM EXEC"
            fcb     0

            end
And here is what it does:

I now have code that can properly (?) detect if it was called from EXEC xxxx, EXEC, or USR. This demo does not handle detecting a string parameter to USR, but … I think it proves it is possible to do it.
With a few more lines of assembly, I came up with this test program:
; lwasm whocalled2.asm -fbasic -owhocalled2.bas --map
; decb copy -2 whocalled2.bin drive0.dsk,WHOCALL2.BIN

ORGADDR     equ     $3e00       ; Where program loads in memory.

; Absolute addresses of items in RAM variables.
EXECJP      equ     $9d         location of jump address for EXEC

; Absolute addresses of ROM calls.
CHROUT      equ	    $A002
INTCNV      equ     $B3ED
GIVABF      equ     $B4F4

            org     ORGADDR

; This code can be called by USRx(n), USRx("STRING"), EXEC addr or EXEC.
start       cmpx    #start      ; called by "EXEC xxxx"?
            beq     fromexec    ; if yes, goto fromexec
            cmpx    #$abab      ; called by "EXEC"?
            bne     fromusr     ; if no, must be USR. goto fromusr
            ldx     EXECJP      ; get EXEC address
            cmpx    #start      ; called by "EXEC"?
            beq     fromexec    ; if yes, goto from exec
fromusr     tsta                ; A=0?
            beq     donumber    ; if yes, number passed in. goto donumber.
            inca                ; inc A so if 255 (string) it will be 0 now.
            beq     dostring    ; if A=0 (was 255), string. goto dostring.
            bra     unknown     ; else, goto unknown (this should never happen).

donumber    leax    numbermsg,pcr ; show "number" message
            bsr     print
            jsr     INTCNV      ; get number that was passed in
            addd    #1          ; add 1 to D
            jmp     GIVABF      ; return new number back to BASIC

dostring    leax    stringmsg,pcr ; show "string" message
            bsr     print
            ldd     #12345      ; load D with a return value
            jmp     GIVABF      ; return that number back to BASIC

fromexec    leax    execmsg,pcr ; show "from exec" message
            lbsr    print
            rts

unknown     leax    unknownmsg,pcr ; this should never happen
            lbsr    print       ; show "unknown" message
            rts

; PRINT subroutine. Prints the 0-terminated string pointed to by X plus CR.
print       lda     ,x+
            beq     printdone
            jsr     [CHROUT]
            bra     print
printdone   lda     #13
            jsr     [CHROUT]
            rts

execmsg     fcc     "FROM EXEC"
            fcb     0

numbermsg   fcc     "FROM USR(NUMBER)"
            fcb     0

stringmsg   fcc     "FROM USR(STRING)"
            fcb     0

unknownmsg  fcc     "UNKNOWN"
            fcb     0

            end
And here is what I get after loading this into memory:
DEF USR0=&H3E00
OK

A=USR0(42)
FROM USR(NUMBER)
PRINT A
43

A=USR0("STRING")
FROM USR(STRING)
PRINT A
12345

EXEC &H3E00
FROM EXEC

EXEC
FROM EXEC
I think we may have a winner! The important parts are:
start       cmpx    #start      ; called by "EXEC xxxx"?
            beq     fromexec    ; if yes, goto fromexec
            cmpx    #$abab      ; called by "EXEC"?
            bne     fromusr     ; if no, must be USR. goto fromusr
            ldx     EXECJP      ; get EXEC address
            cmpx    #start      ; called by "EXEC"?
            beq     fromexec    ; if yes, goto from exec
- If X is the address of the user program, it was called by “EXEC xxx”
- If not, then if X is NOT $ABAB, it was called by USR
- Else, it was $ABAB, so the EXECJP ($9D) is checked to see if it is the address of the user program. If it is, it is from EXEC.
I hope that makes sense. If not, think of it like this:
- X=program start – it was called from EXEC xxxx
- X=$ABAB and EXECJP=program start – it was called by EXEC.
- Anything else is USR.
Now what I need from you is to double check my work and tell me if I got this right, and if this method can be relied on.
Comments if ya got ’em!
Until next time…


