Prototype “Sir Sound” sound module for the CoCo (or anything with a serial port, actually).
So … many … wires.
At the time, I was hoping to find some kind of Arduino emulator so I could write and test code without hooking up hardware. I found nothing.
But that seems to have changed. I just learned about Wokwi which allows one to “simulate IoT projects in your browser.” In a nutshell, it’s a website that has a code editor (which appears to be Microsoft Visual Studio Code), compiler, and virtual target hardware like Arduino and ESP32 devices. It even supports some add-on hardware, like buttons, LCD displays, LEDs and more.
Here’s a project someone made that simulates an Arduino hooked to a numeric keypad and LCD display:
And you can build and run it right there!
There is a library of devices that are supported, and you can add them to your project and wire them up to the computer’s I/O pins. For example, as I write this blog post, I opened up a starter project that is an Arduino and a two-line LCD display. I then added a pushbutton to it.
I could then move the button to where I wanted it, then click on the connectors and draw wire lines between it and I/O pins on the Arduino. By hooking one side to an I/O pin, and the other to ground, I could then modify the program to read that button and, for this example, increment a counter while the button is being held done.
It’s just that easy! I had no idea!
The files can be downloaded and used on real hardware, or you can make an account and log back in to continue working on them. (It has an unusual way to log in — it sends you an e-mail and you click a link to log in, rather than having a username and password. This seems to mean I cannot log in from any system that I don’t have my e-mail account configured on, but I do see options for using a Google or Github login.)
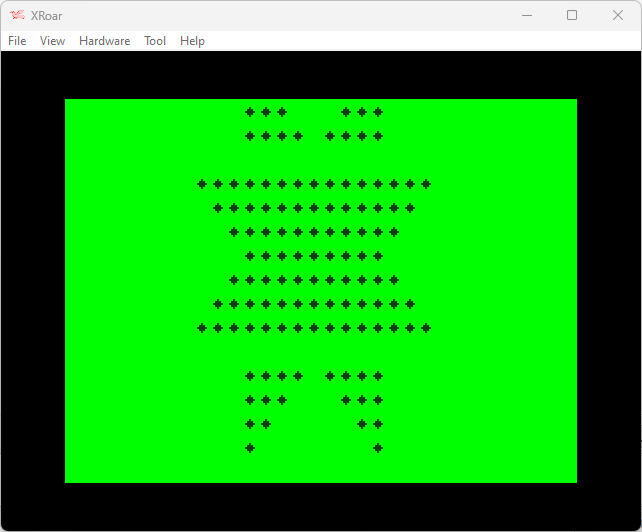
In the beginning Logiker offered up a programming challenge to produce this simple image:
From its humble beginnings as a bunch of PRINT statements, to a DATA driven output routine, we have now ended up with code that can print the top half of the symmetrical image by only having data to describe one quarter of the image.
When we last left off, I had code that would read this data, print the left half, then print the right half, mirroring the same data. It worked well, but only printed the top half of the image.
I showed that code to OpenAI and asked how it would accomplish the task of reversing the data to print the bottom portion:
To make the program print the rows in reverse order after it has finished printing all of the rows, you will need to make some changes to the code. One way to do this would be to add another loop after the main loop that reads the data from the DATA statements and prints the rows in reverse order. You can use the “REVERSE” statement in BASIC to reverse the order of the rows in the DATA statements, and then use the same code as in the main loop to read the data and print the rows. This will cause the program to print the rows in the original order, and then again in reverse order.
– chat.openai.com
I’ve never heard of the REVERSE keyword, and the CoCo’s BASIC doesn’t have it. But if I did have it, this task would be pretty easy. I informed the A.I. that I had no such command, and it said:
If your BASIC does not have a REVERSE command, you can still print the rows in reverse order by using a different approach. One way to do this would be to store the data from the DATA statements in an array, and then loop through the array in reverse order to print the rows. In BASIC, you can use the “DIM” statement to create an array, and the “READ” statement to read data from the DATA statements into the array. You can then use a loop to iterate through the array in reverse order, using the same code as in the main loop to print the rows. This will cause the program to print the rows in the original order, and then again in reverse order.
– chat.openai.com
That’s the approach I was thinking of taking, so… okay!
Side Note: I did ask the A.I. to modify my program to do this, and it gave me something that would have been a good starting point for the rest of this article. I could have then discussed things with the A.I. a bit more and encouraged it to evolve the program until it met the requirements. (One issue with BASIC is that the A.I. inevitably tries to do things from other dialects of BASIC that Color BASIC does not have, such as the REVERSE command.) I hope to demonstrate one of these co-programming sessions in a future article series, provided access to ChatGPT remains available to me.
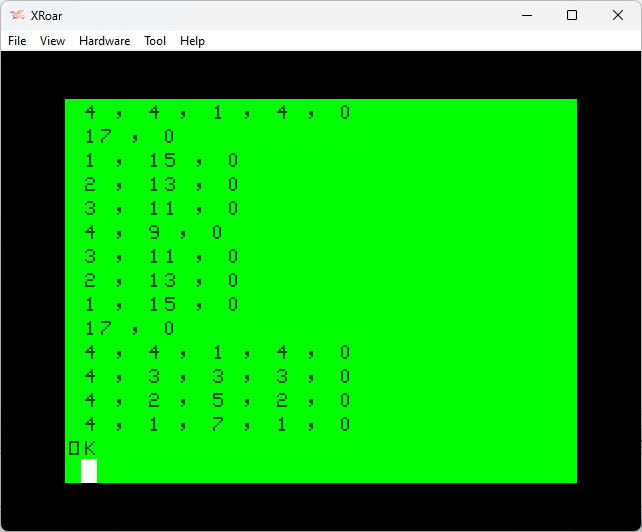
I changed my routine so it loaded all the DATA values in to a dimension. Since I knew how many entries there would be (27), I could eliminate the need for having a -1 to mark the end of data.
Then, in the PRINT routine, instead READing A, B and C and looking at them, I’d use the D() dimension variable as D(x), D(x+1) and D(x+2) to get to the same three values.
At the end of each line (three numbers, or two numbers followed by a zero), I would increment my index by three so it starts at the next set of numbers in the array.
I used a new variable, M, to indicate the mode (forward or reverse). When it reaches the end of the data (D goes past the 27 entries), it sets that variable to 1, and other code now runs decrementing the index by 3 each time until it reaches the top (0).
Here is my new code:
0 ' LOGIKER11.BAS
10 CLS:DIM D(26)
11 FOR I=0 TO 26:READ D(I):NEXT:D=0:M=0
15 PRINTTAB(6);
20 PRINT STRING$(D(D),32);
25 IF D(D+2)=0 THEN PRINT STRING$(D(D+1)*2-1,42);STRING$(D(D),32);:GOTO 40
30 PRINT STRING$(D(D+1),42);STRING$(D(D+2)*2-1,32);STRING$(D(D+1),42);
40 IF M=0 THEN D=D+3:IF D<27 THEN PRINT:GOTO 15 ELSE M=1
41 IF D>0 THEN PRINT:D=D-3:GOTO 15
50 DATA 5,1,4
60 DATA 5,2,3
70 DATA 5,3,2
80 DATA 5,4,1
90 DATA 1,9,0
100 DATA 2,8,0
110 DATA 3,7,0
120 DATA 4,6,0
130 DATA 5,5,0
220 GOTO 220
OpenAI describes it as follows:
This program is similar to the previous ones, but it uses a slightly different approach to read the data from the DATA statements and print the rows. The program starts by defining an array D to store the data from the DATA statements, and then reads the data into the array. The program then enters a loop that prints the rows of the pattern. In each iteration of the loop, the program prints a row of the pattern by printing a string of spaces, followed by a string of asterisks, and then another string of spaces. The number of spaces and asterisks in each string is determined by the data in the array.
After the program has printed all of the rows in the original order, it enters another loop that prints the rows in reverse order. In each iteration of the loop, the program prints the same row as in the previous loop, but in reverse order. This causes the program to print the rows of the pattern in the original order, and then again in reverse order. However, without more information about the data in the DATA statements, it is not possible to say exactly what the output of the program would look like.
– chat.openai.com
Nicely done, A.I.
When I run this program, I get the desired output!
It is, of course, slower than the original brute-force PRINT version. But, we are going for size. And speaking of size, lets try to pack this down as much as possible and see where we stand:
0 ' LOGIKER12.BAS
10 CLS:DIM D(26):FOR I=0 TO 26:READ D(I):NEXT:D=0:M=0
15 PRINTTAB(6);STRING$(D(D),32);:IF D(D+2)=0 THEN PRINT STRING$(D(D+1)*2-1,42);STRING$(D(D),32);:GOTO 40
30 PRINT STRING$(D(D+1),42);STRING$(D(D+2)*2-1,32);STRING$(D(D+1),42);
40 IF M=0 THEN D=D+3:IF D<27 THEN PRINT:GOTO 15 ELSE M=1
41 IF D>0 THEN PRINT:D=D-3:GOTO 15
50 GOTO 50:DATA 5,1,4,5,2,3,5,3,2,5,4,1,1,9,0,2,8,0,3,7,0,4,6,0,5,5,0
Loading the first version gives me 22431 bytes free. Loading the second gives me 22499 – about 68 bytes smaller! Compare that to the original brute-force PRINT version (which was 22309 free), we have saved 190 bytes so far.
And, we could remove spaces, get rid of the REM comment at the start, and save even more.
But is that enough for the challenge? One thing the challenge says it you are not required to clear the screen, and you can return to an OK/Ready prompt. That means I could remove the CLS and the GOTO loop at the end, saving even more.
But saving even more is not enough. I think there’s a few more things we can do, especially now that I understand what it takes to draw this shape.
Until next time, take a look at what I have done in LOGIKER11.BAS and see what suggestions you can come up with.
So far, we’ve taken a brute force PRINT program and turned it in to a less-brute force program that did the same thing using DATA statements:
0 ' LOGIKER8.BAS
10 CLS
15 CH=32:PRINTTAB(6);
20 READ A:IF A=-1 THEN 220
25 IF A=0 THEN PRINT:GOTO 15
30 PRINT STRING$(A,CH);
35 IF CH=32 THEN CH=42 ELSE CH=32
40 GOTO 20
50 DATA 5,1,7,1,0
60 DATA 5,2,5,2,0
70 DATA 5,3,3,3,0
80 DATA 5,4,1,4,0
90 DATA 1,17,0
100 DATA 2,15,0
110 DATA 3,13,0
120 DATA 4,11,0
130 DATA 5,9,0
140 DATA 4,11,0
150 DATA 3,13,0
160 DATA 2,15,0
170 DATA 1,17,0
180 DATA 5,4,1,4,0
190 DATA 5,3,3,3,0
200 DATA 5,2,5,2,0
210 DATA 5,1,7,1,0
215 DATA -1
220 GOTO 220
All of this in an effort to try to print out this image:
While there are still many BASIC optimizations we could do (removing spaces, combining lines even further, renumbering by 1, etc.), those would apply to any version of the code we create. Instead of doing that, let’s look at some other ways we can represent this data.
When the Atari VCS came out in 1977 (you younguns may only know it as the 2600, but it didn’t get that name until 1982 — five years after its release later), it required clever tricks to make games run in only 1K or 2K of ROM and with just 128 bytes of RAM.
The game Adventure was quite the challenge, since it had multiple screens representing different mazes, castles and areas.
Atari’s Greatest Hits on an old iPad
Each screen was represented by only 21 bytes of ROM! If you follow that link, you can read more about my efforts to understand how this worked. Here is an example of how the castle room was represented:
;Castle Definition
CastleDef:
  .byte $F0,$FE,$15 ;XXXXXXXXXXX X X X      R R R RRRRRRRRRRR
  .byte $30,$03,$1F ;XX        XXXXXXX      RRRRRRR        RR
  .byte $30,$03,$FF ;XX        XXXXXXXXXXRRRRRRRRRR        RR
  .byte $30,$00,$FF ;XX          XXXXXXXXRRRRRRRR          RR
  .byte $30,$00,$3F ;XX          XXXXXX    RRRRRR          RR
  .byte $30,$00,$00 ;XX                                    RR
  .byte $F0,$FF,$0F ;XXXXXXXXXXXXXX            RRRRRRRRRRRRRR
There are three bytes to represent each line. Three bytes would only be able to represent 24 pixels (8 bits per byte), and the ASCII art shows the screen width is actually 40. Those three bytes cannot represent the entire row of pixels.
In fact, 4-bits of that isn’t used. Each set of three bytes represents halfa row (20 bits out of the 24 the three bytes represent). Look at the first entry:
.byte $F0,$FE,$15 ;XXXXXXXXXXX X X X R R R RRRRRRRRRRR
If you turn those bytes into binary, you get this pattern:
The Atari drew the first 8-bits from least significant bit to most. the second 8-bits from most significant to least, then the third from least significant to most. That makes it look like this, matching the ASCII art (skipping the unused 4-bits):
000011111111111010101000
    XXXXXXXXXXX X X X
To represent a full screen, the Atari had a trick that would mirror or duplicate the other half of the screen. In the case of the castle, the right side was a mirror image. In the case of certain mazes, the data was duplicated.
Looking at our image here, since it is symmetrical, we could certainly use the same trick and only store half of the image.
Since the image is 17×17 (an odd number, so there is a halfway row and column), we’d actually need to just draw to that halfway row/column, then reverse back through the data.
We should be able to take our existing data and crop it down from this, which represents the full image:
50 DATA 5,1,7,1,0
60 DATA 5,2,5,2,0
70 DATA 5,3,3,3,0
80 DATA 5,4,1,4,0
90 DATA 1,17,0
100 DATA 2,15,0
110 DATA 3,13,0
120 DATA 4,11,0
130 DATA 5,9,0
140 DATA 4,11,0
150 DATA 3,13,0
160 DATA 2,15,0
170 DATA 1,17,0
180 DATA 5,4,1,4,0
190 DATA 5,3,3,3,0
200 DATA 5,2,5,2,0
210 DATA 5,1,7,1,0
…to this, which represents the top left quarter-ish of the image:
50 DATA 5,1,4,0   '     X    '
60 DATA 5,2,3,0   '     XX   '
70 DATA 5,3,2,0   '     XXX  '
80 DATA 5,4,1,0   '     XXXX '
90 DATA 1,9,0     ' XXXXXXXXX'
100 DATA 2,8,0    '  XXXXXXXX'
110 DATA 3,7,0    '   XXXXXXX'
120 DATA 4,6,0    '    XXXXXX'
130 DATA 5,5,0    '     XXXXX'
That represents all the data up to the center row/column, and that seems to be a considerable savings in code space (removing eight lines).
But how do we draw that forward, then in reverse? There is no way to back up when using the READ command, so we’d have to remember what we just did. For a general purpose “compress 1-bit image” routine it would be more complex, but since we know the image we are going to produce, we can make an assumption:
The image never has more than three transitions (space, asterisk, space) in a line.
No line entry has more than 4 numbers total.
Knowing that, we could simply save up to three numbers in variables, so we would print them out A B C and then C B A. We won’t even need the zeros now, since we can read A,B,C and act on them (stopping if C is 0).
Neat!
A quick bit of trial and error gave me this code that will print the top half of the image:
0 ' LOGIKER10.BAS
10 CLS
15 CH=32:PRINTTAB(6);
20 READ A:IF A=-1 THEN 220
21 PRINT STRING$(A,32);
22 READ B,C
25 IF C=0 THEN PRINT STRING$(B*2-1,42);STRING$(A,32):GOTO 15
30 PRINT STRING$(B,42);STRING$(C*2-1,32);STRING$(B,42)
40 GOTO 15
50 DATA 5,1,4
60 DATA 5,2,3
70 DATA 5,3,2
80 DATA 5,4,1
90 DATA 1,9,0
100 DATA 2,8,0
110 DATA 3,7,0
120 DATA 4,6,0
130 DATA 5,5,0
215 DATA -1
220 GOTO 220
It creates this:
I can now say “we are halfway there!”
But now I have another issue to solve. How do I back up? There is no way to READ data in reverse. It looks like I’m going to need to load all those numbers in to memory so I can reverse back through them.
Note: A slightly updated version of this article appeared earlier on Vintage is the New Old.
I asked:
can you write a program in Microsoft BASIC that encodes a message and can decode it later?
– me, to chat.openai.com
It initially showed me this:
REM This is a simple program that uses a substitution cipher to encode and decode a message in Microsoft BASIC

REM Define the alphabet and the substitution key
DIM alphabet(26)
DIM key(26)
alphabet = "ABCDEFGHIJKLMNOPQRSTUVWXYZ"
key = "QWERTYUIOPASDFGHJKLZXCVBNM"

REM Define the message to encode
DIM message(40)
message = "HELLO, WORLD!"

REM Define the encoded message
DIM encoded(40)

REM Define the decoded message
DIM decoded(40)

REM Encode the message
FOR i = 1 TO LEN(message)
  encoded(i) = key(INSTR(alphabet, UCASE$(message(i))))
NEXT

REM Print the encoded message
FOR i = 1 TO LEN(encoded)
  PRINT encoded(i);
NEXT

REM Decode the message
FOR i = 1 TO LEN(encoded)
  decoded(i) = alphabet(INSTR(key, UCASE$(encoded(i))))
NEXT

REM Print the decoded message
FOR i = 1 TO LEN(decoded)
  PRINT decoded(i);
NEXT
Well, that might be some type of BASIC, but it wasn’t what I meant. So I added:
convert that to older interpreted BASIC, which requires line numbers. Make sure no variables are longer than two characters. All variables should be in uppercase.
– me, to chat.openai.com
It took a few back-and-forths as it generated code that wasn’t quite compatible with my CoCo. It initially was using strings similar to how C works, declaring a string array for the number of letters in the string. It would then try to access them as A$(1), A$(2), etc. That seemed silly, and I told it so.
It removed the DIMs and just started using strings normally.
When it was trying to build a string that way, I’d tell it “my BASIC can’t do that. use MID$ instead” and it would switch out.
A few rounds of this, and is had created a program that almost worked. There were some errors, caused by the INSTR command returning 0. I told it “if the string is not found, INSTR returns 0 which cannot be used in that MID$”.
It corrected that.
It worked, but I didn’t like the output, so I told it:
print the original message at the start. you can remove the ; on teh PRINT statements so they print a carraige return
– me to chat.open.ai
And at least, this AI-generated masterpiece was complete. And I didn’t write a line of it — I just told it when something wouldn’t work on my BASIC…
10 REM Simple substitution cipher
20 A$="ABCDEFGHIJKLMNOPQRSTUVWXYZ"
30 K$="QWERTYUIOPASDFGHJKLZXCVBNM"
40 M$="HELLO, WORLD!"
50 PRINT "Original message: "; M$
60 E$=""
70 FOR I=1 TO LEN(M$)
80 C=INSTR(A$,CHR$(ASC(MID$(M$,I,1))))
90 IF C>0 THEN E$=E$+MID$(K$,C,1) ELSE E$=E$+MID$(M$,I,1)
100 NEXT
110 PRINT "Encoded message: "; E$
120 D$=""
130 FOR I=1 TO LEN(E$)
140 C=INSTR(K$,CHR$(ASC(MID$(E$,I,1))))
150 IF C>0 THEN D$=D$+MID$(A$,C,1) ELSE D$=D$+MID$(E$,I,1)
160 NEXT
170 PRINT "Decoded message: "; D$
And, I could have kept giving it more suggestions on what to do. Make them in to subroutines? Sure! Change the encoding method? No problem.
The design is one row taller than will fit on the CoCo’s 32×16 text screen, but it would easily fit on the 40 or 80 column screen of the CoCo 3. For this article, I am going to stick with the standard text screen and just let it scroll one row off the top of the screen. When I have something figured out, it might only require modifying the centering code to display on the 40/80 column screen.
Let there be code!
At this stage, the design is being centered using the TAB command. Putting a “TAB(7)” at the start of each string takes up 3 bytes of programming space. It seems “TAB(” is tokenized, then there is the 3 character, followed by the “)” character. I had thought using PRINT@ might save some space, but the “@” takes a byte, then the screen position numbers follow it, and a comma is required. “PRINT@7,” takes the same amount of code space as “PRINTTAB(7)” so no savings there.
The biggest savings is going to come from eliminating the repeated use of the “* characters in the strings. Since the entire image is made up of spaces or asterisks, it could be represented by data that says how many spaces then how many asterisks then how many spaces, etc.
Here is what the image looks like centered to 32-columns:
The first line has 11 spaces, 1 asterisks, 7 spaces, then 1 asterisk.
The second line has 11 spaces, 1 asterisks, 5 spaces, then 2 asterisks.
And so on… The first line could be represented in DATA to tell how many repeating groups of spaces and asterisks there are such as 11,1,7,1,0 (using 0, to indicate the end of the line).
For something this small, I could have just counted up the spaces and asterisks myself, but it’s more fun to spend ten minutes writing a BASIC program to do what would have taken me 60 seconds to do manually.
I converted the pattern in to DATA statements and created a program that would scan each line looking for repeated characters. When the character changes, it prints how many of the previous repeating characters it saw and resets the counter.
Rather than explain how the program works, like I often try to do, I just submitted this code to the OpenAI ChatGPT system and let it do the work for me:
This BASIC program reads in a series of strings, one at a time, and outputs the number of times each character appears in the string.
Here is a brief explanation of the code:
Lines 10-16: This is the main loop of the program, where each string is read in, processed, and output.
Line 11: This line initializes the LC$ variable to the first character of the string and the DC variable to 1.
Lines 12-14: This is a FOR loop that iterates through each character of the string.
Line 13: This line compares the current character with the last character (stored in LC$). If they are the same, it increments the DC variable. If they are different, it outputs the value of DC and then resets DC to 1 and LC$ to the current character.
Line 15: This line outputs the value of DC after the loop has finished processing the string.
Lines 50-220: These are the data lines that contain the strings to be processed.
Line 220: This is the sentinel value that indicates the end of the data.
Note that this code uses a number of built-in BASIC functions, such as LEFT$, MID$, and LEN, which may not be available in all versions of BASIC. You may need to modify the code to use equivalent functionality if it is not available in the version of BASIC you are using.
– chat.openai.com
Seriously, folks. You have to go play with ChatGPT. It’s amazingly fun.
OpenAI ChatGPT Digression
After showing this program to ChatGPT, I asked “is there a way to do it better?” It responded with:
There are a few ways that this routine could be improved. Here are a few suggestions:
Use a DO loop instead of a GOTO statement to control the main loop. This would make the code easier to read and maintain.
Use a SELECT CASE statement to handle the different cases in line 13 instead of an IF statement. This would make the code more concise and easier to read.
Use a DICTIONARY or MAP data structure to store the counts of each character instead of using separate variables for each character. This would make the code more efficient and allow it to handle an arbitrary number of characters without having to hard-code variables for each one.
Add error-checking to the code to handle cases where the input data is invalid (e.g. empty strings, strings with invalid characters, etc.). This would make the code more robust and prevent it from crashing or producing incorrect results in these cases.
Here is an example of how the code could be modified to incorporate some of these changes:
– chat.openai.com
The code it provided was not something that would work on ancient Microsoft BASIC, but it was interesting to see:
DO
  READ A$
  IF A$="END" THEN EXIT DO

  ' Initialize the character counts to 0
  CHAR_COUNTS = DICTIONARY()

  ' Loop through each character of the string
  FOR i = 1 TO LEN(A$)
    ch = MID$(A$, i, 1)
    IF ch = " " THEN CONTINUE ' Skip whitespace

    ' Increment the count for this character
    IF CHAR_COUNTS.EXISTS(ch) THEN
      CHAR_COUNTS[ch] = CHAR_COUNTS[ch] + 1
    ELSE
      CHAR_COUNTS[ch] = 1
    END IF
  NEXT

  ' Output the counts for each character
  FOR ch = "A" TO "Z"
    PRINT CHAR_COUNTS[ch]; ",";
  NEXT
  PRINT "0"
LOOP

50 DATA"    *       *"
60 DATA"    **     **"
70 DATA"    ***   ***"
80 DATA"    **** ****"
90 DATA"*****************"
100 DATA" ***************"
110 DATA"  *************"
120 DATA"   ***********"
130 DATA"    *********"
140 DATA"   ***********"
150 DATA"  *************"
160 DATA" ***************"
170 DATA"*****************"
180 DATA"    **** ****"
190 DATA"    ***   ***"
200 DATA"    **     **"
210 DATA"    *       *"
220 DATA "END"
I have no idea what version of BASIC that code would work on, and the program it wrote doesn’t really look like it’s doing the same thing, but still neat. In a future article (provided they continue to give us access to this AI), I plan to share some of the interesting things it can do with BASIC programs (including writing them from scratch).
But I digress…
Driving Miss Data
When I run the program, it starts printing out rows of numbers. Since there are seventeen rows of the graphic, it prints out seventeen lines of numbers. I needed to pause the program mid-printing so I can write down the numbers before they scroll off. (A fancier way would have been to have the program write out an ASCII BASIC program with the line numbers and DATA statements already in it which I could load back later. I think I showed how I do that in an earlier article somewhere on this site.)
Now that we have numbers for our DATA statements, a new version of the program could be written to generate the image using them. I will make use of the STRING$ that creates a string of a specific character of a specific length…
0 ' LOGIKER6.BAS
10 CLS
15 CH=32:PRINTTAB(7);
20 READ A:IF A=-1 THEN 220
25 IF A=0 THEN PRINT:GOTO 15
30 PRINT STRING$(A,CH);
35 IF CH=32 THEN CH=42 ELSE CH=32
40 GOTO 20
50 DATA 4,1,7,1,0
60 DATA 4,2,5,2,0
70 DATA 4,3,3,3,0
80 DATA 4,4,1,4,0
90 DATA 17,0
100 DATA 1,15,0
110 DATA 2,13,0
120 DATA 3,11,0
130 DATA 4,9,0
140 DATA 3,11,0
150 DATA 2,13,0
160 DATA 1,15,0
170 DATA 17,0
180 DATA 4,4,1,4,0
190 DATA 4,3,3,3,0
200 DATA 4,2,5,2,0
210 DATA 4,1,7,1,0
215 DATA -1
220 GOTO 220
Obviously those data statements could be combined in to fewer lines, but for this version I wanted them to match the same line number the original PRINT was on. You can easily compare the results:
50 DATA"    *       *"
50 DATA 4,1,7,1,0

60 DATA"    **     **"
60 DATA 4,2,5,2,0

70 DATA"    ***   ***"
70 DATA 4,3,3,3,0

80 DATA"    **** ****"
80 DATA 4,4,1,4,0
Before I show you the results, can you see the flaw in my program?
I’ll give you a hint… Line 170.
Close but no cigar
My program assumes each line starts with a space, so the first value will be printed as spaces, then the next value as asterisks, and so on. This causes a problem when it gets to the row that is entirely the asterisk it reads the first number and prints it as spaces, giving me this incorrect result:
I can think of several ways to solve this:
Use a different value other than 0 for “end-of-line” and make 0 mean “nothing to print, just switch to the astrisk”. That would change line 170 to be “DATA 0,17,X” (where “X” is the new end-of-line marker. This would probably require a new bit of IF logic to handle.
Make each group of data two bytes that specifies the character to print, and how many. Printing 17 asterisks would be “17,42”. Printing four spaces would be “4,32”. This would make the program logic simpler, but would double the size of the data. Depending on how much smaller the logic is, this might be a winner. (And I can think of optimizations to that as well, such as using 0 and 1 for the data to print and just printing “32+X*10” so it prints either 32 (if the value is 0) or 42 (if the value is 1). This is normally how I would have started, but I was trying to make the data as small as possible.
I could just encode the leading spaces at the start of each line rather than using TAB(7). By doing this, every line would start with a space. This would work for this specific challenge, but not be flexible for patterns that don’t start with a space.
For now, let’s make a quick change and try #3 by simply adding 7 to the first number in each DATA statement, and adding a 7 to line 170 which is the row that doesn’t have a space at the start. I think it would look like this:
0 ' LOGIKER7.BAS
10 CLS
15 CH=32
20 READ A:IF A=-1 THEN 220
25 IF A=0 THEN PRINT:GOTO 15
30 PRINT STRING$(A,CH);
35 IF CH=32 THEN CH=42 ELSE CH=32
40 GOTO 20
50 DATA 11,1,7,1,0
60 DATA 11,2,5,2,0
70 DATA 11,3,3,3,0
80 DATA 11,4,1,4,0
90 DATA 7,17,0
100 DATA 8,15,0
110 DATA 9,13,0
120 DATA 10,11,0
130 DATA 11,9,0
140 DATA 10,11,0
150 DATA 9,13,0
160 DATA 8,15,0
170 DATA 7,17,0
180 DATA 11,4,1,4,0
190 DATA 11,3,3,3,0
200 DATA 11,2,5,2,0
210 DATA 11,1,7,1,0
215 DATA -1
220 GOTO 220
Running this program produces the desired results! But, it has a drawback:
The data size grew. Not only did we add “7,” (two bytes) to line 170, but eleven other lines went from a 1-digit value to a 2-digit value. This means our data grew by 13 bytes. If we saved 13 bytes in the decoding routine, this is a win. If we did not, it is not an acceptable fix.
When I load the previous version of the program in to the XRoar emulator and PRINT MEM, it shows 22425 free. When I do the same with this version, I get 22416 — less memory free, so a larger program. This is bad, but the previous version is still missing the code to handle that line 170.
Perhaps, instead of adding 7 to each line to center on the screen, each line could just add 1 (so it doesn’t create two-digit values) and we can use TAB(6). That would look like this:
0 ' LOGIKER8.BAS
10 CLS
15 CH=32:PRINTTAB(6);
20 READ A:IF A=-1 THEN 220
25 IF A=0 THEN PRINT:GOTO 15
30 PRINT STRING$(A,CH);
35 IF CH=32 THEN CH=42 ELSE CH=32
40 GOTO 20
50 DATA 5,1,7,1,0
60 DATA 5,2,5,2,0
70 DATA 5,3,3,3,0
80 DATA 5,4,1,4,0
90 DATA 1,17,0
100 DATA 2,15,0
110 DATA 3,13,0
120 DATA 4,11,0
130 DATA 5,9,0
140 DATA 4,11,0
150 DATA 3,13,0
160 DATA 2,15,0
170 DATA 1,17,0
180 DATA 5,4,1,4,0
190 DATA 5,3,3,3,0
200 DATA 5,2,5,2,0
210 DATA 5,1,7,1,0
215 DATA -1
220 GOTO 220
Doing a PRINT MEM on that one shows 22421, so it is four bytes larger than the original, and still smaller than the “add 7” version. Perhaps that is good enough for now?
Combining all the lines to make a smaller program would look like this:
0 ' LOGIKER9.BAS
10 CLS
15 CH=32:PRINTTAB(6);
20 READ A:IF A=-1 THEN 220 ELSE IF A=0 THEN PRINT:GOTO 15
30 PRINT STRING$(A,CH);:IF CH=32 THEN CH=42 ELSE CH=32
40 GOTO 20
50 DATA 5,1,7,1,0,5,2,5,2,0,5,3,3,3,0,5,4,1,4,0,1,17,0,2,15,0,3,13,0,4,11,0,5,9,0,4,11,0,3,13,0,2,15,0,1,17,0,5,4,1,4,0,5,3,3,3,0,5,2,5,2,0,5,1,7,1,0,-1
220 GOTO 220
Better! But we can make it more better.
In the next installment, we will do something that I learned from studying the Atari 2600’s Adventure program…
With my initial success using the CMOC compiler to build a CoCo program, I wanted to automate my steps (build and copy to disk image).
Back in my OS-9 days, I used an OS-9 shell script called “doit” that would manually do the steps to build whatever project it was designed for. This would do the compile, optimize, link, etc. steps for me.
I wanted to make a shell that let me specify the C file then build and copy it to some emulator disk image. I thought it might be like:
doit hello.c
I couldn’t remember how to pass parameters in to a shell script, so instead of doing a websearch, I just asked ChatGPT:
“how can you pass a parameter to a unix shell script?
To pass a parameter to a Unix shell script, you can use the $1, $2, $3, etc. variables, which correspond to the first, second, third, etc. arguments passed to the script. For example, if you want to pass a filename as a parameter to your script, you could use the following syntax:
./myscript.sh myfile.txt
Then, in the script, you can access the parameter using the $1 variable, like this:
#!/bin/bash# Print the filename passed as a parameterecho "The filename is: $1"
Alternatively, you can use the shift command to access all of the arguments passed to the script, like this:
#!/bin/bash# Print all of the arguments passed to the scriptecho "The arguments are: $@"# Shift the arguments to the left, so that $1 now refers to the second argument, $2 now refers to the third argument, etc.shift# Print all of the arguments again, after shiftingecho "The arguments are now: $@"
In this example, the shift command is used to move all of the arguments to the left by one position, so that the second argument is now accessible using the $1 variable, the third argument is accessible using the $2 variable, and so on. This can be useful if you want to access all of the arguments passed to the script, but you don’t know in advance how many arguments will be passed.
– chat.openai.com
That was quicker than a Google search! I decided to just tell it what I wanted to do:
Write a shell script that takes one parameter (a name) and then runs “cmoc name” and then “decb copy name.bin C.DSK,NAME.BIN -2r”
Here is an example of a Unix shell script that takes one parameter (a name) and then runs the cmoc and decb commands using that parameter:
#!/bin/bash# Get the name parametername=$1# Run the cmoc command using the name parametercmoc $name# Run the decb command using the name parameterdecb copy $name.bin C.DSK,$name.BIN -2r
In this script, the first line specifies the shell interpreter to use (in this case, /bin/bash), and the second line uses the $1 variable to retrieve the first argument passed to the script (i.e., the name parameter). The third and fourth lines use the cmoc and decb commands, respectively, to perform the specified operations using the name parameter.
To run this script, you would use the following command:
./myscript.sh myname
Replace myscript.sh with the name of your script file, and myname with the name you want to use as the parameter. The script will then run the cmoc and decb commands using the specified name.
– chat.openai.com
Well, if it can do that, maybe it an make it even better…
update that script so the parameter’s extension is removed and replaced with .bin for the copy
To update the script so that the extension of the parameter is removed and replaced with .bin for the decb copy command, you can use the basename and dirname commands to extract the base name and directory path of the parameter, respectively, and then use the sed command to remove the extension from the base name. Here is an example of how you could do this:
#!/bin/bash

# Get the name parameter name=$1

# Use the basename and dirname commands to extract the base name and directory path of the parameter
dir=$(dirname $name) base=$(basename $name)

# Use the sed command to remove the extension from the base name
name_without_ext=$(echo $base | sed -e "s/\.[^.]*$//")

# Run the cmoc command using the name parameter
cmoc $name

# Run the decb copy command using the modified name
decb copy $name_without_ext.bin $dir/C.DSK $name_without_ext.BIN -2r
In this updated script, the basename and dirname commands are used to extract the base name and directory path of the parameter. The sed command is then used to remove the extension from the base name, and the modified name is used as the argument to the decb copy command.
To run this script, you would use the same command as before:
./myscript.sh myname
This time, however, the decb copy command will use the modified name (i.e., the name with the extension removed and replaced with .bin) instead of the original name. For example, if you pass myfile.txt as the parameter, the decb copy command will use myfile.bin as the destination filename.
– chat.openai.com
And maybe even more better than that!
can you uppercase the second $name_without_ext in the decb line?
To uppercase the second instance of $name_without_ext in the decb line, you can use the tr command to convert the string to uppercase. Here is an example of how you could do this:
#!/bin/bash

# Get the name parameter
name=$1

# Use the basename and dirname commands to extract the base name and directory path of the parameter
dir=$(dirname $name)
base=$(basename $name)

# Use the sed command to remove the extension from the base namename_without_ext=$(echo $base | sed -e "s/\.[^.]*$//")

# Use the tr command to convert the name to uppercase name_upper=$(echo $name_without_ext | tr "[:lower:]" "[:upper:]")

# Run the cmoc command using the name parameter
cmoc $name

# Run the decb copy command using the modified name decb copy $name_without_ext.bin $dir/C.DSK,$name_upper.BIN -2r
In this updated script, the tr command is used to convert the $name_without_ext variable to uppercase, and the resulting string is stored in the $name_upper variable. The $name_upper variable is then used as the second argument to the decb copy command, so the second instance of the name will be uppercase.
To run this script, you would use the same command as before:
./myscript.sh myname
This time, the decb copy command will use the uppercase version of the name as the second argument. For example, if you pass myfile.txt as the parameter, the decb copy command will be run as follows:
decb copy myfile.bin mydir/C.DSK,MYFILE.BIN -2r
Notice that the second instance of the name (i.e., MYFILE.BIN) is now in uppercase.
– chat.openai.com
It worked great! But it didn’t tell me what it was doing, so…
Make it print what is happening at the cmoc and decb steps
To make the script print what is happening at the cmoc and decb steps, you can simply add some echo statements to the script. Here is an example of how you could do this:
#!/bin/bash

# Get the name parameter
name=$1

# Use the basename and dirname commands to extract the base name and directory path of the parameter
dir=$(dirname $name) base=$(basename $name)

# Use the sed command to remove the extension from the base name
name_without_ext=$(echo $base | sed -e "s/\.[^.]*$//")

# Use the tr command to convert the name to uppercase name_upper=$(echo $name_without_ext | tr "[:lower:]" "[:upper:]")

# Print a message before running the cmoc command
echo "Running cmoc on $name..."

# Run the cmoc command using the name parameter
cmoc $name

# Print a message before running the decb copy command
echo "Running decb copy on $name_without_ext.bin..."

# Run the decb copy command using the modified name
decb copy $name_without_ext.bin $dir/C.DSK,$name_upper.BIN -2r
In this updated script, two echo statements have been added to print a message before running the cmoc and decb copy commands, respectively. These messages will be printed to the console and will indicate what is happening at each step of the script.
To run this script, you would use the same command as before:
./myscript.sh myname
When you run the script, you should see the following output:
Running cmoc on myname...
(output from cmoc command)
Running decb copy on myfile.bin...
(output from decb copy command)
The output from the cmoc and decb copy commands will be shown after the messages indicating what is happening at each step.
Starting with that un-optimized version, I will change it to work on the CoCo 1/2/3’s 32-column screen by adjusting it to be properly centered on that display.
Unfortunately, this design is 17 rows tall, and the CoCo’s standard display is only 16. It won’t fit:
We should still be able to enter the challenge by having the program print this pattern, even if it scrolls off the screen a bit. To get one extra line there, we can get rid of the line feed at the end of the final PRINT statement in line 210 by adding a semi-colon to the end:
210 PRINT" * *";
And so it begins…
And so it begins
The goal is to make this as small as possible. There were many ways to approach last year’s Christmas tree challenge, and you can read about the results and a follow-up with suggestions folks gave to save a byte or two.
A simple thing is to remove the spaces at the front and replace them with the TAB() command:
Although this only looks like it saves a character per line (“TAB(8)” versus “seven spaces”), the code itself will be smaller since the TAB command tokenizes down to one (or maybe two?) bytes.
Also, the ending quote is not needed if it’s the last thing on a line, so they could be removed:
But, each line number consumes 5-bytes on it’s own, so a better way to save space would be to pack the lines together. Each line you eliminate saves five bytes. That would become pretty unreadable though, but let’s do it anyway:
This could still be made better, since the text lines were kept under the input buffer limitation size, but when you enter that line, BASIC compresses it (tokenizes keywords like PRINT, TAB and GOTO) making it take less space. You can then sometimes EDIT the line, Xtend to the end and type a few more characters.
That may or may not be allowed for the Logiker challenge. And since I want to provide code here you could copy and then load in to an emulator, I’ll keep it to the limit of what you could type in.
In the next installment, I’ll see if my brane can figure out a way to generate this code using program logic rather than brute-force PRINT statements.
A few years back, Color Computer community member Rietveld Rietveld took an Arcade1Up Rampage cabinet and converted it so I could run other software — such as emulators. Images have been shown of it running the Color Computer emulator and software.
Now, with the official 1.0 release of the NitrOS9 “Ease of Use”, that has been installed on this arcade machine and, by request, my OS-9 game Invaders09 has been ran on it.
I never imagined that my “arcade” game would eventually be running on a (sorta) arcade machine. Thanks, Rietveld!
In my day job, we have a device that needs data sent to it with the bits reversed. For example, if we were sending an 8-bit value of 128, that bit pattern is 10000000. The device expects the high bit first so we’d send it 00000001.
In one system, we do an 8-bit bit reversal using a lookup table. I suppose that one needed it to be really fast.
In another (using a faster PIC24 chip with more RAM, flash and CPU speed), we do it with a simple C routine that was easy to understand.
I suppose this breaks down to four main approaches to take:
Smallest Code Size – for when ROM/flash is at a premium, even if the code is a confusingf mess.
Smallest Memory Usage – for when RAM is at a premium, even if the code is a confusing mess.
Fastest – for when speed is the most important thing, even if the code is a confusing mess.
Clean Code – easiest to understand and maintain, for when you don’t want code to be a confusing mess.
In our system, which is made up of multiple independent boards with their own CPUs and firmware, we do indeed have some places where code size is most important (because we are out of room), and other places where speed is most important.
When I noticed we did it two different ways, I wondered if there might be even more approaches we could consider.
I did a quick search on “fastest way to reverse bits in C” and found a variety of resources, and wanted to point out this fun one:
At that section of this lengthy article are a number of methods to reverse bits. Two of them make use of systems that support 64-bit math and do it with just one line of C code (though I honestly have no understanding of how they work).
Just in case you ever need to do this, I hope this pointer is useful to you.