See Also: part 1, part 2, part 3, part 4 and part 5.
Converting data to other data
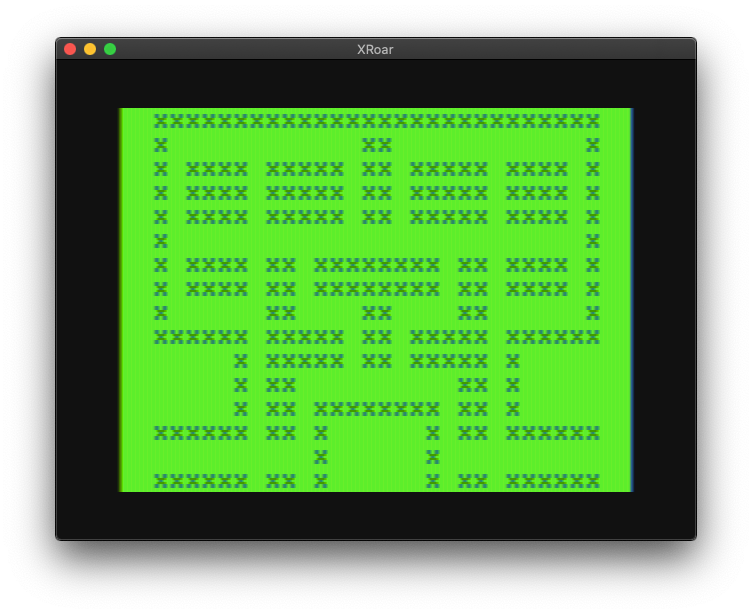
So far, we’ve talked about how to represent a simple maze level, and how to make the maze level have more detail than the data used to represent it. We still need to code a way to represent the maze as bits rather than ASCII characters. Let’s try to get that one figured out.
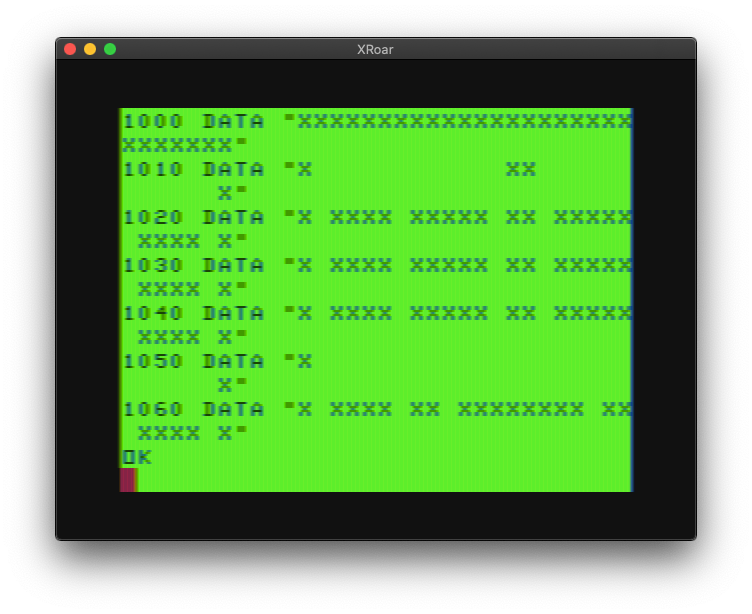
First, we’ll use the DATA statements shown in part 2 and make a program that scans them and outputs the hex bytes we’ll want for DATA statements.
1000 DATA "XXXXXXXXXXXXXXXXXXXXXXXXXXXX"
1010 DATA "X            XX            X"
1020 DATA "X XXXX XXXXX XX XXXXX XXXX X"
1030 DATA "X XXXX XXXXX XX XXXXX XXXX X"
1040 DATA "X XXXX XXXXX XX XXXXX XXXX X"
1050 DATA "X                          X"
1060 DATA "X XXXX XX XXXXXXXX XX XXXX X"
1070 DATA "X XXXX XX XXXXXXXX XX XXXX X"
1080 DATA "X      XX    XX    XX      X"
1090 DATA "XXXXXX XXXXX XX XXXXX XXXXXX"
1100 DATA "     X XXXXX XX XXXXX X     "
1110 DATA "     X XX          XX X     "
1120 DATA "     X XX XXXXXXXX XX X     "
1130 DATA "XXXXXX XX X      X XX XXXXXX"
1140 DATA "          X      X          "
1150 DATA "XXXXXX XX X      X XX XXXXXX"
1160 DATA "     X XX XXXXXXXX XX X     "
1170 DATA "     X XX          XX X     "
1180 DATA "     X XX XXXXXXXX XX X     "
1190 DATA "XXXXXX XX XXXXXXXX XX XXXXXX"
1200 DATA "X            XX            X"
1210 DATA "X XXXX XXXXX XX XXXXX XXXX X"
1220 DATA "X XXXX XXXXX XX XXXXX XXXX X"
1230 DATA "X   XX                XX   X"
1240 DATA "XXX XX XX XXXXXXXX XX XX XXX"
1250 DATA "XXX XX XX XXXXXXXX XX XX XXX"
1260 DATA "X      XX    XX    XX      X"
1270 DATA "X XXXXXXXXXX XX XXXXXXXXXX X"
1280 DATA "X XXXXXXXXXX XX XXXXXXXXXX X"
1290 DATA "X                          X"
1300 DATA "XXXXXXXXXXXXXXXXXXXXXXXXXXXX"
1310 DATA ""
The idea would be to build bytes by scanning 8 characters and setting a 1 bit if there is an “X”, or a 0 bit if there is a ” ” space. In C I’d do this using bit shifting. BASIC doesn’t have that. Except it kinda does.
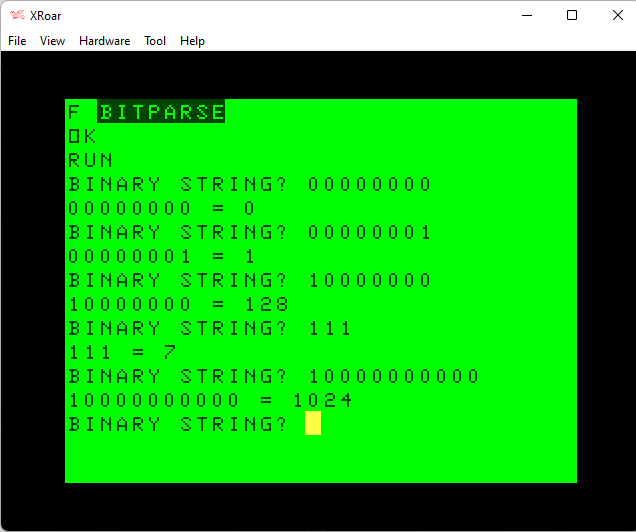
I have previously done some YouTube videos about bit manipulation in BASIC, but basically you just divide by 2 to shift right, or multiply by 2 to shift left. Here is a sample that will take an ASCII binary string and turn it in to a numeric variable:
0 REM BITPARSE.BAS
10 INPUT "BINARY STRING";A$
20 BT=0
30 ' SCAN LEFT TO RIGHT
40 FOR A=1 TO LEN(A$)
50 ' SHIFT LEFT
60 BT=BT*2
70 ' IF 1, ADD 1 BIT
80 IF MID$(A$,A,1)="1" THEN BT=BT+1
90 NEXT
100 PRINT A$;" =";BT
110 GOTO 10
This lets me type a binary string like “111” and see that it represents 7. “11111111” will show 255. You can even go beyond 8 bits, though I did not test to see what the upper limit of BASIC’s floating point variables are before they start showing bogus values.
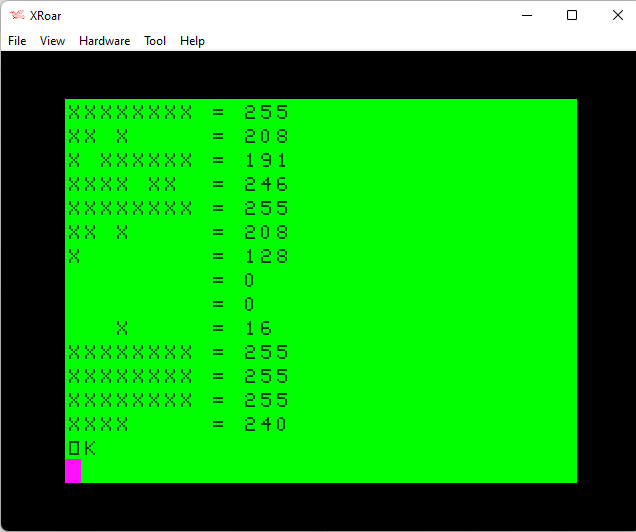
If it’s easy to build a value out of ASCII ones and zeros, it should be just as easy to do it looking for ASCII Xs and spaces. The only new part will be stopping every 8 characters to output the number, then starting over with the next 8 characters. Here is the BITPARSE program updated to do just that. Changes are bolded.
0 REM MAZE2NUM.BAS
10 READ A$:IF A$="" THEN END
15 FOR B=1 TO LEN(A$) STEP 8
20 BT=0
30 ' SCAN LEFT TO RIGHT
40 FOR A=B TO B+7
50 ' SHIFT LEFT
60 BT=BT*2
70 ' IF 1, ADD 1 BIT
80 IF MID$(A$,A,1)="X" THEN BT=BT+1
90 NEXT
100 PRINT MID$(A$,B,8);TAB(8);" =";BT
105 NEXT
110 GOTO 10

1000 DATA "XXXXXXXXXXXXXXXXXXXXXXXXXXXX"
1010 DATA "X            XX            X"
1020 DATA "X XXXX XXXXX XX XXXXX XXXX X"
1030 DATA "X XXXX XXXXX XX XXXXX XXXX X"
1040 DATA "X XXXX XXXXX XX XXXXX XXXX X"
1050 DATA "X                          X"
1060 DATA "X XXXX XX XXXXXXXX XX XXXX X"
1070 DATA "X XXXX XX XXXXXXXX XX XXXX X"
1080 DATA "X      XX    XX    XX      X"
1090 DATA "XXXXXX XXXXX XX XXXXX XXXXXX"
1100 DATA "     X XXXXX XX XXXXX X     "
1110 DATA "     X XX          XX X     "
1120 DATA "     X XX XXXXXXXX XX X     "
1130 DATA "XXXXXX XX X      X XX XXXXXX"
1140 DATA "          X      X          "
1150 DATA "XXXXXX XX X      X XX XXXXXX"
1160 DATA "     X XX XXXXXXXX XX X     "
1170 DATA "     X XX          XX X     "
1180 DATA "     X XX XXXXXXXX XX X     "
1190 DATA "XXXXXX XX XXXXXXXX XX XXXXXX"
1200 DATA "X            XX            X"
1210 DATA "X XXXX XXXXX XX XXXXX XXXX X"
1220 DATA "X XXXX XXXXX XX XXXXX XXXX X"
1230 DATA "X   XX                XX   X"
1240 DATA "XXX XX XX XXXXXXXX XX XX XXX"
1250 DATA "XXX XX XX XXXXXXXX XX XX XXX"
1260 DATA "X      XX    XX    XX      X"
1270 DATA "X XXXXXXXXXX XX XXXXXXXXXX X"
1280 DATA "X XXXXXXXXXX XX XXXXXXXXXX X"
1290 DATA "X                          X"
1300 DATA "XXXXXXXXXXXXXXXXXXXXXXXXXXXX"
1310 DATA ""
This was substantially easier to do than I expected.
And I got lucky, thanks to something BASIC does I was not aware of. The strings being parsed at not multiples of 8 characters. Each line is 28 characters long. Since I parse each one 8 characters at a time, I should be getting:
- MID$(A$,1,8) – first 8 characters.
- MID$(A$,9,8) – second 8 characters.
- MID$(A$,17,8) – third 8 characters
- MID$(A$,25,8) – fourth 8 characters … but there are only 2 left in the line!
MID$() does something that saved me a ton of work. Say you have a ten character string, and you want to print 4 characters starting at position 2:
A$="1234567890"

PRINT MID$(A$,2,4)
2345
But what if you wanted to print four characters starting at position 9? There are only two characters left in the string:
A$="1234567890"

PRINT MID$(A$,9,4)
90
We asked for four… we got two … no error was given. What is BASIC returning? I think this is kind of a bug, because you can do this:
A$="1234567890"

PRINT MID$(A$,25,4)
Tada! Even though you asked for a character beyond the end of the string, it does not error. It just returns … nothing. Literally nothing — the empty string.
A$="1234567890"

IF MID$(A$,200,4)="" THEN PRINT "NOTHING"
NOTHING
And since our parser is looking for an “X” to set a bit, and anything else for 0, nothing counts as anything else and it just works.
Nice. (And I’m too embarrassed to show the overcomplex version I came up with the first time I tried to do this…)
Hexing
It is to make the program print out HEX values by using HEX$, but there is a problem… HEX$ only prints the characters it needs to. If you print HEX$(255) you will get FF. If you print HEX$(15) you will get F. We want our hex values to always be two digits, so we have to add some extra code to make sure any single digit values (0-15) have a 0 added to the start of them.
The simplest way is probably this — assuming we are just dealing with 2-digit hex values (0-255):
V=15
HX$=HEX$(V):IF LEN(HX$)<2 THEN HX$="0"+HX$
Or, since we know only values 0-15 will be one hex digit, this may be both smaller and faster:
V=15
HX$=HEX$(V):IF V<16 THEN HX$="0"+HX$
Or we could go all complicated and build a string like “00” and use MID$ to insert the new string, either one or two characters long.
V=15:V$=HEX$(V)
HX$="00":MID$(HX$,LEN(HX$)-LEN(V$)+1)=V$
That one is cool because you can make HX$=”00″ for two digits, or “0000” for four digits. While the first two are smaller (and probably faster), they are hard-coded for 2 digit hex values.
Which is all we are using here, so I’ll just go with one of those.
Make the computer do the work…
We could now just output all the hex values and put them in DATA statements. Perhaps we copy them down from the screen, or maybe we have the program create a tape or disk text file and write them to it. We could even make them write out as if they were an ASCII program that could be loaded back in to BASIC.
That sounds fun, so we’ll do that.
Here is a simple program that will create a text file on tape (or disk) and write out a few lines of BASIC. You can then load this file in using LOAD or CLOAD and it will load as if it were a program saved in ASCII format.
10 OPEN "O",#-1,"DATA.BAS"
20 PRINT #-1,"1000 DATA 1,2,3"
30 CLOSE #-1
You can change the device from #-1 (cassette) to #1 for disk.
LINE LENGTH WARNING: Lines loaded in this was have a limit of no more than 250 characters. That’s all the room the BASIC input buffer has. If you have a line longer than that, the end of it will be cropped off. Here is the longest line you could load this way (100 1’s, 100 2’s, then 32 dashes, and some numbers so I could count how far it went easily on the screen).
1DATA11111111111111111111111111111111111111111111111111111111111111111111111111111111111111111111111111112222222222222222222222222222222222222222222222222222222222222222222222222222222222222222222222222222--------------------------------1234567890AB
A space after the line number can always be left out of ASCII BASIC program files, and BASIC shows a space there when you LIST it anyway. But if you want a cleaner look with a space between “DATA” and your data, just remember 250 is the limit.
With this in mind, we should be able to generate a string that starts with “1DATA” then packs as many 2 character HEX values as will fit up to 250.
Tangent about line lengths…
Something interesting… If you try typing in BASIC, you will see it stops you after 249 characters (7 full lines plus 25 more characters). I don’t know why they are different.
Also, if you type a long line like this, and press ENTER, the line gets tokenized and takes up less space (assuming it has any BASIC keywords in it like “DATA”). You may then be able to EDIT the line, ‘X’ to the end and type more characters. This is referred to as “packing” the line. However, if you do this EDIT trick, and type until it stops you again, the final character gets dropped. I’m betting that has something to do with the 250 versus 249 difference somewhere in the ROM. I’ll have to look in to that some day.
Also also, you can start the lines out as one digit line numbers, like 1, 2, 3, etc. That gives you more room than if you used line “1000”. Then, you can rename it later, and the tokenized line will still have your full data. Line numbers are represented by 2-bytes once the program is tokenized so it doesn’t matter if it’s line 1 or line 60000 it takes up the same amount of space.
But I digress…
In the next installment, I’ll come up with some kind of program that makes the program so we don’t have to.
Until then…