Category Archives: Color BASIC

Benchmarking the CoCo keyboard – part 2

See also: part 1, part 2, part 3, part 4, part 5, part 6, part 7 and more (coming “soon”).

Previously, a code snippet shared by Jim McClellan on Facebook motivated me to benchmark various methods of reading the CoCo keyboard in BASIC:

10 KBD=PEEK(135) AND PEEK(65282)
20 PRINT KBD
30 GOTO 10

Unfortunately, as I started my stream of consciousness article, I discovered that this sample code did not work on the Xroar emulator I was using. I recalled there had been some differences to Color BASIC’s keyboard scanning code in later versions, and thought this might be why.

Indeed, the knowledgeable Lost Wizard William Astle chimed in via comments:

I think it would only work on Color Basic 1.2 or 1.3. The reason for that is Color Basic 1.2 introduced an optimization where it only does the full matrix scan if no keys (or joystick buttons!) are pressed. It does this by writing a 0 to FF02 to “strobe” all columns. That means there will be at least one 0 bit in FF00 representing a key pressed if anything is down at all. If it detects nothing, it just exits, leaving the column strobe set to 0.

Prior to Color Basic 1.2, the matrix scan was always run. In that case, if no keys are down, it will have strobed all columns in sequence (by writing a zero bit to successive bits of FF02). This zero bit is shifted over by a ROL instruction so it eventually shifts off into carry and the final result in FF02 is FF. Eventually, most versions will eventually strobe no columns by writing FF to FF02 which is used to detect joystick buttons. The debounce check also puts a nonzero, non FF value in FF02 corresponding with the column where a key was detected. Depending on the Color Basic version, the final results of KEYIN and FF02 are (assuming I read the code correctly):

1.0: FF if no key jor joystick button, non-FF if key down (or debounce fails)

1.1: FF if no key or joystick button, non-FF if key down (or debounce fails)

1.2: 0 if no key or joystick button, FF if key or joystick button, not 0 or FF if debounce fails

1.3: same as 1.2; no modifications to KEYIN

Coco3: always FF (the check for a key optimization is removed) except when debounce fails

Basically, this trick only works on Color Basic 1.2 and 1.3. And even then, it isn’t actually reliable since you won’t get FF if debounce fails. Instead, you’ll potentially get a value with a single zero bit which will corrupt your key code. The odds of the timing being just right for that to happen are really small. However, it is possible.

So my considered opinion based on the variances between ROM versions is that this trick must not be used.

As a side note: aside from the system initialization code, KEYIN has the most significant changes between Color Basic versions.

William Astle

With this note, I now have to change my original plan for this article. I was going to see how much faster this code would be with normal tricks (HEX versus decimal constants, variables instead of constants, etc.) to see which approach would make any game using this code faster.

But since this sample only works with specific versions of Color BASIC, I now need to come up with a more portable non-portable way to do this. This sent me back to some other Facebook posts from Ben Jimenez and Jim Gerrie back in April 2020:

10 CLS
20 POKE 341,255:POKE 342,255:POKE 343,255:POKE 344,255
30 I$=INKEY$:IF I$="" THEN GOTO 20
40 PRINT ASC(I$)
50 GOTO 20

When I run this under Xroar using Color BASIC 1.1, I see that it will print a repeating series of numbers as I hold down each arrow key. I also notice that it repeats for some other keyboard presses, but not all.

But why? A new mystery!

I suspect this is because those POKEs must have something to do with the row or column the four arrow keys are in the keyboard matrix:

      1     2     3     4     5     6     7     8
      |     |     |     |     |     |     |     |
1 --- @ --- A --- B --- C --- D --- E --- F --- G 
      |     |     |     |     |     |     |     | 
2 --- H --- I --- J --- K --- L --- M --- N --- O 
      |     |     |     |     |     |     |     | 
3 --- P --- Q --- R --- S --- T --- U --- V --- W 
      |     |     |     |     |     |     |     | 
4 --- X --- Y --- Z -- UP -- DWN - LFT - RGT - SPACE 
      |     |     |     |     |     |     |     | 
5 --- 0 -- 1! -- 2" -- 3# -- 4$ -- 5% -- 6& -- 7' 
      |     |     |     |     |     |     |     | 
6 -- 8( -- 9) -- :* -- ;+ -- ,< -- -= -- .> -- /? 
      |     |     |     |     |     |     |     | 
7 -- ENT - CLR - BRK - ALT - CTL - F1 -- F2 - SHIFT 

All four arrow keys are in row 4, and they repeat. I am betting that the other keys that repeat are the ones in the same columns UP, DOWN, LEFT and RIGHT are in (col 4-7). A quick test shows that @, A and B to not repeat (they use columns 1, 2 and 3), but C, D E and F do (columns 4-7) and G does not (column 8).

Mystery solved.

Whatever those POKEs are doing, they are resetting something involving columns 4, 5, 6 and 7. This sends me back into the Color BASIC Unraveled disassembly to see what memory locations 341 (&H155) to 344 (&H158) are:

0152  KEYBUF  RMB  8  KEYBOARD MEMORY BUFFER

Eight bytes, and we are setting four of them to 255 (all bits set to 1). No help so far. I start making notes:

KEYBUF - Keyboard memory buffer:

338 &H152
339 &H153
340 &H154
341 &H155 - POKEd to 255 (&HFF)
342 &H156 - POKEd to 255 (&HFF)
343 &H157 - POKEd to 255 (&HFF)
344 &H158 - POKEd to 255 (&HFF)
345 &H159

Next, I search the code to see where this KEYBUF is being used, and then things get confusing. The disassembly has multiple code listings that reference this — different code for different versions of the ROM. Great.

KEYIN konfusion

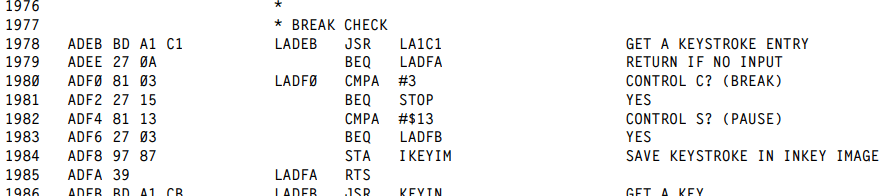
As William Astle referenced, this buffer is used by the KEYIN routine and there are multiple implementations. The code is described as:

KEYIN
SCAN THE KEYBOARD FOR A KEY DEPRESSION - Return zero
flag = 1 if no new key down. Return the ASCII value
of the key in ACCA if a new key is depressed.

Ah, this looks familiar. As soon as I read this, I remembered something from learning CoCo 6809 programming using the EDTASM cartridge.

POLCAT ROM routine digression

Microsoft, thinking ahead to potential changes in the ROM code, set aside a few “documented ROM calls” that assembly language programmers could use. If you wrote an assembly program for Color BASIC 1.0 and wanted to use the KEYIN routine in ROM by jumping directly to its address in the ROM, that program would not work in later Color BASIC 1.2 versions that had KEYIN at a different address.

Instead, Microsoft placed a few hooks in ROM starting at location &HA000. Each entry was the address of a routine elsewhere in the ROM. By using a “jump by reference” assembly instruction, you could end up at wherever those addresses point. POLCAT was the entry for getting a keystroke, and it points to KEYIN:

0002 A000 A1 CB  POLCAT  FDB  KEYIN   GET A KEYSTROKE
0003 A002 A2 82  CHROUT  FDB  PUTCHR  OUTPUT A CHARACTER
0004 A004 A7 7C  CSRDON  FDB  CASON   TURN ON CASSETTE MOTOR, START READING
0005 A006 A7 0B  BLKIN   FDB  GETBLK  READ A BLOCK FROM CASSETTE
0006 A008 A7 F4  BLKOUT  FDB  SNDBLK  WRITE A BLOCK TO CASSETTE
0007 A00A A9 DE  JOYIN   FDB  GETJOY  READ JOYSTICKS
0008 A00C A7 D8  WRTLDR  FDB  WRLDR   TURN ON MOTOR AND WRITE $55’S TO CASSETTE

That was the official documented way to see if a key was pressed. The implementation of what POLCAT points to changes between ROM versions, so while this compatible call would return a key, the way that it obtained that key changed.

Here’s a short assembly program using POLCAT (KEYIN).

Using the Color BASIC POLCAT ROM routine.

When I assemble that in EDTASM (“A/IM/WE/AO”) and execute from ZBUG (“Z”, “G START”), I can start pressing keys and see them POKEd to the top left corner of the screen, and moving forward as I press different keys. Holding down a key does not repeat. Thus, the KEYIN routine does not support keyboard repeat.

But I digress.

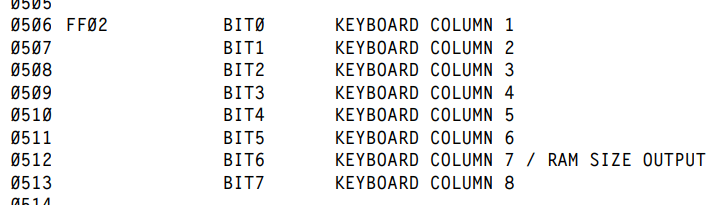
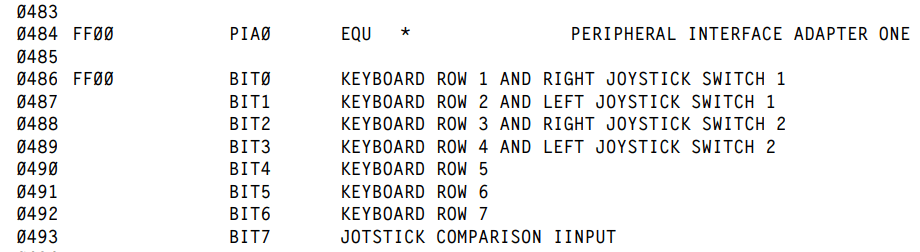
When Jim’s original code PEEKs two values from memory location 135 (last key pressed) and 65282 (&HFF02, the PIA chip that reads the eight keyboard columns of the keyboard matrix), it apparently relying on code in the Color BASIC ROM that is resetting things so it always updates. In the 1.1 ROM I am using, the ROM code is different so that method does not work.

However, the second bit of code (from either Jim or Ben) using the four POKEs and INKEY$ does appear to work on 1.1 as well as 1.2.

Dam this stream of consciousness!

Sorry to disappoint, but I’ll let someone else write an article explaining the differences in KEYIN. I can already see this is over my head without spending substantial time diffing through the various ROM versions…

At this point, I see WHAT works, but cannot explain WHY. In the next installment, I’ll move beyond the WHY and get back to the original goal of trying to make the WHAT work as fast as possible.

To be continued…

Benchmarking the CoCo keyboard – part 1

See also: part 1, part 2, part 3, part 4, part 5, part 6, part 7 and more (coming “soon”).

Updates:

  • 2020-12-13 – Fixed a typo in the last BASIC example. Thanks, Johann K.
  • 2020-12-14 – Fixed a typo in a PEEK command. My bad.

Over in the Facebook CoCo group, Jim McClellan posted a tidbit about reading the CoCo keyboard in BASIC:

I self answered a question I had and figured maybe this might be helpful info for other BASIC peeps. The location for whether a key is beng pressed is 65282. It’s either 255 (yes) or 0 (no) By peeking location 135 (135 retains the ASCII value of the key pressed even after releasing the key) and ANDing 65282, you can get a smooth, repeating key.

10 KBD=PEEK(135) AND PEEK(65282)
20 PRINT KBD
30 GOTO 10

Jim McClellan

Using standard BASIC commands, we have INKEY$ available to detect a keypress:

10 A$=INKEY$:IF A$="" THEN 10
20 PRINT "YOU PRESSED ";A$

This works great, and I have mentioned it in earlier articles on this site including one showing a way to use it without the variable by using it as a parameter of INSTR inside an ON GOTO.

But I digress.

INKEY$ only gets you the first press. It will not detect if the key is being held down. This limits its usefulness to one-key selections (without needing to press ENTER) and perhaps turn-by-turn games where you have to press a directional arrow over and over to move from position to position.

Most games want to move as long as you are holding down the arrow key, and Jim was sharing a way to do that easily by using PEEK.

What the PEEK is going on?

I wanted to understand what these PEEKs are doing, so I consulted the Color BASIC Unravelled book:

0146   0087   IKEYIM   RMB   1   *TV INKEY$ RAM IMAGE

Memory location 135 (&H87 hex) contains the last key handled by INKEY$. Except, that must not be technically correct because it works without calling INKEY$. Looking further into the disassembly, I see that it is actually where the BREAK CHECK stores the key it found:

It checks for BREAK and also the PAUSE key (SHIFT+@ on the CoCo keyboard, which now I see returns as &H13 from the “GET A KEYSTROKE ENTRY” routine). Thus, while INKEY$ uses this location…

…it is not involved with setting that location. (Note to self: Explore what KEYIN does.)

Doing a PEEK(135) will return whatever the last pressed key was, as detected by the looping BREAK check code. By itself, you could use this for a game where the player never stops moving, or only stops when you press a “stop moving” key.

GAME: Never Stop Moving using PEEK

0 REM nsm.bas
10 CLS0
20 PRINT STRING$(32,153);
30 FOR A=0 TO 12
40 PRINT CHR$(153);STRING$(30,32);CHR$(153);
50 SOUND 200-A*2,1:NEXT
60 PRINT STRING$(32,153);
70 L=1024+8*32+16:SC=0
80 POKE L,255:SOUND1,1
90 K=PEEK(135)
100 IF K=94 THEN M=-32
110 IF K=10 THEN M=32
120 IF K=8 THEN M=-1
130 IF K=9 THEN M=1
140 POKE L,96:IF PEEK(L+M)=96 THEN L=L+M ELSE 200
150 PRINT @480,SC;:IF K<>0 THEN SC=SC+1
160 GOTO 80
200 SOUND 1,5
210 PRINT @32*7+11,"GAME OVER!";
999 GOTO 999

In this pointless game (though I’ve seen worse for smartphones), you begin moving a red block around the screen using the arrow keys. Once you start moving, it will never stop unless you crash into a wall, ending the game. How high of a score can you make?

GAME: Never Stop Moving using INKEY$

It would have been easier (and more portable) to do this without PEEK and use INKEY$. All we would have needed was a check for no key being pressed, and then continue using the last direction used. Something like this would work:

0 REM nsm2.bas
10 CLS0
20 PRINT STRING$(32,153);
30 FOR A=0 TO 12
40 PRINT CHR$(153);STRING$(30,32);CHR$(153);
50 SOUND 200-A*2,1:NEXT
60 PRINT STRING$(32,153);
70 L=1024+8*32+16:SC=0
80 POKE L,255:SOUND1,1
90 K$=INKEY$:IF K$<>"" THEN K=ASC(K$)
100 IF K=94 THEN M=-32
110 IF K=10 THEN M=32
120 IF K=8 THEN M=-1
130 IF K=9 THEN M=1
140 POKE L,96:IF PEEK(L+M)=96 THEN L=L+M ELSE 200
150 PRINT @480,SC;:IF K<>0 THEN SC=SC+1
160 GOTO 80
200 SOUND 1,5
210 PRINT @32*7+11,"GAME OVER!";
999 GOTO 999

By avoiding CoCo-specific PEEKs, this version may run on an MC-10 or Dragon.

But, using PEEK may be faster since it has less BASIC to churn through than an INKEY$, IF and ASC() conversion. (Note to self: Benchmark PEEK versus INKEY$, assuming I haven’t already done that in an earlier article.)

But what if you wanted the player to move ONLY when the key is being pressed down? INKEY$ cannot do that, and neither can PEEK(135). That’s where the second memory location come in to play:

Decoding the (keyboard) Matrix

The Unraveled book shows that memory location 65282 (&HFF02) is part of a PIA that is hooked to the keyboard column matrix. BASIC uses this to determine which key is being held down:

Two bytes earlier is a similar value for the keyboard rows:

These bits are set or clear based on what key in the keyboard matrix is being held down.

                Color Computer Keyboard Array 
    Pin 1 --- @ --- A --- B --- C --- D --- E --- F --- G 
              |     |     |     |     |     |     |     | 
    Pin 2 --- H --- I --- J --- K --- L --- M --- N --- O 
              |     |     |     |     |     |     |     | 
    Pin 3 nc  |     |     |     |     |     |     |     | 
              |     |     |     |     |     |     |     | 
    Pin 4 --- P --- Q --- R --- S --- T --- U --- V --- W 
              |     |     |     |     |     |     |     | 
    Pin 5 --- X --- Y --- Z -- UP -- DWN - LFT - RGT - SPACE 
              |     |     |     |     |     |     |     | 
    Pin 6 --- 0 -- 1! -- 2" -- 3# -- 4$ -- 5% -- 6& -- 7' 
              |     |     |     |     |     |     |     | 
    Pin 7 -- 8( -- 9) -- :* -- ;+ -- ,< -- -= -- .> -- /? 
              |     |     |     |     |     |     |     | 
    Pin 8 -- ENT - CLR - BRK - ALT - CTL - F1 -- F2 - SHIFT 
              |     |     |     |     |     |     |     | 
    Pin 9 -----     |     |     |     |     |     |     | 
                    |     |     |     |     |     |     | 
    Pin 10 ----------     |     |     |     |     |     | 
                          |     |     |     |     |     | 
    Pin 11 ----------------     |     |     |     |     | 
                                |     |     |     |     | 
    Pin 12 ----------------------     |     |     |     | 
                                      |     |     |     | 
    Pin 13 ----------------------------     |     |     | 
                                            |     |     | 
    Pin 14 ----------------------------------     |     | 
                                                  |     | 
    Pin 15 ----------------------------------------     | 
                                                        | 
    Pin 16 ---------------------------------------------- 

But, from my testing, just PEEKing these I/O values does not work, at least not on Color BASIC 1.1. (Keyboard scanning changed a bit in later version of the Color BASIC ROMs.) I am unfamiliar with using the PIA so there may be some other things that have to be done to set it up before you can read it. Still, just PEEKing doesn’t do it for me.

10 PRINT PEEK(65282):GOTO 10

I get 255s over and over, though sometimes it looks like it might be blipping to a different value. To catch the changes, I tried this:

10 P=PEEK(65282)
20 IF P<>LP THEN PRINT P:LP=P
30 GOTO 10

Jim says it is 0 if nothing is pressed, or 255 if any key is being held down. From looking at the matrix, even if this did work, it seems like it would only be 0 if nothing was held down in any column, and 255 if a key was held down in each column. Can this be correct?

So I ask the audience: Why does this work for Jim, but not in the Xroar emulator I am using?

Comments are apprecaited!

To be continued…

Color BASIC “DATA” quirk.

I was in the middle of writing more on my CoCo Base-64 encoding series and stumbled upon some weirdness with the DATA command. Consider this silly program:

0 REM baddata.bas
10 READ A$:IF A$="" THEN END
15 PRINT A$;:GOTO 10
20 DATA ":"
30 DATA HELLO
40 DATA ""

This will print:

:HELLO

I know I could just have done DATA “:HELLO” but stay with me on this..

If you try to combine lines like this:

0 REM baddata.bas
10 READ A$:IF A$="" THEN END
15 PRINT A$;:GOTO 10
20 DATA ":":DATA HELLO
40 DATA ""

…you get this:

Color BASIC DATA quirk.

When I get a moment, I’ll have to look at the ROM disassembly and see what is going on.

Until then…

Compressing BASIC DATA with Base-64 – part 3

See also: part 1, part 2, part 3 and part 4.

A Faster Base-64

I had planned to end this series with this third part, giving a simple way to turn 8-bit value DATA statements into Base-64 DATA statements. But smarter folks than I have looked at my previous work, so now my plans have changed. We will need an extra part or two… or three.

Today, let’s highlight some comments made to previous installments.

The always thought-provoking MiaM wrote:

I would had written out the 2 exponent values directly as 4, 16 and 64 rather than using INT(2^2).

The decdode-4-“chars”-to-3-bytes parts could use a modified base 64 thingy where you have the first 6 bits of three bytes in a row, and the fourth “char” contains the upper two bits for the previous three “chars”/bytes. Or the other way around, start with the “char” that contains the upper two bits for the following three chars and put that in a numerical variable. Then have a loop that runs three times. Each time first shift the “upper two bits” variable two steps left, i.e. multiply by 4, and then read a “char” and to that char OR the result of the “upper two bit” variable ANDed with 192 (=%110000).

That format would be incompatible with the standardized representation used by BASE 64, but it would indeed be a format with the same density and using the same characters.

Btw you could use the “BASE 90” as a way to slightly compress some data, by just having the values >63 represent two instances of the actual value minus 64. That might not save much, but perhaps worth investigating.

MiaM

Very good point! Eliminating “power of two” calculations and changing them to hard coded values should offer a noticeable speed increase. Pre-calculating values (i.e. writing 4 instead of 2^2) is a good way to save some time, and possibly space too (since “2^2” takes up more memory than “4”).

Normally I would go on a Benchmarking BASIC tangent, but I will save that for later.

I was more intrigued by the concept of making an easier to parse Base-64 format. Since the original goal of this article was to cram as much type-able DATA numbers as possible in to a BASIC program, there is nothing that says it needs to follow the standard Base-64 encoding format. Any format that gets more bits of data in to type-able DATA values would suffice.

This opens up an opportunity to tweak the encode/decode method to be easier to do in BASIC. Mia suggests something like this:

Instead of the standard Base-64 encoding of three 8-bit values into four 6-bit values:

+- Byte 1 --+- Byte 2 --+- Byte 3 --+
| 000000|00 | 0000|0000 | 00|000000 |
| \__A__/\___B___/ \___C___/ \_D__/

We could alter the encoding into a different version:

+- Byte 1 --+- Byte 2 --+- Byte 3 --+
| 00|000000 | 00|000000 | 00|000000 |
| \| \_A__/   \| \_B__/ | |/ \_C__/ |
|  \___________D__________/

The benefit here is that decoding this in BASIC could be done much easier and faster. Rather than all the multiplication/division needed to shift bits and then combine them into bytes, it could be as simple as this a few ANDs and divides. Here’s a rough example of converting three 8-bit (0-255) input values (A, B and C) into four 6-bit (0-63) output values (O1, O2, O3 and O4).

0 REM 6BIT.BAS
1 REM As proposed by MiaM

10 READ A,B,C
15 REM --XXXXXX of A
20 O1=(A AND &H3F)

25 REM --XXXXXX of B
30 O2=(B AND &H3F)

35 REM --XXXXXX of C
40 O3=(C AND &H3F)

45 REM XX------ of A
50 O4=(A AND &HC0)/4

55 REM XX------ of B
60 O4=O4+(B AND &HC0)/16

65 REM XX------ of C
70 O4=O4+(C AND &HC0)/64

75 PRINT "ENCODED:"
80 PRINT A;B;C,O1;O2;O3;O4

85 A=0:B=0:C=0
90 A=O1+INT(O4 AND &H30)*4
100 B=O2+INT(O4 AND &HC)*16
110 C=O3+INT(O4 AND &H3)*64

120 PRINT "DECODED:"
125 PRINT O1;O2;O3;O4,A;B;C

1000 DATA 111,222,123

Running this program displays:

Three 8-bit values converted to four 6-bit values, and back.

The three 8-bit input values (111, 222 and 123) are converted into four 6-bit output values, then those four are turned back into three 8-bit values to verify it worked.

The conversion is very simple, since the output values O1, O2 and O3 are just the right 6-bits of the input values A, B, and C, which can be obtained by using AND to mask off the top two bits:

20 O1=(A AND &H3F)
30 O2=(B AND &H3F)
40 O3=(C AND &H3F)

Optimization Note: We could save a few bytes by omitting the parenthesis and the space before the &H3F. Due to how the Color BASIC’s parser works, we need the space between the variables (A, B and C) and the keyword “AND”. That space is what tells the tokenizer we want a variable followed by the keyword AND, versus a variable that starts with “AA”:

A=255

PRINT A AND 4
4

PRINT A AND4
4

PRINT AAND4
0

Above, Color BASIC thinks the third example is a variable called “AAND4” which is truncated to just be “AA” since Color BASIC only cares about the first two characters of a variable name:

A=255
AAND4=42

PRINT AAND4
42

PRINT A AND4
4

Oh the fun bugs that must have caused me back in the day!

But I digress…

The fourth byte is built by doing the opposite AND to get only the top two bits of A, then a divided that by 4 to shift them to the right 2 bits (AA—— to —AA—-), then do the same mask to B and divide by 16 to shift them 4 bits to the right (BB—— to ——BB–) and again for C divided by 64 to shift 6 bits to the right (CC—— to ——CC) and then add them together to make the result (–AABBCC).

50 O4=(A AND &HC0)/4
60 O4=O4+(B AND &HC0)/16
70 O4=O4+(C AND &HC0)/64

I think I did a poor job explaining that. But here it is visually:

INPUT (three 8-bit values):

A: aaAAAAAA
B: bbBBBBBB
C: ccCCCCCC

OUTPUT (four 6-bit values):

O1: --AAAAAA
O2: --BBBBBB
O3: --CCCCCC
O4: --aabbcc

Maybe that helps.

Doing it this was can be done faster and with less code, I think. Some benchmarking needs to be done to see if AND is faster than addition for combining the values, and the O4 line can just be made as one thing without the intermediate line numbers and steps:

50 O4=(A AND &HC0)/4+(B AND &HC0)/16+(C AND &HC0)/64

We will want to make the decoder as small as possible, since if we save 100 bytes doing BASE-64 over HEX and the decoder takes more than 100 bytes it defeats the purpose.

Maybe we can figure out this “base 90” concept in a future article, as well.

To be continued…

Compressing BASIC DATA with Base-64 – part 1

See also: part 1, part 2, part 3 and part 4.

NOTE: This article was started a year or two ago, so some references may no longer be pertinent.

NOTE 2: It was then updated in April 2020 before finally being published in November, so some references in the updates may no longer be relevant.

There is some kind of “10 line BASIC” contest, and one of the categories allows for assembly language as long as it can be embedded in a typeable BASIC program. I previously discussed embedded assembly in BASIC in my Interfacing BASIC with Assembly series.

One of the examples I gave was a Pac-Man maze demo that used some assembly code to scroll the screen up and down. The loader looked like this:

2000 REM
2001 REM LOAD ASSEMBLY ROUTINE
2002
2010 READ A,B
2020 IF A=-1 THEN 2070
2030 FOR C = A TO B
2040 READ D:POKE C,D
2050 NEXT C
2060 GOTO 2010
2070 RETURN 'END
2080 DATA 16128,16217,189,179,237,90,39,14,90,39,28,90,39,42,90,39,55,204,255,255,32,67,142,4,32,166,132,167,136,224,48,1,140,5,255,47,244,32,47,142,5,223,166,132,167,136,32,48,31,140,4,0,44,244,32,30,142,4,1,166,132,167,31,48,1,140,5,255,47,245,32,14
2090 DATA 142,5,254,166,132,167,1,48,31,140,4,0,44,245,204,0,0,126,180,244,-1,-1

That particular bit of BASIC code was created by the LWASM assembler. It reads assembly language values from DATA statements and POKEs them into memory where they can be executed.

In another series, I discussed various ways to use DATA statements either for the fastest reading/loading or the smallest size.

Today, I’d like to revisit this subject and offer some more ways to compress data into DATA to store even more than before.

Or something like that.

Knowing our limitations

We know the BASIC input buffer is 249 characters long, so we should be able to type in a single digit line number, the keyword “DATA” and 244 more characters.

BASIC allows typing in up to 249 characters.

Above, I have a one digit line number (“0”), then four characters for the keyword (“DATA”) then seven full lines of 32 characters (32*7=224) plus 20 characters on the final line – so 1+4+224+20 is 249. Hey, it works!

Since loading a BASIC program saved in ASCII is the same as typing it in, that limit should also apply for loading a non-tokenized ASCII program. I will be using that method here to load test programs into the XRoar emulator, so I won’t be able to cheat and load a tokenized line that would have exceeded our typing limit.

If we encode our assembly code as 2-digit hex values, we should have room to type a single digit line number, the keyword “DATA”, and 122 2-digit hex values. We could enter all the hex digits from &H00 to &H79 on a line. This appears to work:

The BASIC input buffer is 249 characters, so that’s the most you can type before pressing ENTER.

As soon as we press enter, BASIC tokenizes the “DATA” keyword. It no longer takes up four bytes. This means even though we typed the full 249 characters, we could EDIT the line and perhaps type a few more characters. Typing “EDIT 0″…

Editing the longest typed line…

…then pressing “X” to extend (go to the end) of the line allows us to add two more digits:

In EDIT mode, there are now two more characters available since DATA has been tokenized.

I am guessing DATA is tokenized into a 2-byte token. However, if you add these two characters, then re-list the line:

BASIC can’t list all the characters.

…we see BASIC does not show the final character. However, if you use the READ command to read that line in to a string, and the PRINT it, you see it’s actually there:

BASIC is storing all the characters, but LIST cannot show them.

The BASIC LIST command has a limit to how much it will display, it seems, and it is one character less than it should be. Bug?

BASIC line packing

It is possible to create BASIC lines that contain much more data than you can type in. They will run fine, but cannot be fully listed. There were several BASIC “crunch” programs available, including one by Carl England that I used often, that did this trick.

However, if we want to stick to how much someone could type in, we need to limit ourselves to that 249 buffer, and not rely on doing the EDIT trick to add more to it.

If that is the case, the most amount of HEX encoded assembly language bytes you can fit on a BASIC line is 122 per single-digit line. The code to read in those lines and POKE them in to memory can easily fit into one line as well, so we could easily fit a 1098 byte assembly language program into a ten line BASIC program.

And, we could even stick a few more bytes on the end of the loader line. Using a simple test program, I figured I could get the loader plus 1167 bytes of assembly code POKEd into memory. It looked like this:

0DATA000102030405060708090A0B0C0D0E0F101112131415161718191A1B1C1D1E1F202122232425262728292A2B2C2D2E2F303132333435363738393A3B3C3D3E3F404142434445464748494A4B4C4D4E4F505152535455565758595A5B5C5D5E5F606162636465666768696A6B6C6D6E6F707172737475767778
1DATA797A7B7C7D7E7F808182838485868788898A8B8C8D8E8F909192939495969798999A9B9C9D9E9FA0A1A2A3A4A5A6A7A8A9AAABACADAEAFB0B1B2B3B4B5B6B7B8B9BABBBCBDBEBFC0C1C2C3C4C5C6C7C8C9CACBCCCDCECFD0D1D2D3D4D5D6D7D8D9DADBDCDDDEDFE0E1E2E3E4E5E6E7E8E9EAEBECEDEEEFF0F1
2DATAF2F3F4F5F6F7F8F9FAFBFCFDFEFF000102030405060708090A0B0C0D0E0F101112131415161718191A1B1C1D1E1F202122232425262728292A2B2C2D2E2F303132333435363738393A3B3C3D3E3F404142434445464748494A4B4C4D4E4F505152535455565758595A5B5C5D5E5F606162636465666768696A
3DATA6B6C6D6E6F707172737475767778797A7B7C7D7E7F808182838485868788898A8B8C8D8E8F909192939495969798999A9B9C9D9E9FA0A1A2A3A4A5A6A7A8A9AAABACADAEAFB0B1B2B3B4B5B6B7B8B9BABBBCBDBEBFC0C1C2C3C4C5C6C7C8C9CACBCCCDCECFD0D1D2D3D4D5D6D7D8D9DADBDCDDDEDFE0E1E2E3
4DATAE4E5E6E7E8E9EAEBECEDEEEFF0F1F2F3F4F5F6F7F8F9FAFBFCFDFEFF000102030405060708090A0B0C0D0E0F101112131415161718191A1B1C1D1E1F202122232425262728292A2B2C2D2E2F303132333435363738393A3B3C3D3E3F404142434445464748494A4B4C4D4E4F505152535455565758595A5B5C
5DATA5D5E5F606162636465666768696A6B6C6D6E6F707172737475767778797A7B7C7D7E7F808182838485868788898A8B8C8D8E8F909192939495969798999A9B9C9D9E9FA0A1A2A3A4A5A6A7A8A9AAABACADAEAFB0B1B2B3B4B5B6B7B8B9BABBBCBDBEBFC0C1C2C3C4C5C6C7C8C9CACBCCCDCECFD0D1D2D3D4D5
6DATAD6D7D8D9DADBDCDDDEDFE0E1E2E3E4E5E6E7E8E9EAEBECEDEEEFF0F1F2F3F4F5F6F7F8F9FAFBFCFDFEFF000102030405060708090A0B0C0D0E0F101112131415161718191A1B1C1D1E1F202122232425262728292A2B2C2D2E2F303132333435363738393A3B3C3D3E3F404142434445464748494A4B4C4D4E
7DATA4F505152535455565758595A5B5C5D5E5F606162636465666768696A6B6C6D6E6F707172737475767778797A7B7C7D7E7F808182838485868788898A8B8C8D8E8F909192939495969798999A9B9C9D9E9FA0A1A2A3A4A5A6A7A8A9AAABACADAEAFB0B1B2B3B4B5B6B7B8B9BABBBCBDBEBFC0C1C2C3C4C5C6C7
8DATAC8C9CACBCCCDCECFD0D1D2D3D4D5D6D7D8D9DADBDCDDDEDFE0E1E2E3E4E5E6E7E8E9EAEBECEDEEEFF0F1F2F3F4F5F6F7F8F9FAFBFCFDFEFF000102030405060708090A0B0C0D0E0F101112131415161718191A1B1C1D1E1F202122232425262728292A2B2C2D2E2F303132333435363738393A3B3C3D3E3F40
9 L=16128:FORA=0TO9:READA$:FORB=1TOLEN(A$)/2:POKEL,VAL(MID$(A$,B*2,2)):L=L+1:NEXT:NEXT:DATA4142434445464748494A4B4C4D4E4F505152535455565758595A5B5C5D5E5F606162636465666768696A6B6C6D6E6F707172737475767778797A7B7C7D7E7F808182838485868788898A8B8C8D8E
100 BT=0:FORA=0TO9:READA$:FORB=1TOLEN(A$)/2:PRINTMID$(A$,B*2,2);:BT=BT+1:NEXT:NEXT:PRINTBT"BYTES":END

Notice LINE 100. It is not part of the program. I can load this and type “RUN 100” to get it to dump all the data and show me what it would be POKEing into memory, as well as the final byte count. For a contest entry, it would only include lines 0-9. (Using the EXIT/eXtend trick, you could probably get another 9 or 10 bytes total, but they might consider that cheating, and maybe someone could optimize the loader code to make even more room.)

We can do better…

Over on the Facebook group, someone (who was it?) suggested using some alternative encoding to get even more data in to the DATA statement. There are existing forms of doing this with 7-bit characters, using the printable range of characters.

The wikipedia has a page showing many different implementations of binary to text encodings.

Since we need to encode things that can be typed in, this puts some limits on what we can do. Characters 0-32 are control characters, so normal printable text characters start with ASCII 32 (space) and go to ASCII 127.

See https://en.wikipedia.org/wiki/ASCII for the list.

There are some other characters in this range that we cannot type on a CoCo keyboard. Here is the printable CoCo character set:

Printable CoCo characters from ASCII 32 to ASCII 127.

We can type the inverted (lower case) letters “a” through “z”, but we have no way to type the inverted @ symbol, or the inverted left bracket, backslash, right bracket, up arrow or left arrow.

But, just because they are typeable does not mean we could use them all in a DATA statement. Quote, for instance, is okay if it’s in the middle of a string that is read…

10 READ A$:PRINT A$
20 DATA ABC"DEF

…but if the quote started up at the beginning of a string of characters, BASIC would skip it and join everything after it together until it sees another quote or an end of line:

10 READ A$:PRINT A$
20 DATA “ABCDEF

Also, comma is a problem. READ separates data using the comma UNLESS the data is quoted. This would only read the first ABC:

10 READ A$:PRINT A$
20 DATA ABC,DEF

…but this would read “ABC,DEF” as one string:

10 READ A$:PRINT A$
20 DATA “ABC,DEF”

So even though we can type about 91 characters, we can’t use all of them in a DATA statement.

Reduce the bass! (Er, base…)

It seems we could achieve a base-90 (?) format by having each line start with a quote (thus we could include a comma in the DATA), but the decoder would have to be much larger.

So instead of that, we’ll turn the base down a bit and do something a bit easier in the next installment.

Until next time…

VIC-20 knowledge lived on, without me knowing it.

I have posted a number of CoCo BASIC articles that used the example of bouncing a ball around the screen. I have a simple routine I use for this, which involves an X and Y location variable, and movement MX and MY variables that will be positive or negative for which direction the ball is moving.

To my surprise, I found nearly this exact code in the old VIC-20 manual as a bouncing ball example!

This code called it DX and DY (delta), but it’s basically the same code I’ve been using all these years. I had no idea I learned this from the VIC-20 manual back in 1982!

Classic.

CoCo text screen can be changed in BASIC?

This writing is inspired by somethingI just saw in a YouTube video by 8-Bit Show and Tell:

In this video, Robin shows off an Easter egg found in the CoCo 2’s BASIC (the same one also found in the CoCo 1 since it was the same BASIC). He was wondering if there was any way to change the screen color (and I remember seeing someone ask this in the CoCo Facebook group but did not realize it was the Show and Tell guy). Australian programmer Nick Marantes gives him a “POKE 359,0:SCREEN 0,1” command to change the screen color… SCREEN can change the screen color? Surely I must have known this back then, but I had completely forgotten.

Thus, this article.

Nuclear Green CoCo Screen

The “nuclear green” screen of the Radio Shack TRS-80 Color Computer is certainly iconic. Black text on a green 32 column screen.

Disk Extended Color BASIC on the CoCo.

The Motorola MC6487 VDG chip contained a number of graphics modes, but only one text mode: 32×16 characters. The semigraphics modes supported up to 8 colors on the screen at the time, but text mode was limited to two colors: black on green. Well, except it was really a dark green on a light green. Here’s a zoomed in look, showing what color the text is compared to the black border:

CoCo “dark green” text on a nuclear green background with a black border.

I guess I sorta remembered this, because there was a way to invert the video to get light text on a dark background, and that background clearly wasn’t black:

Inverted text. Easy to do with a menu setting in the Xroar emulator.

I remember reading an article (probably in Rainbow Magazine) that showed how you could remove the VDG chip, pull up a pin, then plug it back in to the socket and get inverted video. I did that on my CoCo 1 since I thought that looked alot better (but not as good as if it was white on black like an Apple II or TRS-80 Model III).

The Xroar emulator has a menu option to toggle this inverted video.

But there was also a weird “pink” mode that I saw used in some early CoCo games. I recall reading a POKE or something that let you toggle it. You can also do that with the SCREEN command in Extended Color BASIC.

From the manual (page 96):

SCREEN type, color set displays the current graphics or text screen
type is 0 (text screen) or 1 (graphics screen)
color set is 0 or 1
Note: If type or color set is any positive number greater than 1, your computer uses 1.

Although not explained in the manual, you could select two color sets for the text mode. 0 was the normal dark green on nuclear green. 1 is the weird pink mode. But, when BASIC returns to the OK prompt, it resets the mode to 0, so you can’t use this to type things in (without a special POKE to bypass this reset). But, you can enter it in a program and then loop using a GOTO:

Alternate color set for text mode!

As soon as you hit BREAK and return to BASIC, the color resets to the green mode. The inverted mode looks like:

Inverted text color 1.

I don’t recall ever using this mode, though I do recall at least trying it out with the POKE.

I do not know how to invert the video in software, but I expect there is a POKE to do that.

Anyway, there you go… alternate color sets for CoCo BASIC that you can access from BASIC using the SCREEN command.

Bit shifting in BASIC

VIC-20 character blocks, bit shifted.

Recently, I had the urge to be lazy and have the computer do my work for me. I was designing some 8×8 graphics characters for the Commodore VIC-20 and wanted one for each offset position in a 2-character block (see image to the right).

Using modern tools like the Windows-based CBM prg Studio I could have easily edited each one by hand to get the desired result (which is what I did to create that image), but I thought it might be more fun to just design one character and write a program to create the other shifted frames.

I have bit shifted in C programming many times (because it has a bit shift operator) but I don’t recall ever knowingly doing it in BASIC.

Bit shifting basics

Bit shifting is where you take all the bits in a byte (or word, or long, whatever) and move them left or right. Here is an example of shifting the byte value 00111100 to the right:

Before: [ 0 0 1 1 1 1 0 0 ]
After : [ 0 0 0 1 1 1 1 0 ]

If you just want to shift and don’t care about the bit that “falls off the edge,” it is as simple as multiplying or dividing the value by 2.

To demonstrate this, we first need a program that will display a byte as bits.

0 REM bitsslow.bas
10 Z=&H00:GOSUB 500
20 Z=&HF0:GOSUB 500
30 Z=&H0F:GOSUB 500
40 Z=&HFF:GOSUB 500
50 END

500 REM PRINT BITS
510 FOR ZB=7 TO 0 STEP -1
520 IF Z AND 2^ZB THEN PRINT"1"; ELSE PRINT "0";
530 NEXT
540 PRINT:RETURN

The routine at line 500 will print the value in variable Z as bits. It is hard coded to only work with a byte (0-255). When I run that, this is what it displays:

00000000
11110000
00001111
11111111

Those lines correspond to &H00, &HF0, &H0F and &FF. I show them in hex so the bit pattern is easier to see (0=0000, F=1111).

A bit faster…

My bit printing routine is so slow that you can see it print the digits one at a time. This is due to the math that goes on in line 520 for each bit check. To speed things up, we could pre-calculate an array of those powers of two (1, 2, 4, 8, 16, 32, 64, 128) and use that instead:

0 REM bitsfast.bas

5 GOSUB 1000

10 Z=&H00:GOSUB 500
20 Z=&HF0:GOSUB 500
30 Z=&H0F:GOSUB 500
40 Z=&HFF:GOSUB 500
50 END

500 REM PRINT BITS
510 FOR ZB=7 TO 0 STEP -1
520 IF Z AND ZB(ZB) THEN PRINT"1"; ELSE PRINT "0";
530 NEXT
540 PRINT:RETURN

1000 REM INIT BIT ARRAY
1010 FOR ZB=0 TO 7
1020 ZB(ZB)=2^ZB
1030 NEXT
1040 RETURN

Line 5 will GOSUB to our initialization routine which sets up the power-of-two array ZB(). After that, the routine at 500 can be called as it previously was, except now it will print so fast you can’t really see it printing.

Now let’s use this routine to demonstrate bit shifting by multiplying or dividing by 2.

Bit shifting left

0 REM bitshftl.bas
5 GOSUB 1000
10 Z=1 '00000001
20 FOR A=1 TO 8
30 GOSUB 500
35 REM *2 TO SHIFT LEFT
40 Z=Z*2:NEXT
50 END
500 REM PRINT BITS
510 FOR ZB=7 TO 0 STEP -1
520 IF Z AND ZB(ZB) THEN PRINT"1"; ELSE PRINT "0";
530 NEXT
540 PRINT:RETURN
1000 REM INIT BIT ARRAY
1010 FOR ZB=0 TO 7
1020 ZB(ZB)=2^ZB
1030 NEXT
1040 RETURN

In line 10, Z starts out with 1, which is the bit pattern of 00000001. It is then multiplied by 2 in a loop eight times, each time shifting the bit one place to the left. The output looks like this:

00000001
00000010
00000100
00001000
00010000
00100000
01000000
10000000

Bit shifting right

And if we start out with Z being 128 (bit pattern 10000000) and divide by 2, it will shift right:

0 REM bitshftr.bas
5 GOSUB 1000
10 Z=128 '10000000
20 FOR A=1 TO 8
30 GOSUB 500
35 REM /2 TO SHIFT RIGHT
40 Z=Z/2:NEXT
50 END
500 REM PRINT BITS
510 FOR ZB=7 TO 0 STEP -1
520 IF Z AND ZB(ZB) THEN PRINT"1"; ELSE PRINT "0";
530 NEXT
540 PRINT:RETURN
1000 REM INIT BIT ARRAY
1010 FOR ZB=0 TO 7
1020 ZB(ZB)=2^ZB
1030 NEXT
1040 RETURN

This will display:

10000000
01000000
00100000
00010000
00001000
00000100
00000010
00000001

Pretty simple. And if that were all I wanted to do, I’d be done.

But that was not all I wanted to do, so I am not done.

I wanted to shift bits right in one byte and have the bits that shift out end up shifting in to a second byte, like this:

    1st Byte  2nd Byte
1) [00001111][00000000]
2) [00000111][10000000]
3) [00000011][11000000]
4) [00000011][11100000]
5) [00000001][11110000]
6) [00000000][11111000]
...etc...

I spent far too much time coming up with an approach that would get me which bits were going to be shifted off to the right (using AND), and then placing those in a new variable and then shifting those bits to the left to line up where they would have ended up if I had just shifted a 16-bit value…

…then I realized that was silly, because I could just use a 16-bit value in BASIC!

16-bits in BASIC

You may have seen things like this which print out memory locations BASIC is using:

PRINT PEEK(25)*256+PEEK(26)

In Color BASIC, memory locations 25 and 26 contain the 16-bit address for where BASIC memory starts. Since PEEK only works on a single byte, it takes two PEEKs to get the two bytes that make up the 16-byte address, and some math to turn the two 8-bit values into one 16-bit value.

On my virtual CoCo in the Xroar emulator, memory location 25 contains 38 (&H26) and memory location 26 contains 1 (&h01). To turn those two 8-bit values into a 16-bit address, I need to somehow shift the 38/&H28 left eight times into a new 16-bit value, and then add (or OR) in the 1/&H01 value.

In C, one of the ways we’d do this is by using the bit shift operator:

uint16_t Result;
uint8_2  Byte1;
uint8_2  Byte2;
Byte1 = Peek(25); // Made up function to get a memory value.
Byte2 = Peek(26);
Result = (Byte1 << 8) | Byte2; // Shift Byte1 left 8 bits,
                               // OR in Byte2.
// Or...
Result = (Byte1 << 8) + Byte2; // Since the right 8 bits are empty,
                               // adding would have the same result.

…but there are many other ways to do the same thing, some much faster than these two approaches.

Back to BASIC

Shifting left can be done by multiplying the value by 2. To shift once, you might have:

V = V * 2

To shift twice, you could do:

V = V * 2 * 2

…but that looks silly. You’d just multiply by 4. And to bit shift three places (2 * 2 * 2) you could multiply by 8. See the pattern? They are all powers of 2 (2, 4, 8, 16, 32, 64, 128, 256, etc.)

So to shift 8 places left, you multiply by 256. Thus, the C example I gave earlier is represented in BASIC by:

10 B1=PEEK(25)
20 B2=PEEK(26)
30 R=(B1*256)+B2

Tada! When I first saw things like “X=PEEK(Y)*PEEK(Z)” back then, I did not understand why it worked, I just knew it did. And I was also confused at why the CoCo was like that, since on the VIC-20 it would have been “X=PEEK(Y)+256*PEEK(Z)”. See the differences? On the CoCo’s 6809 processor, a 16-bit value is YYZZ, but on the VIC-20’s 6502 processor it is stored the opposite as ZZYY. Thus, on my VIC, you would take the second location and multiply it by 256 then add the first location.

But I digress.

A bit more…

The previous example shows how you are effectively shifting a byte (B1) left 8 places so it ends up at the top 8-bits of a new 16-bit value. Something like that would work very well for shifting an 8-bit value into different positions of two characters (two bytes).

My approach would be this:

  • R will be the result, a value representing 16-bits (two bytes, 0-65535 in range).
  • Since I am shifting right (in this example), my first step is to get the 8-bit source value into the top 8-bits (left most bits) of the R result variable.
  • Next I will shift that entire R variable to the right, and then extract the left and right 8-bits as separate variables which is my output values.

Extract? Well, that will be the reverse of what we just did. In C, you can turn a 16-bit value into two 8-bit values like this:

uint16_t Source;
uint8_2  Byte1;
uint8_2  Byte2;
Source = 0x1234;           // Some 16-bit value.
Byte1 = (Source >> 8);     // Shift left 8-bits to the right.
Byte2 = (Source & 0x00ff); // Mask off top 8-bits.

…though there are many other (faster/better ways to do this). But, we could do this in BASIC the same way.

If shifting left is multiplying by 256, then shifting right must be dividing by 256.

10 R=&H1234
20 B1=(R/256)
30 B2=(R AND &HFF)

IMPORTANT NOTE: As I got to a later point in this article, I discovered a huge problem with this approach. If you didn’t already know it (I didn’t), I’ll explain it in just a bit… When I write, I’m usually learning as I type, and I decided to keep this stream of consciousness intact.

That is the first time I’ve ever done it that way in BASIC (duplicating the way C does it). The way I’ve commonly seen it done in BASIC is this:

10 R=&H1234
20 B1=INT(R/256)
30 B2=R-(B1*256)

Here is a simple test program:

0 REM split1.bas
10 S1=&H12
20 S2=&H34
30 R=S1*256+S2
40 PRINT HEX$(S1)" "HEX$(S2)" -> "HEX$(R)
50 D1=INT(R/256)
60 D2=R-(D1*256)
70 PRINT HEX$(R)" -> "HEX$(D1)" "HEX$(D2)
Using BASIC to split 16-bit values, or combine two 8-bit values.

Benchmark digression

Have I been doing it wrong since the 1980s? Is the C-style way (using AND) any faster than the BASIC way (using INT)? Let’s try the C-style way using my trusty benchmark program:

0 REM split2.bas
5 DIM TE,TM,B,A,TT
6 R=&H1234
10 FORA=0TO3:TIMER=0:TM=TIMER
20 FORB=0TO1000
30 IF Z=42 THEN 100
40 B1=R/256
50 B2=R AND &HFF
70 NEXT
80 TE=TIMER-TM:PRINTA,TE
90 TT=TT+TE:NEXT:PRINTTT/A:END

This shows 1143. (Of course it could be made faster using hex and removing spaces and such, but this is just for comparison with the second version.)

And now let’s try it the traditional BASIC:

0 REM split3.bas
5 DIM TE,TM,B,A,TT
6 R=&H1234
10 FORA=0TO3:TIMER=0:TM=TIMER
20 FORB=0TO1000
30 IF Z=42 THEN 100
40 B1=INT(R/256)
50 B2=R-B1*256
70 NEXT
80 TE=TIMER-TM:PRINTA,TE
90 TT=TT+TE:NEXT:PRINTTT/A:END

This version reports 1498! Well I’ll be darned… INT and a divide and a subtract and a multiply is slow than a divide and an AND. Well, once I write it out like that, I guess it makes sense.

I suppose applying some things I learned in C to BASIC is paying off.

But I digress…

Are we there yet?

So getting back to the original task, I should be able to combine 8-bit values and split 16-bit values and shift them any way I want.

First let me modify the bit printing routine to handle 16-bit values.

IMPORTANT NOTE: Here’s the bit I was talking about earlier…

I thought I could just change the 0 to 7 into 0 to 15 to cover all 16 bits, but that resulted in an ?FC ERROR (function call). A bit of testing revealed that AND only works on values from 0 to 32767 (&H7FFF). That is the maximum value of a 16-bit SIGNED integer, which uses 15-bits for the number and 1-bit for the sign (+ or -).

Yipes! So I could only easily show 15-bits, and I really want that extra bit.

Note to Self: Look into the Color BASIC Unravelled book and see why this is.

So, it looks like I’ll just have to modify my 8-bit print routine to print each byte of a 16-bit value separately. Good thing we learned how to do that earlier in this article!

16-bit bit printing

Here is how I had to modify the routine:

0 REM bits16.bas

5 GOSUB 1000

10 Z=&H0000:GOSUB 500
20 Z=&HFF00:GOSUB 500
30 Z=&H00FF:GOSUB 500
40 Z=&HFFFF:GOSUB 500
50 END

500 REM PRINT BITS
501 ZZ=INT(Z/256):GOSUB 510
502 ZZ=Z-ZZ*256:GOSUB 510
503 PRINT:RETURN
510 FOR ZB=7 TO 0 STEP -1
520 IF ZZ AND ZB(ZB) THEN PRINT"1"; ELSE PRINT "0";
530 NEXT
540 RETURN

1000 REM INIT BIT ARRAY
1010 FOR ZB=0 TO 7
1020 ZB(ZB)=2^ZB
1030 NEXT
1040 RETURN

Whew! That works, and prints the following:

0000000000000000
1111111100000000
0000000011111111
1111111111111111

Okay, so I did not discover any amazing speedup (at least if we want to use values larger than 32767), but I did get it to work.

I saved the best bit for last…

Now we can try a little test to see if we can start with an 8-bit value, shift it to the left side of a 16-bit value, the start shifting one bit at a time right, then splitting up the resulting two bytes at each step. I will use a test byte of &HFF (11111111).

0 REM shift16.bas

5 GOSUB 1000

10 Z=&HFF  '11111111
15 Z=Z*256 '1111111100000000
20 FOR A=1 TO 8
25 REM SPLIT INTO TWO BYTES
26 B1=INT(Z/256)
27 B2=Z-(B1*256)
28 PRINT HEX$(B1)TAB(3)HEX$(B2)TAB(5)" = ";
30 GOSUB 500
35 REM /2 TO SHIFT RIGHT
40 Z=Z/2:NEXT
50 END

500 REM PRINT BITS
501 ZZ=INT(Z/256):GOSUB 510
502 ZZ=Z-ZZ*256:GOSUB 510
503 PRINT:RETURN
510 FOR ZB=7 TO 0 STEP -1
520 IF ZZ AND ZB(ZB) THEN PRINT"1"; ELSE PRINT "0";
530 NEXT
540 RETURN

1000 REM INIT BIT ARRAY
1010 FOR ZB=0 TO 7
1020 ZB(ZB)=2^ZB
1030 NEXT
1040 RETURN

And it displays:

Color BASIC shifting a 16-bit value and splitting it up into two 8-bit values.

Success!

I could now incorporate that routine into my code, and take the data for one 8×8 character (like the solid circle I started this article with) and end up with 16 8×8 characters representing each position it could be within a 2×1 block of characters.

2010 DATA 60,126,255,255,255,255,126,60

In conclusion…

Wow. That was a really long way to go to show multiplying by 256 and dividing by 2, wasn’t it? But maybe there are some useful routines in these examples.

And now it’s my turn to ask you:

  • Do you know a better/faster way to print 16-bit values in binary?
  • Do you know a faster way to combine two 8-bit values into a 16-bit value, or split a 16-bit value into two 8-bit values?
  • Is there a better/faster way to to bit shifting than multiplying or dividing by powers of 2?

Let me know in the comments, and maybe there will be a part 2 on this topic.

Until next time…

Random Easter Egg

Updates:

  • 2022-12-09 – Fixed program listing.

There is an interesting hidden message embedded in the Color BASIC ROM, and here is the code that reveals it:

0 REM COLOR BASIC EASTER EGG
10 A=26493:B=66:C=13:GOSUB40
20 A=291227:B=B+2:C=C+3:GOSUB40
30 END
40 I=RND(-A):FOR I=1 TO 4:PRINT CHR$(B+RND(C));:NEXT:RETURN

If you run this code, it will display this:

“COCOFEST” easter egg in the Color BASIC ROM!

Amazing, eh? How did they possibly know back in 1980 that COCOFEST would become a thing?

But actually, it’s just a random message, and not a hidden message at all. I learned of this trick from this video by 8-Bit Show and Tell that claims to share a hidden anti-Microsoft Easter egg in Commodore 64 BASIC… and then reveals how the prank works.

A hidden anti-Microsoft Easter egg in Commodore 64 BASIC! Or not…

If you tried to run that program on other flavors of BASIC, it probably would not work. It certainly does not produce the expected results on a CoCo.

10 A=125708:GOSUB 20:A=33435700:GOSUB 20:A=17059266:GOSUB 20
20 A=RND(-A)
30 A=INT(RND(A)*22):IF A THEN PRINT CHR$(A+64);:GOTO 30
40 PRINT:RETURN

This was the first video from 8-Bit Show and Tell I ever saw, and it’s lead me down quick a rabbit hole trying things he demonstrates on the Commodore computers on our beloved CoCo. And it all started with this random video that YouTube randomly showed me.

Monkeys and Shakespeare

The infinite monkey theerem states that…

“…a monkey hitting keys at random on a typewriter keyboard for an infinite amount of time will almost surely type any given text, such as the complete works of William Shakespeare.”

Wikipedia

We are just using BASIC’s RND() random number generator to simulate a monkey at a typewriter, and using short words instead of the complete works of Shakespeare.

It’s much quicker this way.

As previously discussed, the RND function generates a series of numbers that are not random. Each time you power up a CoCo, for instance, this code will produce the same “random” numbers the first time you run it:

FOR A=1 TO 8:PRINT RND(50);:NEXT
You get these same random numbers every time you power up the CoCo.

Try it for yourself using the web-based JS Mocha CoCo emulator.

In order to change the series of numbers, you pass a negative value into the RND() function, and that series will be used. If you do X=RND(-1), you will then get the same series of random values every time. If you do X=RND(-42), you get a different set of random numbers every time.

Magic!

Or math. But math is hard, and magic is just frustrating.

The monkey simulator

But how do you find which random seed value will give you the random numbers you want in the order you want them? The original prankster used brute-force trial and error.

A program can be designed that first seeds the RND function with -1, then generates a series of random numbers and tests to see if they are what it is looking for. In the case of the C64 version, it needed to see the numbers that represented the characters of the word followed by a ZERO to terminate the string.

If it did not work, it tries a seed of -2, and so on. This could take hours or days, and there is no guarantee the exact series of numbers will be found.

I decided to write a CoCo version of this monkey typewriter simulator, but I made some changes.

  1. First, I figured looking for “W”+”O”+”R”+”D” was more work than just looking for “W”+”O”+”R”+”D” without a 0 byte at the end. That should speed up the search, but require an extra bit of data in the display program since it now needs to know how many random values to use (the length of the word).
  2. The C64 version looked from A to the highest letter used (“BILL GATES SUCKS” scans A to U, though it doesn’t really need to try to find A since the earliest letter is B.) I figured that looking for A to Z (worst case, 26 choices) would be more work than just looking at the range of letters actually used in the word. For instance, finding “ABC” in a repeating random series of 26 numbers seems less likely than finding “ABC” if you were only using 3 random numbers. I made my generator look for a range covering only the letters being used. “CAT” would need numbers from “C” to “T”. “DOG” would need “D” to “O”. “ALACAZAM” would need “A” to “Z”. This meant my display program also needed to know the starting letter value and range value, in addition to the word length.

My version is not as clean and tidy as the C64 original

Here is the program I came up with. You can type in a word and it will present the range of letters it will look for, and then start searching until it finds it (or, weeks later, it has not and you give up):

10 REM rndwords.bas
20 POKE 65495,0
30 INPUT "TARGET STRING";T$
40 TL=LEN(T$)
50 IF TL=0 THEN 30
60 REM FIND LOWEST AND HIGHEST LETTER
70 LL=255:HL=0
80 FOR P=1 TO LEN(T$)
90 V=ASC(MID$(T$,P,1))
100 IF VHL THEN HL=V
120 ?V,LL;HL
130 NEXT
140 REM CALCULATE LETTER RANGE
150 R=HL-LL+1
160 PRINT "SEARCHING FOR: ";T$
170 PRINT "LETTER RANGE :";R;"(";CHR$(LL);" - ";CHR$(HL);")"
180 REM SEARCH...
190 FL=LL-1
200 FOR SD=1 TO 9999999
210 V=RND(-SD):A$=""
220 A$=A$+CHR$(FL+RND(R))
230 IF LEN(A$)<TL THEN 220
240 IF A$=T$ THEN PRINT -SD,T$
250 NEXT
1000 V=RND(-26493):FOR I=1 TO 4:PRINT CHR$(66+RND(13));:NEXT

Some words are found almost instantly. “HI” shows up immediately:

Finding random words in the Color BASIC RND function.

The output shows the random seed to start with (-5), the word it was looking for (“HI”), the ASCII character to add to the random numbers it finds, and the range to use in the RND functions.

To display the string back, you would modify my original COCOFEST program with the proper values, or do it manually:

V=RND(-5):FOR I=1 TO 2:PRINT CHR$(71+RND(2));:NEXT:PRINT

Here are some words I have found:

REM "COCO"
V=RND(-26493):FOR I=1 TO 4:PRINT CHR$(66+RND(13));:NEXT

REM "FEST"
1001 V=RND(-291227):FOR I=1 TO 4:PRINT CHR$(68+RND(16));:NEXT

REM "SUB"
1002 V=RND(-56403):FOR I=1 TO 3:PRINT CHR$(65+RND(20));:NEXT

REM "ETHA"
1003 V=RND(-1049135):FOR I=1 TO 4:PRINT CHR$(64+RND(20));:NEXT

I tried to find “COCOFEST” together, but after days and days of running, it still hadn’t. Perhaps it would have found it if I was searching the entire A-Z range versus just C-T. It’s random-ish, after all.

Perhaps one of you will take this concept and recreate the C64 version, looking for A-Z and a zero. Maybe that works better. I did not try.

Perhaps one of you will start compiling a dictionary of random words and we can use this as a secret decoder ring for passing cryptic messages to each other on Facebook.

Perhaps this will just be a passing random thought and we will never speak of it again.

But knowing me and this site, I expect we will speak of it again. Especially if I get any good comments to this post.

Until next time…

BASIC and ELSE and GOTO and Work – part 2

See also: part 1

There is a time and ELSE for everything

After I dove into ELSE efficiency, and then dove into it a bit deeper, I realized one of the major things that slows down BASIC is having to scan to the end of the line in order to find the next line.

In part 7 of my Optimizing Color BASIC series, I noticed that a GOTO or GOSUB was much slower if there were things on the line after it:

10 GOTO 100:REM THIS GOES TO THE INPUT ROUTINE

When BASIC is searching for a line number, each line entry has a size which lets it skip ahead to the next line if the line number did not match. But, once BASIC is processing a line, it does not track that. If the parser gets one token in to a line and it has to GOTO somewhere else, it has to scan forward until it finds the end of the line, then it can start scanning line numbers and skipping lines again.

Thus, one should not put comments on the ends of lines. They have to be parsed through. It is much faster to put comments on their own lines, though that takes up a more memory since each new line number takes 5 bytes.

This is one of the reasons this…

30 IF Z=1 THEN 100 ELSE IF Z=2 THEN 200 ELSE IF Z=3 THEN 300 ELSE IF Z=4 THEN 400

…can be slower than…

30 IF Z=1 THEN 100
31 IF Z=2 THEN 200
32 IF Z=3 THEN 300
33 IF Z=4 THEN 400

In the first example, if Z=1, BASIC still has to scan through all the remaining bytes of the line until it finds the end. In the second example, BASIC gets the line number then is already at the end and can immediately start scanning.

Thus, to add to my previous ELSE discussion, we should stop doing this:

30 IF X=1 THEN X=X+1:GOTO 70

If X is NOT 1, BASIC still has to scan through the rest of the line before it can check whatever happens next. Instead, it ican be much faster to do this:

30 IF X=1 THEN 100
...
100 X=X+1:GOTO xxx

There is a caveat to this. Things in BASIC are quite predictable. This change makes it faster to get to line 100 to do the actual work (X=X+1). BUT, from line 100 it could be much slower to get back to the top if there were a bunch of lines before the target line. If it’s a GOTO near the top of the program, it’s fast. If it’s a loop around 500, and you try to GOTO 500, that could be much slower if it had to scan through all the lines from 10 to 499 to get there.

This is when organizing code locations comes in very important, but that is a discussion for another time.

But other than situations like that, this is faster way:

10 REM MAIN LOOP

20 REM GET Z OR WHATEVER
30 IF Z=1 THEN 100
31 IF Z=2 THEN 200
32 IF Z=3 THEN 300
33 IF Z=4 THEN 400

40 REM NO KEY, DO IDLE LOOP STUFF
50 GOTO 10
100 X=X+1:GOTO 10
200 X=X-1:GOTO 10
300 Y=Y+1:GOTO 10
400 Y=Y-1:GOTO 10

If Z=4, the code will get there much faster since there is less for it to scan through after each Z check.

The location of where the work is done (later in the program or back at the top) is the only thing that can make this slower (or faster). Once a program gets large enough, moving things around may help speed up certain things but will slow down other things. I guess, much like real estate, location matters.

I guess we can stop using ELSE, and stop doing work on IF lines. And that goes for things like this:

IF SC=1000 THEN LV=LV+1

At 1000 points, we get a new life! However, every time through that loop when SC is not 1000, BASIC has to skip over “THEN LV=LV+1”, wasting cycles. The savings would be huge over the life of that loop to just do:

IF SC=1000 THEN 1000

…and let 1000 handle LV=LV+1 and returning back with a GOTO. GOSUB might be better, but that might be slower for something like this since:

IF SC=1000 THEN GOSUB 1000

…has an extra token (and potentially spaces, if you use them for readability) versus:

IF SC=1000 THEN 1000

WHEN this code runs (SC=1000), it may be faster to GOSUB and RETURN than it would be to GOTO/GOTO. BUT, most of the time the main loop is running that code will not be called and parsing past the GOSUB will just be wasting time.

Until next time…