When I loaded YouTube recently, one of the suggested videos was entitled “How To Solve Google’s 25-Horses Interview Question” by MindYourDecisions. The video cover image contained the text:
“What is the best way to find the 3 fastest horses? You can race 5 horses at a time, but you do not have a watch.”
– MindYourDecisions on YouTube
I did not watch the video since I thought this might be a fun exercise in BASIC. Instead, I fired up the excellent XRoar emulator and began writing a simple program that raced horses.
I started with an array big enough to hold the speed of 25 horses:
DIM H(24)
In Color BASIC, arrays are base-0, so that represents H(0) to H(24).
Next I initialized the array with a unique speed value by simply going through the loop and assigning each horse a speed of 0 to 24:
FOR I=0 TO 24:H(I)=I:NEXT
My next step was to randomize the entries, so I looked back on an earlier article I posted about Random BASIC shuffling. I implemented the suggested from James Jones to swap values in this array:
FOR I=0 TO 24
IF I/5=INT(I/5) THEN PRINT
J=I+INT(RND(25-I)-1)
T=H(I)
H(I)=H(J)
H(J)=T
PRINT H(I);
NEXT
Now I had an array of 25 horse speeds — H(0) to H(24) — that contains a random selection of values 0 (slowest) to 24 (fastest).
If you wanted to just find the fastest horse, you could simply scan the array and remember the fastest entry you found. At the end of the scan, you know the fastest horse. Something like this:
FH=-1:FS=-1
FOR I=0 TO 24
IF H(I)>FS THEN FH=I:FS=H(I)
NEXT
PRINT "FASTEST HORSE IS";FH
…but since this question requires racing no more than five horses at a time, I had to split that up in to code that would run five races of five horses, then a sixth race that raced the winners of each of the five races.
This is not the solution to the question, but it was a fun exercise. Here is the messy program I came up with. It will first print out the speeds of all 25 horses (five per line, matching how they will be raced) and then run the five races and final race of the winners:
0 ' HORSES1.BAS
1 '
2 ' 25 horses
3 ' Race up to 5 at a time
4 ' Find the fastest horse
5 '
10 ' H(x) - horse speed
15 DIM H(24)
20 '
21 ' Initialize each speed
22 '
25 FOR I=0 TO 24:H(I)=I:NEXT
30 '
31 ' Randomize
32 '
35 FOR I=0 TO 24
40 IF I/5=INT(I/5) THEN PRINT
45 J=I+INT(RND(25-I)-1)
50 T=H(I)
55 H(I)=H(J)
60 H(J)=T
65 PRINT H(I);
70 NEXT
75 PRINT:PRINT "RACE!"
100 '
101 ' Find fastest horse
102 '
105 DIM FH(4)
110 '
111 ' Race five sets of five
112 ' FH(x) - fastest horse
113 ' FS(x) - and its speed
114 '
115 FOR R=0 TO 4
120 FH(R)=-1:FS=-1
125 PRINT R;"-";
130 FOR I=R*5 TO R*5+4
135 PRINT I;
140 IF H(I)>FS THEN FH(R)=I:FS=H(I)
145 NEXT
150 PRINT "=";FH(R)
155 NEXT
160 '
161 ' Race the five winners
162 '
165 FH=-1:FS=-1
170 PRINT " F -";
175 FOR I=0 TO 4
180 PRINT FH(I);
185 IF H(FH(I))>FS THEN FH=FH(I):FS=H(FH)
190 NEXT
195 PRINT "=";FH
200 PRINT "WINNER IS HORSE";FH
500 END
And the result (also messy) looks like this:
Color BASIC program to find the fastest of 25 horses, when racing no more than five at a time.
But this isn’t the solution we are looking for.
The question was what is the fastest way to find the fastest three horses. I found the fastest by running six races. I expect the solution is simple, but I do not know it.
I thought I’d share this here and see if anyone else wants to work on it.
It seems like only yesterday that you had a dozens of choices in what computer you could buy. Most were not compatible with the others — and we liked it that way. Software companies, however, probably didn’t. To reach the largest market, they had to write their program multiple times for different systems. My Radio Shack Color Computer, sadly, did not get many of these official ports.
Many things we take for granted today — such as sending text from one computer to another (via e-mail, text, etc.) — were not as simple back then. Not all systems used an industry standard character set, meaning the numeric code that represented a character on one system, might represent a different character on another.
The CoCo used ASCII – “American Standard Code for Information Interchange.” The defined numeric values represented the following characters in this clear and easy to understand chart:
ASCII table from https://en.wikipedia.org/wiki/ASCII
If that chart doesn’t help, you are not alone. Just know that characters 0 to 127 were all defined to represented a standard set of letters, numbers, punctuation, symbols and control codes (such as 8 being BACKSPACE, 13 being CARRIAGE RETURN, etc.).
System like the Atari 400/800 and Commodore PET/VIC-20/64/etc. included non-ASCII graphical symbols in their character set. Each of these systems came up with their own standard — PETSCII from Commodore (which originated on the Commodore PET in 1977), and ATASCII from Atari (which originated on the Atari 400/800 in 1979).
Before WWW there was BBS
One of the first things I ever did with a computer was use one with a modem to dial other computers over a land line telephone. (Kid’s, ask your parents…) Folks would run Bulletin Board System software that let others call their computer and post messages for other folks to read who called in later.
This presented a problem. If the character sets were different between computers, how could an ASCII CoCo user dial in to an Atari ATASCII system or a Commodore PETSCII system?
To solve this problem, some BBS programs on the non-ASCII computers would first ask you if you wanted ASCII or ATASCII (or PETSCII or whatever). For ASCII users, the BBS would then translate the character codes.
Not all systems did this, of course. There were plenty of Commodore-only and Atari-only systems that made use of the extended character set to draw fancy menus and screens that ASCII computers couldn’t view.
However, the modem “terminal programs” that non-ASCII systems ran usually had an ASCII translation mode built in. Thus, a Commodore or Atari user could call any ASCII BBS. While I am sure they existed, I never did see a terminal program for my ASCII CoCo that let it call an ATASCII or PETSCII-only system. (TwilightTerm by SockMaster is similar, allowing a CoCo 3 to view the IBM PC ANSI character set and colors.)
When I lived in Lufkin, Texas, one of the local BBSes was running on an Atari 800 (via BBS Express software) and allowed ASCII systems to call in. This was how I first learned about the differences in ATASCII versus ASCII.
Here is what ASCII characters 32-127 looked like on the CoCo 1 and 2 (characters 0-31 are control codes and such):
Radio Shack Color Computer 32-column text screen ASCII.
And here is the same set of characters on a CoCo 3 40-column screen with row and column numbers (since I had more screen room):
Tandy Color Computer 3 40-column text screen ASCII.
From wikipedia, here is what ATASCII looks like:
ATASCII from https://en.wikipedia.org/wiki/ATASCII
I think this table is much easier to read that the ASCII one, as long as you know hexadecimal.
Starting at character 32 (0x20) is a space, followed by special characters and the alphabet. Although there are some symbol differences (like the ^ on CoCo being a diamond on the Atari), the main letters, numbers and symbols are the same.
But, if I were to write up a text file and send it to the Atari BBS so they could post it, it would not work. ASCII uses 13 (CR, carriage return) as a line ending, but ATASCII uses 155 (ATASCII CR). If I translated line endings, and avoided using things like ^, brackets (or curly braces), etc., I could then have a text file the Atari BBS could use.
The amazing ASCII to ATASCII Convert program!
So I wrote a simple ASCII to ATASCII converter:
0 REM ASCII TO ATASCII CONVERT
1 REM BY ALLEN HUFFMAN
2 REM (09/02/87)
3 REM
5 CLEAR1000
10 CLS:PRINT@3,"ASCII TO ATASCII CONVERTER":PRINT@40,"BY ALLEN HUFFMAN":PRINTSTRING$(32,131)
15 PRINT@96,"ASCII FILE TO CONVERT:":LINEINPUT">";F1$:IFF1A$=""THEN15
20 PRINT@192,"NAME OF NEW FILE:":LINEINPUT">";F2$:IFF2$=""THEN15
25 PRINT@289,"CONVERTING ASCII TO ATASCII...":OPEN"I",#1,F1$:OPEN"O",#2,F2$
30 LINEINPUT#1,A$:PRINT@320,A$:PRINT#2,A$+CHR$(155);:IFEOF(1)=0THEN30
35 PRINT#2,CHR$(26);:UNLOAD
40 PRINT@422,"CONVERSION COMPLETE!":END
In line 15, it asks for an INPUT filename (F1$).
In line 20, it asks for an OUTPUT file name (F2$).
In line 25, it opens the first file as input (“I”) and the second file for output (“O”).
In line 30, it loops reading a raw line from the first file, displaying it on the screen (so the user can see what is going on), then writes the text out to the output file with a CHR$(155) at the end and NO ASCII carriage return (by using the semicolon). If end-of-file is not reached, it goes back to 30 to process the next line.
In line 35, it writes out a final CHR$(26) (control-Z) to the ATASCII output file — but I do not recall why. It then uses the UNLOAD command to close any open files.
I had to look up UNLOAD, as I had forgotten this existed. The description reads:
“Closes any open files on the disk in the drive you specify. If you do not specify a drive number, the computer uses Drive 0 (or the drive you specified in the DRIVE command).”
Disk Extended BASIC manual
Not much to it, but it worked and it let me write bulletins and such that I could upload to the Atari BBS.
I thought I would share this code in case any CoCo user out there needs to upload some text files to an Atari BBS.
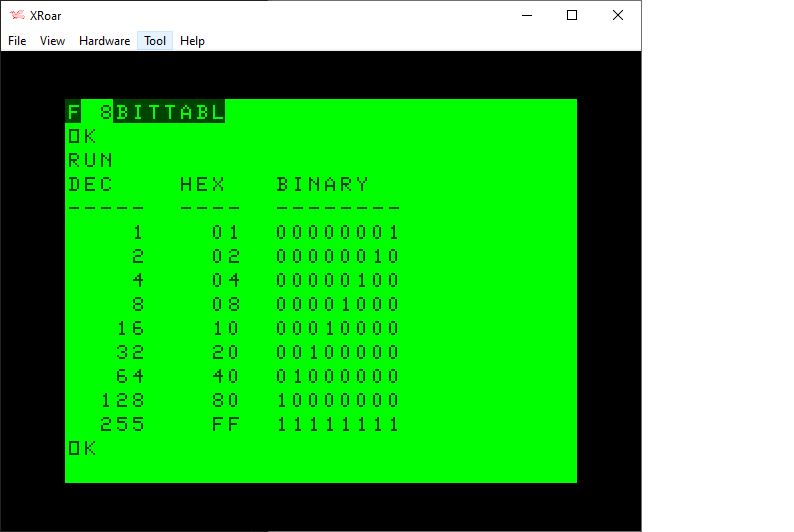
When dealing with bits in Color BASIC, we have AND, OR and NOT. Unfortunately, we can really only use these on values 15-bits or less. For example, here is a table represent various 8-bit values in the range of 0-255:
We have no problem using 8-bit values with standard Color BASIC. Here is my routine that will print out the bits of any 8-bit value:
0 REM 8BITS.BAS
10 DIM BT(7):FOR BT=0 TO 7:BT(BT)=2^BT:NEXT
20 INPUT "VALUE     ";Z
30 GOSUB 500:GOTO 20
500 REM SHOW Z AS BINARY
510 FOR BT=7 TO 0 STEP-1
520 IF Z AND BT(BT) THEN PRINT "1"; ELSE PRINT "0";
530 NEXT
540 PRINT Z:RETURN
Here is a program using that routine that will print out a similar table:
0 REM 8BITTABL.BAS
10 DIM BT(7):FOR BT=0 TO 7:BT(BT)=INT(2^BT):NEXT
20 PRINT "DEC    HEX   BINARY"
30 PRINT "-----  ----  --------"
40 FOR I=0 TO 7:Z=INT(2^I)
50 GOSUB 100
60 NEXT
70 Z=255:GOSUB 100
80 END

100 REM PRINT TABLE ENTRY
110 PRINT USING"#####    ";Z;
120 IF Z<&H10 THEN PRINT "0";
130 PRINT HEX$(Z);"  ";
140 GOSUB 500
150 RETURN

500 REM SHOW Z AS BINARY
510 FOR BT=7 TO 0 STEP-1
520 IF Z AND BT(BT) THEN PRINT "1"; ELSE PRINT "0";
530 NEXT
540 PRINT:RETURN
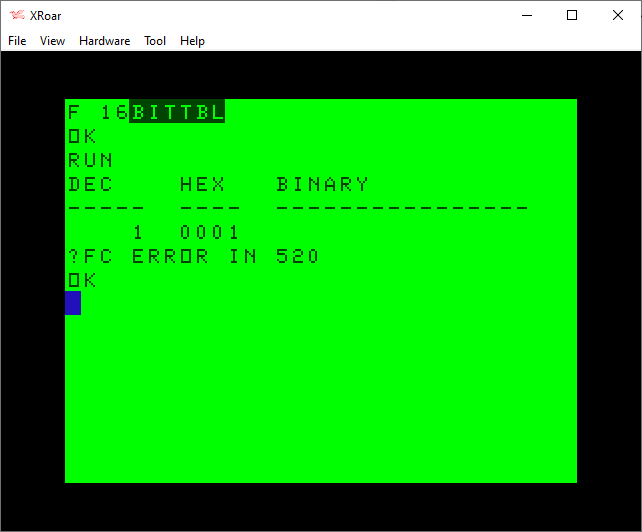
When I started experimenting with bits like this, I tried to modify my routine to work with 16-bit values. It did not work:
0 REM 8BITTABL.BAS - DOES NOT WORK!
10 DIM BT(15):FOR BT=0 TO 15:BT(BT)=INT(2^BT):NEXT
20 PRINT "DEC    HEX   BINARY"
30 PRINT "-----  ----  ----------------"
40 FOR I=0 TO 15:Z=INT(2^I)
50 GOSUB 100
60 NEXT
70 Z=255:GOSUB 100
80 END

100 REM PRINT TABLE ENTRY
110 PRINT USING"#####  ";Z;
120 IF Z<&H10 THEN PRINT "0";
121 IF Z<&H100 THEN PRINT "0";
122 IF Z<&H1000 THEN PRINT "0";
130 PRINT HEX$(Z);"  ";
140 GOSUB 500
150 RETURN

500 REM SHOW Z AS BINARY
510 FOR BT=15 TO 0 STEP-1
520 IF Z AND BT(BT) THEN PRINT "1"; ELSE PRINT "0";
530 NEXT
540 PRINT:RETURN
A bit of investigation revealed that AND could not operate on values greater than 32767 (&H3FFF in hex):
I did not understand why, but I expected it has something to do with integer values being treated as signed values, as if this was an INT16 (−32768 to +32767 range) rather than a UIN16 (0-65535 range).
rflberg to the rescue
I had recently posted a series of YouTube videos discussing bits in Color BASIC. My most recent one showed a program I wrote that demonstrated AND, OR and NOT operations:
The program I demonstrated looked like this:
0 REM ANDOR.BAS
10 DIM BT(7):FOR BT=0 TO 7:BT(BT)=INT(2^BT):NEXT
20 INPUT "VALUE     ";V
30 PRINT "(A/O/N)";
40 A$=INKEY$:IF A$="" THEN 40
50 IF A$="A" THEN M=0:PRINT "AND";:GOTO 90
60 IF A$="O" THEN M=1:PRINT "OR ";:GOTO 90
70 IF A$="N" THEN M=2:PRINT "NOT":GOTO 100
80 SOUND 1,1:GOTO 40
90 INPUT O
100 PRINT:PRINT "    ";:Z=V:GOSUB 500
110 IF M=0 THEN PRINT "AND ";:Z=O:GOSUB 500:Z=V AND O:PRINT "    ";:GOSUB 500
120 IF M=1 THEN PRINT "OR  ";:Z=O:GOSUB 500:Z=V OR O:PRINT "    ";:GOSUB 500
130 IF M=2 THEN PRINT "NOT ";:Z=NOT V:GOSUB 500
140 PRINT:GOTO 20

500 REM SHOW Z AS BINARY
510 FOR BT=7 TO 0 STEP-1
520 IF Z AND BT(BT) THEN PRINT "1"; ELSE PRINT "0";
530 NEXT
540 PRINT:RETURN
In the video I explain how it works, somewhat, but you will notice it works only on 8-bit values. Because I did not know a way to make it work.
However, in the comments, use rflberg left a few comments:
IF you want to see the full bits change the program to this:
10 DIM BT(15):FOR BT=0 TO 15:BT(BT)=2^BT:NEXT 501 IF Z<0 THEN PRINT”1″; ELSE PRINT”0″; 510 FOR BT=14 TO 0 STEP -1
rflberg (via YouTube)
I was intrigued. The modifications did not work for me, but a few additional comments help me understand the intent:
-1 is actually 1111111111111111 and 255 is 0000000011111111. It computes numbers -32768 to 32767. Negative numbers the most significant bit is a 1 and positive numbers is a 0. … -32768 is 1000000000000000 and 32767 is 0111111111111111
rflberg (via YouTube)
I experimented with this for awhile last night, and now I think I understand it. AND, NOT and OR allow you to pass in 0 to 32677 just fine. But, you can also pass in -32768 to -1 as well! It seems to be using the high bit (bit 15) to indicate a negative value. The explanation was to simply use negative values to make AND, NOT and OR see that bit.
The code modification would work if I passed in 0-32767 for the normal 15-bit range then -32768 to 1 to represent the high-bit range. I should be able to modify my routine to do this automatically.
I could use standard bit values for bits 0 to 14 (my BT array values of 1, 2, 4, 8, 16, 32, 64, 128, 256, 512, 1024, 2048, 4096, 8192, and 16384, just like in the earlier table), and then have a special case for bit 15 — a value of -32768 — which I would have in the array as BT(15)=-32768.
Then, in the print bit routine I could check to see if the value was greater than 32767, and turn it in to a negative number by subtracting 65536. (i.e., 32767 would be fine, but 32768 would turn in to -32768).
Since I print out the integer value after the bit display, I decided to make a temporary (altered) variable Z2, and retain the user’s intended Z value. This means I could pass in 32768 and it would print 32768, but would be really using -32768.
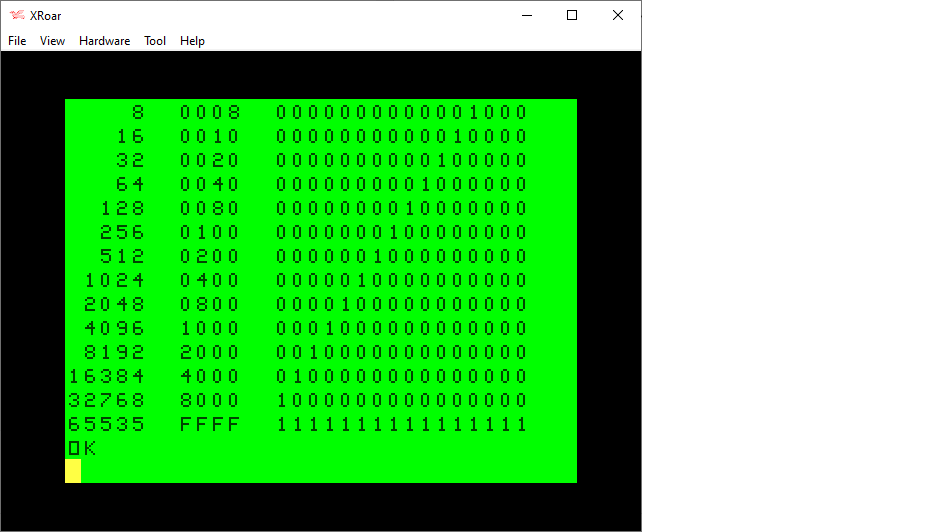
I ended up with a minor modification to my program, giving me this routine that will display the bits of any 16-bit value (0-65535):
0 REM 16BITS.BAS
1 REM WORKS THANKS TO rflberg
10 DIM BT(15):FOR BT=0 TO 14:BT(BT)=INT(2^BT):NEXT:BT(15)=-32768

20 INPUT "VALUE     ";Z
30 GOSUB 500:GOTO 20
500 REM SHOW Z AS BINARY
505 IF Z>32767 THEN Z2=Z-65536 ELSE Z2=Z
510 FOR BT=15 TO 0 STEP-1
520 IF Z2 AND BT(BT) THEN PRINT "1"; ELSE PRINT "0";
530 NEXT
540 PRINT Z;Z2:RETURN
Using this updated routine, I modified my table printing program to handle 16-bits:
0 REM 8BITTABL.BAS
1 REM WORKS THANKS TO rflberg
10 DIM BT(15):FOR BT=0 TO 14:BT(BT)=INT(2^BT):NEXT:BT(15)=-32768
20 PRINT "DEC    HEX   BINARY"
30 PRINT "-----  ----  ----------------"
40 FOR I=0 TO 15:Z=INT(2^I)
50 GOSUB 100
60 NEXT
70 Z=65535:GOSUB 100
80 END

100 REM PRINT TABLE ENTRY
110 PRINT USING"#####  ";Z;
120 IF Z<&H10 THEN PRINT "0";
121 IF Z<&H100 THEN PRINT "0";
122 IF Z<&H1000 THEN PRINT "0";
130 PRINT HEX$(Z);"  ";
140 GOSUB 500
150 RETURN

500 REM SHOW Z AS BINARY
505 IF Z>32767 THEN Z2=Z-65536 ELSE Z2=Z
510 FOR BT=15 TO 0 STEP-1
520 IF Z2 AND BT(BT) THEN PRINT "1"; ELSE PRINT "0";
530 NEXT
540 PRINT:RETURN
Tada! Thanks for those great YouTube comments, I now have a workaround to doing bit detection on all 16 bits. Thank you very much, rflberg!
That uses 66 byte of BASIC program space (though will use more RAM for strings as it runs).
It appears there are still optimizations to make! In the comments. Stewart Orchard pointed out this one:
Not a big gain but two bytes can be saved by removing the third argument from MID$().
The two argument version of MID$() returns the remainder of the string starting from the specified position, and ASC() returns its result based on the first character of its argument.
– Stewart Orchard
In Color BASIC, MID$ can accept three parameters:
Color Computer 3 BASIC Quick Reference Guide, page 11
If you had as string of 10 characters, and wanted to print the third character, you could do it like this:
A$="ABCDEFGHIJ"
OK
PRINT MID$(A$,3,1)
C
Stewart pointed out that if you left off the final parameter, it returns the rest of the string:
A$="ABCDEFGHIJ"
OK
PRINT MID$(A$,3,1)
CDEFGHIJ
Now that I look at it, it appears MID$ with two parameters is sort of like an inverted RIGHT$. MID$ would give you all the characters starting at the one you specify, and RIGHT$ gives you the number of ending characters you specify.
PRINT MID$(A$,3)
CDEFGHIJ

PRINT RIGHT$(A$,3)
HIJ
I don’t recall using MID$ like this, but I have simulated the same behavior using RIGHT$ like:
I am a bit embarrassed to admit I think I even did something like this:
PRINT MID$(A$,3,LEN(A$)-3)
CDEFGHIJ
…but let’s not speak of that.
And if MID$ can work like RIGHT$, it can also work like LEFT$:
PRINT LEFT$(A$,3)
ABC

PRINT MID$(A$,1,3)
ABC
But I digress…
If MID$(A$,3,1) gives you one character starting as location 3, and MID$(A$,3) gives you all the characters starting at position 3, how does that work? Stewart explained that ASC will still work if you pass it a string since it only works on the first character of the string. It is even documented that way:
Thus, ASC(“HELLO”) produces the same result as ASC(“H”) — the ASCII value of letter H.
With that in mind, we can remove “,1” from the program and reduce it by two bytes:
The challenge is simple: Write a program that prints out a centered text Christmas tree using the same layout of their example program. I thought it would be fun to work through several methods to do this.
PRINT
We start with their simple example, which displays the centered tree using PRINT statements. Here is their example with spaces altered so it centers on the CoCo’s 32 column screen:
You will see one memory optimization they did was leaving off the ending quote. BASIC will stop parsing a quoted string if it reaches the end of a line, so the ending quote is only necessary if more statements follow the PRINT.
I do not know if the space between PRINT and the quote is required for the system they wrote this example, but on the CoCo we could remove it and save 23 bytes of program space right there.
PRINT TAB
Speaking of spaces, each space takes up a character. BASIC has a command that will jump forward a certain amount of spaces — TAB. It works like this:
PRINT TAB(5);"FIVE SPACES OVER"
From my test, it appears TAB takes up one byte(for the “TAB(” portion, then a byte for each digit, then a byte for the closing parenthesis. If tabbing a single digit of spaces, it takes three bytes of program space. Thus, any time we are spacing over more than 3 spaces, it would save memory to use TAB. Also, the semicolon between TAB and the item being printed is optional, so we can leave that out as well.
For the tree example centered on a 32 column screen, every line starts with at least 4 spaces, so using TAB should save memory. Let’s try this:
It is drawing three sections, with the first expanding on each side by 1 (adding two asterisks to each row), then the next section expanded each side by 2 (adding four asterisks to each row), then the final section expands each side by 3 (adding six asterisks to each row).
There is probably a simple way to math it. But first…
Centering
Since one of the requirements is centering the tree on the screen, let’s look at how we center a string. To do this, we simply subtract the length of the string we want to center from the width of the string then divide the result by two:
A$="CENTER THIS"
PRINT TAB((32-LEN(A$))/2);A$
Or, to eliminate some parenthesis, we can start with half the width of the screen (the center of the screen) and subtract half the length of the string:
A$="CENTER THIS"
PRINT TAB(16-LEN(A$)/2);A$
With that out of the way, now we need to figure out how to draw the three triangle shapes of the tree, each time getting wider.
Numbers and patterns.
I decided to lookat the number sequences of each line length for each section of the tree (skipping the trunk lines).
I could easily create the first pattern by doing a FOR/NEXT loop with a step of 2:
FOR I=1 TO 7 STEP 2:PRINT I:NEXT
And then I could do 3 to 15 with a STEP 4, and 5 to 23 with a STEP 6.
FOR I=1 TO 7 STEP 2:PRINT I:NEXT
FOR I=3 TO 15 STEP 4:PRINT I:NEXT
FOR I=5 TO 23 STEP 6:PRINT I:NEXT
This would generate the number sequence I need, and then I could simply print a centered string of that many asterisks, and manually print the tree trunk at the end.
10 FOR I=1 TO 7 STEP 2:GOSUB 50:NEXT
20 FOR I=3 TO 15 STEP 4:GOSUB 50:NEXT
30 FOR I=5 TO 23 STEP 6:GOSUB 50:NEXT
40 I=3:GOSUB 50:GOSUB 50:END
50 PRINT TAB(16-I/2)STRING$(I,42):RETURN
127 bytes.
That’s much better! Though, I saved a bit more by combining lines, and I could save even more by removing spaces and combining lines further:
Now we’re getting somewhere! But ignoring the compressing, can we do better than 127 using better math?
Math. Why did there have to be math?
I am slow and bad at math, but I am convinced there is a math solution to this, as well.
Let’s look at how the numbers for START value and STEP value work. I know there are going to be three sections of the tree, so it seems logical I’d start with something like this:
10 FOR I=1 TO 3
20 PRINT I*2-1
30 NEXT
That would print out 1, 3 and 5, which is the start width of each section of the tree. I could have also done the FOR loop using 0 to 2 and added 1 to get the same result:
10 FOR I=0 TO 2
20 PRINT I*2+1
30 NEXT
Maybe one will be more useful than the other depending on what comes next…
Once we know how wide a section starts, we need to know how much the length increases for each line.
Section 1 increases by 2 each row, section 2 increases by 4 each row, and section 3 increases by 6 each row. That is a pattern of 2, 4, 6. It looks like I could get those values by taking the section (1 to 3) and multiplying it by 2. This will print 2, 4, 6:
10 FOR J=1 TO 3
20 PRINT J*2
30 NEXT
I am bad with math, as I mentioned, but I was able to work out that taking a value of 1 to 4 (for each layer of a section) and multiply that by the section (1 to 3), and subtracting one, I could get this:
10 FOR I=1 TO 3
20 FOR J=1 TO 4
30 PRINT J*I*2-1
60 NEXT
70 NEXT
To print the row of asterisks, I use the STRING$ function. It takes the number of characters to print, then the ASCII value of the character. The asterisk is ASCII character 42 so it I wanted to print ten of them I would do:
PRINT STRING$(10,42)
I can now print the layers of the tree like this:
10 FOR I=1 TO 3
20 FOR J=1 TO 4
30 W=J*I*2-1
50 PRINT TAB(16-W/2);STRING$(W,42)
60 NEXT
70 NEXT
But that still doesn’t handle the “trunk” at the bottom of the tree.
Since the trunk does not follow any pattern, I will simply treat it like an extra section, and increase the section loop (FOR I) by one, and add an IF that says if we are on that layer, the width will be 3. Then, since I don’t want this section to be four layers thick, I can use a second IF after the one that checks for the fourth section to know when to exit (checking for J to be larger than 2):
10 FOR I=1 TO 4
20 FOR J=1 TO 4
30 W=J*I*2-1
40 IF I>3 THEN W=3:IF J>2 THEN END
50 PRINT TAB(16-W/2);STRING$(W,42)
60 NEXT
70 NEXT
162 bytes.
Ah, well, being clever seems to have increase beyond the 127 bytes of just using three FOR/NEXT loops. I suspect it’s the overhead of the way I am trying to print the trunk section. Indeed, without it (like 40, above, and adjusting the I loop to 3) makes it 125.
Sometimes being clever doesn’t help. Even without trying to be clever about the trunk section, the “W=J*I*2-1” stuff takes up as much space as just doing another FOR/NEXT and a GOSUB to print the line.
DATA
We could just have a table to line lengths, and do it like this:
10 READ W
20 IF W=0 THEN END
30 PRINT TAB(16-W/2);STRING$(W,42):GOTO 10
40 DATA 1,3,5,7,3,7,11,16,5,9,13,17,3,3,
98 bytes.
Not bad at all! And that is before compressing it to fewer lines. Here’s a 79 byte attempt, removing spaces, removing the semicolon, altering the logic just a bit to be on LINE 0 (so you can just say GOTO) and changing the IF so there is no END token:
Another “DATA” technique which I have seen Jim Gerrie use is to simply encode the line lengths as characters in a string, and use that as data. For example, ASCII “A” (character 65) will represent 1, “B” will represent 2, and so on. Make a string of the appropriate characters and retrieve them using MID$() and get the ASCII value using ASC() then subtract 64 from that value and you have something like this.
10 FOR C=1 TO 14
20 W=ASC(MID$("ACEGCGKOEKQWCC",C,1))-64
30 PRINT TAB(16-W/2);STRING$(W,42)
40 NEXT
97 bytes.
If we compress the lines together, we can shrink it even further:
Is this as small as it gets? (Technically, this uses more memory, since string space has to be used to create temporary strings for MID$(), but we are only looking at program size and not memory usage.)
CLEAR 0 can be used to reserve 0 bytes for string storage. With no string space, we obviously expect something like this to NOT work:
A$="THIS WON'T WORK WITH CLEAR 0"
Indeed, that would give us “?OS ERROR” — Out of string space.
The exception to this rule are “constant strings” that are embedded inside the BASIC program itself. In a YouTube video I recently posted, I demonstrated how constant strings in a program do not use string space:
You can see twenty nine other short Color BASIC videos I posted to YouTube during the month of #SepTandy 2021.
But I digress…
Here are some other things that won’t work without string space, even if, at first glance, it seems like they would:
It seems you can’t SAVE, LOAD or even PRINT a “constant” string if there is no string space.
But why?
Consider this… The same thing happens with string functions such as LEFT$, RIGHT$, MID$ and even INSTR:
Looking at those, and recalling my String Theory article, we know LEFT$, RIGHT$ and MID$ are trying to create a new string. With no string space, there is no way to create it. That must be why they fail. This makes sense.
But INSTR does not create any strings. It merely returns the position where one string appears inside of another, or 0 if the string is not found. (Or 1 if you give it an empty string, which truly does seem like a bug but other flavors Microsoft BASIC behave the same way with their implementations of INSTR. But I digress…)
And SAVE, LOAD and PRINT are similar. They just print something, not create a string.
That does not make sense.
Let’s speculate a bit.
What’s all this, then?
Without consulting the Color BASIC Unravelled disassembly, my guess is that the ROM code for SAVE, LOAD, PRINT, etc. probably expects some register to be pointing to where the string exists in memory (a location pointer in the variable data). This might be code space, in the case of a constant string embedded in a BASIC line, or string space, in the case of a dynamic string.
But when you are entering a command directly in to BASIC, there is no program memory for that command (even though it seems like it could just point to the keyboard input buffer and then make the ROM call). BASIC needs to put that constant string data somewhere before jumping to the ROM call.
That’s weird, and quite possibly unnecessary, but would, at least, make sense.
I am going to add this to my “look this up in the disassembly to see what’s going on” list for future investigation.
In the meantime … I wonder what else won’t work without string space?
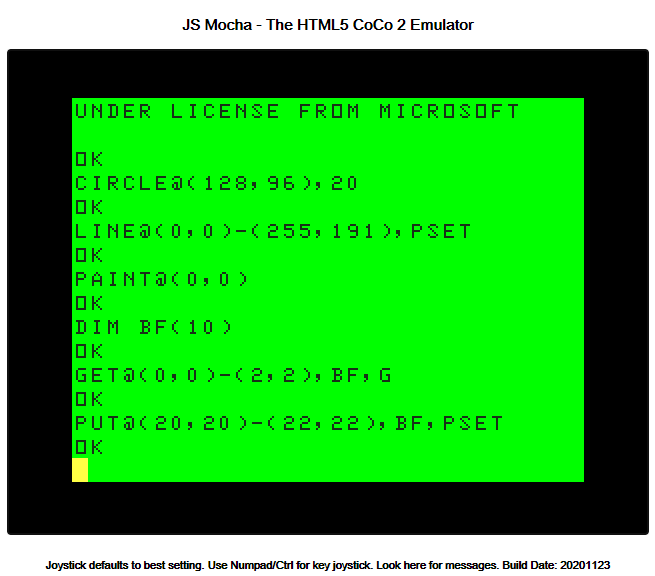
The other night I was experimenting with Extended Color BASIC and the “GET” and “PUT” commands. I knew that the documentation was incorrect about them, and was trying to figure out how they worked. I also wanted to do this without cheating (i.e., doing a quick web search and finding the results of someone who already did this).
I will share the results of this experimentation later, but I wanted to pass along something I was unaware of until last night. I ended up looking at the Extended Color BASIC disassembly to try to find clarification on why something I was seeing was happening. Reading through it revealed a syntax I was unaware of for the following commands:
CIRCLE
GET
LINE
PAINT
PUT
Much like the CoCo BASIC “PRINT@” command, the ‘@’ sign is allowed on these commands as well. It does nothing, and is merely skipped:
Extended Color BASIC’s unused @ syntax.
A note in the Unraveled book says:
It is interesting to note that the “@” symbol does not do anything! It is there to make the command syntax consistent with the “PRINT @” concept and to make it compatible with other versions of Microsoft BASIC.
– Extended Color BASIC Unraveled II
Since this was not documented in the manual (as far as I know), I was not aware of this syntax.
Did you know about this?
There are certainly many undocumented secrets in the Color BASIC ROMs, from the unimplemented Easter egg to things like how the PLAY command plays nonexistent notes. Certainly the author of the Unraveled series discovered these items, and anyone who read those books would have known about it, but I wonder how widespread these oddities were back in the 1980s.
Beyond removing some spaces and a REM statement, here is the smallest I have been able to get my “attract” program:
10 ' ATTRACT4.BAS
20 FOR I=0 TO 3:READ L(I),LD(I),CL(I),CD(I):NEXT:Z=143:CLS 0:PRINT @268,"ATTRACT!";
30 Z=Z+16:IF Z>255 THEN Z=143
40 FOR I=0 TO 3:POKE L(I),Z:L(I)=L(I)+LD(I):FOR C=0 TO 3:IF L(I)=CL(C) THEN LD(I)=CD(C)
50 NEXT:NEXT:GOTO 30
60 DATA 1024,1,1024,1,1047,1,1055,32,1535,-1,1535,-1,1512,-1,1504,-32
(We could reduce it by one line by sticking the DATA statement on the end of line 50, now that I look at it.)
Let’s rewind and look at the original, which used individual variables for each of the moving color blocks:
10 ' ATTRACT.BAS
20 A=1024:B=A+23:C=1535:D=C-23:Z=143
30 AD=1:BD=1:CD=-1:DD=-1
40 CLS 0:PRINT @268,"ATTRACT!";
50 POKE A,Z:POKE B,Z:POKE C,Z:POKE D,Z
60 Z=Z+16:IF Z>255 THEN Z=143
70 A=A+AD
80 IF A=1055 THEN AD=32
90 IF A=1535 THEN AD=-1
100 IF A=1504 THEN AD=-32
110 IF A=1024 THEN AD=1
120 '
130 B=B+BD
140 IF B=1055 THEN BD=32
150 IF B=1535 THEN BD=-1
160 IF B=1504 THEN BD=-32
170 IF B=1024 THEN BD=1
180 '
190 C=C+CD
200 IF C=1055 THEN CD=32
210 IF C=1535 THEN CD=-1
220 IF C=1504 THEN CD=-32
230 IF C=1024 THEN CD=1
240 '
250 D=D+DD
260 IF D=1055 THEN DD=32
270 IF D=1535 THEN DD=-1
280 IF D=1504 THEN DD=-32
290 IF D=1024 THEN DD=1
300 GOTO 50
This was then converted to us an array:
10 ' ATTRACT2.BAS
20 L(0)=1024:L(1)=1024+23:L(2)=1535:L(3)=1535-23
30 Z=143
40 CL(0)=1024:CD(0)=1
50 CL(1)=1055:CD(1)=32
60 CL(2)=1535:CD(2)=-1
70 CL(3)=1504:CD(3)=-32
80 CLS 0:PRINT @268,"ATTRACT!";
90 LD(0)=1:LD(1)=1:LD(2)=-1:LD(3)=-1
100 FOR I=0 TO 3:POKE L(I),Z:NEXT
110 Z=Z+16:IF Z>255 THEN Z=143
120 FOR I=0 TO 3:L(I)=L(I)+LD(I):NEXT
130 FOR L=0 TO 3
140 FOR C=0 TO 3
150 IF L(L)=CL(C) THEN LD(L)=CD(C)
160 NEXT
170 NEXT
180 GOTO 100
And then it was converted to use READ/DATA instead of hard-coding values:
10 ' ATTRACT3.BAS
20 FOR I=0 TO 3
30 READ L(I),LD(I),CL(I),CD(I)
40 NEXT
50 Z=143
60 CLS 0:PRINT @268,"ATTRACT!";
70 Z=Z+16:IF Z>255 THEN Z=143
80 FOR I=0 TO 3
90 POKE L(I),Z
100 L(I)=L(I)+LD(I)
110 FOR C=0 TO 3
120 IF L(I)=CL(C) THEN LD(I)=CD(C)
130 NEXT
140 NEXT
150 GOTO 70
160 ' L,LD,CL,CD
170 DATA 1024,1,1024,1
180 DATA 1047,1,1055,32
190 DATA 1535,-1,1535,-1
200 DATA 1512,-1,1504,-32
Shuffling code around is fun.
But it’s still really slow.
10 PRINT “FASTER”
There are other ways to do similar effects, such as with strings. We could make a string that contained a repeating series of the color block characters, like this:
FOR I=0 TO 7:B$=B$+CHR$(143+16*I):NEXT
Then we could duplicate that 8-character string a few times until we had a string that was twice the length of the 32 column screen:
B$=B$+B$+B$+B$+B$+B$+B$+B$
Then we could make the entire thing move by printing the MID$ of it, like this:
FOR I=1 TO 32
PRINT@0,MID$(B$,33-I,32);
PRINT@480,MID$(B$,I,31);
NEXT
We print one section @0 for the top line, and the other @480 for the bottom line. Unfortunately, using PRINT instead of POKE means if we ever print on the bottom right location, the screen would scroll, so the bottom right block has to be left un-printed (thus, printing 31 characters for the bottom line instead of the full 32). This bothers me so apparently I do have O.C.D. Maybe we can fix that later.
But, it gives the advantage of scrolling ALL the blocks, and is super fast. Check it out:
10 ' ATTRACT5.BAS
20 CLS 0:PRINT @268,"ATTRACT!";
30 FOR I=0 TO 7:B$=B$+CHR$(143+16*I):NEXT
40 B$=B$+B$+B$+B$+B$+B$+B$+B$
50 FOR I=1 TO 32
60 PRINT@0,MID$(B$,33-I,32);
70 PRINT@480,MID$(B$,I,31);
80 NEXT:GOTO 50
That’s not bad, but only gives the top and bottom rows (minus that bottom right location). But, it’s fast!
ATTRACT5.BAS
Since the orders of the colors is the same on the top and bottom, we’d really need to reverse the bottom characters to make it look like it’s rotating versus just reversing. Let’s tweak that:
10 ' ATTRACT6.BAS
20 CLS 0:PRINT @268,"ATTRACT!";
30 FOR I=0 TO 7:B$=B$+CHR$(143+16*I)
35 R$=R$+CHR$(255-16*I):NEXT
40 B$=B$+B$+B$+B$+B$+B$+B$+B$
45 R$=R$+R$+R$+R$+R$+R$+R$+R$
50 FOR I=1 TO 32
60 PRINT@0,MID$(B$,33-I,32);
70 PRINT@480,MID$(R$,I,31);
80 NEXT:GOTO 50
That’s a bit better. But getting the sides to work is a bit more work and it will slow things down quite a bit. But let’s try anyway.
Initially, I tried scanning down the sides of the string using MID$, like this:
FOR J=1 TO 14
PRINT@480-32*J,MID$(R$,39-J+I,1);
PRINT@31+32*J,MID$(R$,33-J+I,1);
NEXT
But that was very, very slow. You could see it “paint” the sides. Each time you use MID$, a new string is created (with data copied from the first string). That’s a bunch of memory shuffling just for one character.
Then I thought, since I can’t get the speed up from a horizontal string being PRINTed, it was probably faster to just use CHR$().
I tried that, and it was still too slow.
Benchmark Digression: POKE vs PRINT
This led me back to an earlier benchmark discussion… Since I cannot get any benefit of using PRINT for a vertical column of characters, I could switch to the faster POKE method. This would also allow me to fill that bottom right character block. My O.C.D. approves.
To prove this to myself, again, I did two quick benchmarks — one using PRINT@ and the other using POKE.
0 ' LRBENCH1.BAS
1 ' 4745
10 C=143+16
20 TIMER=0:FOR A=1 TO 1000
30 FOR P=1024 TO 1535 STEP 32
40 POKEP,C
50 NEXT
60 NEXT:PRINT TIMER

0 ' LRBENCH2.BAS
1 ' 6013
10 C=143+16
20 TIMER=0:FOR A=1 TO 1000
30 FOR P=0 TO 511 STEP 32
40 PRINT@P,CHR$(C);
50 NEXT
60 NEXT:PRINT TIMER
Line 1 has the time that it printed for me in the Xroar emulator.
POKE will be the way.
However, there is still a problem: Math.
It just doesn’t add up…
The CoCo screen is 32×16. There are 8 colors. That means those 8 colors can repeat four times along the top of the screen, and four times along the bottom, leaving only 14 on each side going vertical. 32+32+14+14 is 92, which is not evenly divisible by our 8 colors. If we represent them as numbers, they would look like this:
If you start at the top left corner and go across, repeating 12345678 over and over, you end up back at the top left on 4. We have three colors that won’t fit. This means even if I had a nice fast routine for rotating the colors, they would not be evenly balanced using this format.
However…
…if I leave out the four corners, we get 88, and that divides just fine by our 8 colors!
Thus, the actual O.C.D.-compliant border I want to go for would look like this:
The only problem is … how can this be done fast in BASIC?
To be continued…
Bonus: Show Your Work
Here are the stupid BASIC programs I wrote to make the previous four screens:
0 ' border1.bas
10 CLS:C=113:L=1024
20 ' RIGHT
30 L=1024:D=1:T=31:GOSUB 110
40 ' DOWN
50 L=1087:D=32:T=13:GOSUB 110
60 ' LEFT
70 L=1535:D=-1:T=31:GOSUB 110
80 ' UP
90 L=1472:D=-32:T=13:GOSUB 110
100 GOTO 100
110 ' L=LOC, D=DELTA, T=TIMES
120 POKE L,C
130 C=C+1:IF C>120 THEN C=113
140 IF T=0 THEN RETURN
150 L=L+D:IF L>1023 THEN IF L<1536 THEN 170
160 L=L-D:SOUND 200,1
170 T=T-1:GOTO 120
0 ' border2.bas
10 CLS:C=113:L=1024
20 ' RIGHT
30 L=1025:D=1:T=29:GOSUB 110
40 ' DOWN
50 L=1087:D=32:T=13:GOSUB 110
60 ' LEFT
70 L=1534:D=-1:T=29:GOSUB 110
80 ' UP
90 L=1472:D=-32:T=13:GOSUB 110
100 GOTO 100
110 ' L=LOC, D=DELTA, T=TIMES
120 POKE L,C
130 C=C+1:IF C>120 THEN C=113
140 IF T=0 THEN RETURN
150 L=L+D:IF L>1023 THEN IF L<1536 THEN 170
160 L=L-D:SOUND 200,1
170 T=T-1:GOTO 120
0 ' border3.bas
10 CLS 0:C=143:L=1024
20 ' RIGHT
30 L=1025:D=1:T=29:GOSUB 110
40 ' DOWN
50 L=1087:D=32:T=13:GOSUB 110
60 ' LEFT
70 L=1534:D=-1:T=29:GOSUB 110
80 ' UP
90 L=1472:D=-32:T=13:GOSUB 110
100 GOTO 100
110 ' L=LOC, D=DELTA, T=TIMES
120 POKE L,C
130 C=C+16:IF C>255 THEN C=143
140 IF T=0 THEN RETURN
150 L=L+D:IF L>1023 THEN IF L<1536 THEN 170
160 L=L-D:SOUND 200,1
170 T=T-1:GOTO 120
Previously, I took a target from the attract screen code to talk more on using arrays in BASIC than individual variables. I gave an example of moving ghosts around a screen, and then did modifications to use an array. This let the user select how many ghost they wanted to see randomly display on the screen.
I mentioned that arrays were slower, but allowed flexibility. With that in mind, here is that “wandering ghosts” example turned in to a simple game demo. The player will appear as a yellow block in the top left corner of the screen. The ghosts will randomly appear around the screen as white blocks. The goal is to navigate to the bottom right corner of the screen without hitting a ghost, or being hit by one.
To hopefully make this compatible with the MC-10 computer, it uses the keyboard letters “WASD” — A for left, D for right, W for up and S for down.
You can choose one ghost, and get a single fast moving ghost to avoid. Or you can choose 100 ghosts, and get 100 slow moving ghosts to avoid, making it more like navigating a random maze that slowly moves walls.
Ghost Run in Color BASIC
10 ' ghostrun.bas
15 INPUT "NUMBER OF GHOSTS";G:G=G-1:IF G<0 THEN 15
20 CLS0:DIM G(G):DIM C(G):C=207:B=128:FOR I=0 TO G
30 G(I)=1023+RND(512)
41 NEXT
45 D(0)=1:D(1)=-1:D(2)=-32:D(3)=32
46 PL=1056:PC=159:POKE PL,PC
50 ' DISPLAY GHOSTS
60 FOR I=0 TO G:POKE G(I),C
65 D=INSTR(" DAWS",INKEY$):IF D>1 THEN GOSUB 190
70 ' RANDOM MOVE G(I)
80 NL=G(I)+D(RND(4)-1)
130 IF NL<1024 THEN 170
140 IF NL>1535 THEN 170
150 ' ERASE G(I) AND UPDATE LOCATION
160 POKE G(I),B:POKE NL,C:G(I)=NL
165 IF NL=PL THEN 480
170 NEXT:GOTO 60
180 ' PLAYER MOVED D
190 NL=PL+D(D-2)
200 IF NL<1024 THEN RETURN
210 IF NL>1535 THEN RETURN
220 IF NL=1535 THEN 510
230 IF PEEK(NL)=C THEN 530
240 POKE PL,B:POKE NL,PC:PL=NL
250 RETURN
470 GOTO 60
480 ' GHOST GOT PLAYER
490 PRINT "WE GOT YA!"
500 END
510 PRINT "YOU MADE IT!"
520 END
530 PRINT "YOU HIT A GHOST!"
540 END
To reduce instant death, I made the ghosts spawn no higher than one line below the player. But, with a small amount of faster ghosts, something could spawn then randomly move towards the player quickly. It’s surprisingly challenging (or frustrating).
To make the game responsive to the player, as the code it updating the position of the ghost, the player can move. For example, if drawing 100 ghosts, the player can move as each ghost being drawn. I found this much more fun than doing a turn-by-turn game like the old 1976 CHASE game (also known as Robots for Unix, Daleks for Mac, and a zillion spinoffs in the 70s and 80s). Check out the first published listing Creative Computing 1976 or the wikipedia entry for more details.
But I, as I say, digress.
Maybe we can revisit this in future installments of this series.
Until then, here is another size optimization of the attract screen code, this time removing all the hard-coded array initializations and turning them in to DATA statements loaded by the READ command:
10 ' ATTRACT3.BAS
20 FOR I=0 TO 3
30 READ L(I),LD(I),CL(I),CD(I)
40 NEXT
50 Z=143
60 CLS 0:PRINT @268,"ATTRACT!";
70 Z=Z+16:IF Z>255 THEN Z=143
80 FOR I=0 TO 3
90 POKE L(I),Z
100 L(I)=L(I)+LD(I)
110 FOR C=0 TO 3
120 IF L(I)=CL(C) THEN LD(I)=CD(C)
130 NEXT
140 NEXT
150 GOTO 70
160 ' L,LD,CL,CD
170 DATA 1024,1,1024,1
180 DATA 1047,1,1055,32
190 DATA 1535,-1,1535,-1
200 DATA 1512,-1,1504,-32
We have no changed the original 30 line version in to a 20 line version… but that is actually two lines longer than the previous one due to adding some extra lines for DATA and READ. But, if we were dealing with 50 objects instead of just 4, we’d likely be quite ahead at this point.
Next time, we’ll try to reduce this even further by packing lines together.
In part 1, I showed a simple but slow way to recreate a classic CoCo game startup screen with color blocks moving around the screen. I recall many early CoCo games had startup screens similar to this, though fancier. The assembly language games would rotate all the blocks around the screen, rather than just moving four blocks like my BASIC demo does. For instance, Steve Bjork‘s port of Clowns and Balloons:
You can check it out in videos on YouTube, or play it in a web browser via the wonderful JS Mocha CoCo emulator.
My BASIC attract screen does not attempt to recreate that one, but is more of an homage to the style of attract screens we had in those early years.
My initial version clocked in at about 30 lines, and I suggested ways to make it smaller, such as using arrays to store screen locations rather than individual variables. Arrays make things smaller, but are slower. i.e., if you wanted to track four ghosts on the screen for a Pac-Man game, you could have variables like G1, G2, G3 and G4 and then have a block of code that handled each one individually. Or, you could have an array such as DIM G(3) and access the four ghost locations using G(0), G(1), G(2) and G(3). This allows handling the ghosts in a FOR/NEXT loop instead of four individual blocks of code using separate variables.
Here is a verbose example of randomly moving around four “ghosts”:
10 ' WANDERING.BAS
20 CLS0
30 G1=1024:G2=1055:G3=1504:G4=1535
40 C1=191:C2=239:C3=223:C4=255
50 ' DISPLAY GHOSTS
60 POKE G1,C1:POKE G2,C2:POKE G3,C3:POKE G4,C4
70 ' RANDOM MOVE G1
80 ON RND(4) GOTO 90,100,110,120
90 NL=G1+1:GOTO 130
100 NL=G1-1:GOTO 130
110 NL=G1-32:GOTO 130
120 NL=G1+32
130 IF NL<1024 THEN 180
140 IF NL>1535 THEN 180
150 ' ERASE G1 AND UPDATE LOCATION
160 POKE G1,128:POKE NL,C1:G1=NL
170 ' RANDOM MOVE G2
180 ON RND(4) GOTO 190,200,210,220
190 NL=G2+1:GOTO 230
200 NL=G2-1:GOTO 230
210 NL=G2-32:GOTO 230
220 NL=G2+32
230 IF NL<1024 THEN 280
240 IF NL>1535 THEN 280
250 ' ERASE G2 AND UPDATE LOCATION
260 POKE G2,128:POKE NL,C2:G2=NL
270 ' RANDOM MOVE G3
280 ON RND(4) GOTO 290,300,310,320
290 NL=G3+1:GOTO 330
300 NL=G3-1:GOTO 330
310 NL=G3-32:GOTO 330
320 NL=G3+32
330 IF NL<1024 THEN 380
340 IF NL>1535 THEN 380
350 ' ERASE G4 AND UPDATE LOCATION
360 POKE G3,128:POKE NL,C3:G3=NL
370 ' RANDOM MOVE G4
380 ON RND(4) GOTO 390,400,410,420
390 NL=G4+1:GOTO 430
400 NL=G4-1:GOTO 430
410 NL=G4-32:GOTO 430
420 NL=G4+32
430 IF NL<1024 THEN 470
440 IF NL>1535 THEN 470
450 ' ERASE G4 AND UPDATE LOCATIOn
460 POKE G4,128:POKE NL,C4:G4=NL
470 GOTO 60
And here is that same program, converted to use arrays for the four ghost locations, four ghost colors, and four directions:
10 ' WANDERING2.BAS
20 CLS0
30 G(0)=1024:G(1)=1055:G(2)=1504:G(3)=1535
40 C(0)=191:C(1)=239:C(2)=223:C(3)=255
45 D(0)=1:D(1)=-1:D(2)=-32:D(3)=32
50 ' DISPLAY GHOSTS
60 FOR I=0 TO 3:POKE G(I),C(I)
70 ' RANDOM MOVE G(I)
80 NL=G(I)+D(RND(4)-1)
130 IF NL<1024 THEN 170
140 IF NL>1535 THEN 170
150 ' ERASE G(I) AND UPDATE LOCATION
160 POKE G(I),128:POKE NL,C(I):G(I)=NL
170 NEXT
470 GOTO 60
I tried to keep common line numbers where I could. 47 lines of code down to 15.
And, now that it is an array, it’s easy to make it handle as many ghosts as you want. By adding one more element to the array, and changing the FOR/NEXT loop to count 0-4 instead of 0-3, we get an extra ghost:
10 ' WANDERING3.BAS
20 CLS0
30 G(0)=1024:G(1)=1055:G(2)=1504:G(3)=1535:G(4)=1263
40 C(0)=191:C(1)=239:C(2)=223:C(3)=255:C(4)=143
45 D(0)=1:D(1)=-1:D(2)=-32:D(3)=32
50 ' DISPLAY GHOSTS
60 FOR I=0 TO 4:POKE G(I),C(I)
70 ' RANDOM MOVE G(I)
80 NL=G(I)+D(RND(4)-1)
130 IF NL<1024 THEN 170
140 IF NL>1535 THEN 170
150 ' ERASE G(I) AND UPDATE LOCATION
160 POKE G(I),128:POKE NL,C(I):G(I)=NL
170 NEXT
470 GOTO 60
Arrays are great for reducing code size, and making it so one routine can handle multiple instances of something (locations, colors, etc.).
But, it is slower. Looking up X(3) is slower than looking up X3 since looking up an array has to first look up the variable, and then index in to it to find the entry.
Here is the attract code, converted to use arrays for the block positions and movement directions. As you can see, I’m basically handling the blocks like I did the ghosts above — as objects that can be moved around the screen. Instead of making their movement random, they follow a pattern around the outline of the screen. Instead of having a set color, they just cycle through the seven available non-black VDG colors:
10 ' ATTRACT2.BAS
20 L(0)=1024:L(1)=1024+23:L(2)=1535:L(3)=1535-23
30 Z=143
40 CL(0)=1024:CD(0)=1
50 CL(1)=1055:CD(1)=32
60 CL(2)=1535:CD(2)=-1
70 CL(3)=1504:CD(3)=-32
80 CLS 0:PRINT @268,"ATTRACT!";
90 LD(0)=1:LD(1)=1:LD(2)=-1:LD(3)=-1
100 FOR I=0 TO 3:POKE L(I),Z:NEXT
110 Z=Z+16:IF Z>255 THEN Z=143
120 FOR I=0 TO 3:L(I)=L(I)+LD(I):NEXT
130 FOR L=0 TO 3
140 FOR C=0 TO 3
150 IF L(L)=CL(C) THEN LD(L)=CD(C)
160 NEXT
170 NEXT
180 GOTO 100
30 lines of the originally down to 18 by using arrays.
When time isn’t as important as code size (or convenience), arrays are a great thing.
I have two more iterations of this attract screen to share, so I’ll end with…