So far, we’ve taken a brute force PRINT program and turned it in to a less-brute force program that did the same thing using DATA statements:
0 ' LOGIKER8.BAS
10 CLS
15 CH=32:PRINTTAB(6);
20 READ A:IF A=-1 THEN 220
25 IF A=0 THEN PRINT:GOTO 15
30 PRINT STRING$(A,CH);
35 IF CH=32 THEN CH=42 ELSE CH=32
40 GOTO 20
50 DATA 5,1,7,1,0
60 DATA 5,2,5,2,0
70 DATA 5,3,3,3,0
80 DATA 5,4,1,4,0
90 DATA 1,17,0
100 DATA 2,15,0
110 DATA 3,13,0
120 DATA 4,11,0
130 DATA 5,9,0
140 DATA 4,11,0
150 DATA 3,13,0
160 DATA 2,15,0
170 DATA 1,17,0
180 DATA 5,4,1,4,0
190 DATA 5,3,3,3,0
200 DATA 5,2,5,2,0
210 DATA 5,1,7,1,0
215 DATA -1
220 GOTO 220
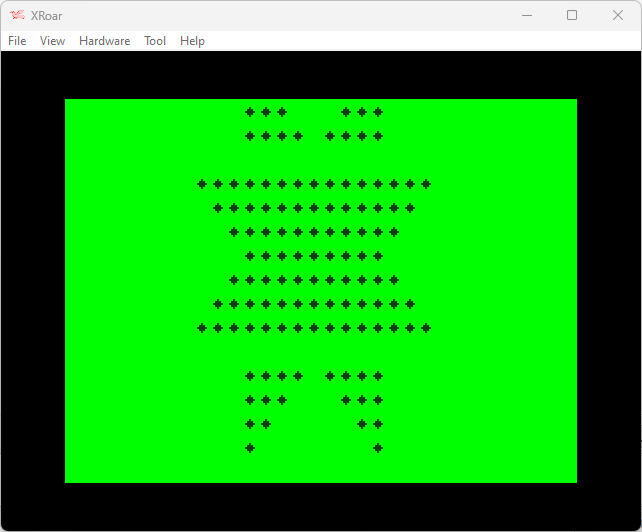
All of this in an effort to try to print out this image:
While there are still many BASIC optimizations we could do (removing spaces, combining lines even further, renumbering by 1, etc.), those would apply to any version of the code we create. Instead of doing that, let’s look at some other ways we can represent this data.
When the Atari VCS came out in 1977 (you younguns may only know it as the 2600, but it didn’t get that name until 1982 — five years after its release later), it required clever tricks to make games run in only 1K or 2K of ROM and with just 128 bytes of RAM.
The game Adventure was quite the challenge, since it had multiple screens representing different mazes, castles and areas.
Atari’s Greatest Hits on an old iPad
Each screen was represented by only 21 bytes of ROM! If you follow that link, you can read more about my efforts to understand how this worked. Here is an example of how the castle room was represented:
;Castle Definition
CastleDef:
  .byte $F0,$FE,$15 ;XXXXXXXXXXX X X X      R R R RRRRRRRRRRR
  .byte $30,$03,$1F ;XX        XXXXXXX      RRRRRRR        RR
  .byte $30,$03,$FF ;XX        XXXXXXXXXXRRRRRRRRRR        RR
  .byte $30,$00,$FF ;XX          XXXXXXXXRRRRRRRR          RR
  .byte $30,$00,$3F ;XX          XXXXXX    RRRRRR          RR
  .byte $30,$00,$00 ;XX                                    RR
  .byte $F0,$FF,$0F ;XXXXXXXXXXXXXX            RRRRRRRRRRRRRR
There are three bytes to represent each line. Three bytes would only be able to represent 24 pixels (8 bits per byte), and the ASCII art shows the screen width is actually 40. Those three bytes cannot represent the entire row of pixels.
In fact, 4-bits of that isn’t used. Each set of three bytes represents halfa row (20 bits out of the 24 the three bytes represent). Look at the first entry:
.byte $F0,$FE,$15 ;XXXXXXXXXXX X X X R R R RRRRRRRRRRR
If you turn those bytes into binary, you get this pattern:
The Atari drew the first 8-bits from least significant bit to most. the second 8-bits from most significant to least, then the third from least significant to most. That makes it look like this, matching the ASCII art (skipping the unused 4-bits):
000011111111111010101000
    XXXXXXXXXXX X X X
To represent a full screen, the Atari had a trick that would mirror or duplicate the other half of the screen. In the case of the castle, the right side was a mirror image. In the case of certain mazes, the data was duplicated.
Looking at our image here, since it is symmetrical, we could certainly use the same trick and only store half of the image.
Since the image is 17×17 (an odd number, so there is a halfway row and column), we’d actually need to just draw to that halfway row/column, then reverse back through the data.
We should be able to take our existing data and crop it down from this, which represents the full image:
50 DATA 5,1,7,1,0
60 DATA 5,2,5,2,0
70 DATA 5,3,3,3,0
80 DATA 5,4,1,4,0
90 DATA 1,17,0
100 DATA 2,15,0
110 DATA 3,13,0
120 DATA 4,11,0
130 DATA 5,9,0
140 DATA 4,11,0
150 DATA 3,13,0
160 DATA 2,15,0
170 DATA 1,17,0
180 DATA 5,4,1,4,0
190 DATA 5,3,3,3,0
200 DATA 5,2,5,2,0
210 DATA 5,1,7,1,0
…to this, which represents the top left quarter-ish of the image:
50 DATA 5,1,4,0   '     X    '
60 DATA 5,2,3,0   '     XX   '
70 DATA 5,3,2,0   '     XXX  '
80 DATA 5,4,1,0   '     XXXX '
90 DATA 1,9,0     ' XXXXXXXXX'
100 DATA 2,8,0    '  XXXXXXXX'
110 DATA 3,7,0    '   XXXXXXX'
120 DATA 4,6,0    '    XXXXXX'
130 DATA 5,5,0    '     XXXXX'
That represents all the data up to the center row/column, and that seems to be a considerable savings in code space (removing eight lines).
But how do we draw that forward, then in reverse? There is no way to back up when using the READ command, so we’d have to remember what we just did. For a general purpose “compress 1-bit image” routine it would be more complex, but since we know the image we are going to produce, we can make an assumption:
The image never has more than three transitions (space, asterisk, space) in a line.
No line entry has more than 4 numbers total.
Knowing that, we could simply save up to three numbers in variables, so we would print them out A B C and then C B A. We won’t even need the zeros now, since we can read A,B,C and act on them (stopping if C is 0).
Neat!
A quick bit of trial and error gave me this code that will print the top half of the image:
0 ' LOGIKER10.BAS
10 CLS
15 CH=32:PRINTTAB(6);
20 READ A:IF A=-1 THEN 220
21 PRINT STRING$(A,32);
22 READ B,C
25 IF C=0 THEN PRINT STRING$(B*2-1,42);STRING$(A,32):GOTO 15
30 PRINT STRING$(B,42);STRING$(C*2-1,32);STRING$(B,42)
40 GOTO 15
50 DATA 5,1,4
60 DATA 5,2,3
70 DATA 5,3,2
80 DATA 5,4,1
90 DATA 1,9,0
100 DATA 2,8,0
110 DATA 3,7,0
120 DATA 4,6,0
130 DATA 5,5,0
215 DATA -1
220 GOTO 220
It creates this:
I can now say “we are halfway there!”
But now I have another issue to solve. How do I back up? There is no way to READ data in reverse. It looks like I’m going to need to load all those numbers in to memory so I can reverse back through them.
The design is one row taller than will fit on the CoCo’s 32×16 text screen, but it would easily fit on the 40 or 80 column screen of the CoCo 3. For this article, I am going to stick with the standard text screen and just let it scroll one row off the top of the screen. When I have something figured out, it might only require modifying the centering code to display on the 40/80 column screen.
Let there be code!
At this stage, the design is being centered using the TAB command. Putting a “TAB(7)” at the start of each string takes up 3 bytes of programming space. It seems “TAB(” is tokenized, then there is the 3 character, followed by the “)” character. I had thought using PRINT@ might save some space, but the “@” takes a byte, then the screen position numbers follow it, and a comma is required. “PRINT@7,” takes the same amount of code space as “PRINTTAB(7)” so no savings there.
The biggest savings is going to come from eliminating the repeated use of the “* characters in the strings. Since the entire image is made up of spaces or asterisks, it could be represented by data that says how many spaces then how many asterisks then how many spaces, etc.
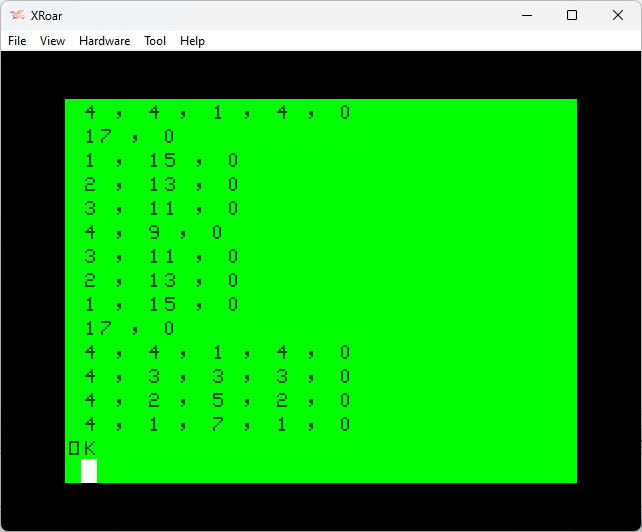
Here is what the image looks like centered to 32-columns:
The first line has 11 spaces, 1 asterisks, 7 spaces, then 1 asterisk.
The second line has 11 spaces, 1 asterisks, 5 spaces, then 2 asterisks.
And so on… The first line could be represented in DATA to tell how many repeating groups of spaces and asterisks there are such as 11,1,7,1,0 (using 0, to indicate the end of the line).
For something this small, I could have just counted up the spaces and asterisks myself, but it’s more fun to spend ten minutes writing a BASIC program to do what would have taken me 60 seconds to do manually.
I converted the pattern in to DATA statements and created a program that would scan each line looking for repeated characters. When the character changes, it prints how many of the previous repeating characters it saw and resets the counter.
Rather than explain how the program works, like I often try to do, I just submitted this code to the OpenAI ChatGPT system and let it do the work for me:
This BASIC program reads in a series of strings, one at a time, and outputs the number of times each character appears in the string.
Here is a brief explanation of the code:
Lines 10-16: This is the main loop of the program, where each string is read in, processed, and output.
Line 11: This line initializes the LC$ variable to the first character of the string and the DC variable to 1.
Lines 12-14: This is a FOR loop that iterates through each character of the string.
Line 13: This line compares the current character with the last character (stored in LC$). If they are the same, it increments the DC variable. If they are different, it outputs the value of DC and then resets DC to 1 and LC$ to the current character.
Line 15: This line outputs the value of DC after the loop has finished processing the string.
Lines 50-220: These are the data lines that contain the strings to be processed.
Line 220: This is the sentinel value that indicates the end of the data.
Note that this code uses a number of built-in BASIC functions, such as LEFT$, MID$, and LEN, which may not be available in all versions of BASIC. You may need to modify the code to use equivalent functionality if it is not available in the version of BASIC you are using.
– chat.openai.com
Seriously, folks. You have to go play with ChatGPT. It’s amazingly fun.
OpenAI ChatGPT Digression
After showing this program to ChatGPT, I asked “is there a way to do it better?” It responded with:
There are a few ways that this routine could be improved. Here are a few suggestions:
Use a DO loop instead of a GOTO statement to control the main loop. This would make the code easier to read and maintain.
Use a SELECT CASE statement to handle the different cases in line 13 instead of an IF statement. This would make the code more concise and easier to read.
Use a DICTIONARY or MAP data structure to store the counts of each character instead of using separate variables for each character. This would make the code more efficient and allow it to handle an arbitrary number of characters without having to hard-code variables for each one.
Add error-checking to the code to handle cases where the input data is invalid (e.g. empty strings, strings with invalid characters, etc.). This would make the code more robust and prevent it from crashing or producing incorrect results in these cases.
Here is an example of how the code could be modified to incorporate some of these changes:
– chat.openai.com
The code it provided was not something that would work on ancient Microsoft BASIC, but it was interesting to see:
DO
  READ A$
  IF A$="END" THEN EXIT DO

  ' Initialize the character counts to 0
  CHAR_COUNTS = DICTIONARY()

  ' Loop through each character of the string
  FOR i = 1 TO LEN(A$)
    ch = MID$(A$, i, 1)
    IF ch = " " THEN CONTINUE ' Skip whitespace

    ' Increment the count for this character
    IF CHAR_COUNTS.EXISTS(ch) THEN
      CHAR_COUNTS[ch] = CHAR_COUNTS[ch] + 1
    ELSE
      CHAR_COUNTS[ch] = 1
    END IF
  NEXT

  ' Output the counts for each character
  FOR ch = "A" TO "Z"
    PRINT CHAR_COUNTS[ch]; ",";
  NEXT
  PRINT "0"
LOOP

50 DATA"    *       *"
60 DATA"    **     **"
70 DATA"    ***   ***"
80 DATA"    **** ****"
90 DATA"*****************"
100 DATA" ***************"
110 DATA"  *************"
120 DATA"   ***********"
130 DATA"    *********"
140 DATA"   ***********"
150 DATA"  *************"
160 DATA" ***************"
170 DATA"*****************"
180 DATA"    **** ****"
190 DATA"    ***   ***"
200 DATA"    **     **"
210 DATA"    *       *"
220 DATA "END"
I have no idea what version of BASIC that code would work on, and the program it wrote doesn’t really look like it’s doing the same thing, but still neat. In a future article (provided they continue to give us access to this AI), I plan to share some of the interesting things it can do with BASIC programs (including writing them from scratch).
But I digress…
Driving Miss Data
When I run the program, it starts printing out rows of numbers. Since there are seventeen rows of the graphic, it prints out seventeen lines of numbers. I needed to pause the program mid-printing so I can write down the numbers before they scroll off. (A fancier way would have been to have the program write out an ASCII BASIC program with the line numbers and DATA statements already in it which I could load back later. I think I showed how I do that in an earlier article somewhere on this site.)
Now that we have numbers for our DATA statements, a new version of the program could be written to generate the image using them. I will make use of the STRING$ that creates a string of a specific character of a specific length…
0 ' LOGIKER6.BAS
10 CLS
15 CH=32:PRINTTAB(7);
20 READ A:IF A=-1 THEN 220
25 IF A=0 THEN PRINT:GOTO 15
30 PRINT STRING$(A,CH);
35 IF CH=32 THEN CH=42 ELSE CH=32
40 GOTO 20
50 DATA 4,1,7,1,0
60 DATA 4,2,5,2,0
70 DATA 4,3,3,3,0
80 DATA 4,4,1,4,0
90 DATA 17,0
100 DATA 1,15,0
110 DATA 2,13,0
120 DATA 3,11,0
130 DATA 4,9,0
140 DATA 3,11,0
150 DATA 2,13,0
160 DATA 1,15,0
170 DATA 17,0
180 DATA 4,4,1,4,0
190 DATA 4,3,3,3,0
200 DATA 4,2,5,2,0
210 DATA 4,1,7,1,0
215 DATA -1
220 GOTO 220
Obviously those data statements could be combined in to fewer lines, but for this version I wanted them to match the same line number the original PRINT was on. You can easily compare the results:
50 DATA"    *       *"
50 DATA 4,1,7,1,0

60 DATA"    **     **"
60 DATA 4,2,5,2,0

70 DATA"    ***   ***"
70 DATA 4,3,3,3,0

80 DATA"    **** ****"
80 DATA 4,4,1,4,0
Before I show you the results, can you see the flaw in my program?
I’ll give you a hint… Line 170.
Close but no cigar
My program assumes each line starts with a space, so the first value will be printed as spaces, then the next value as asterisks, and so on. This causes a problem when it gets to the row that is entirely the asterisk it reads the first number and prints it as spaces, giving me this incorrect result:
I can think of several ways to solve this:
Use a different value other than 0 for “end-of-line” and make 0 mean “nothing to print, just switch to the astrisk”. That would change line 170 to be “DATA 0,17,X” (where “X” is the new end-of-line marker. This would probably require a new bit of IF logic to handle.
Make each group of data two bytes that specifies the character to print, and how many. Printing 17 asterisks would be “17,42”. Printing four spaces would be “4,32”. This would make the program logic simpler, but would double the size of the data. Depending on how much smaller the logic is, this might be a winner. (And I can think of optimizations to that as well, such as using 0 and 1 for the data to print and just printing “32+X*10” so it prints either 32 (if the value is 0) or 42 (if the value is 1). This is normally how I would have started, but I was trying to make the data as small as possible.
I could just encode the leading spaces at the start of each line rather than using TAB(7). By doing this, every line would start with a space. This would work for this specific challenge, but not be flexible for patterns that don’t start with a space.
For now, let’s make a quick change and try #3 by simply adding 7 to the first number in each DATA statement, and adding a 7 to line 170 which is the row that doesn’t have a space at the start. I think it would look like this:
0 ' LOGIKER7.BAS
10 CLS
15 CH=32
20 READ A:IF A=-1 THEN 220
25 IF A=0 THEN PRINT:GOTO 15
30 PRINT STRING$(A,CH);
35 IF CH=32 THEN CH=42 ELSE CH=32
40 GOTO 20
50 DATA 11,1,7,1,0
60 DATA 11,2,5,2,0
70 DATA 11,3,3,3,0
80 DATA 11,4,1,4,0
90 DATA 7,17,0
100 DATA 8,15,0
110 DATA 9,13,0
120 DATA 10,11,0
130 DATA 11,9,0
140 DATA 10,11,0
150 DATA 9,13,0
160 DATA 8,15,0
170 DATA 7,17,0
180 DATA 11,4,1,4,0
190 DATA 11,3,3,3,0
200 DATA 11,2,5,2,0
210 DATA 11,1,7,1,0
215 DATA -1
220 GOTO 220
Running this program produces the desired results! But, it has a drawback:
The data size grew. Not only did we add “7,” (two bytes) to line 170, but eleven other lines went from a 1-digit value to a 2-digit value. This means our data grew by 13 bytes. If we saved 13 bytes in the decoding routine, this is a win. If we did not, it is not an acceptable fix.
When I load the previous version of the program in to the XRoar emulator and PRINT MEM, it shows 22425 free. When I do the same with this version, I get 22416 — less memory free, so a larger program. This is bad, but the previous version is still missing the code to handle that line 170.
Perhaps, instead of adding 7 to each line to center on the screen, each line could just add 1 (so it doesn’t create two-digit values) and we can use TAB(6). That would look like this:
0 ' LOGIKER8.BAS
10 CLS
15 CH=32:PRINTTAB(6);
20 READ A:IF A=-1 THEN 220
25 IF A=0 THEN PRINT:GOTO 15
30 PRINT STRING$(A,CH);
35 IF CH=32 THEN CH=42 ELSE CH=32
40 GOTO 20
50 DATA 5,1,7,1,0
60 DATA 5,2,5,2,0
70 DATA 5,3,3,3,0
80 DATA 5,4,1,4,0
90 DATA 1,17,0
100 DATA 2,15,0
110 DATA 3,13,0
120 DATA 4,11,0
130 DATA 5,9,0
140 DATA 4,11,0
150 DATA 3,13,0
160 DATA 2,15,0
170 DATA 1,17,0
180 DATA 5,4,1,4,0
190 DATA 5,3,3,3,0
200 DATA 5,2,5,2,0
210 DATA 5,1,7,1,0
215 DATA -1
220 GOTO 220
Doing a PRINT MEM on that one shows 22421, so it is four bytes larger than the original, and still smaller than the “add 7” version. Perhaps that is good enough for now?
Combining all the lines to make a smaller program would look like this:
0 ' LOGIKER9.BAS
10 CLS
15 CH=32:PRINTTAB(6);
20 READ A:IF A=-1 THEN 220 ELSE IF A=0 THEN PRINT:GOTO 15
30 PRINT STRING$(A,CH);:IF CH=32 THEN CH=42 ELSE CH=32
40 GOTO 20
50 DATA 5,1,7,1,0,5,2,5,2,0,5,3,3,3,0,5,4,1,4,0,1,17,0,2,15,0,3,13,0,4,11,0,5,9,0,4,11,0,3,13,0,2,15,0,1,17,0,5,4,1,4,0,5,3,3,3,0,5,2,5,2,0,5,1,7,1,0,-1
220 GOTO 220
Better! But we can make it more better.
In the next installment, we will do something that I learned from studying the Atari 2600’s Adventure program…
Starting with that un-optimized version, I will change it to work on the CoCo 1/2/3’s 32-column screen by adjusting it to be properly centered on that display.
Unfortunately, this design is 17 rows tall, and the CoCo’s standard display is only 16. It won’t fit:
We should still be able to enter the challenge by having the program print this pattern, even if it scrolls off the screen a bit. To get one extra line there, we can get rid of the line feed at the end of the final PRINT statement in line 210 by adding a semi-colon to the end:
210 PRINT" * *";
And so it begins…
And so it begins
The goal is to make this as small as possible. There were many ways to approach last year’s Christmas tree challenge, and you can read about the results and a follow-up with suggestions folks gave to save a byte or two.
A simple thing is to remove the spaces at the front and replace them with the TAB() command:
Although this only looks like it saves a character per line (“TAB(8)” versus “seven spaces”), the code itself will be smaller since the TAB command tokenizes down to one (or maybe two?) bytes.
Also, the ending quote is not needed if it’s the last thing on a line, so they could be removed:
But, each line number consumes 5-bytes on it’s own, so a better way to save space would be to pack the lines together. Each line you eliminate saves five bytes. That would become pretty unreadable though, but let’s do it anyway:
This could still be made better, since the text lines were kept under the input buffer limitation size, but when you enter that line, BASIC compresses it (tokenizes keywords like PRINT, TAB and GOTO) making it take less space. You can then sometimes EDIT the line, Xtend to the end and type a few more characters.
That may or may not be allowed for the Logiker challenge. And since I want to provide code here you could copy and then load in to an emulator, I’ll keep it to the limit of what you could type in.
In the next installment, I’ll see if my brane can figure out a way to generate this code using program logic rather than brute-force PRINT statements.
Today Sebastian Tepper submitted a solution to the “draw black” challenge. He wrote:
I think this is much faster and avoids unnecessary SETs. Instruction 100 will do the POKE only once per character block.
– Sebastian Tepper, 7/5/2022
The routine he presented (seen in lines 100 and 101) looked like this:
10 CLS
20 FOR A=0 TO 31
30 X=A:Y=A:GOSUB 100
40 NEXT
50 GOTO 50
100 IF POINT(X,Y)<0 THEN POKE 1024+Y*16+X/2,143
101 RESET(X,Y):RETURN
It did see the criteria of the challenge, correctly drawing a diagonal line from (0,0) down to (31,31) on the screen. And, it was fast.
POINT() will return -1 if the location is not a graphics character. On the standard CLS screen, the screen is filled with character 96 — a space. (That’s the value you use to POKE to the screen, but when printing, it would be CHR$(32) instead.) His code would simply figure out which screen character contained the target pixel, and POKE it to 143 before setting the pixel.
So I immediately tried to break it. I wondered what would happen if it was setting two pixels next to each other in the same block. What would RESET do?
I added a few lines to the original test program so it drew the diagonal line in both directions PLUS draw a box (with no overlapping corners). My intent was to make it draw a horizontal line on an even pixel line, and odd pixel line, and the same for verticals. It looks like this (and the original article has been updated):
10 CLS
20 FOR A=0 TO 15

30 X=A:Y=A:GOSUB 100
31 X=15-A:Y=16+A:GOSUB 100

32 X=40+A:Y=7:GOSUB 100
33 X=40+A:Y=24:GOSUB 100

34 X=39:Y=8+A:GOSUB 100
35 X=56:Y=8+A:GOSUB 100

40 NEXT
50 GOTO 50
And this did break Sebastian’s routine… and he immediately fixed it:
100 IF POINT(X,Y)<0 THEN POKE 1024+INT(Y/2)*32+INT(X/2),143
101 RESET(X,Y):RETURN
I haven’t looked at what changed, but I see it calculates the character memory location by dividing Y by two (and making sure it’s an integer with no floating point decimals — so for 15 becomes 7 rather than 7.5), and then adds half of X. (Screen blocks are half as many as the SET/RESET pixels).
And it works. And it works well — all cases are satisfied.
And if that wasn’t enough, some optimizations came next:
And for maximum speed you could change line 100 from:
100 IF POINT(X,Y)<0 THEN POKE 1024+INT(Y/2)*32+INT(X/2),143
To time the difference, I added these extra lines:
15 TIMER=0
and:
45 PRINT TIMER
This lowers execution time from 188 to 163 timer units, i.e., down to 87% of the original time.
– Sebastian Tepper, 7/5/2022
Any time I see TIMER in the mix, I get giddy.
Spaces had been removed, 0 was changed to . (which BASIC will see a much faster-to-parse zero), and integer values were changed to base-16 hex values.
Also, in doing speed tests about the number format I verified that using hexadecimal numbers was more convenient only when the numbers in question have two or more digits.
– Sebastian Tepper, 7/5/2022
Awesome!
Perhaps final improvement could be to change the screen memory location from 1024/&H400 to a variable set to that value, the multiplication value of 32/&h20, as well as the 143/&H8F. Looking up a variable, if there are not too many of them in the list before the ones you’re looking up, can be even faster.
Using the timer value of 163 for our speed to beat, first I moved that extra space just to see if it mattered. No change.
Then I declared three new variables, and used DIM to put them in the order I wanted them (the A in the FOR/NEXT loop initially being the last):
11 DIM S,C,W,A
12 S=1024:W=32:C=143
...
100 IFPOINT(X,Y)<.THENPOKES+INT(Y/2)*W+INT(X/2),C
101 RESET(X,Y):RETURN
No change. I still got 163. So I moved A to the start. A is used more than any other variable, so maybe that will help:
11 DIM A,S,C,W
No change — still 163.
Are there any other optimizations we could try? Let us know in the comments.
Thank you for this contribution, Sebastian. I admire your attention to speed.
Recently, I was annoyed to find that there did not seem to be any way to set a black pixel on the CoCo’s normal green background. I have since been schooled in the simplest way to make this work, which I will share after a long digressing ramble.
Never the Same Color Twice
The CoCo’s MC6847 VDG chip provides nine colors. Commenter Jason wrote:
“It always bothered me that the CoCo had nine colors in semi-graphics modes. The number nine should raise a red flag for anyone who is familiar with computers and the tendencies for things to be powers of two.“ … “It’s interesting that seven of the eight colors are from the NTSC test pattern (https://en.wikipedia.org/wiki/SMPTE_color_bars) which leads me to believe they’re all a particular frequency distance from each other. This would make the circuitry simpler.”
– Jason
I suppose it’s actually eight foregrounds colors with a black background, which matches the black border of the screen. There was even a test pattern program included in one of Radio Shack’s quick reference guide that I still have:
Color Adjustment Test Display
5 FOR X = 0 TO 63
10 FOR Y = 0 TO 31
15 C = INT(X/8+1)
20 SET(X,Y,C)
25 NEXT Y,X
30 GOTO 30
That produces the following output, showing the eight possible colors (plus the black background):
Color Adjustment Test Display, Radio Shack TRS-80 Color Computer Quick Reference Guide, page 55.
And here is the NTSC test pattern Jason referenced:
By Denelson83 – Own work, CC BY-SA 3.0, https://commons.wikimedia.org/w/index.php?curid=1067498
This made me want to alter the program to make it render something with the matching colors in the correct order (and with the Xroar emulator set to not emulate a crappy 1980s RF modulated TV signal):
The 7 NTSC color bar colors that the CoCo produces.
The extra color that is not shown is orange. I wonder why those eight colors (plus black) were chosen? And what makes the colors used by the two PMODE high res graphics screens? I’ll have to revisit that in the future.
But I digress…
You can’t, even if you SET your mind to it
My original article was written because I noticed you couldn’t SET a black pixel on a normal CoCo text screen. Even though the manual listed nine colors, with zero being black, attempting to do SET(X,Y,0) would result in that pixel being set to the green background color instead of black — the same as SET(X,Y,1). While other colors acted as you expected…
CoCo SET command.
SET seemed to be treating color 0 (black) as 1 (green). Because reasons.
In order to SET a black pixel on the normal text screen, extra code would be needed.
Ciaran Anscomb
Xroar emulator author Ciaran Anscomb was the first to respond with his GOSUB routine to achieve the desired effects:
I mean I think you’re making it harder by asking for it to work with plain CLS and not CLS1, but in that case:
His method would PEEK the character value at the 2×2 block that was being SET and, if that value was less than 128, it would change it to 143 and then use RESET… And it works:
10 CLS
20 FOR A=0 TO 31
30 X=A:Y=A:GOSUB 100
40 NEXT
50 GOTO 50
99 ' Ciaran Anscomb
100 IFPEEK(1024+INT(Y/2)*32+INT(X/2))<128THENPOKE1024+INT(Y/2)*32+INT(X/2),143
110 RESET(X,Y):RETURN
Jim Gerrie
BASIC programmer extroidinaire Jim Gerrie provided his take on this routine:
His version sets some pixels to color 1, and some to color 0 (using the “.” shortcut), based on some math with X and Y and divisions and integer conversions and … well, stuff I don’t grasp.
His also works! But as it draws, you can see it blipping surrounding pixels in the 2×2 block on then off. And while it passes the test case which drew a diagonal line, it doesn’t allow for setting arbitrary pixels near each other. They turn into full blocks.
However, he also added a second attempt:
I know that my first suggestion above is a bit of a cheat. Here’s a more robust suggestion:
10 CLS 20 FOR A=0 TO 31 30 X=A:Y=A:GOSUB 100 40 NEXT 50 GOTO 50 100 IFPOINT(X,Y)<.THENXX=(X/2-INT(X/2)=.)-(X/2-INT(X/2)>.):YY=(Y/2-INT(Y/2)=.)-(Y/2-INT(Y/2)>.):SET(X,Y,1):SET(X-XX,Y,1):SET(X-XX,Y-YY,1):SET(X,Y-YY,1) 101 RESET(X,Y):RETURN
– Jim Gerrie
This version passes the test as well, and looks like it better handles setting pixels at any position without impacting pixels around it.
What’s the POINT?
Ciaran made use of PEEK to detect what was on the screen before adding something new, and Jim figured out what pixels to set back to the background color. Neither did it the way I was expecting — using POINT:
POINT (X,Y) Tests whether specified graphics cell is on or off, x (horizontal) = 0-63; y (vertical) = 0-31. The value returned is -1 if the cell is in a text character mode; 0 if it is off, or the color code If it is on, See CLS for color codes.

IF POINT(10,10) THEN PRINT "ON" ELSE PRINT "OFF"
I expected I’d see folks use this to see if a pixel was set, and handle accordingly. Somehow. But as I read this description (from the Quick Reference Guide), I see that note that says “The value returned is -1 if the cell is in a text character mode.”
Text character mode? It’s just the background, isn’t it?
All green backgrounds are not the same
And that takes me back to Ciaran’s code:
IF PEEK(1024+INT(Y/2)*32+INT(X/2))<128 . . .
Less than 128 is a text character. The graphics blocks (2×2) start as 128. If the square is a text character then set it to 143. So what is that? That is a 2×2 graphics block that has all pixels set to the green color. And that green color is the same color as the background screen. Which isn’t 143 when you use CLS. Try this:
CLS:PRINT PEEK(1024)
If you clear the screen then PEEK to see what value is at the top left character (1024), it returns 96. 96 is the space character (yeah, ASCII is 32, but values in screen memory aren’t ASCII).
Ciaran’s code sees if it’s anything (including that green space), set it to 143, which is a green block that looks the same. Try this:
CLS 1:PRINT PEEK(1024)
That will print 143. Yet, visually, CLS and CLS 1 look the same. But, CLS is filling the screen with the space text character (96) and CLS 1 fills it with the green graphics character (143)! CLS 0-8 fill the screen with solid graphics characters, and CLS with no parameter is the space.
Now, I knew about character 143 looking like the normal space but not being one, because we used to use this as a cheap “copy protection” method. On DISK, you could save out a file like this:
SAVE "HELLO.BAS"
…and you’d get a file on BASIC called HELLO.BAS. But, if you did this:
SAVE "HELLO"+CHR$(143)+".BAS"
…Disk BASIC would write out a file called HELLO(char 143).BAS. When you did a DIR they would look the same, but you couldn’t do a LOAD”HELLO.BAS” to get the one with the CHR$(143) in it. Unless you exempted the disk directory bytes you would not know there was an “invisible” character at the end of the “HELLO” filename.
Sneaky. And I did this with some of my own programs.
But years later, when the CoCo 3 came out, it’s 40 and 80 column screen did NOT support the 2×2 graphics block characters, and this trick was no longer as sneaky since you would see “HELLO(some funky character).BAS” in the directory listing and know something weird had been done.
But I digress, again…
Why do it the hard way, anyway?
It turns out, even though I knew about the “add CHR$(143)” trick, I had forgotten (or never knew/realized) that CLS and CLS 1 filled the screen with different characters. And, if the screen has a graphics character at the position, RESET will then work to change that pixel back to black.
Ciaran got me exploring this because in his e-mail he added:
If you allow CLS1, the problem solves itself :)
– Ciaran Anscomb
I had to follow up and ask what he meant by this. And, well, nevermrind, then. All I needed to do was start the program with CLS 1 instead of CLS 0, and then I could use RESET() to set individual black pixels on the screen.
I could have a subroutine that expect X, Y and C (for color) and if the color was 0 (black), do a RESET, else do a SET:
0 REM RESET
10 CLS 1
20 FOR A=0 TO 31
30 X=A:Y=A:C=0:GOSUB 100
40 NEXT
50 GOTO 50
100 IF C=0 THEN RESET(X,Y) ELSE SET(X,Y,C)
110 RETURN
And that works fine on any CLS 0-8 screen. Remember, SET(X,Y,0) never gives you a black pixel. 0 seems to mean “background color” instead, while RESET(X,Y) seems to mean “set to black”.
To me, this is a bit counterintuitive, since today I would expect “reset” to mean “set to background color” but this isn’t a graphics mode — it’s just graphics characters on a screen, so the only way BASIC could have done this is if it remembered what the CLS # value was, and made RESET set to that color. Which would be extra ROM space for a simple enhancement that most could work around with RESET instead.
It seems like all I’m doing lately is regurgitating things that Robin of 8-Bit Show and Tell has already done.
So let’s do that again.
Don’t blame me. Blame YouTube!
YouTube did what YouTube does and it showed me another of Robin’s well-done videos. This one caught my attention because it dealt with the Commodore VIC-20 and its Super Expander cartridge.
The main thing that pulled me away from Commodore was seeing the TRS-80 Color Computer’s Extended Color BASIC. The CoCo had simple commands to play music and draw lines, boxes and circles. It also had this wondrous ELSE command I’d only heard rumors about.
On the VIC-20, it seemed you needed to use POKE and PEEK for just about anything graphics or sound related. Thus I gave up a computer with programmable characters and a hardware sound chip for a machine that had neither. On my new CoCo, at least I could draw a circle and play music without needing pages of DATA statements and cryptic PEEKS and POKEs.
Commodore was aware of this shortcoming, and they sold the Super Expander as a way to make up for it. Not only did it provide an extra 3K of memory (giving a whopping 6.5K for BASIC), it also added new commands to do “high resolution” graphics including drawing lines and circles, as well as ways to PRINT music using simple notation.
I used the Super Expander to do TV titles for fishing videos my father shot and edited. It was a thrill to see my VIC-20 graphics on TV screens at the Houston Boat Show.
But no one else could run my programs unless they had purchased the Super Expander as well.
But I digress.
(And besides, the Commodore 64 was $600 when it came out, and I was able to get a 64K CoCo 1 for $300 at the time.)
Don’t blame YouTube. Blame Twitter.
Robin’s video was making use of the Super Expander to let the VIC-20 solve a challenge initiated by Twitter user Dataram_57. On June 8th, 2019, they wrote:
I challenge every mathematician and programmer to solve this problem. Write the equation that you will use to change the position of the red point according to time and the animation. (You can use every function without if statement)???? #programming#math#mathgames#programmerpic.twitter.com/UDgGv1pajB
— D̨̯̞̜͇a̶͙̤t̵̪̤̺̪ͅḁ̱̳̱͠r̡a̦͞m͍̩̗͉͢ (@Dataram_57) June 8, 2019
This was, more or less, a classic bouncing ball program very much like the ones I have been writing about lately. But, all mine certainly made use of IF. Here’s how mine started:
0 REM bounce.bas
10 CLS:X=0:Y=0:XM=1:YM=1
20 PRINT@Y*32+X,"O";
30 X=X+XM:IF X<1 OR X>30 THEN XM=-XM
40 Y=Y+YM:IF Y<1 OR Y>13 THEN YM=-YM
50 GOTO 20
That’s not a very good example. It doesn’t erase itself, nor does it use the bottom line to avoid screen scrolling when the ball hits the bottom right position. It does show how I would use X and Y coordinates then an XM (X movement) and YM (Y movement) variable to increment or decrement them based on if they hit an edge.
The parameters of Dataram_57’s challenge were as follows:
Width: 90
Height: 80
Starting Position: 0,0
Time: ???
I wrote a quick graphical program do do this using my X/Y/XM/YM method:
0 REM dataram_57 twitter challenge
1 POKE 65495,0
10 W=89:H=79:X=0:Y=0:T=0:XM=1:YM=1
20 PMODE0,1:PCLS0:SCREEN1,1
30 LINE(0,0)-(89,79),PSET,BF
40 PSET(X,Y,0)
50 X=X+XM:IF X<0 THEN XM=1:GOTO 50 ELSE IF X>=W THEN XM=-1:GOTO 50
60 Y=Y+YM:IF Y<0 THEN YM=1:GOTO 60 ELSE IF Y>=H THEN YM=-1:GOTO 60
70 T=T+1:IF T=7031 THEN END
80 GOTO 40
The first thing to notice is that I draw a filled box from 0,0 to 89,79 and then set black pixels in it. This lets me visually verify my line is going all the way to the edge of the 90×80 target area. Also, I am using the CoCo 1/2 double speed poke since this is time consuming. If you do this on a CoCo 3, feel free to use POKE 65497,0 instead.
Twitter user Dataram_57’s challenge running on a CoCo.
Eventually the area should be entirely black when every dot has been erased.
How long has this been going on?
I did some tests and figured out that it takes 7032 iterations (0-7031) for the dot to cycle through the entire 90×80 area before it has erased all the other dots.
With that in mind, I propose we turn this into both a logic and optimization challenge. On the CoCo, let’s see if we can use the PMODE 0 screen (128×96 resolution with 1 color). We can put this in a modified version of benchmark framework for 7032 cycles and see how fast we can do it. (By modified, I am removing the outer “try this three times and average the results” loop.)
My example, using IFs, looks like this:
0 REM dataram_57 twitter challenge 2
1 POKE 65495,0
5 DIM TM,A
10 TIMER=0:TM=TIMER

15 W=89:H=79:X=0:Y=0:XM=1:YM=1
16 PMODE0,1:PCLS0:SCREEN1,1
17 LINE(0,0)-(89,79),PSET,BF

20 FORA=0TO7030

30 PSET(X,Y,0)
40 X=X+XM:IF X<0 THEN XM=1:GOTO 40 ELSE IF X>=W THEN XM=-1:GOTO 40
50 Y=Y+YM:IF Y<0 THEN YM=1:GOTO 50 ELSE IF Y>=H THEN YM=-1:GOTO 50

80 NEXT
90 PRINTTIMER:END
Mine, running in Xroar, displays 9808 at the end. And it’s not the correct way to meet the requirements of the challenge, so … the real versions may be faster, or slower.
Your challenge, should you decide to accept it…
Our challenge is to:
Rewrite this to work WITHOUT using any “IFs”.
Try to make it as fast as possible while keeping the benchmark code (lines 5, 10, 20, 80 and 90) intact. You can add variables to the DIM, but otherwise leave those lines alone.
What says you?
Credit where credit is due…
And lastly, for those who want to cheat, here is the solution that Robin came up with using the VIC-20 Super Expander cartridge…
Is his the only way? The best way? The fastest way?
My original “nicer to read, slower to run” version took 25.28 seconds to run. Here are some things that can speed it up.
RENUMber by 1
Renumbering the program by 1 can save program memory (since “GOTO 77” takes less space than “GOTO 1500”, and if the program is large enough, you get a slight speed increase since it’s also less work to parse shorter line numbers. But this program is too small for this to matter.
Remove comments / avoid comments at the end of lines
Removing comments, in general, is a good way to make a program smaller (and thus, a bit faster since BASIC will have less lines to skip). But, as I found out, comments at the end of lines are a real problem, since BASIC cannot just skip the entire line like it can if the line starts with a comment:
10 X=42:REM SET X TO THE ANSWER.

10 REM SET X TO THE ANSWER.
20 X=42
The second version is faster, since even though BASIC has to scan an extra line, it can immediately skip it, while the first example must be parsed, character-by-character, to find the end of that line. But for this example, this did not help. It would have, if there were more GOTOs to earlier line numbers, since they would have to parse through a few lines with end comments, which would be slower. Since our looping was done with a FOR/NEXT, we didn’t have to do that.
Remove unnecessary spaces
Spaces are great for readability, but bad for code size and speed. There are only a few times when a space is needed, such as when BASIC can’t tell if the next character is a keyword or part of a variable:
10 IF A=B THEN 100
BASIC must have the space between the variable and the keyword THEN, else the parser isn’t sure if the variable is “B” or “BT” followed by the characters HEN. BUT, if it’s a number, it can figure it out:
10 IFA=42THEN100
Removing all other spaces reduces the amount of code BASIC has to parse through. My program had plenty of spaces. Removing them in this tiny program only reduced it to 25.15 seconds, but it can have a bigger impact on larger programs.
Combine lines
This one is easy. The less lines BASIC has to scan through, the quicker it will run. But, there are exceptions to this. Any time BASIC has to do more work at the end of a line, such as checking an ELSE, if that condition is not satisfied, BASIC has to scan forward character-by-character to get to the end of the line:
10 IF X=42 THEN 100 ELSE PRINT "I DON'T KNOW THE ANSWER"
Above, if X is 42, the ELSE code will not be ran. BUT, before the program can find 100, it has to scan through all the rest of the bytes in that line to find the end of it, then it continues scanning a line at a time looking for 100. Based on line lengths, sometime it might be faster to do:
10 IF X=42 THEN 100
20 IF X<>42 THEN PRINT "I DON'T KNOW THE ANSWER"
Combining lines in the program reduced the speed slightly to 25.13 seconds. The more code, the more you save by doing this (and it makes the program smaller, since every line number takes up space).
NEXT without variable
Unless you are doing really weird stuff with FOR/NEXT loops, it’s faster to leave off the variable in the NEXT. For example:
10 FOR A=1 TO 10:NEXT A
…will be slower than:
10 FOR A=1 TO 10:NEXT
NEXT without a variable will go to the most recent FOR anyway, so this works fine:
10 FOR A=1 TO 10
20 FOR B=1 TO 20
30 PRINT A,B
40 NEXT
50 NEXT
For this program, just removing the variables from NEXT A and NEXT Z increased the speed to 24.66 seconds.
Use HEX instead of decimal
It takes much more work to convert base-10 (i.e., “normal”) decimal numbers than it does to convert base-16 (hex) values. Every time a number is encountered, time can be saved by simply changing the number to a HEX — even though a hex digit has to start with “&H”. It will make the program larger, since 15 takes less bytes than &HF. For this example, it reduced time down to 21.66 seconds!
Pre-render strings
If you have to PRINT a generated string more than once, you are better off pre-rendering that string first so it only gets generated one time. This includes using things like STRING$, CHR$, etc. For example:
10 PRINT CHR$(128);"HELLO";CHR$(128)
Each time BASIC has to print that, it allocates a new string a few times and copies things over. See my string theory article for more details. For this program, I use STRING$() to generate a repeating block of characters. But, since it’s in a loop to print the block, it generates the same string over and over for each line of the block. Instead of this:
10 FOR A=1 TO 10
20 PRINT STRING$(10,128)
30 NEXT A
…I could generate that string ahead of time and just print it in the loop:
5 LN$=STRING$(10,128)
10 FOR A=1 TO 10
20 PRINT LN$
30 NEXT A
In this program, doing this trick reduces the time to 20.98 seconds! String are slow, you see…
The time savings so far…
Combining all of these (the ones that matter, at least), reduces time taken down to 18.45 seconds – saving 6.83 seconds overall.
Here is what it looks like, with the stuff outside of the benchmark timing loop left alone:
If we’d done any GOTO/GOSUBing to earlier lines, that would have to scan through those lines with ending REMarks, so cleaning all that up would be useful. If this was a larger program, RENUMbering by 1s might also squeak out a bit more speed.
But wait! There’s more!
I originally wrote this follow-up the evening that I wrote the original article. However, several folks have contributed their own optimizations. Let’s see what they did…
First, we go to the comments of the original article…
George Phillips – inner loop optimization
My current best effort is going full strength reduction on the inner loop. Replace lines 120 to 170 with:
The STRING$ requires Extended Color Basic which starts at a baseline of 20.4 seconds and those changes get it down to 13.
George Phillips
George pre-rendered the string, removed spaces, and vastly sped things up by simplifying the math. On Xroar, it reports 16.15 – faster than any of my efforts. Nice job!
I took his updated code and converted the integers to HEX and that dropped it to 15.1 seconds! Even faster.
Jason Pittman – hex and start row calculation
Interestingly, changing the blue square value on line 130 to hex (“&HAF”) saves about 11.5% for me (27.55 to 24.33). Then, moving the row start calculation out of the print statement takes it down to 22.87.
120 FOR A=32 TO H*32 STEP 32 130 PRINT@P+A,STRING$(W,&HAF) 140 NEXT A
Jason Pittman
Ah, the magic of hex! Jason did a similar trick with the row calculation. I tried Jason’s updates, and it was 20.28 on my Xroar. George is still in the lead.
Adam – DIM, reductions and variable substituion
So I was able to cut out 5 seconds doing the following: – DIM all variables – Adding variables for constants (2, 32, etc.) for lines 130, 160. – Removing the math in lines 10, 20. – Removing the variables after NEXT. – Removing all remarks.
No change to the original algorithm or PRINT line.
Coco3 (6309): Original code = 27.15s. Optimized code 22.13s. With high speed poke: 11.05s. :D
I’m intrigued with the post that mentioned using HEX values. I may have to try that.
Adam
Ah! Using a variable rather than a constant can be significantly faster. I didn’t think about that, even though I’ve previously benchmarked and tested that. He adds:
I just put the STRING$ statement into a variable as suggested by George Phillips. That took out another 2 seconds! I also ran RENUM 1,,1. Run time is down from 27.2 s to 20.1 s.
L$=STRING$(W,C) FORA=1TO H PRINT@P+A*B,L$ NEXT
Adam
It looks like George has gotten us all thinking. I don’t have Adam’s code to test, but I am going to experiment with replacing the constants with variables and see what that does.
Ciaran Anscomb – uh… not really sure!
The author of Xroar chimes in:
So I cheated and read the comments on your page and combined some of those techniques (and replace /2 with *1/2, forgot about that…).
Ciaran reorganized the code, placing initialization at the end. This is a habbit I need to get into since GOTO/GOSUB to an earlier line number have to start at the FIRST line of the program and scan forward EVERY TIME. Code that only needs to run once, if placed at the top, slows down every GOTO to an earlier line number.
I just ran this and got 13.13 seconds!
There is alot to dissect here. Numbers are replaced with variables. Stuff is pre-calculated. And he’s using a variable for the end of a FOR/NEXT, for some reason. I’m going to have to dig in to that one.
Twice as fast, indeed!
I feel like there were a few more responses, but I can’t locate them at the moment, so maybe there will be a second attempt article down the line.
Until next time, kudos to all of you for giving me new things to consider — especially Ciaran with that amazing improvement. Very impressive.
Here is a simple Color BASIC program that will scale blue box on the screen from small to large then back, going through the scaling processes 100 times.
0 REM scale.bas
10 SW=32/4 ' SCALE WIDTH
20 SH=16/3 ' SCALE HEIGHT
30 SM=.1   ' SCALE INC/DEC
40 S=.5    ' SCALE FACTOR
70 TM=TIMER:FOR Z=1 TO 100
80 W=INT(SW*S)
90 H=INT(SH*S)
100 P=15-INT(W/2)+(7-INT(H/2))*32
110 CLS
120 FOR A=1 TO H
130 PRINT@P+A*32,STRING$(W,175)
140 NEXT A
150 S=S+SM
160 IF H<1 OR H>15 THEN SM=-SM:S=S+(SM*2)
170 NEXT Z
180 ' 60=NTSC 50=PAL
190 PRINT:PRINT (TIMER-TM)/60;"SECONDS"
After this runs, it will report the approximate number of seconds it took. It does this by resetting the TIMER at the start, then printing the current TIMER value divided by 60 (since the CoCo timer is based on the NTSC video interrupt that happens 60 times a second).
NOTE: If you run this on a PAL system, you will need to change the 60 to a 50 in line 190. (edit: thanks, George P., for catching my typo.)
On the Xroar emulator running on my Mac it reports 25.25 seconds.
Color BASIC scaling demo.
Your challenge, should you decide to accept it, is to take this code and make it run faster.
Rules
You must leave the basic algorithm intact (the SW, SH, S and SH stuff with all the math). You can rename variables, change the representation of values, speed up PRINTing, etc. but the core program flow should remain the same.
For bonus points, you are welcome to rewrite the program (in BASIC) to improve upon the algorithm in any way that makes sense, provided it achieves the same results (including the 1 to 100 benchmark loop).
There are some very (very!) simple things that can be done to dramatically improve the speed to his code.
Feel free to share your efforts in the comments. If you post your code, be sure to post the resulting time, too.