Author Archives: Allen Huffman

About Allen Huffman

Co-founder of Sub-Etha Software.

CoCo and 16-bits

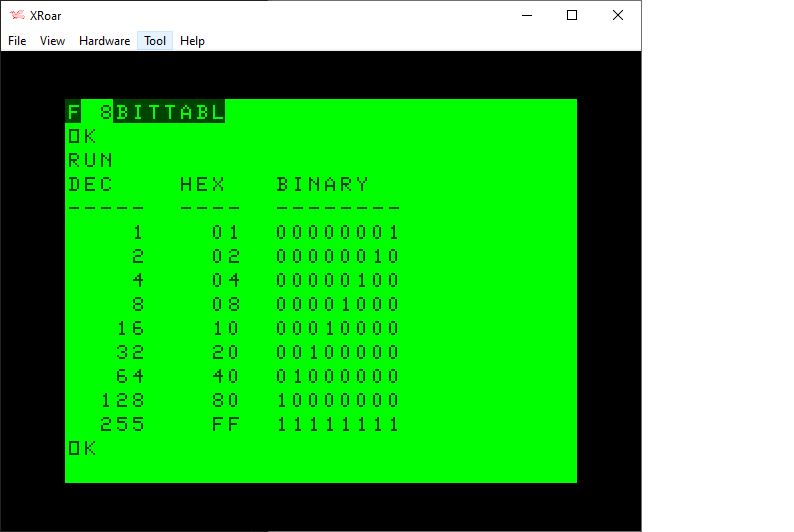
When dealing with bits in Color BASIC, we have AND, OR and NOT. Unfortunately, we can really only use these on values 15-bits or less. For example, here is a table represent various 8-bit values in the range of 0-255:

Dec    Hex   Binary
-----  ----  --------
    0    00  00000000
    1    01  00000001
    2    02  00000010
    4    04  00000100
    8    08  00001000
   16    10  00010000
   32    20  00100000
   64    40  01000000
  128    80  10000000
  255    FF  11111111

We have no problem using 8-bit values with standard Color BASIC. Here is my routine that will print out the bits of any 8-bit value:

0 REM 8BITS.BAS
10 DIM BT(7):FOR BT=0 TO 7:BT(BT)=2^BT:NEXT
20 INPUT "VALUE     ";Z
30 GOSUB 500:GOTO 20
500 REM SHOW Z AS BINARY
510 FOR BT=7 TO 0 STEP-1
520 IF Z AND BT(BT) THEN PRINT "1"; ELSE PRINT "0";
530 NEXT
540 PRINT Z:RETURN

Here is a program using that routine that will print out a similar table:

0 REM 8BITTABL.BAS
10 DIM BT(7):FOR BT=0 TO 7:BT(BT)=INT(2^BT):NEXT
20 PRINT "DEC    HEX   BINARY"
30 PRINT "-----  ----  --------"
40 FOR I=0 TO 7:Z=INT(2^I)
50 GOSUB 100
60 NEXT
70 Z=255:GOSUB 100
80 END

100 REM PRINT TABLE ENTRY
110 PRINT USING"#####    ";Z;
120 IF Z<&H10 THEN PRINT "0";
130 PRINT HEX$(Z);"  ";
140 GOSUB 500
150 RETURN

500 REM SHOW Z AS BINARY
510 FOR BT=7 TO 0 STEP-1
520 IF Z AND BT(BT) THEN PRINT "1"; ELSE PRINT "0";
530 NEXT
540 PRINT:RETURN

When I started experimenting with bits like this, I tried to modify my routine to work with 16-bit values. It did not work:

0 REM 8BITTABL.BAS - DOES NOT WORK!
10 DIM BT(15):FOR BT=0 TO 15:BT(BT)=INT(2^BT):NEXT
20 PRINT "DEC    HEX   BINARY"
30 PRINT "-----  ----  ----------------"
40 FOR I=0 TO 15:Z=INT(2^I)
50 GOSUB 100
60 NEXT
70 Z=255:GOSUB 100
80 END

100 REM PRINT TABLE ENTRY
110 PRINT USING"#####  ";Z;
120 IF Z<&H10 THEN PRINT "0";
121 IF Z<&H100 THEN PRINT "0";
122 IF Z<&H1000 THEN PRINT "0";
130 PRINT HEX$(Z);"  ";
140 GOSUB 500
150 RETURN

500 REM SHOW Z AS BINARY
510 FOR BT=15 TO 0 STEP-1
520 IF Z AND BT(BT) THEN PRINT "1"; ELSE PRINT "0";
530 NEXT
540 PRINT:RETURN

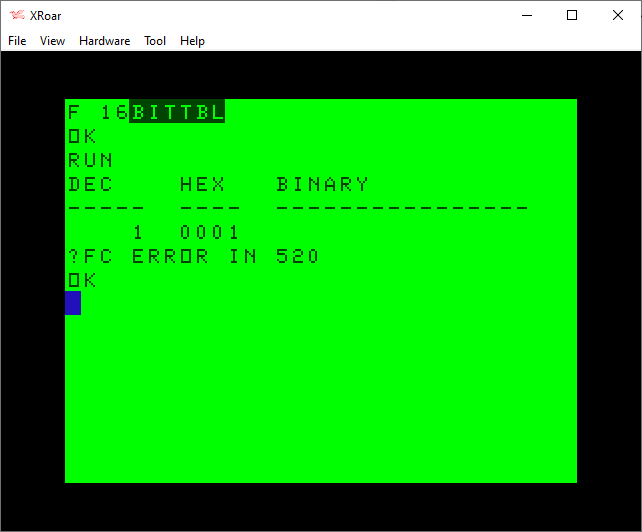
A bit of investigation revealed that AND could not operate on values greater than 32767 (&H3FFF in hex):

I did not understand why, but I expected it has something to do with integer values being treated as signed values, as if this was an INT16 (−32768 to +32767 range) rather than a UIN16 (0-65535 range).

rflberg to the rescue

I had recently posted a series of YouTube videos discussing bits in Color BASIC. My most recent one showed a program I wrote that demonstrated AND, OR and NOT operations:

The program I demonstrated looked like this:

0 REM ANDOR.BAS
10 DIM BT(7):FOR BT=0 TO 7:BT(BT)=INT(2^BT):NEXT
20 INPUT "VALUE     ";V
30 PRINT "(A/O/N)";
40 A$=INKEY$:IF A$="" THEN 40
50 IF A$="A" THEN M=0:PRINT "AND";:GOTO 90
60 IF A$="O" THEN M=1:PRINT "OR ";:GOTO 90
70 IF A$="N" THEN M=2:PRINT "NOT":GOTO 100
80 SOUND 1,1:GOTO 40
90 INPUT O
100 PRINT:PRINT "    ";:Z=V:GOSUB 500
110 IF M=0 THEN PRINT "AND ";:Z=O:GOSUB 500:Z=V AND O:PRINT "    ";:GOSUB 500
120 IF M=1 THEN PRINT "OR  ";:Z=O:GOSUB 500:Z=V OR O:PRINT "    ";:GOSUB 500
130 IF M=2 THEN PRINT "NOT ";:Z=NOT V:GOSUB 500
140 PRINT:GOTO 20

500 REM SHOW Z AS BINARY
510 FOR BT=7 TO 0 STEP-1
520 IF Z AND BT(BT) THEN PRINT "1"; ELSE PRINT "0";
530 NEXT
540 PRINT:RETURN

In the video I explain how it works, somewhat, but you will notice it works only on 8-bit values. Because I did not know a way to make it work.

However, in the comments, use rflberg left a few comments:

IF you want to see the full bits change the program to this:

10 DIM BT(15):FOR BT=0 TO 15:BT(BT)=2^BT:NEXT
501 IF Z<0 THEN PRINT”1″; ELSE PRINT”0″;
510 FOR BT=14 TO 0 STEP -1

rflberg (via YouTube)

I was intrigued. The modifications did not work for me, but a few additional comments help me understand the intent:

-1 is actually 1111111111111111 and 255 is 0000000011111111. It computes numbers -32768 to 32767. Negative numbers the most significant bit is a 1 and positive numbers is a 0.

-32768 is 1000000000000000 and 32767 is 0111111111111111

rflberg (via YouTube)

I experimented with this for awhile last night, and now I think I understand it. AND, NOT and OR allow you to pass in 0 to 32677 just fine. But, you can also pass in -32768 to -1 as well! It seems to be using the high bit (bit 15) to indicate a negative value. The explanation was to simply use negative values to make AND, NOT and OR see that bit.

The code modification would work if I passed in 0-32767 for the normal 15-bit range then -32768 to 1 to represent the high-bit range. I should be able to modify my routine to do this automatically.

I could use standard bit values for bits 0 to 14 (my BT array values of 1, 2, 4, 8, 16, 32, 64, 128, 256, 512, 1024, 2048, 4096, 8192, and 16384, just like in the earlier table), and then have a special case for bit 15 — a value of -32768 — which I would have in the array as BT(15)=-32768.

Then, in the print bit routine I could check to see if the value was greater than 32767, and turn it in to a negative number by subtracting 65536. (i.e., 32767 would be fine, but 32768 would turn in to -32768).

Since I print out the integer value after the bit display, I decided to make a temporary (altered) variable Z2, and retain the user’s intended Z value. This means I could pass in 32768 and it would print 32768, but would be really using -32768.

I ended up with a minor modification to my program, giving me this routine that will display the bits of any 16-bit value (0-65535):

0 REM 16BITS.BAS
1 REM WORKS THANKS TO rflberg
10 DIM BT(15):FOR BT=0 TO 14:BT(BT)=INT(2^BT):NEXT:BT(15)=-32768

20 INPUT "VALUE     ";Z
30 GOSUB 500:GOTO 20
500 REM SHOW Z AS BINARY
505 IF Z>32767 THEN Z2=Z-65536 ELSE Z2=Z
510 FOR BT=15 TO 0 STEP-1
520 IF Z2 AND BT(BT) THEN PRINT "1"; ELSE PRINT "0";
530 NEXT
540 PRINT Z;Z2:RETURN

Using this updated routine, I modified my table printing program to handle 16-bits:

0 REM 8BITTABL.BAS
1 REM WORKS THANKS TO rflberg
10 DIM BT(15):FOR BT=0 TO 14:BT(BT)=INT(2^BT):NEXT:BT(15)=-32768
20 PRINT "DEC    HEX   BINARY"
30 PRINT "-----  ----  ----------------"
40 FOR I=0 TO 15:Z=INT(2^I)
50 GOSUB 100
60 NEXT
70 Z=65535:GOSUB 100
80 END

100 REM PRINT TABLE ENTRY
110 PRINT USING"#####  ";Z;
120 IF Z<&H10 THEN PRINT "0";
121 IF Z<&H100 THEN PRINT "0";
122 IF Z<&H1000 THEN PRINT "0";
130 PRINT HEX$(Z);"  ";
140 GOSUB 500
150 RETURN

500 REM SHOW Z AS BINARY
505 IF Z>32767 THEN Z2=Z-65536 ELSE Z2=Z
510 FOR BT=15 TO 0 STEP-1
520 IF Z2 AND BT(BT) THEN PRINT "1"; ELSE PRINT "0";
530 NEXT
540 PRINT:RETURN

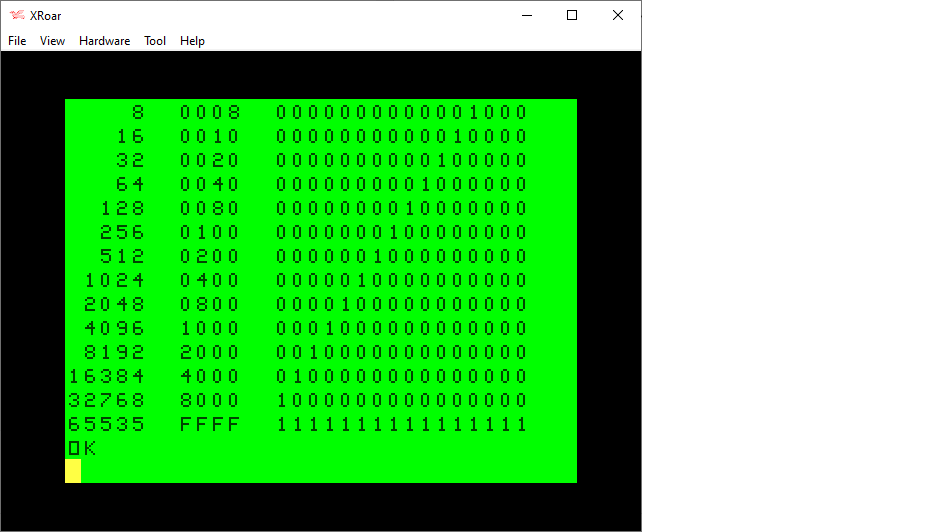
Tada! Thanks for those great YouTube comments, I now have a workaround to doing bit detection on all 16 bits. Thank you very much, rflberg!

Insta360 ONE X2: default WiFi password and telnet root access?

Updates:

  • 2022-1-28 – Additional details.
  • 2022-1-31 – Added link to YouTube video discussion.

Over on REDDIT I found a troubling post about the 360 camera I am currently reviewing:

Doing a bit of searching led me to more information elsewhere in a forum post from 3/6/2021:

https://www.goprawn.com/forum/ambarella-cams/19528-insta360-one-x2-runs-on-amba

How can a popular consumer product have a hard-coded WiFi password that gives access to all your photos and videos? Even worse, how can it have a non-encrypted telnet server (which even Windows and macOS have removed) that lets one log in as the root user without needing a password?

Since this information has been public for at least almost a year, and the problem remains in the most recent firmware update (dated 1/22/2022 as of this writing), either Insta360 is unaware of the problem or doesn’t think it is a problem.

Either way, I think I’m going to change the root password on mine, and a REDDIT reply says you can change the WiFi password if you don’t mind manually connecting WiFi to the camera each time.

Baby steps.

Until next time…

Additional Details

WiFi password is reportedly generated by Bluetooth, and ends up in a temporary file created each time:

/tmp/wpa_supplicant.conf

The script that generates this file is in /usr/local/share/script/

There, I see places where AP_PASSWD is set, overwriting a default of 1234567890 listed in wifi.conf/wifi.ap.conf.

ap_start.sh may be the one (AP = access point).

I will share details on if there is any easy way to alter the password from the default, assuming the Insta360 app allows that. My thought is generating a new file on startup and making it read-only so the app cannot overwrite it.

Shared Security Show on YouTube

Discussed at the 14:40 mark.

Why is choosing a 3-D printer so difficult?

Years ago, I started following some early consumer 3-D printer projects on sites like Kickstarter. At the time, existing 3-D printers were very, very expensive, and/or built from kits. The future was promising consumer pricing on printers that would actually be usable by consumers rather than engineers.

In 2017, I picked up a cheap Monoprice Mini Delta printer, today known as the “Malyan M300” model, since Monoprice has since released a newer Mini Delta V2 that is a completely different machine.

Back then, I made the choice due to price. Small printers like this had dropped below $200 and the Mini Delta was actually cheaper than the last several EPSON inkjet printers I had bought.

I had trouble figuring out how to use the printer, and was pointed to Simplify3D software. That had a profile ready to go for the Mini Delta, and was super easy to figure out how to us. I’ve been printing stuff ever since… The only thing I was lacking it the ability to build larger items.

Upgrade path?

Today, there are hundreds — if not thousands — of 3-D printers for sale. You can pick up cheap ones for under $100, or get a well reviewed “good” printer in the $200-$300 range.

But which one should you choose? Every “good” printer, if you read the reviews, has tons of folks praising it as their favorite, and tons of folks saying it’s garbage and is nothing but problems. The 3-D printer market seems to have very inconsistent quality control.

But beyond that … here is what we need:

Buying a 3-D printer: What we need.

Part 1 – An elimination system.

When I ask about a printer, folks always say “it depends on what you want to do with it.” The first round is to simply eliminate printers that do not meet your requirements:

  1. If you have specific needs, such as how large an item you want to build, or how fast you require it to be built, you can immediately stop looking at all printers that do not meet those requirements. You can do the same with OS support (Mac, Windows, Linux).
  2. Not all printers print all materials. If you want to print flexible materials, some printers are great at that, and others cannot do it at all. If your goal is to print “rubberized” phone cases, you can instantly eliminate alot of choices.

Part 2 – Quality

The next part is something that should be 100% achievable without any opinions getting in the way. The job of a 3-D printer is to take a digital design and turn it in to the three-dimensional object. It should be trivial to simply run through a series of prints that exercise different aspects of printing (overhands, the need for supports, etc.) and then scan the resulting object and compare it against the digital blueprints. You should be able to end up with a simple list of accuracy in different categories, much like any auto buyer’s guide breaks down vehicles in to a simple set of basic categories.

Part 3 – Opinion

The last part should be the opinion part. How many units were dead on arrival? How many have had to be repaired? How fast is support? etc.

Even if you find the best printer, if it breaks and you can’t fix it, maybe it’s not a good choice. BUT, maybe you are fine getting past a project even if your printer breaks in six months and never runs again. That is why I think this choice should be last.

So … why is there no such website? Number two should be especially easy, as would be speed. At least we should have those.

Until next time…

The many, many Insta360 Selfie Sticks

Updates:

  • 1/18/2022 – Page created.
  • 2/17/2022 – Added some Bullet Time Bundle details.
  • 4/26/2022 – Added the new Power Selfie Stick.
  • 4/18/2024 – Added new sticks.

Why are there so many? What are the differences? Let’s find out…

The first problem is that the official insta360.com online store does not currently give any specifications of these accessories. Only two mention a length in their product name. You can find their full accessory list here:

https://store.insta360.com/accessory

The following table will contain information as I obtain it.

Summary

Product
Collapsed LengthExtended LengthWeightBuilt-In Tripod?PriceNotes
2-in-1 Invisible Selfie Stick + Tripod24 cm / 9.4 in105 cm / 41.3 cmYes$25
70cm Invisible Selfie Stick15 cm / 6 in70 cm / 27.5 in$19.99
85cm Invisible Selfie Stick (2024)
85 cm / 33.5 in19.4 cm / 7.64 in119 g / 4.2 oz$24.99
114cm Invisible Selfie Stick (black)23.3 cm / 9.2 in114 cm / 44.9 in118 g / 4.16 oz$24.99
114cm Invisible Selfie Stick Gold Edition23.3 cm / 9.2 in114 cm / 44.9 in118 g / 4.16 oz$24.99Golden color
120cm Invisible Selfie Stick23.5 cm / 9.25 in120 cm / 47.4 in$16
Action Invisible Selfie Stick28 cm / 11 in100 cm / 39.3 in124.3 g / 4.4 oz$49.99Carbon fiber
All-Purpose TripodYes$34.90
Bullet Time AccessorySee 114cm Selfie StickSee 114cm Selfie StickSee 114cm Selfie StickIncludes Handle (Tripod)$64.99
Bullet Time Handle (Tripod)16.9 cm / 6.6 inN/AYes$40
Extended Edition Selfie Stick (new version)36 cm / 14 in3 m / 9.8 ft365 g / 12.9 oz$99.99
Extended Edition Selfie Stick (old version)55.8 cm / 22 in304.8 cm / 10 ft
Mini 2-in-1 Tripod97 g / 3.42 oz$29.99
Power Selfie Stick33 cm / 13 in100 cm / 39.3 in280 g / 9.8 oz$69.994500 mAh battery and power/shutter buttons. Cannot get wet.

120cm Invisible Selfie Stick

  • Possibly the one included with the special Apple Store X2 kit.

2-in-1 Invisible Selfie Stick + Tripod

  • Larger selfie stick (in thickness) with a fold-out tripod at the end of the handle.

70cm Invisible Selfie Stick

  • Possibly the stick being included with the Bullet Time accessory.

All-Purpose Tripod

  • A tiny tripod base that the selfie sticks can screw in to.

Bullet Time Accessory

  • Includes a special tripod base with a spinning top. The top can be locked so it will not spin. A selfie stick can be attached at the top to use this as a tripod, or on the side, to use a bullet time accessory. (Kit shipping in 2022 includes a 120cm selfie stick, but the packaging had a spot that was designed to hold a taller collapsed stick — no details on what that one was.)

Extended Edition Selfie Stick (new)

  • No details yet.

Extended Edition Selfie Stick (old)

  • No details yet.

Power Selfie Stick

  • Contains a 4500 mAh battery to double the shooting time of the camera. (The battery included with the X2, for example, is about 1600 mAh).
  • Contains buttons to start/stop the camera so you can use it like a remote control.
  • 100 cm extending length. (This makes it a selfie stick with the battery, different than things like the LUME power handle, which is just a handle with a battery).

C structures and padding and sizeof

This came up at my day job when two programmers were trying to get a block of data to be the size both expected it to be. Consider this example:

typedef struct
{
    uint8_t     byte1;  // 1
    uint16_t    word1;  // 2
    uint8_t     byte2;  // 1
    uint16_t    word2;  // 2
    uint8_t     byte3;  // 1
                        // 7 bytes
} MyStruct1;

The above structure represents three 8-bit byte values and two 16-bit word values for a total of 7 bytes.

However, if you were to run this code in GCC for Windows, and print the sizeof() that structure, you would see it returns 10:

sizeof(MyStruct1) = 10

This is due to the compiler padding variables so they all start on a 16-bit boundary.

The expected data storage in memory feels like it should be:

[..|..|..|..|..|..|..] = 7 bytes
 |  |  |  |  |  |  |
 |  |  |  |  \  /  byte3
 |  |  |  |  word2
 |   \ /  byte2
 |  word1
 byte1

But, using GCC on a Windows 10 machine shows that each value is stored on a 16-bit boundary, leaving unused padding bytes after the 8-bit values:

[..|xx|..|..|..|xx|..|..|..|xx] = 10 bytes
 |     |  |  |     |  |  |
 |     |  |  |     \  /  byte3
 |     |  |  |     word2
 |      \ /  byte2
 |     word1
 byte1

As you can see, three extra bytes were added to the “blob” of memory that contains this structure. This is being done so each element starts on an even-byte address (0, 2, 4, etc.). Some processors require this, but if you were using one that allowed odd-byte access, you would likely get a sizeof() 7.

Do not rely on processor architecture

To create portable C, you must not rely on the behavior of how things work on your environment. The same can/will could produce different results on a different environment.

See also: sizeof() matters, where I demonstrated a simple example of using “int” and how it was quite different on a 16-bit Arduino versus a 32/64-bit PC.

Make it smaller

One easy thing to do to reduce wasted memory in structures is to try to group the 8-bit values together. Using the earlier structure example, by simple changing the ordering of values, we can reduce the amount of memory it uses:

typedef struct
{
    uint8_t     byte1;  // 1
    uint8_t     byte2;  // 1
    uint8_t     byte3;  // 1
    uint16_t    word1;  // 2
    uint16_t    word2;  // 2
                        // 7 bytes
} MyStruct2;

On a Windows 10 GCC compiler, this will produce:

sizeof(MyStruct1) = 8

It is still not the 7 bytes we might expect, but at least the waste is less. In memory, it looks like this:

[..|..|..|xx|..|..|..|..] = 8 bytes
 |  |  |     |  |  \  /
 |  |  |     \  /  word2
 |  |  |     word1
 |  |  byte3
 |  byte2
 byte1

You can see an extra byte of padding being added after the third 8-bit value. Just out of curiosity, I moved the third byte to the end of the structure like this:

typedef struct
{
    uint8_t     byte1;  // 1
    uint8_t     byte2;  // 1
    uint16_t    word1;  // 2
    uint16_t    word2;  // 2
    uint8_t     byte3;  // 1
                        // 7 bytes
} MyStruct3;

…but that also produced 8. I believe it is just adding an extra byte of padding at the end (which doesn’t seem necessary, but perhaps memory must be reserved on even byte boundaries and this just marks that byte as used so the next bit of memory would start after it).

[..|..|..|..|..|..|..|xx] = 8 bytes
 |  |  |  |  |  |  |
 |  |  |  |  \  /  byte3
 |  |  \  /  word2
 |  |  word1
 |  byte2
 byte1

Because you cannot ensure how a structure ends up in memory without knowing how the compiler works, it is best to simply not rely or expect a structure to be “packed” with all the bytes aligned like the code. You also cannot expect the memory usage is just the values contained in the structure.

I do frequently see programmers attempt to massage the structure by adding in padding values, such as:

typedef struct
{
    uint8_t     byte1;    // 1
    uint8_t     padding1; // 1

    uint16_t    word1;    // 2

    uint8_t     byte2;    // 1
    uint8_t     padding2; // 1

    uint16_t    word2;    // 2

    uint8_t     byte3;    // 1
    uint8_t     padding3; // 1
                          // 10 bytes
} MyPaddedStruct1;

At least on a system that aligns values to 16-bits, the structure now matches what we actually get. But what if you used a processor where everything was aligned to 32-bits?

It is always best to not assume. Code written for an Arduino one day (with 16-bit integers) may be ported to a 32-bit Raspberry Pi Pico at some point, and not work as intended.

Here’s some sample code to try. You would have to change the printfs to Serial.println() and change how it prints the sizeof() values, but then you could see what it does on a 16-bit Arduino UNO versus a 32-bit PC or other system.

#include <stdio.h>
#include <stdlib.h>
#include <stdint.h>

typedef struct
{
    uint8_t     byte1;  // 1
    uint16_t    word1;  // 2
    uint8_t     byte2;  // 1
    uint16_t    word2;  // 2
    uint8_t     byte3;  // 1
                        // 7 bytes
} MyStruct1;

typedef struct
{
    uint8_t     byte1;  // 1
    uint8_t     byte2;  // 1
    uint8_t     byte3;  // 1
    uint16_t    word1;  // 2
    uint16_t    word2;  // 2
                        // 7 bytes
} MyStruct2;

typedef struct
{
    uint8_t     byte1;  // 1
    uint8_t     byte2;  // 1
    uint16_t    word1;  // 2
    uint16_t    word2;  // 2
    uint8_t     byte3;  // 1
                        // 7 bytes
} MyStruct3;

int main()
{
    printf ("sizeof(MyStruct1) = %u\n", (unsigned int)sizeof(MyStruct1));
    printf ("sizeof(MyStruct2) = %u\n", (unsigned int)sizeof(MyStruct2));
    printf ("sizeof(MyStruct3) = %u\n", (unsigned int)sizeof(MyStruct3));

    return EXIT_SUCCESS;
}

Until next time…

PiZ SuperCap safe shutdown for Raspberry Pi Zero

Last year, I learned of a new Kickstarter that solved a significant problem with using a Raspberry Pi for embedded “turn key” projects. The Raspberry Pi is a disk-based Linux system, using a microSD card in place of a hard drive. If you kill power to a Raspberry Pi without safely shutting down Linux first, file system corrupt can occur. I have seen this dozens of times over the years on my devices. When it happens, I just reformat the memory card and re-image it and continue.

But now we don’t have to — at least not if we are using the Pi Zero.

Abhinav Shukla created the PiZ SuperCap and launched it as a Kickstarter in 2021. The device is a small circuit board with a capacitor. It connects to a Pi Zero via the I/O header. Instead of plugging the USB power cable directly in to the Pi, you plug it in to the PiZ SuperCap board. This charges the capacitor then begins powering the Pi.

PiZ SuperCap by Abhinav Shukla

If power is disconnected, the capacitor has enough power to run the Pi Zero for a short amount of time (about 15 seconds). It also toggles a GPIO pin to indicate that power has been lost. By running a simple Python script on the Pi, you can now detect when power has been lost and, if it is not resumed in a set amount of seconds, safely shut down the Pi Zero by issuing a “shutdown” command.

I backed ten of these units, and I am glad I did. They work great! Now I can use a Pi Zero for any type of embedded project I want and just kill power when I want to shut down.

How it works

Here are some things to be aware of:

  1. When you first apply power, the Pi Zero will not immediately power up like you are used to. It must first charge the capacitor. The Pi Zero won’t actually start up until about 8 seconds after you apply power.
  2. When you turn off power, if no shutdown script is installed, the Pi won’t turn off until the capacity runs out. On my Pi Zero W (first version), I timed it at 75 seconds when just sitting at a text console login prompt. If you are running a graphical desktop or any programs using the CPU, it won’t last that long.
  3. The PiZ SuperCap will toggle GPIO pin 4 to indicate a power loss. To enable safe shutdown, you need some form of program or script that will monitor GPIO pin 4 and shut the system down when power goes away. The sample code provided uses a 9 second delay before deciding to power off, making the unit act like a mini UPS rather than shutting down on any temporary power blip. Clever.

Shutdown script

The designer provides some sample Python code on the project page, but here is a shorter one I came up with. I am not a Python programmer, so I have no idea if my technique is good. I just wanted it to block until it sees a power loss, and either shut down (after a delay) or continue:

supercap_shutdown.py

#!/usr/bin/python3

import RPi.GPIO as GPIO
import time
import os

GPIO.setmode(GPIO.BCM)
GPIO.setup(4, GPIO.IN)

while True:
        # Wait for power to drop.
        print ("Waiting for power loss...");
        GPIO.wait_for_edge(4, GPIO.FALLING)
        print ("Power loss")

        # Give user 9 seconds to restore power.
        print ("Waiting to see if power is restored...")
        time.sleep(9)

        if GPIO.input(4) == 0:
                print ("Power not restored.")
                os.system("sudo shutdown -h now")
                break;
        else:
                print ("Power restored.")

The above script has print statements in it so you can run it from the console to verify it is working. Those can be removed (or commented out) once you are sure it works.

You will need to do a “chmod +x supercap_shutdown.py” to make it executable.

If you want to make it run on startup, edit the /etc/rc.local file:

sudo pico /etc/rc.local

…and add this line at the end before “exit 0”:

# Pi Z SuperCap monitor script:
python /home/pi/supercap shutdown.py

You can then restart the system (“sudo restart now”) and when it reboots, the script should be running. Disconnect power and after 9 seconds (or whatever time you modify the script to use) it will issue a safe “shutdown” command.

3-D printed enclosure

I have created a very simple 3-D printer enclosure that holds a Raspberry Pi Zero and the PiZ SuperCap. Let me know if this is something you might want.

PiZ SuperCap by Abhinav Shukla in a custom 3-D printed enclosure by Sub-Etha Software.

Support the designer

If one of these might be of interest to you, consider backing the project at:

https://moonshotjr.com/moonfunded/project/piz-supercap/

FLSUN Super Racer discount code

I have received my FLSUN SuperRacer 3-D printer. It is very large, and must be assembled. Assembly is simple (maybe 28 screws, of two sizes, plus connecting plugs) but took me almost an hour. Others (who have done this) say it should take about 20 minutes.

The first thing I did was follow the steps in the manual to upgrade the firmware on the printer and the display. Each requires formatting a microSD card in a specific way (32K sectors for the printer, 4K sectors for the display). Updating the display requires opening it up (four screws) to access the card slot on the circuit board.

After this, I printed the included demo — a nut and bolt:

FLSUN SuperRacer SR 3-D printer demo file – nut and bolt.

It turned out exceptionally nice, even using generic Amazon Basics filament I had.

To better visualize how large it could print, I used Tinkercad.com to create a ring that was almost as large as the print surface. Since my SImplify3D did not have a profile for this printer (you have to e-mail them to receive it), I downloaded and installed the Mac version of Cura and used it’s SuperRacer profile to slice it. I then printed it, just fine:

FLSUN SuperRacer SR 3-D printer demo file – large ring.

So far, so good. I’ll be posting more about this printer as I have time. Until then, if you want to get one…

Please use my referral link:

https://flsun3d.com/?ref=j8tbouf6u7

Use code SUBETHASOFTWARE for a discount.

Most-viewed articles of 2021

Here is a snapshot of the most-viewed articles on this site for 2021. Some of these even had dozens of views.

The most popular article continues to be my writeup on using a cheap ESP8266 module as a WiFi modem via a .99 cent RS-232/TTL adapter.

Several of my C programming articles top the charts as well, including simple things like how to split up a 16-bit value into two 8-bit values.

My “fix” for Arduino Ethernet has dropped down a few places, after being one of the most-viewed articles for years since I first published it. Perhaps they have finally updated the library to support multiple connections from the same IP address so my hack is not needed.

Even my bicycle LED POV light page (which hasn’t been updated in years) still shows up.

And although Sub-Etha Software was created in 1990 to offer software or the Radio Shack Color Computer (“CoCo”), you will see that content barely make an appearance in the list. But, it at least makes an appearance.

To the dozen or so folks who visited my site in 2021, thank you for visiting :)

Kugoo G5 electric scooter problems.

Updates:

  • 2025-05-15 – The stem/post of my G5 broke. I no longer have a working G5, and have not been able to find any source for replacement parts. I now am trying a Segway Max G3 but the throttle control on it is awful.

I received a Kugoo G5 electric scooter to review. It seems to have died after a few minutes. And I can’t find any references to it anywhere on YouTube or the internet beyond a bunch of Kugoo websites, Alibaba and Amazon. This, this post.

When powering up, the display and lights come on for a second, there is a beep, then it shuts back off. The app can still connect via Bluetooth, but trying to power up via the app has the same result.

It’s weird not being able to find something on the internet.

I have been making a list of errors in the manual, as well, which I will provide back to Kugoo when the review is complete. Assuming their support responds and can get this review unit running for me.

Here is a Facebook group I created just for discussing this model. So far, no one has found it…

https://www.facebook.com/groups/1451645235237571/

Kugoo G5 electric scooter (non functional)

Tackling the Logiker Vintage Computing Christmas Challenge 2021 follow-up

Previously I discussed several approaches to printing out the Christmas tree pattern for this challenge.

The method that produced the smallest Color BASIC program looked like this:

0 FORC=1TO14:W=ASC(MID$("ACEGCGKOEKQWCC",C,1))-64:PRINTTAB(16-W/2)STRING$(W,42):NEXT

That uses 66 byte of BASIC program space (though will use more RAM for strings as it runs).

It appears there are still optimizations to make! In the comments. Stewart Orchard pointed out this one:

Not a big gain but two bytes can be saved by removing the third argument from MID$().

The two argument version of MID$() returns the remainder of the string starting from the specified position, and ASC() returns its result based on the first character of its argument.

– Stewart Orchard

In Color BASIC, MID$ can accept three parameters:

Color Computer 3 BASIC Quick Reference Guide, page 11

If you had as string of 10 characters, and wanted to print the third character, you could do it like this:

A$="ABCDEFGHIJ"
OK
PRINT MID$(A$,3,1)
C

Stewart pointed out that if you left off the final parameter, it returns the rest of the string:

A$="ABCDEFGHIJ"
OK
PRINT MID$(A$,3,1)
CDEFGHIJ

Now that I look at it, it appears MID$ with two parameters is sort of like an inverted RIGHT$. MID$ would give you all the characters starting at the one you specify, and RIGHT$ gives you the number of ending characters you specify.

PRINT MID$(A$,3)
CDEFGHIJ

PRINT RIGHT$(A$,3)
HIJ

I don’t recall using MID$ like this, but I have simulated the same behavior using RIGHT$ like:

PRINT RIGHT$(A$,LEN(A$)-3+1)
CDEFGHIJ

PRINT MID$(A$,3)
CDEFGHIJ

I am a bit embarrassed to admit I think I even did something like this:

PRINT MID$(A$,3,LEN(A$)-3)
CDEFGHIJ

…but let’s not speak of that.

And if MID$ can work like RIGHT$, it can also work like LEFT$:

PRINT LEFT$(A$,3)
ABC

PRINT MID$(A$,1,3)
ABC

But I digress…

If MID$(A$,3,1) gives you one character starting as location 3, and MID$(A$,3) gives you all the characters starting at position 3, how does that work? Stewart explained that ASC will still work if you pass it a string since it only works on the first character of the string. It is even documented that way:

Thus, ASC(“HELLO”) produces the same result as ASC(“H”) — the ASCII value of letter H.

With that in mind, we can remove “,1” from the program and reduce it by two bytes:

0 FORC=1TO14:W=ASC(MID$("ACEGCGKOEKQWCC",C))-64:PRINTTAB(16-W/2)STRING$(W,42):NEXT

64 bytes!

Thank you, Stewart, for leaving that comment.

Until next time…