

Updates:
- 2022-06-09 – Added link to ExifTool source code that parses these sections. ExifTool command line example. Updated output of parser showing the MakerNotes fields. Adding crappy brute force C test code. Added hex dump screen shots of the sections.
*** WORK-IN-PROGRESS ***
I am posting this now in case it helps someone else who is trying to figure this out. My goal is to be able to modify a video recorded in Bullet Time mode to appear as a normal 360 video file. I just need to figure out what bytes to zap in the file…
Over in the Insta360 REDDIT forum, user SalsaGreen pointed me to this Github repository:
https://github.com/nivim/Insta360toBlackBoxCSV
It contains a Python script that parses the .insv files to export accelerometer and exposure data. This gave me a good starting point for exploring the .insv file format.
From there, searches led me to the ExifTool by Phil Harvey, which has support for parsing .insv files. Here is the parsing code:
https://github.com/exiftool/exiftool/blob/master/lib/Image/ExifTool/QuickTimeStream.pl
Magic Phrase
The last 32-bytes of the file will be this special string of characters:
8db42d694ccc418790edff439fe026bf
If those characters exist, parsing can begin.
The end of the file looks like this, with offsets being bytes from the end of the file:
Offset   Length   Description
------   ------   -----------
-78      42?      Trailer
-36      4?       ?
-32      32       Magic phrase '8db42d694ccc418790edff439fe026bf'
 0       0        End of File
Trailer
The trailer is a series of (up to seven?) entries containing a 2-byte ID followed by a 4-byte offset. I am unsure if the entries are fixed, or if they can be terminated by 0x0000 / 0x00000000 entries if not all segments appear.

Segments defined in the Github Python script include:
- 0x0101 – “.insv maker notes” (serial number, firmware version, etc.)
- 0x0300 – accelerometer data
- 0x0400 – exposure data
- 0x0600 – timestamps
- 0x0700 – GPS data
- …and may also have 0x0900 and 0x0a00 (in comments, no code).
This makes the end of the file look like this:
Offset   Length   Description
------   ------   -----------
-78      2        Trailer entry #1 - ID
-76      4        Trailer entry #1 - Size
-72      2        Trailer entry #2 - ID
-70      4        Trailer entry #2 - Size
-66      2        Trailer entry #3 - ID
-64      4        Trailer entry #3 - Size
-60      2        Trailer entry #4 - ID
-58      4        Trailer entry #4 - Size
-54      2        Trailer entry #5 - ID
-52      4        Trailer entry #5 - Size
-48      2        Trailer entry #6 - ID
-46      4        Trailer entry #6 - Size
-44      2        Trailer entry #7 - ID
-40      4        Trailer entry #7 - Size
-36      4?       ?
-32      32       Magic phrase '8db42d694ccc418790edff439fe026bf'
 0       0        End of File
Parsing begins at offset -78 by reading the 2-byte ID and 4-byte Size. The data for that ID will be located Size bytes earlier in the file. Data parsers for each segment seek there and begin parsing.
ExifTool
I have now found that ExifTool can be used to display these items. It does not show the Trailer information by default, but here is a command that displays it in .json format:
exiftool -ee -G -s -b -j -a -T filename.insvMaker Notes – ID 0x0101
WORK-IN-PROGRESS: The “maker notes” section appears to use a byte for the type of data, then a byte for the length of that data segment. Some of the bytes appear to be (QuickTime::INSV_MakerNotes)
Hex Dec Description
--- --- -----------
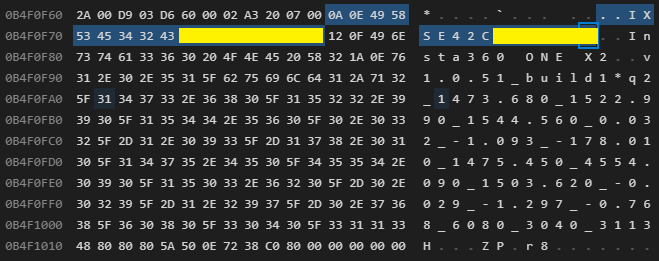
0x0A 10 Serial Number ("IXSE42xxxxxxxx")
0x12 18 Camera Model ("Insta260 ONE X2")
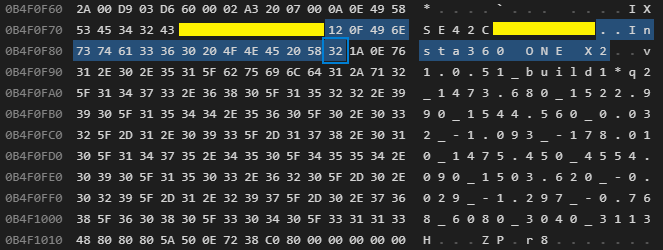
0x1A 26 Firmware Version ("v1.0.51_build1")
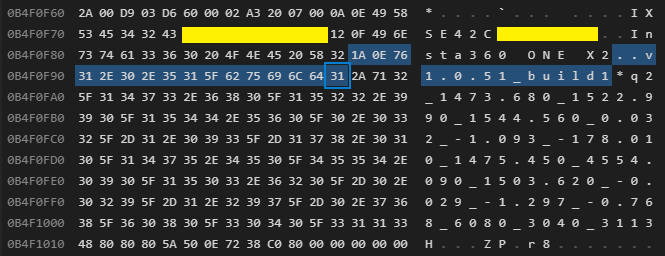
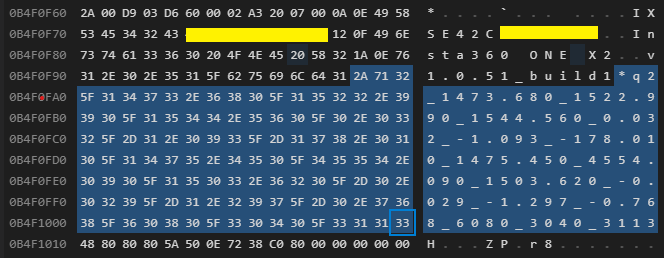
0x2A 42 ? Parameters ?
NOTE: It appears that this section (0x0101) may be hard-coded to only have four entries, and the parser just reads four entries and stops. I was expecting some kind of record size or end of record marker, but looking at the ExifTool source shows it just does a for/next loop of 0-3.
Serial Number
Model
Firmware
Parameters
A simple parser I wrote in C can parse out some of these, then it gets lost at the binary data, so there is more to it than just that:
Magic Phrase: 8db42d694ccc418790edff439fe026bf
Good file.
0x0101 0x0000073a - Maker Notes
-------------------------------------------------------------------------------
Maker Notes - offset -1928
-------------------------------------------------------------------------------
  Type: 0x0a (10) - SerialNumber
Length: 0x0e (14)
  Data: 49 58 53 45 34 32 xx xx xx xx xx xx xx xx (edited out)
  Text: IXSE42xxxxxxxx (edited out)

  Type: 0x12 (18) - Model
Length: 0x0f (15)
  Data: 49 6e 73 74 61 33 36 30 20 4f 4e 45 20 58 32
  Text: Insta360 ONE X2

  Type: 0x1a (26) - Firmware
Length: 0x0e (14)
  Data: 76 31 2e 30 2e 35 31 5f 62 75 69 6c 64 31
  Text: v1.0.51_build12

  Type: 0x2a (42) - Parameters
Length: 0x71 (113)
  Data: 32 5f 31 34 37 33 2e 36 38 30 5f 31 35 32 32 2e
        39 39 30 5f 31 35 34 34 2e 35 36 30 5f 30 2e 30
        33 32 5f 2d 31 2e 30 39 33 5f 2d 31 37 38 2e 30
        31 30 5f 31 34 37 35 2e 34 35 30 5f 34 35 35 34
        2e 30 39 30 5f 31 35 30 33 2e 36 32 30 5f 2d 30
        2e 30 32 39 5f 2d 31 2e 32 39 37 5f 2d 30 2e 37
        36 38 5f 36 30 38 30 5f 33 30 34 30 5f 33 31 31
        33
  Text: 2_1473.680_1522.990_1544.560_0.032_-1.093_-178.010_1475.450_4554.090_1503.620_-0.029_-1.297_-0.768_6080_3040_3113

0x0000 0x00000000 - Unknown
0x0000 0x00000000 - Unknown
0x0000 0x00000000 - Unknown
0x0000 0x00000000 - Unknown
0x0000 0x00000000 - Unknown
0x0000 0x000f16f4 - Unknown
More work to be done on this part…
Accelerometer Data – ID 0x0300
TODO
Exposure Data – ID 0x0400
TODO
Timestamps – ID 0x0600
TODO
GPS Data – ID 0x0700
TODO
To be continued…
Crappy Brute-Force C Parsing Test Code
/*--------------------------------------------------------------------------*/
// .insv parser test.
//
// 2022-06-08 0.00 allenh - Initial brute-force version.
// 2022-06-09 0.01 allenh - Code cleanup, more defines.
/*--------------------------------------------------------------------------*/
#include <stdio.h>
#include <stdlib.h>
#include <string.h> // for memset()
#include <stdint.h>
#include <stdbool.h>

#define FILENAME "VID_20220607_102410_00_322.insv"
//#define FILENAME "VID_20220607_104109_00_323.insv"


/*--------------------------------------------------------------------------*/
// Defines / Constants / Enums
/*--------------------------------------------------------------------------*/
#define TRAILER_OFFSET      -78
#define TRAILER_SIZE        42

#define MAGIC_PHRASE_OFFSET -32
#define MAGIC_PHRASE_SIZE   32
#define MAGIC_PHRASE_STRING "8db42d694ccc418790edff439fe026bf"

enum
{
    HID_MAKER_NOTES     = 0x0101,
    HID_ACCELEROMETER   = 0x0300,
    HID_EXPOSURE        = 0x0400,
    HID_TIMESTAMPS      = 0x0600,
    HID_GPS             = 0x0700
} HidEnum;

enum
{
    MAKER_NOTES_SERIALNUMBER = 0x0a,
    MAKER_NOTES_MODEL        = 0x12,
    MAKER_NOTES_FIRMWARE     = 0x1a,
    MAKER_NOTES_PARAMTERS    = 0x2a
} MakeNotesEnum;


/*--------------------------------------------------------------------------*/
// Prototypes
/*--------------------------------------------------------------------------*/
bool checkForMagicPhrase (FILE *fp);

bool parseTrailer (FILE *fp);
bool parseMakerNotes (FILE *fp, long int offset);

const char *getHidString (unsigned int hid);
const char *getMakerNotesString (unsigned int id);

uint32_t freadU32 (FILE *fp);
uint16_t freadU16 (FILE *fp);
uint8_t freadU8 (FILE *fp);
void  hexDump (void *ptr, size_t size);


/*--------------------------------------------------------------------------*/
// Main
/*--------------------------------------------------------------------------*/
int main (int argc, char **argv)
{
    (void)argc;
    (void)argv;

    FILE    *fp = NULL;

    fp = fopen (FILENAME, "rb");

    if (fp != NULL)
    {
        if (checkForMagicPhrase (fp) == true)
        {
            printf ("Good file.\n");

            parseTrailer (fp);
        }
    }
    else
    {
        perror ("Unable to open");
    }

    fclose (fp);

    return errno;
}


/*--------------------------------------------------------------------------*/
// Functions
/*--------------------------------------------------------------------------*/

/*--------------------------------------------------------------------------*/
// Check for the 32-byte magic phrase at the end of the file.
/*--------------------------------------------------------------------------*/
bool checkForMagicPhrase (FILE *fp)
{
    bool    status = false;

    if (fp != NULL)
    {
        int retVal = 0;

        retVal = fseek (fp, MAGIC_PHRASE_OFFSET, SEEK_END);

        if (retVal == 0) // If successful, the function returns zero.
        {
            size_t  bytesRead = 0;
            char    buffer[MAGIC_PHRASE_SIZE+1];

            memset (buffer, 0x0, sizeof(buffer));

            bytesRead = fread (buffer, sizeof(buffer[0]), MAGIC_PHRASE_SIZE, fp);

            if (bytesRead == MAGIC_PHRASE_SIZE)
            {
                if (strncmp (buffer, MAGIC_PHRASE_STRING, sizeof(buffer)) == 0)
                {
                    // Match.
                    printf ("Magic Phrase: %s\n", buffer);

                    status = true;
                }
            }
        }
    }

    return status;
}


/*--------------------------------------------------------------------------*/
// Parse Trailer.
/*--------------------------------------------------------------------------*/
bool parseTrailer (FILE *fp)
{
    bool    status = false;

    if (fp != NULL)
    {
        int retVal = 0;
        long int offset = 0;

        offset = TRAILER_OFFSET;

        while (offset < TRAILER_OFFSET+TRAILER_SIZE)
        {
            retVal = fseek (fp, offset, SEEK_END);

            if (retVal == 0)
            {
                uint16_t hid = 0;
                uint32_t size = 0;

                hid = freadU16 (fp);
                size = freadU32 (fp);

                printf ("0x%04x 0x%08x - %s\n", hid, size, getHidString (hid));

                switch (hid)
                {
                    case HID_MAKER_NOTES:
                        parseMakerNotes (fp, offset-size);
                        break;
                }

                offset = offset + sizeof(uint16_t) + sizeof(uint32_t);
            }
        }
    }

    return status;
}


/*--------------------------------------------------------------------------*/
// Parse INSV_MakerNotes section.
/*--------------------------------------------------------------------------*/
bool parseMakerNotes (FILE *fp, long int offset)
{
    bool status = false;
    uint8_t type = 0;
    uint8_t length = 0;
    size_t bytesRead = 0;
    uint8_t buffer[255];

    printf ("-------------------------------------------------------------------------------\n");
    printf ("Maker Notes - offset %ld\n", offset);
    printf ("-------------------------------------------------------------------------------\n");

    // There can be only four?
    for (int entryNumber=0; entryNumber < 4; entryNumber++)
    {
        if (offset >= TRAILER_OFFSET) // Hack.
        {
            break;
        }

        fseek (fp, offset, SEEK_END);

        type = freadU8 (fp);
        length = freadU8 (fp);

        printf ("  Type: 0x%02x (%u) - %s\n", type, type, getMakerNotesString (type));
        printf ("Length: 0x%02x (%u)\n", length, length);

        bytesRead = fread (buffer, sizeof(uint8_t), length, fp);
        if (bytesRead == length)
        {
            printf ("  Data: ");
            hexDump (buffer, length);

            printf ("  Text: %s\n", buffer);
        }

        offset = offset + length + sizeof(uint8_t) + sizeof(uint8_t);

        printf ("\n");
    }

    return status;
}


/*--------------------------------------------------------------------------*/
// Return pointer to string for Hid.
/*--------------------------------------------------------------------------*/
const char *getHidString (unsigned int hid)
{
    const char *ptr = "Unknown";

    switch (hid)
    {
    case HID_MAKER_NOTES:
        ptr = "Maker Notes";
        break;

    case HID_ACCELEROMETER:
        ptr = "Accelerometer";
        break;

    case HID_EXPOSURE:
        ptr = "Exposure";
        break;

    case HID_TIMESTAMPS:
        ptr = "Timestamps";
        break;

    case HID_GPS:
        ptr = "GPS";
        break;
    }

    return ptr;
}

/*--------------------------------------------------------------------------*/
// Return pointer to string for MakerNotes ID.
/*--------------------------------------------------------------------------*/
const char *getMakerNotesString (unsigned int id)
{
    const char *ptr = "Unknown";

    switch (id)
    {
        case MAKER_NOTES_SERIALNUMBER:
            ptr = "SerialNumber";
            break;

        case MAKER_NOTES_MODEL:
            ptr = "Model";
            break;

        case MAKER_NOTES_FIRMWARE:
            ptr = "Firmware";
            break;

        case MAKER_NOTES_PARAMTERS:
            ptr = "Parameters";
            break;
    }

    return ptr;
}


/*--------------------------------------------------------------------------*/
// Read U32, convert and return.
/*--------------------------------------------------------------------------*/
uint32_t freadU32 (FILE *fp)
{
    uint32_t val = 0;
    uint8_t a,b,c,d;

    a = freadU8 (fp);
    b = freadU8 (fp);
    c = freadU8 (fp);
    d = freadU8 (fp);

    val = (a) | (b << 8) | (c << 16) | (d << 24);

    return val;
}


/*--------------------------------------------------------------------------*/
// Read U16, convert and return.
/*--------------------------------------------------------------------------*/
uint16_t freadU16 (FILE *fp)
{
    uint16_t val = 0;
    uint8_t msb = 0;
    uint8_t lsb = 0;

    msb = freadU8 (fp);
    lsb = freadU8 (fp);

    val = (msb << 8) | (lsb);

    return val;
}


/*--------------------------------------------------------------------------*/
// Read U8.
/*--------------------------------------------------------------------------*/
uint8_t freadU8 (FILE *fp)
{
    uint8_t val = 0;

    val = fgetc (fp);

    return val;
}


/*--------------------------------------------------------------------------*/
// Dump bytes as HEX, with a tab at the start of lines after the first.
/*--------------------------------------------------------------------------*/
void     hexDump (void *ptr, size_t size)
{
    int col = 1;
    if (ptr != NULL)
    {
        for (int idx=0; idx<size; idx++)
        {
            printf ("%02x ", ((uint8_t*)ptr)[idx]);

            if ((col % 16) == 0)
            {
                printf ("\n\t");
                col = 0;
            }
            col++;
        }

        printf ("\n");
    }
}

// End of main.c


